19 – Spatial-based FX

In a previous tutorial I spoke about how you can create frequency-based FX and divide your FX, sending different delays or phasers or any combination of FX to different frequencies in your mix. This time we’re going to send those same FX to different locations in your mix: Front, Back, Left and Right. This way, we’ll create different FX for 4 different corners of your mix.

In a previous tutorial I spoke about how you can create frequency-based FX and divide your FX, sending different delays or phasers or any combination of FX to different frequencies in your mix. This time we’re going to send those same FX to different locations in your mix: Front, Back, Left and Right. This way, we’ll create different FX for 4 different corners of your mix.

The tutorial files can be downloaded here: 4-corner-spatial-fx This zip file contains 2 Combinators: 4-corner delay FX and 4-corner phaser FX.

Starting of creating the Front and Back sections

First, the video:


  1. First, we’ll start in Reason, and start by opening a new document with all the usual suspects. Create a main mixer, and a sound source (an initialized Thor would do just fine).
  2. Next, create a Combinator under the sound source. Inside the Combinator, hold down shift and create a Unison device (UN-16), Audio Merger/Splitter, 6:2 Line Mixer, Stereo Imager, RV7000, and for our FX device, let’s create a Phaser (PH-90).
  3. Now holding shift down, select the Stereo Imager, RV7000, and PH-90 Phaser, then right click and select “Duplicate Devices and Tracks.”
  4. Routing time (note that all the audio routings we’re going to create here are in Stereo pairs): Flip the rack around, and move the Thor Audio outputs into the Combinator Audio inputs. Send the Combinator outputs to Channel 1 on the main mixer. Send the Combinator To Devices outputs into the Unison inputs. Then send the Unison outputs to the Audio Splitter inputs. Send 1 split into the first Stereo Imager’s inputs (we’ll call this the Front Imager), and the second split into the second Stereo Imager’s inputs (we’ll call this the Back Imager).
  5. Continuing with our routing, send the Imager outputs to the RV7000 Inputs (do this for both front and back imagers). Then send the RV7000 outputs to the Phaser inputs (both front and back). Then send the front and back Phaser outputs to Channels 1 and 3 on the 6:2 line mixer. Finally, send the Mixer’s master output to the “From Devices” inputs on the Combinator.
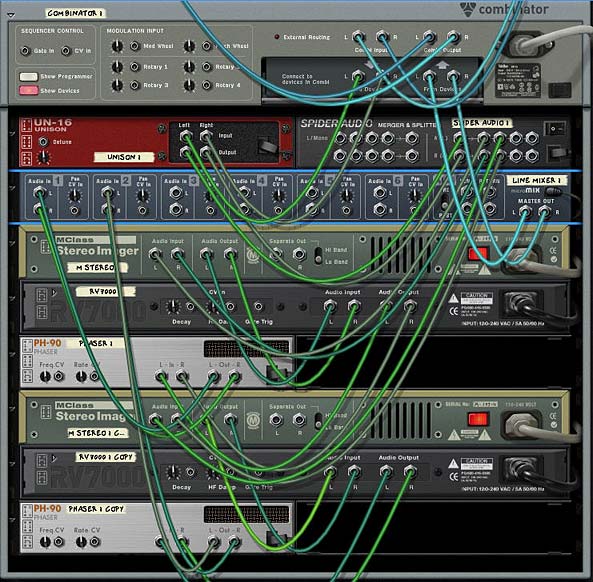
    The Routings on the back of the rack. Looks complicated, but it's really pretty straightforward.
    The Routings on the back of the rack. Looks complicated, but it's really pretty straightforward.
  6. Flip the rack around to the front. Now it’s time to set up some parameters. On the Front Imager, send both the Lo and Hi bands fully Mono (fully left). On the Back Stereo Imager, send both the Lo and Hi bands fully Wide (fully right).
  7. Open up the Remote Programmer on both the front and back RV7000 Reverbs. The Hall algorithms are the default and these are fine for now. On the front Reverb, reduce the size fully (to 13.2 m) and reduce the Global decay to around 50. Increase the HF Dampening to around 84. On the back Reverb increase the size fully (to 39.6 m) and increase the decay to around 98. Also leave the default HF Dampening at around 28. Finally, decrease the Dry/Wet knob on both reverbs to around 30-40 or thereabouts.
  8. Open up the Combinator’s Programmer, select the 6:2 Line Mixer and enter these settings:

Rotary 1 > Channel 1 Level: 0/85

Rotary 3 > Channel 3 Level: 0/85

Now, the First Rotary controls the Front Mix, and the third Rotary controls the back mix. If you play your sound source through this FX Combinator, you’ll hear the front and back sounds by adjusting the Rotaries. But what makes things more interesting is if you apply different settings to your two Phaser devices. Even some subtle changes to the Frequency and Width parameters can provide a much more rich soundscape which makes even Thor’s initialized patch sound pretty interesting.

You can also leave things as they are, or you can move on and create two more spatial corners in our mix by adding both Left and Right panning. In this way, you create a 4-Corner FX split for Front Left, Front Right, Back Left, and Back Right.

Moving from side to side

Now, for the second part in the Video Series:

So let’s continue on our journey and create a split for left and right.

  1. First thing we’ll have to do is hold the shift key down and create two other phasers; one next to the front phaser and another next to the back phaser. Then select the front RV7000 and holding shift down, create a Spider Audio Merger/Splitter. Do the same for the back by holding down the back RV7000 and creating another Spider Audio Merger/Splitter.
  2. Flip to the back of the rack and let’s set up some new routings. Move the cables from the inputs on both Phasers and move these cables to their respective Spider Splitters (in the main Split). Then send one split to the Front Phaser 1 (let’s call this left) and send another split to the Front Phaser 2 (let’s call this right). Then send the outputs from the two new phasers to Channel 3 and 4 respectively.
  3. Flip to the front of the rack and on the 6:2 Line Mixer set the panning for Channels 1 and 3 to about -22 (left) and Channels 2 and 4 to +22 (right). How far left or right you set the panning is really a matter of taste. With this all set up, the 6:2 Line Mixer will be set up as follows:

    Channel 1: Front Left Phaser

    Channel 2: Front Right Phaser

    Channel 3: Back Left Phaser

    Channel 4: Back Right Phaser

  4. Open up the Combinator Programmer, and assign the 6:2 Line Mixer Channel 2 and Channel 4 to Rotary 2 and 4 respectively as follows:

    Rotary 2 > Channel 2 Level: 0/85

    Rotary 4 > Channel 4 Level: 0/85

  5. Now you can provide labels for all 4 rotaries as follows:

    Rotary 1: Front Left

    Rotary 2: Front Right

    Rotary 3: Back Left

    Rotary 4: Back Right

And there you have it. A 4-corner mix with different FX for each corner. You don’t have to restrict yourself to Phasers. With some ingenuity you can assign any FX to any location, or any combination of FX to any of these 4 locations, and all of those with different parameters too. The only thing left is to adjust the Phasers to have different settings as you see fit.

Here’s a video showing you some of the things you can do to modulate the Phasers:

A few other notes:

  • The reason we set up a Unison device in front of the mix is because this ensures that the signal sent into both the imagers is in Stereo. This is needed for the Stereo Imager to function as it should. It won’t work with a Mono signal. It means that even if you use a Subtractor, for example (which is mono), it can still be sent into the Imagers and the Imagers can work their magic.
  • Using the Width / Mono setting on the Imager bands helps to create the illusion of front and back audio locations. Used in conjunction with the Reverbs, you can create some sophisticated positioning not only with your FX, but also audio of any kind. When you move towards Mono, the sound appears to come from the front of the mix. By widening the bands, the sound becomes more spread out and appears to come from the back.
  • Just as with the Imagers, changing the space size and decays on the Reverbs helps the illusion along. Smaller sizes and shorter decays means a tighter reverb space which appears as though the sound is closer. For the back Reverb, the opposite is in effect. By creating a wider space with a longer tail reverb, you end up with a sound that is pressed further back. Keeping the same algorithm type still binds the two reverb spaces together. However, there’s nothing preventing you from trying to use different algorithms altogether (for example, a Small Space reverb for the front and an Arena reverb for the back).
  • Ever look at those Escher drawings where the staircases keep looping back into themselves? They are impossible pictures. Well, the same can be achieved with sound. You can create some really weird effects by creating an impossible space. Try switching the Reverbs around but keeping the Imagers as they are. The Imagers will tell your ears that the sound should be coming from the front and back, but the reverbs will be telling you the reverse. It can be a disturbing effect. But in the virtual world, you can create these “Impossible” sounds easily. Try that one out.

As always I’d love to hear what you think? Show some love and drop me some feedback or any questions you might have. Until next time, good luck in all your musical endeavors.

Is the New Apple iPad Worth it?

Here’s the lowdown: I own an iPod Touch, and so I have a scaled down version of the iPad. Do I produce music on it? Nope. Do I want to? Maybe. Why don’t I? Because it’s finicky, toyish and still doesn’t have the feel of working in a real DAW or control of working in a real DAW. And worst of all, it doesn’t have any Propellerhead software on it.

“Magical” and “Revolutionary” is the way Apple is describing their new 9.56 x 7.47 inch iPad to the public. But does this device really deliver for Musicians like you and me, who use Propellerhead Reason and Record?

Here’s the lowdown: I own an iPod Touch, and so I have a scaled down version of the iPad. Do I produce music on it? Nope. Do I want to? Maybe. Why don’t I? Because it’s finicky, toyish and still doesn’t have the feel of working in a real DAW or control of working in a real DAW. And worst of all, it doesn’t have any Propellerhead software on it.

On the positive side, I love the flat surface touch control. There’s no doubt that this is the most intuitive and tactile way to control any software. Give me touch, and give me more of it. Let me glide the faders and knobs with a single finger. Let me zoom in and out of areas by pinching and prying apart with my thumb and forefinger. Yeah! I love that.

I was reading in the latest issue of CM (Computer Music magazine) — issue 150, that the App developers were saying this would be a really great product. No offense, but that doesn’t tell me anything. Of course the App developers are going to start promoting the iPad. It gives them a platform to build more and better Apps for which they will make more and better money. Then I read how a certain person from a certain controller company thought the iPad wouldn’t be good for live performance (I share his belief, btw). But again, of course he’s going to dismiss the iPad because it will mean less sales for his company. Everything points to the fact that nobody really knows the impact the iPad will have. And it’s just too early to tell. And way too early to buy IMHO.

And then I read in the CM article that a certain head of Propellerhead software gave the iPad cautious praise. Does this perhaps hint at the possibility of the Props putting together an App of their own, specifically for the iPad? Perhaps. If that happens, I would most definitely give it a great deal more consideration. But this is all rumors and heresay for now. Nobody really knows. So save your money and put the $500 iPad cost to better use by getting an audio interface or nice set of monitors (ok, maybe just 1 monitor, but it’s a start).

Here’s what keeps nagging at me:

  1. Playing “Live” might be a problem due to the fact that the sensor technology is such that when you get all sweaty, the touching might not respond. And even if you’re not all sweaty, the touch system on my iPod Touch can be finicky and non-responsive at times. This still needs to be worked on.
  2. If you’re in the studio, it’s just an overgrown iPod (for now). It’s got the same apps, and the same OS running it. This means that you still can’t multitask, and existing apps don’t take advantage of the additional space.
  3. Did you hear me? It can’t MULTITASK. You can run one app at a time, no more. Which means you can’t run two plug-ins at once, or control a DAW and a synth at the same time.
  4. If it’s one thing I’ve learned from Apple, it’s never to buy the first product release. Why? Because they save all their goodies for v.2 and v.3 product launches. Right now this is nothing more than a larger iPod Touch. Wait 6 months for the iPad v.2 when Apple has had a chance to a) sort out the bugs, b) add new and improved functionality and c) app developers have had a chance to catch up.

    Case in point: my girlfriend bought me the first release of the iPod Touch and 4 months later the iPod Touch release came out with double the amount of space for the same price. I understand that technology keeps moving forward, but Apple just doesn’t take a breather. And as a result, I become a very jaded customer who will never buy the first release. Of course, Apple probably doesn’t care one bit about this situation. There are plenty of others who will jump on the bandwagon to buy this device and even — god forbid — PREORDER! But hey, to each their own. And if you preorder, I wish you the best of luck with your new iPad. Don’t say I didn’t warn you.

The additional screen real-estate is great, and there’s no question that there is some promise here. It’s also light-weight. But let’s see some Apps built for it first. Let’s see Reason and Record for the iPad. And let’s see how the iPad can be the next super DAW controller and music-making machine. Then, and only then can we assess whether or not this product really is “Magical” or “Revolutionary.” Right now it’s a lot of hype.

There used to be an expression when I was a debt collector talking to deadbeats and trying to get them to pay their bills. It went something like this: There’s a lot of smoke on the barbecue, but I don’t see any meat. Somehow the imminent Apple iPad release made me think of that expression. We’ll see how much “meat” is actually there in the coming months.

What are your thoughts on the new iPad from Apple?

Here’s an interesting article on the subject of iPads and Tablet PCs, which have been around for at least 6 years now. And I think this author is bang on right! http://www.tomshardware.com/news/tablet-islate-ipad-netbook-notebook,9929.html. Thanks Doinky for the link!

Mono, Poly and Stereo

This article will explore Monophonic versus Stereo and Monophonic versus Polyphonic. Two very different concepts, but both very important concepts. This is also a good opportunity to discuss the Effects devices and go over the suggested audio routing options for each.

This article will explore Monophonic versus Stereo and Monophonic versus Polyphonic. Two very different concepts, but both very important concepts with which everyone needs to get to grips. The reason I’m going to explain them both in one article is because they have similar terminology (they both share the term “Monophonic”). This can lead to some confusion. This is also a good opportunity to discuss the Effects devices and go over the suggested audio routing options for each. 

When I originally put together my Reason wishlist and posted it here on my blog, I made the fatal mistake of saying that I wanted the Matrix to be “Stereo.” I actually meant to say I wanted the matrix to be “Polyphonic.” Oh gasp! I know. The horror. So just in case anyone else is confused by these terms, let’s see if we can set the record straight. 

First, there are two concepts: 

  1. Monophonic versus Stereophonic: This refers to channels in an audio system. Monophonic is 1 channel (or any single-channel system). Stereophonic is a two-channel system (left and right audio channels) which are reproduced by 2 speakers (left and right).
  2. Monophonic versus Polyphonic: This refers to the number of voices that a Synthesizer can play at one time. Monophonic means the synth can play a single voice (single note). Polyphonic means the synthesizer can play multiple voices (2 or more notes). In Thor, you can have 32 voice polyphony, meaning you can have 32 notes playing simultaneously. In addition, Thor has Release Polyphony and can also have 32 notes sustain after you lift your finger off the key, or after the note’s end in the sequencer (in the case of midi).

There is also the term “Monophony” which refers to the melody line of the song. It is a song which contains only a melody line without an accompanying Harmony. So strictly speaking, if you have two notes played at once, each one octave apart, the song can still be considered “Monophonic.” Confused yet? I’ll let Wikipedia explain this concept of Monophony

A few other notes: 

  • In Reason, as in the real-world, CV relates to Monophonic and Polyphonic voices of a synthesizer. While Monophonic and Stereophonic channels in an audio system are audio-specific. The RPG-8 Arpeggiator and Matrix are termed “Monophonic” which means they can only control one voice of a synth at a time. If you want to create a “faux” Polyphony, you must first duplicate the RPG-8 or Matrix as well as the sound sources they are controlling, and then send the output of both these sound sources to their own audio channels; either mono or stereo, it doesn’t matter. You now have two-voice polyphony.
  • The above points out also that you can have a Monophonic synth that has a Stereophonic “audio” output OR you could have a Polyphonic synth with a Monophonic “audio” output. Plus, you can take a Stereophonic signal and make it Monophonic (panning both channels to center), but if you take a polyphonic CV and make it mono (sending it to a mono synth) you will just drop all the notes beyond the first or last one (just like playing a chord on a mono synth).

Effects Devices in Reason, and Reason’s Routing Suggestions

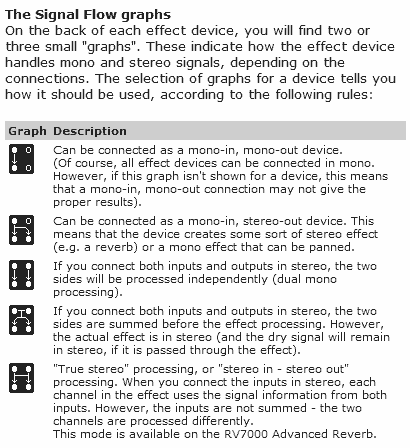
According to the literature in Reason and Record, there are specific ways in which the Effect devices should be connected. I’m going to plagiarize for a moment and take an excerpt directly from the help file. This excerpt explains the way Monophonic and Stereophonic signals are processed by the effects devices in Reason, and shed light on those little tiny diagrams on the back of the FX devices (come on, give me a show of hands. How many of you knew those diagrams were there to begin with? And how many knew what they meant?). 

FX Routing Legend and Descriptions

 So looking at the diagrams, we can see the following connections can be made by the Reason devices: 

RV7000 Digital Reverb: 

Mono In / Stereo Out 

Stereo In / Stereo Out 

Scream 4 Distortion: 

Mono In / Mono Out 

Dual Mono In / Dual Mono Out 

BV512 Vocoder: 

Mono In / Mono Out 

Dual Mono In / Dual Mono Out 

RV7 Digital Reverb: 

Mono In / Stereo Out 

Stereo In / Summed Stereo Out 

DDL-1 Digital Delay: 

Mono In / Stereo Out 

Stereo In / Summed Stereo Out 

D-11 Foldback Distortion: 

Mono In / Mono Out 

Dual Mono In / Dual Mono Out 

ECF-42 Envelope Controlled Filter: 

Mono In / Mono Out 

Dual Mono In / Dual Mono Out 

CF-101 Chorus/Flanger: 

Mono In / Mono Out 

Dual Mono In / Dual Mono Out 

Mono In / Stereo Out 

PH-90 Phaser: 

Mono In / Mono Out 

Dual Mono In / Dual Mono Out 

Mono In / Stereo Out 

UN-16 Unison: 

Mono In / Mono Out 

Dual Mono In / Dual Mono Out 

Mono In / Stereo Out 

COMP-01 Compressor: 

Mono In / Mono Out 

Dual Mono In / Dual Mono Out 

PEQ-2 2-Band Parametric EQ: 

Mono In / Mono Out 

Dual Mono In / Dual Mono Out 

MClass Equilizer: 

Mono In / Mono Out 

Dual Mono In / Dual Mono Out 

MClass Stereo Imager: 

Dual Mono In / Dual Mono Out 

MClass Compressor: 

Mono In / Mono Out 

Dual Mono In / Dual Mono Out 

MClass Maximizer: 

Mono In / Mono Out 

Dual Mono In / Dual Mono Out 

Phew! Now that’s quite a lot of information to take in. However, when you look at it, you can pretty much break it down into a few key points which are easier to remember: 

  • All devices can be connected in Mono In/Mono Out except the MClass Stereo Imager (makes sense right? Because you can’t separate a mono signal or make it wider/narrower. It’s already mono, so you can’t make it more mono. You also can’t magically turn a mono signal into a true stereo signal). So forget using it for anything other than Dual Mono In/Dual Mono Out.
  • Every FX device except the Delay and Reverb devices can be connected in Dual Mono In / Dual Mono Out.
  • The RV7000 device is the ONLY device in Reason which is true stereo (Stereo In / Stereo Out). The RV7 and DDL-1 are the next best thing with a Stereo In / Summed Stereo Out.
  • The Devices that can be used as Mono In / Stereo Out are: RV 7000, RV-7, DDL-1, CF-101, PH-90, and UN-16.
  • Every device can be used as an Insert effect, however not every device should be used as a Send effect. Effects that should not be used as Sends fall under 2 categories: 1. Dynamics Processors (all MClass devices, COMP-01 and PEQ-2), and 2. Distortion Units (the Scream 4, and D-11).

This last point is not really related to the issue of Mono/Stereo, but is an important consideration when connecting devices in your tracks and is another point that shouldn’t be overlooked. 

One other thing I wanted to point out. If you get a chance, you really should check out Hydlide24’s great video on different ways to create Stereo separation in Reason. There’s so much great information in this video, I thought this would be a relevant place for it. He tends to move a little fast through the video, but you can always pause and go over it a few times to follow along. Check out some of his other videos if you get a chance as well. 

Hopefully this information is accurate. I’m human and prone to many mistakes. If there is an error, please help me point it out and make sure it’s accurate. I’ll ensure I get it corrected. And if you have anything to add, I welcome your advice and opinions.

Panning to Punch out your Mix

Kevin Parks is a former architectural designer, artist, and boatbuilder with a life-long love of music. Learn how he uses Panning in Record to punch up his mixes, giving them enough sonic space to have a fighting chance.

Your mastering will go a lot better when your mix is fine tuned.

These are some procedures that have evolved for me through time, advice, and experience. Everyone’s work flow is different, but we are all trying to solve the same sorts of problems, so I hope what follows will add something to your bag of tricks.

Before adding a lot of FX to try to punch out a mix, there are some things I like to do to give my mixes enough sonic space to have a fighting chance.

Working with Audio

First of all, since Record gives us audio capability now, let’s start with audio.

For all audio recording, I want to get the cleanest signal possible going into my computer.  Electronic noise takes up space better used for actual audio content.

I spent weeks routing and re-routing cables, getting rid of bad connections, separating all my power cords from my audio cables, and gain-staging to get the cleanest signal I could going into my computer.

While my input signal is *much* improved, it isn’t perfect, and electronic noise is cumulative. So if you mix a lot of tracks, each with a little noise, it adds up. If you don’t have noise reduction software, what can you do?

One thing you can do about that in Record is to use the razor tool and cut out the silent stretches in each audio track.  That will eliminate your hardware’s noise profile, at least from those stretches.  Nothing worse than teaching people’s ears how to tune into the static, just as they are ready for the music to start. This can make a really surprising difference. Noise can hide rather nicely within the audio content when the listener isn’t being trained how to hear it.

So now that we have gotten off to a good start by getting rid of obvious  problems with the audio tracks. Now what?

Next step , before adding a lot of FX to the mix, is to make sure to give all your tracks a place to be in the mix,  their own sonic space. No sense to start cutting freqs with EQ to solve problems that will go away with proper panning.  So start out with panning before using EQ.

To pan your tracks well, the first thing to consider is what goes center stage?

Be careful not to stack too many things in the center. 

Keep in mind that bass  frequencies are non directional to a great extent, so try to avoid panning low freqs very far if at all. The farther you pan a low frequency track the muddier your mix will get. (I have sometimes panned a bass and a kick a little bit, say 10-15%, and then gone back later to help separate them with some judicious EQ work.)

Separate freq ranges work OK together in the center, but if the freqs are too close to each other it will get “crowded” very quickly.  Think in terms of low, medium and high frequencies, and choose what  tracks you will stack in the center. Then  preview just  those tracks in your center channel.  You can try out different instruments until your center shines.

Next idea to remember:  The higher the frequency, the easier it is for it to sit farther from center. Since I use a lot of guitar tracks, I often balance the rhythm and lead guitars by placing them approximately the same distance from center, say 30-50%.

I like to continue to keep balance in my mix by pairing up higher freq tracks and placing them likewise the same distance apart. Higher freq tracks I place farther out than the guitar tracks. More often than not, it is better not to go all the way to 100% .  

Placing higher freqs farther apart is a good rule of thumb to start off with. I  get a sense of how many pairs I have and then divide up the space between pairs accordingly. Then preview different ideas; it’s fun, it’s free, and it’s going to improve your mix.

On the psycho-acoustic side, keep in mind that people tend to rely more on their right ear for things that they pay more attention to, so I like to place the lead somewhat, but not extremely, to the right. It helps hold peoples attention.

So remember,  you will need to do less fiddling with EQ when the tracks each have their own place in the sound field. Panning is powerful stuff.

Now, just to touch on EQ and Reverb:

OK, at this point,  panning has just given you the ability to place your tracks/instruments in different locations from left to right across the sound field. Then if there is a conflict, if  there is an instrument or track that is masking another one, then use EQ to tweak that  problem specifically.  Using a bass track and a kick drum as an example, solo those two tracks and tweak the EQ gently on each  until you can hear them both clearly. (Research this aspect if necessary.) 

Apply reverb last: Now I evaluate where I need/want reverb. Reverb will push a track farther back in the mix.  Sometimes you might need some reverb on a guitar track to help it cut through the mix. I often like to give my guitar tracks an ethereal feel with reverb. Avoid using reverb on low freqs; it makes muddy, harmonics. Reverb is much more pleasant and clean when used on higher freqs.

Once in a while I find that a *little* reverb applied globally to the finished song, can help integrate the tracks. Be careful though. If you are having to do very much of that, chances are that there is a track that needs more attention.

That’s all for now.  Knock ’em out, baby!


Kevin Parks is a former architectural designer, artist, and boatbuilder with a life-long love of music.  Translating uncharted realms of emotion using rhythm, space, and harmony..weaving real world instruments and software synths into experiential ambient synthesis. You can visit his website at http://www.soundclick.com/ambientsynthesis where he showcases several of his musical works.

My Reason/Record Wishlist

Reason and Record together constitute one of the best all-in-one music creation and sequencing packages. I’ve tried out most all of the major DAWs out there, and I keep coming back to Reason and Record time and again. So here is my wishlist of items I’d like to see in future versions of the software; in no particular order.

Let’s just say Reason and Record together constitute one of the best all-in-one music creation and sequencing packages. I’ve tried out most all of the major DAWs out there, and I keep coming back to Reason and Record because of a few things: a) it’s easy and intuitive. This is the biggest draw for me. b) it allows me a wide latitude in sound creation. Sure some of the FX are a little lacking, but nowhere else can I create my own setups in such a simplistic way without having to know any programming or high level math. c) It’s instant and quick. Yes, I’m a little ADD, and I just love the fact that Reason and Record caters to me. I can jump in and add midi and audio tracks in a snap. I can go with an idea and get sidetracked into all kinds of wonderful tangents. It’s great. d) Finally, it’s stable and light-weight. My computer isn’t struggling unless I have an insane amount of Thors packed into a project. Sure I’d love access to VSTs but not at the expense of stability. Besides, I could spend a lifetime alone exploring the factory soundbank alone (not to mention all the great refill packages out there). So why go further.

All that being said, here is my wishlist of items I’d like to see in future versions of the software, in no particular order. I’m sure there are lots more that could be added, and this list is not meant to be exhaustive. It’s just a few of the major things I’d like to see in future versions.

For Record:

  1. Automatic Routing of the Reason mixer channels to the Record Main Mixer. Right now you can bring Reason songs into Record, but there is no mixer routings set up. You have two options: delete the mixer in Reason and then open the song in Record so that all devices get their own channels, or you can manually reroute in Record once your song is brought in. A user preference or dialog which opens and allows you to select the mixer you want to automatically route to separate channels should be available so that bringing a completed Reason song into Record maps all the Reason channels to new channels on the Record main mixer. Maybe in the next version PLEEEEEEZE!
  2. Comping for Midi as well. The new Comping Feature is great. Love it. However, it is reserved for Audio Lanes. If you want to do something similar in Note Lanes you have to use the New Dub / New Alt features. Overall, these two concepts are very similar. I’m wondering if there is a way to be more consistent with implementation. Why can’t we implement comps, for example, in note, and even in parameter automation lanes, and then do away with the new dub/new alt features altogether. This would make recording in loop mode in a Note Lane so much easier and workable. When you’ve laid down 4 or 5 takes in a note lane, you go into comp mode where you can have all the note lanes right there automatically waiting for you. The only real difference would be that in note lanes, you can have overlapping takes (audio and parameter automation can’t do this). But everything else would be pretty much identical for all types of track lanes. Seems a little clunky to have different methods which essentially do the same thing.
  3. Split Performance Controller Data into Separate Lanes. Would be nice to have the ability to split performance controller/note data from each other into two different clips on two different lanes. Right now it’s a tedious process of copying clips, deleting notes out of one clip and then deleting performance automation out of the other.
  4. Record Performance Controllers as automation. Would be nice if you can elect to record the “Performance Controllers” (Pitch Bend/Mod/etc) as automation instead of performance. Currently you have to record once for the notes, and once for the performance to get them on separate lanes OR you have to draw in the performance controller data. There is no way to click a button to record performance controllers as automation lanes (opposite to the “Automation as perf ctrl” button).
  5. Tempo automation/changes on a per-track basis. In the documentation on Page 161, it says “Automating tempo is done much in the same way as with other parameter automation. You record the tempo changes by changing the Tempo value on the Transport Panel. When you later play back, audio clips will automatically be stretched to follow the tempo changes (unless you have disabled stretch for the clips – see “About disabling Stretch for audio clips”). Note clips and automation clips will always follow tempo changes.” It woud be nice if you could opt to leave note lanes at the current tempo, thereby being able to change some note lanes or clips to a different tempo, and leaving other note clips / lanes as they are. This would be a nice advance in both Reason and Record.
  6. Display Masked Audio portion in the Audio Clip. In the documentation on page 169: Nice touch showing whether or not a clip has masked notes/areas! Nice improvement (Having this same feature added to audio clips would be nice as well). What would be even nicer is if masked areas were displayed the same way muted clips are displayed in the Arrange view, as there is really very little difference between the two. In fact, if you take this idea a step further, when you resize a clip (making it smaller) so that a masked area is created, it should automatically create the masked area as a new muted clip separate from the “active/visible” clip. When you resize back, it should automatically join the clips again. I think that would make sense, but I’m not sure if this would have undesired consequences in other places? But off the top of my head, it’s a suggestion. The benefit is that you would then be able to visualize how far the masked area goes in a given direction. Right now, there’s no visual indicator to show how far and wide the masked area is. It’s worthwhile to note that this is already pretty much implemented in the audio comp tracks. Now if we could bring that into the main arrange view, we’d be golden.
  7. Synch Reason / Record Favorites. I wish there was a way to automatically import your reason favorites into the Record Favorites and synch them together. I don’t like having to recreate all my favorites over again. It’s one of those time-wasters.
  8. Cut Note Events in the Clips. It might be nice to have the option when cutting clips, to cut the note events in the clip as well (if the note goes between split clips). This should be a toggle button on every track. Sometimes you DO want to split the notes, and it’s easier than going into edit mode for each clip and cutting them manually one by one (especially over several tracks). By doing this, you could select which tracks split notes and which don’t. Would be ideal if you are cutting several clips along multiple lanes, or inserting bars between locators.
  9. Scale Transposition of Notes. This is imminently more useful than chromatic transposition of the notes. Having both in the software would be a wonderful addition.
  10. Multiple Left and Right locators. When using Record to master a series of tracks, it would be nice if you could set things up with L/R locators and bounce all the tracks at once instead of bouncing them one at a time.
  11. More Training/Tutorials and videos included in the user documentation. At 850+ pages, the manual is getting absurd. Time to start moving with the times. More creative and advanced documentation please!

For Reason:

  1. Adding some new Effects, especially a glitch box such as “Glitch
  2. Having the ability to Randomize the entire Matrix or Redrum device with one click of a button. Currently you have to create random patterns in each and every slot in all the banks, and then (if you want), you need to randomize the Steps AND Resolution. Having a button, which when clicked, allows you to select what you want to randomize on the matrix or redrum (steps / resolution / how many patterns, notes, curves, both notes and curves) AND also providing the ability to randomize percentage-wise (for example, randomize 10% gives you less randomization than 90%). This would turn a very tedious process into a simple one. Same thing in the automation lanes. How about random automation? This would be a godsend for glitch music.
  3. Combinator updates: In the Programmer, subdivide the right-click context menus into submenus (a la Thor modulation matrix menus). Also, adding an option for step increments for the Rotaries would be welcome. In cases where steps are needed, you could switch the Rotary to use steps. If you need the rotary as it is, you could switch it back. Also, give the user the ability to choose how many steps are required (up to 16 or 32 would be nice).
  4. Integrate ReCycle into Reason (or Record). Yes, Reason and Record are not considered DAWs, but when most other DAWs have slicing capability built in, it makes for a good justification to integrate this capability into the software.
  5. The ability to reverse midi and audio for backward playback. You can reverse a small sample in the NN-XT, but it would be nice if you could reverse the midi notes (and in record if you could reverse the audio) within the sequencer.
  6. Tap Tempo. This is important on so many levels.
  7. When in edit mode in the sequencer, providing the ability to move notes from one clip into another. Right now you need to combine the two clips, then move the notes around, then cut them up again. It’s very finicky to do this. Further to this, having the ability to see all the tracks while in edit mode is important if you’re trying to line up one set of notes or automation with another track. You can get around this somewhat by using the L/R markers, but it’s limiting.

Do you agree with these points? Is there anything in your wishlist that isn’t here? Anything else you want to see improved in Reason?

4 – Map Reason Songs to Record

Learn how to transfer all settings from one channel in the Reason Mixer to one channel in the Record Main Mixer. With this technique you can properly tranfer any song with any mixer settings from Reason to Record.

As a beta tester, when I got Record I was super excited. I promptly downloaded and installed, and went to open it up. I was salivating by the time all three record windows were opened stacked in front of me on my screen. The “AHHHHH” moment. A halo emanated around my computer. Come on, you know what I mean. I first saw the double rack and was amazed. Then I looked at the main mixer and my jaw hit the ground. Beautiful! A work of art. now I can finally work on making my tracks truly sing.

Then I opened a Reason song. And everything that I had hoped and dreamed got shattered in one swift moment. What? My mixer with 9 tracks and automation applied to the sends, EQ settings, panning, levels got reduced to a measly single track attached to the new main mixer in Record. All my earlier praise now turned to dismay.

I’m sure most of you know exactly what I mean. You’ve been there. You’ve gone through the same agony. So what do you do now? Curl up in a ball? Send Record back to the Props? Well, you could do that. Or you can read this tutorial and learn how to properly transfer all your settings from the 14:2 mixer in Reason into the SSL Main Mixer in Record. It’s not that hard, as you’ll see. But it is a little time consuming, depending how many tracks you have. And I’m not going to undertake doing an entire song mix. What I’ll do is show you how to transfer all settings from one channel in the Reason Mixer into one channel in the Record Main Mixer. Once you have that down, you can do any number of channels, no matter how complicated the song. So let’s get busy.

Before starting, I’ve put together a zip package with the project files. It contains the Reason song with a single channel and the Record version of the same song once it was converted: Download the Project Files.

It should be noted here that if you have not yet done any serious mixing in your main reason mixer, and don’t have any automation set up for any mixer parameters AND don’t have any CV setup for the Pans/Levels on the back of the mixer, then you can safely open the Reason song in Record and delete your main mixer. Then you can select all the (now disconnected) devices, right-click, and choose “Auto-route Device.” This will create Mix Channels for all the devices. Depending on how creative your connections were to begin with, you may find a few devices that require some custom routing after you do this. [thanks to Mattpiper from the Props forum for this excellent tip]

However, if you already have your mix set up with a lot of automation applied to the Reason main mixer device, then read onward, because this article is for you!

  1. First thing, open the Reason song, mixer and all, in Record.
  2. Next, you’re going to have to move any mastering Combinator or devices into the Master Section in Record. Let’s say we have a “Dance” Combinator inserted between the Reason Mixer and the Hardware Interface. Select all the devices in the Dance Combi and move it into the Master Section. Flip the rack around, and move the “From Devices” and “To Devices” cables from the Dance Combi to the same ins/outs of the Master Section. Then delete the audio ins/outs from the dance Combi, and delete the Dance Combi altogether. You don’t need it anymore.
  3. Adding the mastering Combi into the Master Section
    Adding the mastering Combi into the Master Section
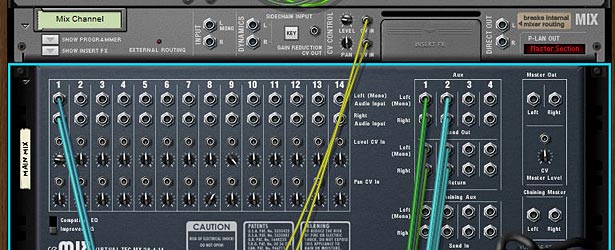
  4. Now let’s assume you have a Matrix set up to control the Panning of the channel, and another Matrix set up to control the Level of the channel. You’ll have to flip to the back of the rack, and move the CV inputs from the Reason Mixer to the CV inputs of the Mix channel. Then adjust the pots to the same settings they were at in the Reason Mixer. Level and Pan is done. Note that if you have several channels set up in your song, you’ll have to create the same number of Mix devices in Record.
  5. Pan / Level CV rerouted through the Mix Device
    Pan / Level CV rerouted to the Mix Device
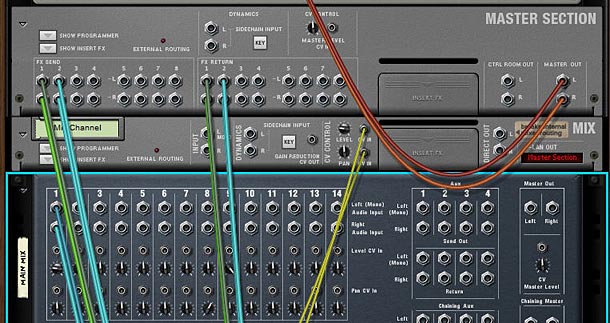
  6. Next, let’s move the Aux Sends/Returns from the Reason Mixer to the Master Section’s Sends/Returns in Record. This is pretty straightforward. Plus in Record you can now set up 8 Aux sends if you want, which is more than enough power. But in the example I’ve provided there was a Reverb and a Delay set up. So we’ll move those over now.
  7. Send / Return cable rerouting to the Master Section
    Send / Return cable rerouting to the Master Section
  8. Our last cable job is to move the Lead Audio Cables from the first channel in the Reason Mixer over to the Main L/R input on the Mix Device. You can now flip the rack around. You’re done with the cabling.
  9. Cabling the Main Audio outs from the Lead track
    Cabling the Main Audio outs from the Lead track to the Input on the Mix Device
  10. Now let’s move to the Record mixer. Press F5 and F6 at the same time to show both the rack and the main mixer in record. If your channels have any settings that ARE NOT automated, but are static for the entire duration of the song (and are different from their default setting), then you can adjust those settings on the main mixer channels in Record. For example, if a channel is set to a level of 90 in the main Reason mixer, and stays at 90 through the duration of the entire song, then you can change the dB level on the Main Record Mixer’s channel to -2.8 dB and leave it there. If the Level stays at 100 for the duration of the entire song in Reason, then you won’t need to change a thing in Record, because the level is already set to 0.0 dB. Make sense so far?
  11. At this point, you’ve probably realized that the new Mixer in Record use decibel values, not midi values. This is a good change, however, it makes it a little difficult to translate levels and send values from the old mixer. So I put together this little chart in PDF format that you can download to see the values. You may not get to use those exact values shown in the chart due to the jumps between values in the Record Mixer, but you can get pretty close. Thanks to Selig on the Props forum for the chart values. Download the Midi to dB Conversion Chart. Note that the chart is also included in the Project Files zip above.

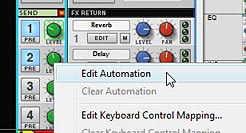
  12. Next, turn the sends 1 and 2 on in the Main Mixer’s Send section in Record. Since the example file has automation set up for these sends, right-click and select Automate. Do this for both sends. However, don’t move to the sequencer just yet. Instead, Look at the other elements on the channel that are automated, and do the same for those as well. So in our example, the solo and level parameters are automated, so right-click and select “Edit Automation” for those two parameters as well.
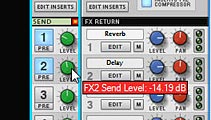
  13. Turning on and adjusting the Send settings
    Turning on and adjusting the Send settings
    Selecting "Edit Automation" for all parameters which were automated in the Reason Mixer
    Selecting "Edit Automation" for all parameters which were automated in the Reason Mixer
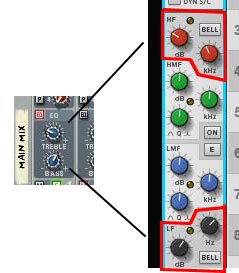
  14. One last thing in the Mixer. If you’ve adjusted the Reason Mixer’s EQ settings for Bass and Treble, you’ll have to map that over to the Record mixer as well. The best way to do this is to adjust the HF (High Frequency) and LF (Low Frequency) settings in the EQ section of Record’s main mixer. This is a shelving EQ which controls your bass and treble. Note that it gives you more control over the Bass/Treble settings that you’d find on the 14:2 Mixer in Reason, because it allows you to dial in the proper frequency range to affect. So you’ll have to use your ears for this one. For more on the EQ settings found in the new Record Mixer, you should read Ernie Rideout’s great article: Tools for Mixing: EQ (Parts 1 and 2).
  15. Converting the Treble and Bass EQ settings
    Converting the Treble and Bass EQ settings
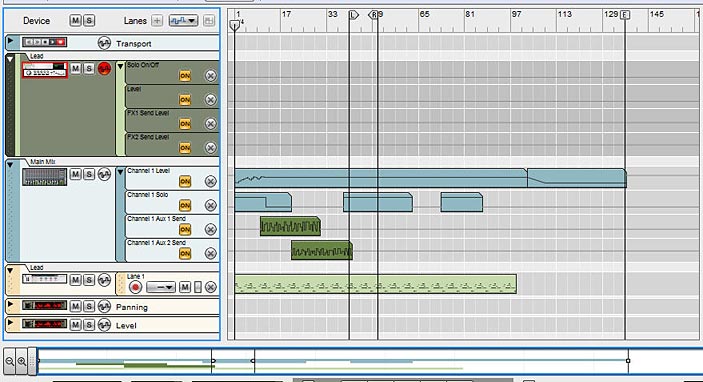
  16. Finally, we move to the sequencer. Press F7 on your keyboard to open the Sequencer. Notice that you have the Mixer with all the parameter automation, but since you selected “Edit Automation” for all those same parameters in Record’s mixer, you have all those lanes set up under the Mix Device. Now it’s just a matter of moving the clips from the Mixer into the proper lanes in the Mix Device. To make things easier (if your song is very long), expand the view by dragging the view window along the bottom of the sequencer all the way to the right, or click the “Zoom Out” magnifying glass at the bottom-left in the horizontal scroll view.
  17. Zooming out to see the whole track in view along the timeline
    Zooming out to see the whole track in view along the timeline
  18. When you move the automation over, some lanes may show “Alien Clips.” To convert the lanes to proper automation, right-click and select “Adjust Alien Clips to Lane.”
  19. Adjusting Alien Clips to Lane
    Adjusting Alien Clips to Lane
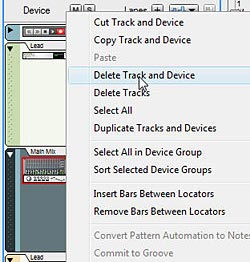
  20. And last but not least, right-click on the Mixer device in the sequencer and select “Delete Track and Device.” You won’t need it anymore. You’ve now converted your Reason song into Record and are free to mix and master your song using the SSL Mixer in Record. The sound should be pretty darn close to the original mix in Reason.
  21. The Final step: Deleting the Mixer
    The Final step: Deleting the Mixer

Be sure to save your song as a .record file. You’ll still have the original Reason song saved away which you can open as a reference, as opening Reason songs in Record does not overwrite your Reason song. It leaves it as is. The really nice thing about the Record mixer is that it gives you a wide array of other options which cannot be found on the Reason mixer, such as High and Low Pass filters, Compression, and a Main Compressor you can apply to the overall mix. More Sends, and handling of rotary and button controls for your devices makes this mixer a huge and powerful addition to your Reason software. So go forth and convert. It takes some time, but the more you do it the better you’ll get at it.

What are your experiences with song conversion from Reason to Record? Did you find this helpful? Is there anything I’ve missed? Please comment and let me know.

1 – Record as a CD Mastering Tool

My task a few weeks ago: To turn Propellerhead Record software into a CD mastering tool. Learn how to master 12 audio tracks in Record. A Record Template file is included.

So my task a few weeks ago: to turn Propellerhead Record software into a CD mastering tool. Keep in mind most of my tracks were already created in Reason and mostly fully formed. I had 12 tracks to master. My results:

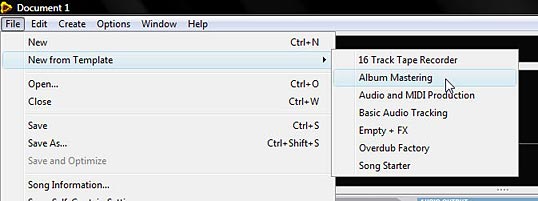
  1. Open Record and go into File > Create from Template > Album Mastering. The template opens with the default mastering suite as an insert effect before 10 empty audio tracks. Ok. not great. But just ok. I think what would have made it better here is if there were some reverb already plugged into the master FX sends, with all the sends switched on the master mixer and set to a low value (saving some steps here would do wonders). Though, since you can create your own templates out of anything, it’s not a major issue.
  2.  
    Opening the Record Album Mastering Template Opening the Record Album Mastering Template


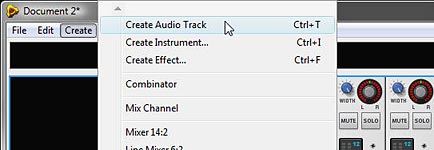
  3. I created two additional audio tracks (I have 12 tracks in total on my new CD project, not 10).
  4. Adding 2 more audio tracks to the template
    Adding 2 more audio tracks to the template
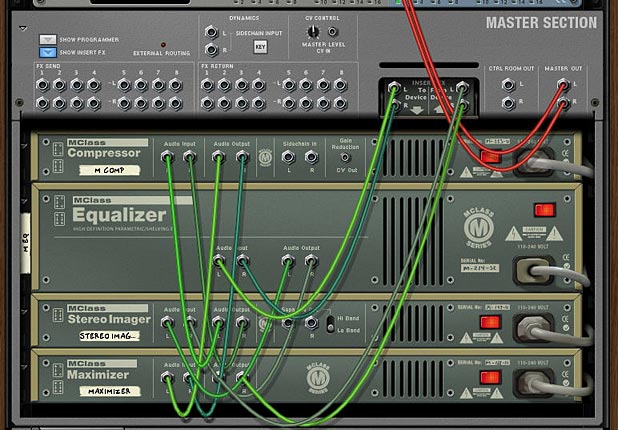
  5. I updated the master insert effects with the mastering combinator. Under the Master Section, click “Show insert FX” to expand the FX section, and update the empty mastering suite with your own mastering FX. In this case, I used the “Dance” combinator, as I really like the sound that this mastering combinator gives to my own music. I realize that usually this is the last step when mastering the mix, and this may seem kind of backwards, but I find that once I have all the tracks laid out and they are ready to be mastered, I’d rather listen to how these FX work with each track and do all the final adjustments from there. And if you don’t want to do it this way, you can always bypass the Insert FX with the click of a button, toggling the dance combi on and off. A great way to see how it affects each track.
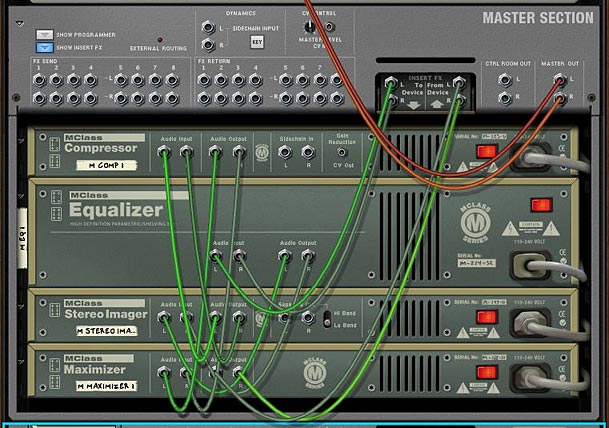
  6. Note: since you can’t insert a combi inside the master section, one way to add the Dance mastering combi in there is to first right-click over the front of the master section and select “Clear Insert FX,” then create the dance combi underneath the master section (hold down shift, so it is not auto connected. Expand it, select all the devices inside it and then drag them into the master section. Flip the rack around and move the blue “To Devices” L and R cables which are still connected to the dance combi to the master sections “To Devices” L and R cables. Do the same for the “From Devices” cables and then delete the now-empty dance combi. Voila, the Dance combi and all connections are inside the master section as Insert FX (see the image below for a look at the back of the rack and the connections.

    Back of the Master Section with a Mastering Suite Combi attached
    Back of the Master Section with a Mastering Suite Combi attached
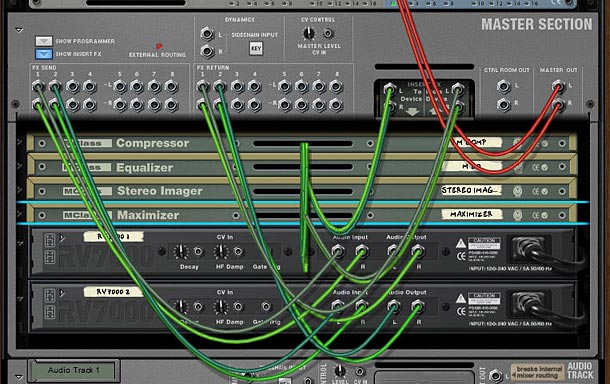
  7. I added two reverbs as send effects I added the “All Plate Spread” and “All Warm Plate” RV7000 units as send FX in the Master Section. I also set the dry/wet amounts very low (setting on 5 for each). This was done to add a little smooth reverb to all my tracks and make them “fit” or “glue” better together (see step 1 above — would have been nice if this step was already done).
  8. Adding the two Reverbs as Send FX
    Adding the two Reverbs as Send FX
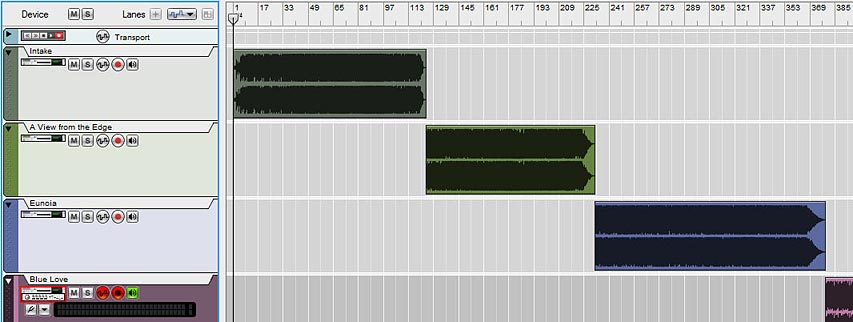
  9. Added each song (wav) file to each of the audio tracks using the File > import audio track on each channel and set them up one after the other in the sequencer timeline.
  10. Note: You can also set your tracks up on top of each other in a stack if you prefer. This is probably a wiser course of action, but as this was my first time using Record to master my CD, I opted to try laying things out on a timeline. The benefit to laying it out sequentially is that you can track the total time of your songs combined. The downside is that it makes for a real pain when it comes to bouncing each song individually to a wav file. There’s a lot of movement of the L / R markers in the sequencer at that stage.

    The tracks laid out in series within the Sequencer
    The tracks laid out in series within the Sequencer

    Note: it was at this point I realized something. I had one track out of the 12 whose tempo was faster than it should have been. It took me a while, but I figured out that this was the only track that was output from Record, not Reason. When you import an audio track that was produced with record, it understands the tempo data from the file (The track was 100 bpm, while my “CD Mastering” project tempo was 120). If you import a wav file that was created via Reason’s export, it shows “no tempo data” which I still find a little odd.

    Soooooooo…. I went to the tempo transport in the sequencer and switched the tempo to 100 for the duration of that one track. Problem fixed.

    It was also at this point that I was glad that Record didn’t make the connection and understand the Reason song tempos. Otherwise I’d have to go back and write down the tempo of each of my songs, and then change the transport’s tempo over each song to match. What a pain that would have been.

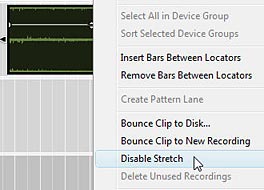
    Update: Mattpiper provided this nice little tip which avoids having to use the Tempo Automation Track: “In Record, you can right-click on any clip and select “Disable Stretch.” Then the clip will not have its tempo affected by the song tempo.” — Thanks Matt!

    Disabling Stretch by right-clicking on the audio clip in the Sequencer
    Disabling Stretch by right-clicking on the audio clip in the Sequencer

    Back to my strategy:

  11. Turned on “send 1” and “send 2” for all the audio tracks so the reverbs I set up were audible. Adjusted the send levels for each track to taste.
  12. Adjusting the Send levels in the Main Mixer
    Adjusting the Send levels in the Main Mixer
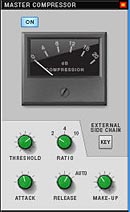
  13. Now the hard part: On the Main Mixer I adjusted compression settings for the Master Compressor, as well as for individual tracks. Also adjusted the LPF/HPF on some tracks, though not very much because as I say, all the work was already done in reason, and I didn’t want to go overboard. This process took a few days as I didn’t want to rush it and suffer from ear fatigue when adjusting these settings.
  14. Final adjustments with the Master Compressor
    Final adjustments with the Master Compressor
  15. Now the hard part (part 2): listened to each track once or twice and adjusted the volume levels so that they were just below clipping. My intention was to have them all evened out. I got about halfway through and called it quits for the night. Finished it in about 2 nights. For what it’s worth, I find that even if the song shows clipping in Reason or Record here and there (via the clip out light on the transport panel), as long as the clipping light is shown infrequently, and they are short clips, it doesn’t affect the final mixdown or output. Since this is the final adjustment before bouncing, I don’t mind pushing it. If I were still in the mixing stage, I would leave more headroom (about 2-3 dB). 
  16. Set up the L/R markers in the sequencer and bounced each song (LOOP) to an audio file individually. Loop is in caps for a reason. Since all the tracks are in the sequencer in sequence (how self-reflexive), each song is really considered a loop by the software. So don’t make the mistake of bouncing the song, otherwise you’ll end up with one huge wav file of the whole CD (of course, this may be what you’re after, but probably not).
  17. It’s times like this I wish I could set up multiple start/stop markers within Record, and bounce them all to individual tracks with one click of a button. But Record just isn’t there yet. Note to props: this would be a great addition! Also, the whole project turned out to be 1.5GB, so it’s not for the feint of heart. But it’s worthwhile to do if it’s going to make all my tracks have a certain amount of consistency across the board.

Now tell me: do you think this is an approach that makes sense? I know we all have different approaches when it comes to mastering, but is there anything you would do differently? Anything you would add or subtract from this process? Any suggestions to improve this process? Would anyone care to share their own process using Record?

If you would like to listen to the final result, all the tracks on the CD can be found here: http://www.phisequence.com

Also, if you would like the template file, I’ve created the one I set up here, with the Dance Combi and Reverbs in the Master Section, as well as all the sends turned on. I also added the extra two audio tracks:

Download the cd-master-tpl (zip file)