At long last, the much awaited Crapre is here from PEFF! Outstandingly crappy sound quality can only make your tracks betterer than ever. And so I thought I would provide some much needed information and documentation about this heavy duty device. After taking all last month to document Spacre (lengthy article posting to follow), I thought I would give this device a much-needed test-drive and overview. It was a daunting task.
We’re a fun bunch, us Reason developers & users. And PEFF just keeps putting the fun back in Reason. At long last, the much awaited Crapre is here! Outstandingly crappy sound quality can only make your tracks betterer than ever. And so I thought I would provide some much needed information and documentation about this heavy duty device. After taking all last month to document Spacre (lengthy article posting to follow), I thought I would give this device a much-needed test-drive and overview. It was a daunting task.
The Craptastic new RE from PEFF. Get it while it’s out. Offers expire on May 1, 2014.
How could I pass up the opportunity to fully document this beautiful device? Download it here: Crapre Guide. And if you want to get your hands on the insanity, it’s available in the Propellerhead shop here: Crapre Rack Extension.
Stack ’em in your rack to make supercrapasonic textures and intriguing effects for all your sounds. It’s the missing preset on the Audiomatic Retro Transformer that you always wanted, and never knew you needed.
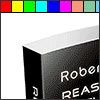
It’s a game changre for sure. You should get it for the Combinator skin alone! I might even post some of my crappy patches for it at some point in the future. For now, get it for the love of all the kittens & unicorns out there.
. . . and now back to your regularly scheduled program.
I’m obsessed with figuring out solutions to problems. One problem I recently encountered when I was putting together some files for the Alias8 PDF Guide, was trying to get the Alias8 Rack Extension Fader to double for a second control. I wanted to be able to use it to adjust two different parameters (let’s say Amplitude and Pitch of a SubTractor). The idea and thought process behind it is pretty easy. You adjust the Amplitude by moving the Fader, then click a button, and the Fader switches to adjust the Pitch. Click the same button again, and it goes back to controlling the Amplitude.
I’m obsessed with figuring out solutions to problems. One problem I recently encountered when I was putting together some files for the Alias8 PDF Guide, was trying to get the Alias8 Rack Extension Fader to double for a second control. I wanted to be able to use it to adjust two different parameters (let’s say Amplitude and Pitch of a SubTractor). The idea and thought process behind it is pretty easy. You adjust the Amplitude by moving the Fader, then click a button, and the Fader switches to adjust the Pitch. Click the same button again, and it goes back to controlling the Amplitude.
You can download the example files here: Alias8-Multi-Function-Fader. There are two Reason documents (.reason) and two Combinators (.cmb), which are explained below. The files will work in Reason 6.5 and above. To use them, you will also need the Alias8 CV Controller Rack Extension, which is available in the Propellerhead Rack Extension shop. To use, open up the file and go into the Combinator. Press the “Run Pattern Devices” on the Combinator, or press “Play” on the Matrix. The Matrix is used to gate the Subtractor, and is only used as an example so you can hear something when you tweak the Fader. A more comprehensive explanation is provided below.
To start, what I found is that you can’t completely get this type of functionality to work. Not completely. BUT, here are two ideas that get you pretty close.
1 Control with 2 Functions (V.2).reason / F1 2-Function Control (V.2).cmb Files:
I’m starting backwards here, because this was actually the second idea I had (hence, this is Version 2 in the filenames above). This idea uses two toggle buttons, one for Amp and the other for Pitch. Then, with the proper CV routing and an additional Thor to process the CV, you can map both parameters to the Fader. Click the first Toggle, and the Fader will control the amplitude. Click the Second Toggle, and it switches to control the Pitch. When the Amp toggle is off, you adjust the amplitude. Then click the Toggle button on, and the Amp level is held at the current Fader position. Then click the Pitch Toggle off, and the same Fader now controls the Pitch. Click the Pitch toggle on, and the Pitch is held at the current Fader position. The drawback is that you have to have both Toggle Buttons on to start with, and you can’t turn off both of them, since this would screw up the functionality. One of the buttons always has to be “On.” To get it “set” right again, you need to turn on both Toggles, then, turn one of them off and use the Fader. Sounds confusing, I know. But it’s the most efficient way I’ve found to set it up, as it only uses two Toggle Buttons (aside from the Fader).
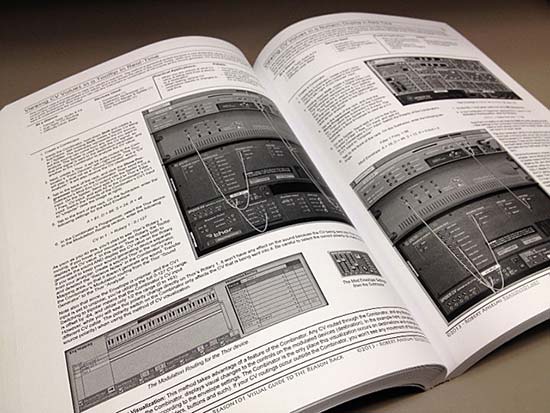
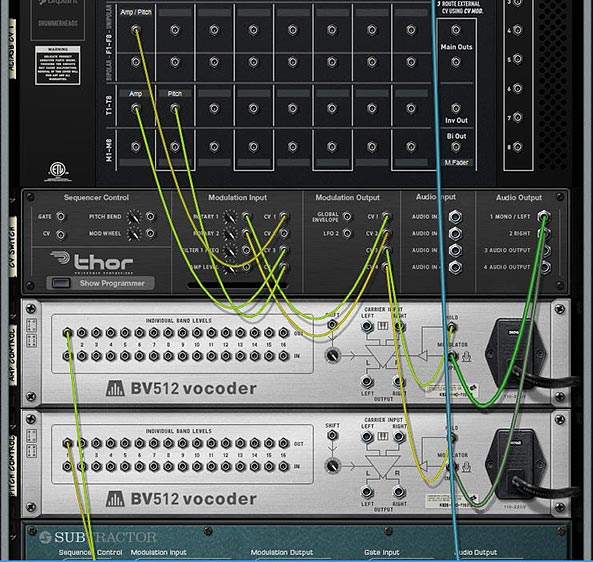
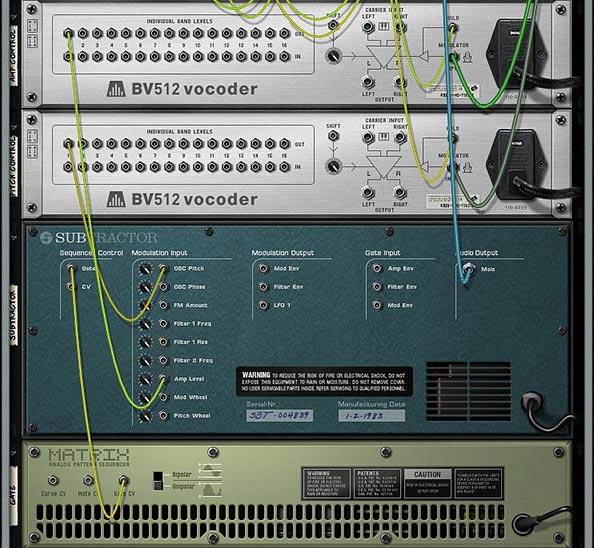
The Back of the rack for the “Version 2” example that uses 2 Toggles to switch Fader Parameters and simultaneously “Hold” the CV values via the BV512 devices.The CV routings from the BV512 into the SubTractor (destination parameters). The Matrix is there simply to “Gate” the SubTractor, so you can hear something and test out the Fader.The settings for the Modulation Bus Routing Section in Thor.
1 Control with 2 Functions (V.1).reason / F1 2-Function Control (V.1).cmb Files:
This next idea uses three additional buttons (aside from the Fader). The two Toggle Buttons act as the Amp / Pitch selection (as above), but a Momentary Button is used to switch between the two Fader states. The benefit of doing it this way is that you can’t screw up the functionality of the Fader in any way. The two Toggle Buttons act to “Hold” or “Freeze” the Level’s position for the selected parameter. The selection of which parameter the Fader controls is determined by the Momentary button. While I think this is a better method in some respects, it suffers from one disadvantage: You can’t tell which parameter is selected via the Momentary Button. There’s no real visual indication to tell you which of the two parameters are selected. This isn’t a big concern when you have only two parameters switched via the Momentary Button, but if you have several parameters you’re cycling through on that Button, things will get confusing quickly (though you could add a visual indicator with the DDL-1 or BV512 Vocoder, but it’s still not perfect – if interested in how this works, see the Kong FX Chain Builder tutorial where I discuss it at the bottom of the page).
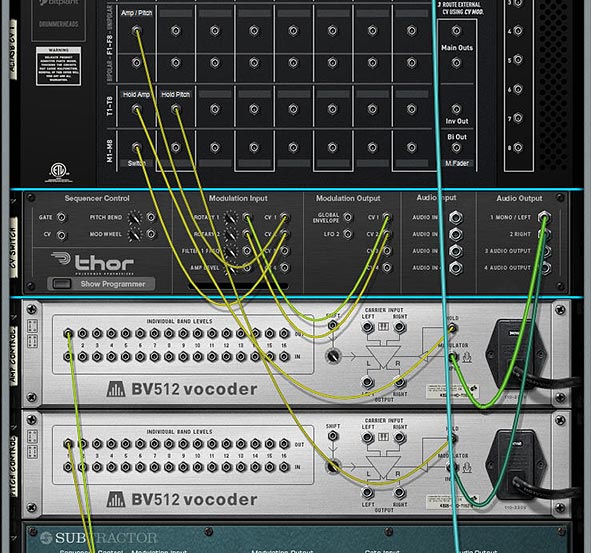
The Back of the Rack for the “Version 1” example that uses 1 Momentary Button to switch Fader parameters, and 2 Toggle buttons that “Hold” the CV values of the Fader via the BV512 devices. Note that the CV coming from the BV512 devices are routed into the SubTractor in the same way as the “Version 2” example (Refer to that image further up in this post).The settings for the Modulation Bus Routing Section in Thor.
How Does It Work?
The engine of this CV trick is the Thor device. What’s happening is that you are sending the CV value from the Fader into Thor, converting that CV value to Audio, then sending it through the BV512, where it gets converted back to a CV value that is sent out by Band 1 to control the SubTractor parameter (Amp or Pitch). The reason you need to convert it to Audio is because the BV512 Modulation input can be “held” — this allows you to “hold” the Fader value via the Toggle buttons on the Alias8. Note that this is also useful for a lot of other things because it allows you to “Freeze” any CV value in place (for instance, you could freeze the value of an LFO at any time by mapping the “Hold” button to a Combinator button, but that’s going a bit off tangent). There are 2 different BV512 devices because you need to be able to “Hold” each parameter you want to control with the Fader.
Another thing to keep in mind is the CV amount value of 39 in the Modulation Bus Routing Section on the front of Thor. This seems to be the correct value to correctly scale the “CV > Audio” conversion going out from Thor to the BV512 Vocoder. Note that the Rotary is used to Scale this “CV > Audio” conversion, and then the Fader value is going into Thor and modulating the Rotary, which in turn modifies the CV value being sent into the BV512 device. It seemed like the easiest way to set it all up, and the other benefit is that it doesn’t use any routings or mappings in the Combinator device itself.
A Few Additional Notes:
The value sent to the Fader seems to be Scalar, not Linear. Anyone who knows how the CV value can be sent to the Fader in a Linear way, please let me know.
I also would have loved to have one Toggle or one Momentary button switch between the two Fader parameters (keeping everything in one column in the Alias8), but I honestly don’t think this can be done. However, if you figure out a way, please let me know.
Even though this concept creates a multi-function Fader, there’s nothing saying you can’t set it up on a Rotary control instead, to produce a multi-function Rotary.
Why is this an important concept? Because it extends the functionality of a single Control on the Alias8, and the Alias8 device itself. For example, with a little thinking, you could create 8 different controls on 4 of the Alias 8 Faders, and still have 4 Free faders left over for more tweaking. Or have all the Toggle Buttons switch 8 different destination parameter controls on a single Fader, and free up the other 7 Faders for more tweaking.
Update
Eric Kloeckner was kind enough to expand on this idea and improve upon the above design. He managed to put the whole setup on a single Toggle button to switch the operation of the Fader between the two modulations. It solves the need for having two separate toggle buttons to drive the two different parameters.
I then took his design and tweaked it a little to make it as straightforward as possible. The concept uses 2 Thors to control the Toggle switch. This, in turn switches the Fader between the two modulation controls. The only downside is that you have to first “initialize” it by pressing the Toggle button at least once. But this is a huge improvement. And my thanks goes to Eric for finding a solution to one of the problems that was bugging me. Download the Files here: Alias8-Multi-Function-Fader-v2. There are two files in this zip:
Example File Combinator: Press play, and then toggle between adjusting the Pitch and the Level using Fader 1 on the Alias8.
Template File: Use the Output A / Output B spiders to send CV values to target multiple parameters as you wish. “A” parameters are adjusted when the toggle button is “off” and “B” parameters are adjusted when the toggle button is “on.” Use this setup to create a template where all 8 faders can have multiple-functions if you like.
Note: There’s still a slight discrepancy between the CV input & output. In other words, it’s still not 100% Fader value CV : Destination value CV. You’ll still get slightly off results (where moving the fader on a single CV value will bump up the Output CV value by a value of “1,”). However, this is very slight, and shouldn’t be a problem in most cases.
That’s it for now. Don’t forget that the Alias8 PDF Guide I put together contains many other creative ideas for this Rack Extension, so check it out as well. Happy Reasoning!
Complete coverage of Reason 7.0 Core devices & 8 Rack Extensions, with 101 in-depth Tutorials focusing on Basics, Utility constructions, Sound Design, Advanced usage and Rack Extension integration. This book is built from the ground up to explore all aspects of the Reason Rack.
With forewords from Kurt Kurasaki (Peff) and Ed Bauman (EditED4TV).
Robert Anselmi’s Reason101 Visual Guide to the Reason Rack
Complete coverage of all Reason 7.0 core devices & 8 Rack Extensions, with 101 in-depth tutorials focusing on basics, utility constructions, sound design, advanced usage and Rack Extensions. This book is built from the ground up to explore all aspects of the Reason Rack.
With forewords from Kurt Kurasaki (Peff) and Ed Bauman (EditED4TV).
The first half covers all core rack devices & 8 Rack Extensions front and back. All sliders, rotaries, buttons, and audio & CV connections are explored visually. The second half of the book provides 101 different ways you can integrate those devices together to create practical applications.
This manual provides all you need to know to start out using reason and take your skills from Basic to advanced, and beyond. Save time learning the Rack in the most intuitive way possible, and keep your copy handy as a desk reference while you work.
Features & Benefits:
Save time and learn Reason visually, in the most intuitive way possible.
101 detailed step-by-step tutorials cover basic to advanced Reason lessons.
Device section cross-referenced with Tutorial section for easy navigation
Learn the secrets of Reason sound design, FX & audio routing, and utility construction.
Merges the theory with the practical, offering many creative ideas along the way.
Useful as a handy desk reference when looking for answers.
Premium options provide an additional 250-patch ReFill and coil binding.
Full Color options with higher quality paper.
All options provide both an electronic PDF & printed book.
Picks up where the Operation Manual leaves off.
Ordering Options
Black & White
Color
Standard
Premium
Standard
Premium
Black & White Book
(Perfect Binding).
B&W PDF Copy*
Black & White Book
(Coil Binding).
B&W PDF Copy*
Companion ReFill*
Color Book
(Perfect Binding).
Color PDF Copy*
Color Book
(Coil Binding).
Color PDF Copy*
Companion ReFill*
$49.99 USD.
$69.99 USD.
$109.99 USD.
$129.99 USD.
*Note: To receive the PDF Copy and Companion ReFill, you must forward the receipt that was sent to you from www.lulu.com after your order is placed. Forward the receipt to webmaster@reason101.net. Once I receive your receipt, I will send you the PDF and ReFill download links (depending on the order option you chose). The PDF and ReFill download links will be sent to you in two separate emails, and will be sent to the same email you used to forward the receipt. This is a manual process, so please allow up to 24 hours for download file delivery.
When you click the “buy now” button, you are directed to www.lulu.com to order the hard copy book. You will then receive two emails from Lulu: a “Thank You” email and a “Receipt” email. To receive the electronic PDF copy and Companion ReFill, forward a copy of your Lulu receipt to webmaster@reason101.net. Once I receive your receipt, I will send you the electronic PDF, and ReFill file (depending on the order option you chose). The PDF and ReFill are sent to you in two separate emails, and are sent to the same email you used to forward me the receipt. This is a manual process, so please allow up to 24 hours for download file delivery.
This process must be performed because Lulu does not provide customer information to publishers. Without this information, there is no way for me to track your order, and no way for me to know where to forward the electronic files. The receipt is only used to confirm you have placed an order, and to fulfill the electronic portion of your order. This information will not be shared with any other third parties.
Are the tutorials provided on your Reason101 website found in the book?
While many of the tutorials found on my website are found in the book, most of them have been updated and expanded. I took a year off to organize and update them. In addition, there are numerous tutorials in the book that are not found on the website. Finally, the first half of the book where all the devices are outlined are exclusive to the book, and not found on the website.
What are the product specifications?
Book: 360-pages. Publisher: Reason101. Author: Robert Anselmi. Language: English. Product Dimensions: U.S. Letter 8.50 x 11” or 21.59 x 27.94 cm. Shipping Distribution: www.lulu.com.
PDF (black & white or color): Encrypted PDF Optimized for fast web view (smallest file size). PDF stamped with customer Name / Email / Transaction ID.
The “Reason101 Visual Guide to the Reason Rack” is a book loaded with information. Part technical manual, part creative resource, and part practical “how-to” guide, this takes you on a tour through the past 10 years of my Reason experience, and provides it to you in one comprehensive 360-page volume. Use it as a reference to save you time, and shorten your Reason learning curve. Time to show you what’s inside the book.
The Reason101 Visual Guide to the Reason Rack is a book loaded with information. Part technical manual, part creative resource, and part practical “how-to” guide, this takes you on a tour through the past 10 years of my Reason experience, and provides it to you in one comprehensive 360-page volume. Use it as a reference to save you time, and shorten your Reason learning curve.
I’ve shown you the video and a few still shots from the hard copy. See my previous post for that. So what are you going to get when you purchase?
The book is divided into two main sections:
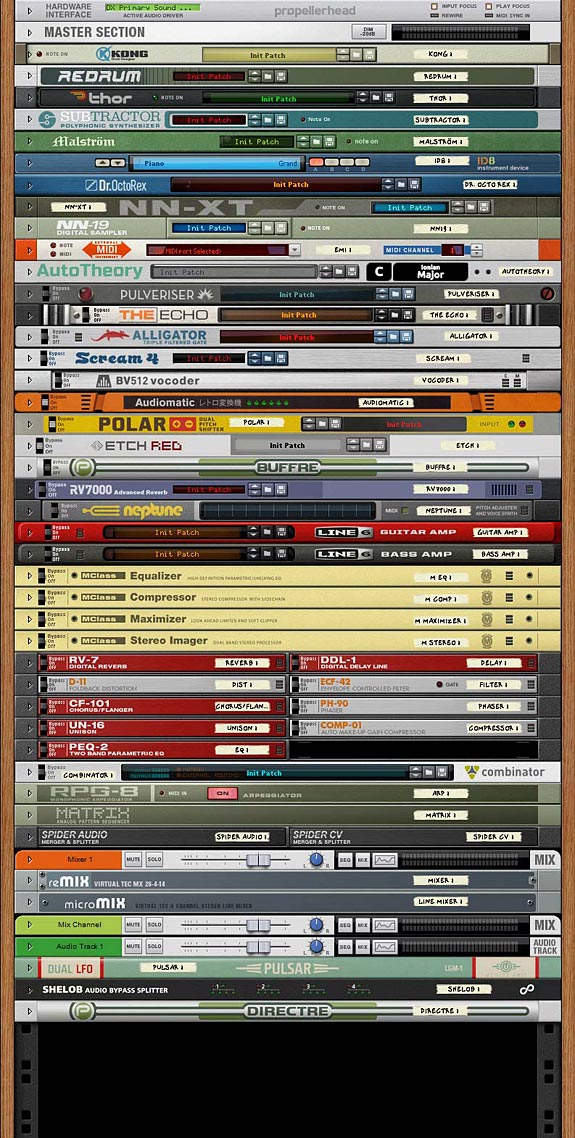
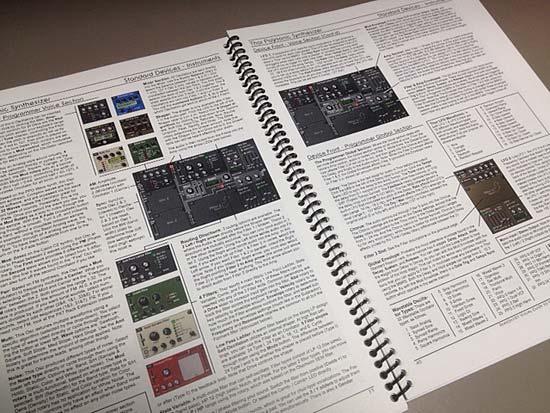
The Core Reason Devices & 8 Rack Extensions outlined fully front to back (see the image below for all the devices covered).
101 in-depth Tutorials that cover Basics, Utility Construction, Sound Design, FX Design, Advanced Setups, and Rack Extension Integration. (see the PDF Table of Contents for a listing of all the Tutorials).
Both of these sections are cross-referenced, so that it’s easy to navigate between the two sections. For example, when you are reading about the SubTractor device, all the tutorials related to the SubTractor are outlined (by number) in the SubTractor heading section. When you are in a specific Tutorial, all the devices used in that Tutorial are outlined in the Tutorial’s heading section.
Note: There’s also a Companion ReFill that will be provided with “premium” options, containing 250 patches. These patches serve to complement the Tutorials. There’s also several additional routing and sound ideas in there for you to explore.
I wanted to give you a few samples from the book. So I’m providing them here as free PDF files:
That should give you a pretty good idea of what you get with the book and the book’s layout. Now for a visual listing of all the devices covered in the first half of the book:
The Book covers all 43 Core Reason Devices, as well as 8 additional Rack Extensions; all of which are shown here.
I think you’ll agree that this is unlike any other Reason book on the market. This is the only Reason book you’ll find that offers a Coil-Bound, full Color purchase option. And the only book that provides a full copy PDF with all purchase options.
You can pick up your copy of the Reason101 Visual Guide to the Reason Rack exclusively athttp://www.reason101.net/shop
A picture is worth a thousand words. 864 pictures and 312,000 words on 360 pages becomes an invaluable story. Especially when what it conveys is everything you’ve ever wanted to know about the Reason Rack in a logical, easy-to-follow way. Take a sneak peek inside the “Reason101 Visual Guide to the Reason Rack” – There’s a lot to cover, with 51 devices presented in full detail, along with many creative and practical ideas, tips, tricks, sounds, and utilities. Stay tuned for more updates to come.
A picture is worth a thousand words. 864 pictures and 312,000 words on 360 pages becomes an invaluable story. Especially when that story conveys the inner workings of the software tool used to get the music in your head out to the world. And especially when that story is packaged in a logical, easy-to-follow book. That’s what you’ll find in the Reason101 Visual Guide to the Reason Rack
Want to know a bit more? Here’s a video that should answer most of your questions about what it is and why you should invest in it:
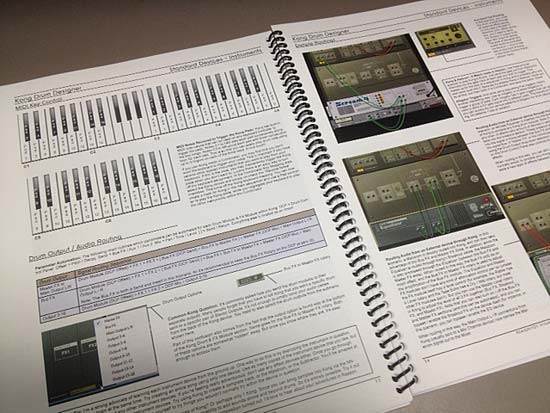
Here’s a little preview of some of the test copies I got back from the printer. 51 devices are covered top to bottom, and there are full visual outlines of how every parameter on each one of them functions. And all this is cross-referenced with the 101 Tutorials on everything from basic to advanced sound design, effects design, and utility construction.
A few pages from the Kong device section (Color test copy)
The idea was to create a dual purpose book whereby the Device section can be used as a quick reference as well as completely cover all front and back panel parameters. The Tutorial section can open up new ideas on how all the devices can be integrated together to create different sounds, effects, and utilities. A complete course in a book.
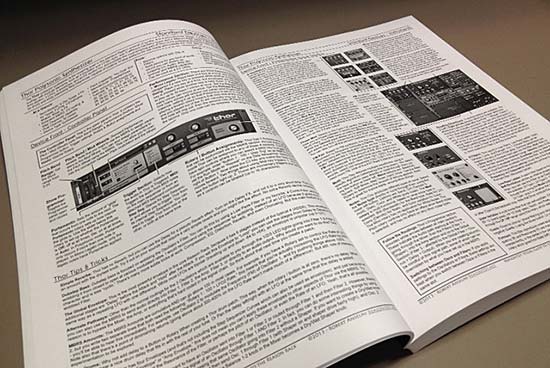
A few pages from the Thor device section (Color test copy)
As I progressed with the devices, I found that you could explain most all of them in a very concise way over 3-4 pages each. Of course, some devices took considerable more space, such as Thor and Kong, which are each about 9 pages. But each page had to be laid out according to the device’s design, not a “one-size-fits-all” book layout. Each page was hand-crafted, and required completely different layouts, balanced against the consistency of the headings, fonts., page size, and other elements to give the book its flow.
I’ve been a technical writer for 12 years, and that often involves working on your own layouts and graphic design. I was very mindful of this when crafting the book to give you the best learning experience I could. Part technical manual, part creative index of ideas, and part practical “how-to,” I hope this book encourages you to push your limits with the Reason software.
A few pages from the “Thor” section (Black & White test copy)
One of the most important aspects of working on this project was ensuring that all the visuals presented the devices in full view as you would see them on-screen. I wanted to make everything easy to follow and simple to navigate. I didn’t want to intrude too much on the imagery. Therefore, all the call-out lines are simple and don’t cover any important device areas.
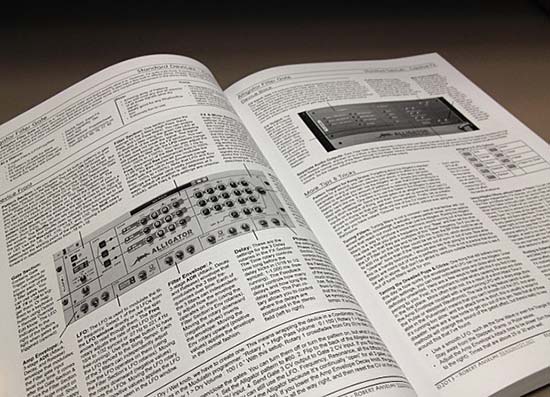
A few pages from the “Alligator” section (Black & White test copy)
As you can see, all the tutorials have full visuals as well, so you can follow along and recreate exactly what I’m explaining. And with 101 Tutorials, there’s plenty in there to work on. Many of these tutorials also have alternative ways to accomplish something, or additional ideas and tips. This isn’t a rehash of what you’ll find on my website. There are many new tutorials, as well as expansions and re-workings of many of the most popular articles found on my site.
A few pages from the “Tutorials” section (Black & White test copy)
Well, that’s a quick look at the actual copy. Let me know what you think.
You can pick up your copy of the Reason101 Visual Guide to the Reason Rack exclusively athttp://www.reason101.net/shop
10 Years in the making. What I will present to you on December 1st, 2013 is the book I always envisioned for the program, and I want to invite you to stand over my shoulder and see why I find this software such a compelling and creative tool for anyone with a love of music and audio. I wrote the “Reason101 Visual Guide to the Reason Rack” so that I could convey all the amazing things this program can do in a logical, easy-to-follow way. I wanted to shorten your learning curve, and at the same time share my 10-year Reason journey with you. I hope you enjoy learning about Reason as much as I do.
Robert Anselmi’s Reason101 Visual Guide to the Reason Rack
When I first started working with Reason, I was amazed at the breadth and depth of the program. It had such a wide array of devices and options, it made my head spin. And the visual design of the software was truly stunning. I was excited and wanted to learn more. I had longed for a book that would walk me through all these Rack devices, and more importantly, would explain how to connect all these devices together to create what I wanted. It had to be highly visual as well, doing justice to the fine artistic efforts put into the Reason software design. I searched everywhere for a concise and comprehensive book that would teach me all the possibilities. Yet, nothing like that existed at the time. And it was at that point I decided to eventually write that book. I’m more than happy to provide it to you now, a decade later.
What I will present to you on December 1st, 2013 is the book I always envisioned for the program, and I want to invite you to stand over my shoulder and see why I find this software such a compelling and creative tool for anyone with a love of music and audio. I guarantee two things will happen when you invest in it: 1. It will save you time when seeking out answers to how the software operates; making you more efficient, and 2. It will teach you something new; no matter what level of expertise. These are bold claims. And I promise to deliver.
Reason is a gigantic Lego set, and you’re free to construct anything you can think up. Using the devices, audio, CV, and all the related sliders, rotaries, and buttons as your building blocks, you’re free to construct an endless amount of sounds, effects, and utilities.
But without an understanding of how these blocks fit together, it’s difficult to build anything. And that’s where this book comes in. The first half will provide you with the theory. Every core device and 8 Rack Extensions are comprehensively outlined in a clear, concise, and visual way. You’ll learn how each device operates, front to back, A-Z. It can be read straight through, or used as a desk reference when you are seeking out how a particular control or connection works.
The second half of the book will provide you with the practical side of Reason, and can be thought of as a complete course, from basic to advanced, over the span of 101 in-depth lessons. You can read them straight through, or focus on specific tutorials that interest you. To help you navigate through these two sections, I’ve cross-referenced them. This way, you can see the tutorials that relate to a specific device in each device section, and which devices are used in a specific tutorial in each tutorial section.
I wrote the Reason101 Visual Guide to the Reason Rack so that I could convey all the amazing things this program can do in a logical, easy-to-follow way. I wanted to shorten your learning curve, and at the same time share my 10-year Reason journey with you. I hope you enjoy learning about Reason as much as I do.
You can pick up your copy of the Reason101 Visual Guide to the Reason Rack exclusively at http://www.reason101.net/shop
With the advent of Reason 7, you get the Audiomatic Retro Transformer Rack Extension for free. This is like Instagram for photos, except it creates musical snapshots that can be applied to the whole mix or individual tracks. So I thought, why not create an FX combinator where you can select different Audiomatic presets using the Kong pads. The added benefit is that you can switch between them in real-time at any point you like using automation. I even added a bypass so that when an audiomatic preset is not selected, the original audio is passed through unaffected. Or, there’s a method to play it parallel with the original loop.
In this tutorial I’m going to go over how to create an 8-way Audiomatic Retro Transformer Switcher using the Pads in a Kong device. You can easily add all 16 on all Kong Pads and then switch between any of them using your Pad Controller or Key Controller. Or you can use a built-in randomizer. This is just one idea I came up with out of a discussion with Kurt Kurasaki on Facebook. So I thought I would share it with everyone.
With the advent of Reason 7, you get the Audiomatic Retro Transformer Rack Extension for free. This is like Instagram for photos, except it creates musical snapshots that can be applied to the whole mix or individual tracks. So I thought, why not create an FX combinator where you can select different Audiomatic presets using the Kong pads. The added benefit is that you can switch between them in real-time at any point you like using automation. I even added a bypass so that when an audiomatic preset is not selected, the original audio is passed through unaffected. Or, there’s a method to play it parallel with the original loop.
You can download the project files here: 8-way-audiomatic-kong-switcher. There’s 2 Combinator files included. One file with an audio bypass, and one without. It requires Reason 7.0, Audiomatic Retro Transformer and Directre.
The Audiomatic Retro Transformer Instantaneous Switcher
Create a Dr. Octo Rex Loop Player. Click the Browse Patch folder icon and open the AC Guitar | Open Strums Key of A 90 bpm.drex patch. This provides a sound source for our Combinator FX setup.
Hold down Shift and create a Combinator. Click the Show Programmer button.
Inside the Combinator, create a Mixer 14:2. Reduce the Level Faders on Channels 1-8 all the way to 0. We’re going to control the volume of these Channels using Kong.
Hold down Shift and create a Kong Drum Designer. Relabel pads 1-8 in the following way:
Pad 1 = Spread
Pad 2 = Radio
Pad 3 = VHS
Pad 4 = Vinyl
Pad 5 = Tape
Pad 6 = Hi-Fi
Pad 7 = Bright
Pad 8 = Bottom
Hold down Shift and create a Directre Audio Router. Turn on all 8 Channels using the Enable buttons. We’ll use this to split the incoming audio out to 8 different Channels on Directre (note that you can also use another Mixer 14:2 for this task, instead of Directre).
Hold down Shift and create 8 Audiomatic Retro Transformer devices. Label them the same way you labeled the first 8 Pads on Kong above. Then switch each device’s Preset to the corresponding label. In this case, we will have 8 Audiomatic devices, each with a different preset. The basic premise is to send audio splits from each Directre output into the Audiomatic, and then send that back out to the Main Mixer and then out of the Combinator.
Hold down Shift and create a Thor device. Click the Show Programmer buttton. Name the Thor device “Sequencer.” On the Global panel, set the Pitch Bend range, Polyphony, and Release Polyphony to 0. Relabel Button 1 “Trig Step Seq” and disable both the MIDI & Step Seq buttons. In the Programmer panel, turn off Oscillator 1, disable routing Oscillator 1 from the Mixer to Filter 1 by deselecting the “1” button, bypass Filter 1, and turn off the Global Envelope. Rename Thor 1 “Bass Filter” and Thor 2 “Snare Filter” (see image at right). Enter the following into the first line of the Modulation Bus Routing System (MBRS):
Button 1 : 100 > S. Trig [This allows you to enable the Run button on Thor’s Step Sequencer from Thor’s Button 1]
Still inside the “Sequencer” Thor, set the Run Mode to Repeat, and the Direction to Random. Set the Octave Switch to 4. Create an 8-step sequence where each step is set to subsequent Note values from C1 to G1. Since these notes trigger Kong’s first 8 pads via the internal MIDI Pad assignments, we’re setting up Thor to trigger these Pads randomly.
Still inside the “Sequencer” Thor device, switch the Edit rotary to “Gate Length” and set all 8 steps to 100%. This ensures that switching among Audiomatic presets is instantaneous, as it takes up the full length of the gate. Going from one to the other is a smooth transition.
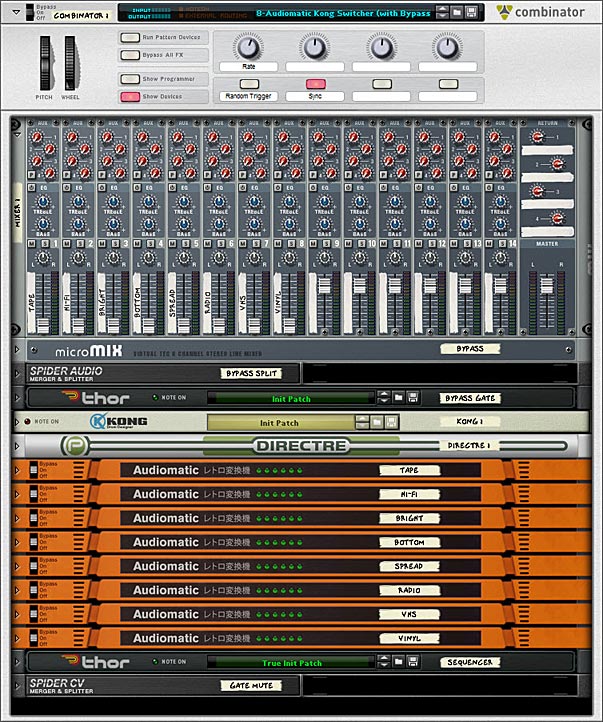
The front panel showing all the devices in the Audiomatic Retro Transformer Combinator patch.
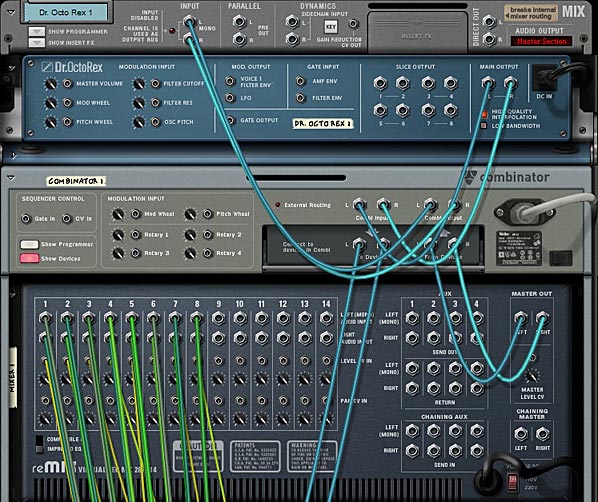
Tab to the back of the rack. Move the left / right Main Output cables from the Dr. Octo Rex to the left / right “Combi Output.” Create a new audio cable pair from the left / right Main output of Dr. Octo Rex to the left / right “Combi Input.” Create another audio cable pair from the Combinator’s left / right “To Devices” to the left / right “Main In” on Directre.
The back of the rack showing the routings between the Dr. Octo Rex and the Combinator, as well as the routings for the Main Mixer.
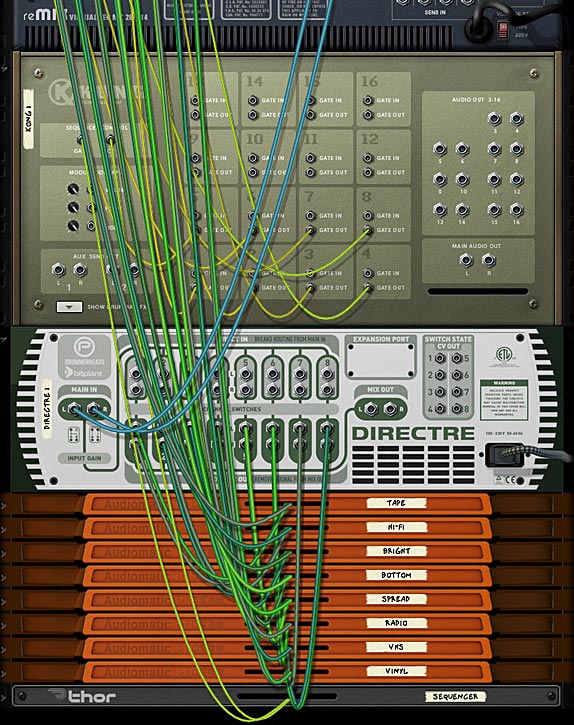
Send Channels 1-8 left / right Direct Out from Directre into the 8 Audiomatic left / right inputs. Then send the left / right outputs of all 8 Audiomatic devices into the first 8 Channels on the Mixer 14:2.
On Kong, send the first 8 Pad Gate Out CV cables to their respective Level CV In on the Mixer 14:2. However, set it up so that Pads 1-4 on Kong are going into Channels 5-8 on the Mixer, and Pads 5-8 on Kong are going into Channels 1-4 on the Mixer.
Finally, on the “Sequencer” Thor device, send the Note & Gate/Velocity from Thor’s Step Sequencer into the Kong’s CV & Gate inputs. This sets up Kong to be sequenced from Thor.
The back of the rack showing the routings between the Mixer, Kong, Directre and the Audiomatic devices.
Tab to the front of the rack. On the Combinator, label Rotary 1 “Rate,” Button 1 “Rnd Sequence,” and Button 2 “Sync.” In the Programmer, select the “Sequencer” Thor device in the Key Mapping area, and enter the following in the Modulation Routing section:
Rotary 1 > Synced Rate : 0 / 20 [Ensures you have access to the full rate of Thor’s sequencer via Rotary 1 on the Combinator]
Rotary 1 > Free Rate : 1 / 2,500 [Ensures you have access to the full rate of Thor’s sequencer via Rotary 1 on the Combinator]
Button 1 > Button 1 : 0 / 1 [Since Thor’s Button 1 sets the Sequencer in motion, this Button turns the Sequencer on when enabled]
Button 2 > Synced : 0 / 1 [Syncs Thor’s Step Sequencer to the Rate to the Song Tempo when enabled]
Set Rotary 1 on the Combinator to 72 (which equals a rate of 1/4 in the Sequencer). Then press Button 2 to set the Sequencer to Sync mode (even though it’s already set up like this by default, it engages the button to operate in Sync).
Press the Run button on the Dr. Octo Rex or press play on the Transport. This starts the Dr. Octo Rex guitar loop. You won’t hear anything though, because there’s no audio bypass. However, when you now press Button 1 on the Combinator, Thor’s Sequencer is set in motion. This, in turn, triggers the Kong Pads to play the first 8 pads randomly (and this, I should add, is wonderful for many different applications). However, you may want to play the Pads manually, or from your Pad Controller, without using the Thor sequencer. You can do this by creating a track for Kong and then going nuts on the first 8 pads. Since the audio is always going through all 8 Audiomatic devices, the switch from Pad to Pad is instantaneous. However, when no pad is pressed, you won’t hear anything. So let’s set up our Combinator so that if the Pads are not pressed, the original audio still passes through. The following explains how to set this up.
Setting up an Audio Bypass
Continuing with our above tutorial, go inside the Combinator and select the Mixer 14:2. Hold Shift down, and create a Line Mixer 6:2, a Spider Audio Merger / Splitter, and a Thor. Name the Line Mixer “Bypass,” the Spider “Bypass Split,” and the Thor “Bypass Gate.”
In the “Bypass Gate” Thor device, set the Pitch Bend Range to 0, the Polyphony & Release Polyphony to 0, and click the Show Programmer buttton. Turn off Oscillator 1, disable routing Oscillator 1 from the Mixer to Filter 1 by deselecting the “1” button, bypass Filter 1, and turn off all the Envelope (Gate Trig) buttons. Enter the following in the first 2 lines of the MBRS:
Audio In1 : 100 > Audio Out1 : -100 > MIDI Gate
Audio In2 : 100 > Audio Out2 : -100 > MIDI Gate
The negative MIDI gate values in the MBRS mean that the original unprocessed sound will shine through when the keys are NOT played. They will also cut the sound when the keys ARE played. In this case, since you have the effects loaded on the keys, the FX signal will take over and you’ll hear the effects processing the sounds while those keys are played. Click the Show Programmer button again to fold up the “Bypass Gate” Thor device.
Tab to the back of the rack, and Move the Directre’s left / right “Main In” audio cables to the “Bypass Split” Spider’s left / right Split Inputs. Send Split 1 left / right outputs on the “Bypass Split” Spider back into the Directre’s left / right “Main In.” Then send a second Split from the “Bypass Split” (Split 2) left / right outputs into the “Bypass Gate” Thor device’s Audio In 1 / Audio In 2.
On the “Bypass Gate” Thor device, send 1 / Left & 2 / Right Audio Outputs into the Channel 1 left / right inputs on the “Bypass” Line Mixer. Move the left / right Master Outputs from the Mixer 14:2 into the Master Outputs of the “Bypass” Line Mixer. Then create a new audio connection from the left / right Master Outputs of the Main Mixer 14:2 to the Channel 2 left / right inputs on the “Bypass” Line Mixer.
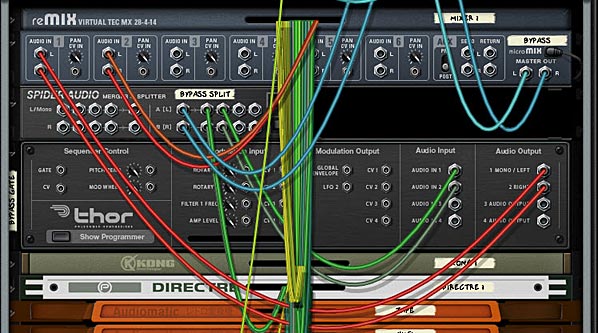
The back of the rack showing the routings for the Audio / FX Bypass setup.
Tab to the front of the rack. So far we’ve set up the routing for the bypass. As it stands now, if you press Run on the Dr. Octo Rex, you’ll hear the original loop. If you then press Button 1 on the Combinator, you’ll hear BOTH the original Loop and the Audiomatic Preset playing at once (in a Parallel manner). To set things up so that you don’t hear both at once do the following:
Hold Shift and create a Spider CV Merger / Splitter at the bottom of the Combinator’s device stack. Tab to the back of the rack. Move the “Sequencer” Thor’s Gate / Velocity CV output from the Step Sequencer into the A Split 1 on the Spider CV Splitter. Then create a new CV cable from the “Sequencer” Thor Gate / Velocity CV output into the Spider CV Splitter’s A input. Send another Split (A Split 2) into the Combinator’s CV 1 Input. Change the CV Switch on Input 1 to Unipolar.
Tab to the front of the rack, and in the Combinator, select the “Bypass” Line Mixer in the Key Mapping area. Enter the following in the Modulation Routing section:
CV In 1 > Channel 1 Mute : 0 / 1
When you press Run on the Dr. Octo Rex, you’ll hear the original loop. If you now press Button 1 on the Combinator, the original loop is muted, and only the Audiomatic preset affecting the loop will be heard. Note that with this setup, you cannot play the pads individually via your Pad Controller. If you do, you will still hear the parallel processed configuration with both the Original and processed loop at the same time. However, this gives you two methods to control the Audiomatic switching effect.
That’s it for now. Hope you find this idea useful. Try your hand at creating a 16-way switcher if you like.
In my fervent attempt to learn every single Rack Extension in the known universe, I stumbled upon Etch Red. And then I started creating, and just kept going and going and going. You see, this is part of the fun of the Rack Extensions. I’m starting to learn it’s not always about pitting the default Reason software against a particular Rack Extension. It’s just as important that a Rack Extension motivates you to create more. To that end, Etch Red was a seriously fun creative tool that allowed me to experiment on a large scale. So I thought I would share some of these experimentations with you.
In my fervent attempt to learn every single Rack Extension in the known universe, I stumbled upon Etch Red. And then I started creating, and just kept going and going and going. You see, this is part of the fun of the Rack Extensions. I’m starting to learn it’s not always about pitting the default Reason software against a particular Rack Extension. It’s just as important that a Rack Extension motivates you to create more. To that end, Etch Red was a seriously fun creative tool that allowed me to experiment on a large scale. So I thought I would share some of these experimentations with you.
You can download the patches here: Etch Red Patch Pack. There are 20 patches included: 8 Combinators (4 Instruments and 4 Effect devices), along with 12 Etch Red device patches. In order to use them, you will need Reason 6.5+ and the Etch Red Rack Extension.
I hope you enjoy the patches. And if you do, please consider donating here: [paypal-donation]
Now a little bit about the patch pack. There are two sections:
Combinators — There are 4 instrument patches and 4 effect devices, all of which make use of Etch Red.
Etch Red Device Patches — Since Etch Red can save it’s own patches, I’ve included 12 .repatch files as well.
Here is a brief description of each patch you’ll find inside this pack:
FX Combinators
Drive LP FX.cmb
This patch Combines the various drive modes of Etch Red and pairs them with a Low Pass Filter. Use Rotary 1 for the Drive amount, and Rotary 2 to switch between the seven drive modes. Rotary 3 and 4 allow you to shape the LP filter (Frequency and Resonance). You can turn the drive or filter on or off using the first two buttons. And even apply some Drive modulation using button 3. Lastly, you can Pan the Filter using button 4.
Dual Auto-Panner FX.cmb
As it says in the name, this Combinator offers up some dual panning. It uses the two Etch Red LFOs in order to Pan the audio signal. In this way, you can create complex panning effects. The Rotaries control the depth (gain) and Rate of both Pans. You can also change between two different wave types (square and sine) for both Pans using Button 1 and 2. And if you like, you can turn off the second pan altogether using Button 3. Lastly, you can sync or un-sync Pan 1.
Hi – Lo Filter Splits (BP).cmb
This Combinator splits out the audio signal into the High and Low Frequencies. The fun comes in the fact that you can apply a different Bandpass filter to these two different Frequency splits independently. Use Rotary 1 to determine the crossover frequency, and then use Rotary 2 and 3 to set the Frequency for the High and Low Bandpass filters. There’s also a few other modulations and a HP filter that you can apply to both the High and Low Frequency streams, as well as some FM application if you like (on Rotary 4).
Tremolo & Vibrato FX.cmb
Tremolo affects the level of the audio signal (volume wobble), and Vibrato affects the Filter variance (Filter wobble). Using the Combinator Rotaries and buttons, you can control both in a variety of ways. You can adjust their Level, Rate, and what wave shape is used for the wobbling.
Instrument Combinators
Dubstep Bass C.cmb
As the name suggests, this is a Dubstep Bass experiment. You can adjust Filter Frequency, Drive, FM, and Wobble Glide using the rotaries, as well as some other adjustments using the buttons. Hint: If you don’t like the wobble pattern, open up the Combinator, and change the Thor step sequencer Velocity and Step Count. The velocity controls the Rate of the LFO in Etch Red, and therefore the type of Wobble you hear.
Easy Etch Synth Pad Hybrid.cmb
This is a nice hybrid between a polyphonic synth and pad instrument. Use Rotary 3 to smoothly transition between a Synth (fully left) and a Pad (fully right). Frequency and Resonance are on Rotaries 1 & 2. And you can control the level of the Sub Oscillator on Rotary 3. Button 1 and Button 2 control various Modulations applied to the Filter Frequency and FM, respectively. And try out the Pad Wrapper on button 3, which adds a nice shaper modulation to the sound.
Hooveretch.cmb
Where Etch Red meets a Hoover style sound. There’s even a Thor Step Sequencer thrown in for an Arpeggiated rhythm. Probably one of my favorite sounds of the bunch. You can control the Filter Frequencies using the first two Rotaries, and the level of the Sub Oscillator on Rotary 3. You can also use Rotary 4 to detune the main two Oscillators. Add in some Delay, FM, and Shaper, and you have yourself a really nice rich Bass.
Memory Pad
Another Pad, I think this one has a nice upbeat sound, yet still floats in the background. It’s more Rhythmic in nature, but you can dampen that if you like by turning down the “Flicker” rotary (Rotary 3) and turning switching to the alternate Wave type (Turn button 1 On).
Etch Red Device Patches
Basic Auto-Panner.repatch
The name is pretty self-explanatory. This is a patch that allows you to pan any audio signal.
Comb Phreak.repatch
Difficult to explain. Baiscally uses a Comb along with some drive to create a pretty wild little sound. Great for a sci-fi effect.
Deep Basso.repatch
Try this one out on your Bass sounds. It tends to raise the level and spreads out the Bass sound a little for you.
Dueling Filter Sweeps.repatch
This one is a double-sweep using two slow LFOs. Try to use this on a sound with a long ADSR time, like a Pad. That way you really get a chance to hear the sweep.
Ghost Pad.repatch
This is one of my favorites, and is great for smooth Pads and textures. It creates almost a feedback echo on your sound, but it’s a slow sweeping echo. So give it some musical room to breathe. Long held notes for this one.
Grunge Guitar.repatch
How could I do an Etch Red Patch Pack without a great distorted effect for Guitar. Nuff said.
Kick Variable Enhancer.repatch
Use this on your Kicks. It adds both punch and enough variation in the Filtering / Resonance so that it doesn’t become static. Instead your Kick drum will display a little variation each time it’s played.
LFO Grind Drive Distort.repatch
Another wacky and heavily distorted sound. There’s a lot of vibration and drive in this one. Try it with a bass or synth sound. Or even a texture or drone sound.
Simple Tremolo.repatch
This is a simplified version of Tremolo, and shows you how you can wobble the level of any audio source.
Panned Combs.repatch
A very simple patch that takes the audio coming into Etch Red and sends it through two Comb filters in parallel. Then the signal is panned left and right.
Snare Variable Dual Filter.repatch
Like the Kick Variable patch, except this one was built for snares.
Whacky Comb.repatch
Something a little more “out there” using a Comb filter. Try it out for some weird glitchiness.
So that’s what you’ll find included in the free Etch Red Patch Pack. Let me know what you think. Now I have to go wrap my head around Peff’s excellent Directre Rack Extension. Deep! Until next time, I hope some of what I do inspires you. All my best.
This article will introduce you to the Etch Red RE from http://www.fxpansion.com. This RE is a powerful dual multi-mode filter that can be set up in series or parallel. It also comes with a comprehensive built-in and external modulation scheme that is unlike any other in the stock Reason program. Aside from filtering, it is capable of several tricks such as gating, stereo widening, compression, distortion, LFO wobbling, Tremolo, and Vibrato effects. To top it all off, it comes with the ability to Frequency Modulate the filters (either internally via the 2 built-in LFOs, or externally using an incoming audio source). A lot of power for a very affordable Reason device. So let’s take a walk-through and learn a little more about it.
This article will introduce you to the Etch Red RE from FXpansion. This Rack Extension is a powerful dual multi-mode filter that can be set up in series or parallel. It also comes with a comprehensive built-in and external modulation scheme that is unlike any other in the stock Reason program. Aside from filtering, it is capable of several tricks such as gating, stereo widening, compression, distortion, LFO wobbling, Tremolo, and Vibrato effects. To top it all off, it comes with the ability to Frequency Modulate the filters (either internally via the 2 built-in LFOs, or externally using an incoming audio source). A lot of power for a very affordable Reason device. So let’s take a walk-through and learn a little more about it.
Before I get into the nuts and bolts of the device, let me first point you to the PDF User Manual that you can download. This comes straight from the FXpansion site, and it’s a good idea that you have a read before jumping in. There’s a few pitfalls that you want to avoid when working with this Rack Extension, and while it’s a very nicely designed device, there’s still some areas that might cause you to scratch your head.
Next, let me point out the main features of this Rack Extension in a simple video:
It’s all about Source > Destination = Modulation.
The heart of Etch Red is all the wonderful red knobs scattered throughout the upper (Filters) and lower (Sources) section of the device. These knobs allow you to modulate their associated parameters with one or more of the 10 Sources (selected in the Middle section of the device). Indeed you can modulate one parameter with all 10 sources if you like. Where I can see a lot of people getting tripped up is when you start trying to figure out how to modulate one destination with these Multiple Sources. So here’s a step-by-step tutorial to help you get your feet wet with this concept:
Create a Subtractor, Thor, NNXT, or any other sound-generating device in Reason, or else create a new Audio Track and place some audio on this track. My recommendation is to go for a nice Pad sound to start yourself off. Load up a Pad patch from the Factory Sound Bank if you are stumped for creativity.
Create an Etch Red device underneath so that it is auto-routed to the sound device (hint: Etch Red is found in the Creative FX menu if you right-click under the sound device). If all goes well, the sound device’s Left and Right audio goes into the Etch Red device, and then back out to the Mix Channel or Audio Track.
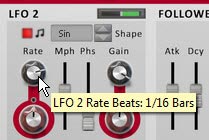
Set the LFO1 Rate to be 1/2 bars and LFO2 Rate to be 1/16 bars. Both are Synced by default. Also adjust their Gain settings to both be set to around 66%. This will remove the harshness of the LFO curve. It’s like a depth or volume setting for the modulation source.
Setting the LFO1 Rate to 1/2 Bars in the Source (bottom) section of the device
Setting the LFO2 Rate to 1/16 Bars in the Source (bottom) section of the device
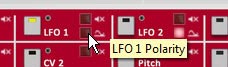
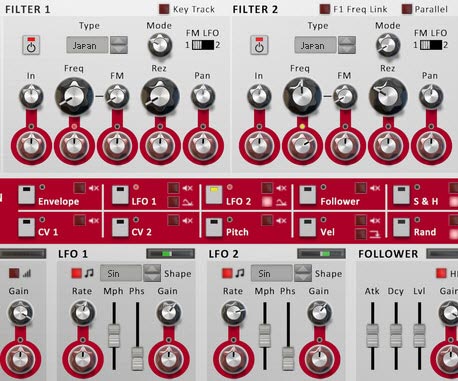
Select a Source from the middle “Modulation Source Selection” section of the device. By default, the LFO1 is selected as a source. You can see this because the little LED within the square icon is yellow. You can also select a source using the drop-down list to the right of all 10 sources. For this example, we’ll use both LFO1 and LFO2 as a source to modulate both Filter Frequencies. Keep LFO1 selected for now. Click the tiny square red LED light just to the bottom right of the LFO1 selector. Turning it off switches the polarity of LFO1 from Unipolar to Bipolar. Leave LFO2 set to Unipolar, which is the default.
The Modulation Source Selection (middle) area of Etch Red. Note that the LFO1 selector is yellow. You can select a source by pressing these square icons, or by clicking from the drop-down list (both are shown here with a black square border).
Setting the Polarity of LFO1 to Unipolar by turning the LED off. This ensures the LFO travels both negatively and positively to affect the destination parameter.
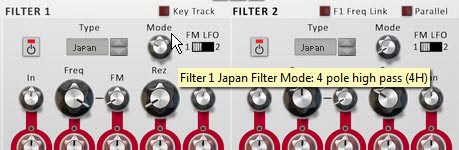
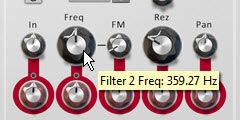
Next, switch the Filter 1 Mode to a 4-Pole High Pass Filter (4H) and the Frequency to 6 Hz (fully left). For Filter 2, leave it set to the Low Pass Filter (default), and set the Frequency to around 350 Hz or so. Also set its Resonance (Rez Rotary) to roughly 25%. Note: The Black rotaries change the parameters. The Rotaries encased in Red circles are used to modulate these parameters. So Black changes the parameters outright, while red is used to modulate them negatively (left) or positively (right).
Setting Filter 1 Mode to a 4-Pole High Pass Filter.
Setting the Filter 1 Frequency to 6 Hz.
Setting the Filter 2 Frequency to around 350 Hz and the Resolution (Rez) to about 25%.
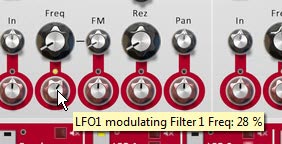
Now we’re set to actually use the sources to modulate the Filters. Using the Red Modulation Rotaries, set the rotaries beneath both filter Frequency parameters to positive 28%. You’ll start to hear the sway of LFO1 affecting the sound as you play the sound device.
Adjusting the Modulation of the Filter 1 Frequency.
Select LFO2 by clicking on the square icon in the middle section of the device or using the drop-down at the far right of the 10 Mod Sources. When you switch over to a new Modulation Source, you’ll notice that both filter frequencies’ Modulation Rotaries snap back to their original values (dead center). You’ll also notice that the small LED circle just above these rotaries turn red. This LEDs indicate that there is another source modulating this parameter. Finally, the previous source’s square selector changes from yellow to red (LFO1 in this case). Switch back to LFO1, and these LEDs turn yellow. Switch back to LFO2, the parameters go back to their default and the LEDs turn Red. Yellow = whatever is currently selected in Etch Red. Red = another value is being used to modulate this parameter.
Note: The one thing that I dislike about working with Etch Red is the fact that when you start creating complex modulations and have several sources modulating a certain Destination, there’s no immediate way to see which sources are modulating the parameter and by how much. You have to click on each source to see how it is affecting all its associated destinations. On the flipside, this does make experimenting with complex modulation assignments quick and you can easily get lost in experimentation. So that’s a plus!
With LFO2 as the selected source, change the Modulation Rotary underneath Filter 2 to a positive 50%. You now have the Frequency for Filter 2 being modulated by both LFO1 and LFO2. That’s pretty much all there is to it.
The Final Etch Red Filter, Mod Source Selection, and Sources sections. Note how LFO2 and the LED just above the Modulation rotary for the Filter 2 Frequency are yellow, indicating LFO 2 is the currently selected source, and Filter 2 Frequency is being modulated by LFO2. On the other hand the LED above the Modulation Rotary for the Filter 1 Frequency parameter is red, indicating it is being modulated by another source (in this case, LFO1).
Note: Of course, you can also modulate a Source’s Rate or Gain settings (at least for the sources listed in the top row of the Modulation Source Selection area) by adjusting the red Modulation Rotaries underneath these parameters (in the bottom section of the device). This can also open up some very complex modulations. You can even use LFO1 to modulate its own Rate and Gain. How trippy.
Getting a little more Advanced
So now that we have a grasp on how Etch Red works, I thought I would delve a little deeper into things by using the Envelope source. In order to get the envelope working, you need to send a Gate input signal into the back of the device. And what better way to trigger the envelope than with a Rex loop’s Gate output. So here’s a little video that shows a few techniques along those lines:
Everyone Loves a Dubstep Bass, right (or am I being sarcastic)?
Here’s a great video put together by FXpansion themselves that goes over the process of creating a Dubstep Bass using their device. It’s a little more advanced, but it’s a great way to showcase how some of the CV modulations can be used on the back of their device. And the sound is just cool, so I had to include it here:
More Tips and Tricks
Here are a few other handy tricks you can try out using Etch Red.
Fun with Distortion: Unsync LFO 1 and select it as a mod source. Set its rate to somewhere around 100-600 Hz. Set the output level to -14 dB. Turn up the Drive Mod Rotary slowly. adjust the LFO 1 Rate, Mph, and Drive Types until you find something you like. Great for basses.
Tremolo: Select the LFO 1 as a mod source and click the Polarity LED to make it bipolar. Adjust the Level Mod rotary set to a small amount in either direction for Tremolo.effects.
More Shapes: Create a Malstrom and from the back send Mod A into Etch Red’s CV 1 input. You can now use Malstrom’s 31 waves as a source to affect any Etch Red Modulation.
Dual Filter Gates: Turn off Drive and Filter 2. Set LFO 1 & 2 with “Square” shapes. Ensure the rates are synced, but different for each (ex.: 1/4 & 1/16). Keep the Gain full. Select LFO 1 as a source, and Set Filter 1 to Low Pass (Japan, SVF, or Fatty). Set the Frequency to 6 Hz (full left). Then turn the Frequency Mod Rotary to 100% (full right). Now select LFO 2 as a Source and use it to modulate the same Filter 1 Frequency in the same way (Mod Rotary to 100% – full right). Adjust the depth of both LFOs by adjusting their Gain values.
Auto-Panner: Set LFO 1 to Bipolar. Then use LFO 1 as a source adjusting the Pan Mod Rotary for Filter 1. Adjust the LFO 1 settings to taste.
FM Audio Fun: Try sending audio from a Loop or a synth into the Filter 1 and/or 2 FM inputs. Then on the front, turn up the FM Rotaries, and adjust the Filter Freq & Res to taste. Noise and Saw Oscillators are great audio inputs too (though you may need to raise their volume). For further manipulation, assign an LFO to modulate the FM amount.
Envelopes: To use the Etch Red Envelope, you need to send a CV signal into the Gate CV input on the back. Try sending a matrix Gate CV into the Gate CV input. Now put together a gate pattern in the matrix. Alternately, you can send a Curve CV from the Matrix. Now you can use the Envelope modulation source to modulate any Etch Red Mod Parameters.
Key Tracking your Filters: To use the Etch Red “Key Track” feature, create a Sequencer Track for Etch Red. Then copy MIDI data from another Track (some monophonic data works best). Then reduce the Filter Frequency. When you play back the Sequencer, the Filter will follow the MIDI track, and will in essence be following the musical track from which you stole the MIDI data. Or you can just play along on your keyboard to track the Filters.
Internal Pitching: Try sending the LFO 1 CV output to the Pitch CV input on the back of Etch Red. Then turn on Key Track on the front, and set up your Filter. Choose a Fatty LP filter for a nice bassy sound. Set Freq to about 185 Hz, Rez to 70%, and set LFO 1 Rate to 34 Hz, Free-running, and Mph to about 77%. Oh yeah, some nice Bass Wobbling.
Hope you enjoy Etch Red as much as I do. It’s capable of quite a lot. If you have any other ideas, tips and tricks, please share them with the class.
Reason is one heckuva great program. Reason is the reason I’ve created all these tutorials. Perhaps one of the most overlooked aspects to the program is the creation and usage of Templates. These amazing time savers can reduce your time to creating tracks immensely, and if you don’t use them now, hopefully you’ll realize their value after you read this article, and use them as an integral part of your process. So let’s get busy!
Reason is one heckuva great program. Reason is the reason I’ve created all these tutorials. Perhaps one of the most overlooked aspects to the program is the creation and usage of Templates. These amazing time savers can reduce your time to creating tracks immensely, and if you don’t use them now, hopefully you’ll realize their value after you read this article, and use them as an integral part of your process. So let’s get busy!
You can download the project files here: 3-templates. They contain 3 Templates that I have used in the past. The first template Album Session – Dark is exactly that. It’s a template I used when I was coming up with the songs for my “Dark” album. It contains all the starting things you would need (Drums, Bass, and two audio tracks). I used Redrum channel 1, 2, and 3 to mix together 3 bass drums. Channel 4 & 5 were for the Snare sound, and channel 8 & 9 for the Hi Hat. The Bass Drum is processed through a Pulverizer and is also used to sidechain the Bass. I put a simple drum track in the Redrum Pattern Sequencer and Bass track in the Main Sequencer so you can see the setup. The audio tracks were used to include samples that I stretched out to be a super long length and in effect created the Pad sound. I also sometimes threw in an Alligator to apply to the Bass or the Pad sound on the audio track. There’s also some basic mastering in the Master Insert device, and two Reverb Send FX. It’s pretty basic, but gives you an idea of how to set up a template for use as the main song starter for an entire project. There’s a million different directions you could go with this idea. Normally, after loading this template, I would change out the drum and bass sounds, and create a new pattern (or several) in the Redrum. I would also play a different MIDI pattern on the Main Sequencer for the Bass, and change the Bass instrument. Essentially, it’s just an empty shell. It’s up to you to fill it with your own MIDI, Patterns, and instruments.
The second template is the ReDrum Submix which I used to use prior to Record and Reason 6. It submixes a Redrum into its own 14:2 Mixer, and then routes that mixer to the Main Mixer for the song. Again, a simple pattern was added into the ReDrum to give you an example. This also uses two BV512 Vocoders as Spectrum Analyzers to monitor your sound. The third template, Sound Design is one that I still use when I want to create some new patches and sounds in Reason using the stock 3 synth devices. There’s one of each of these devices, and all the parameters are set to zero. In addition, there’s a Matrix sequencer attached to each one. This way, you can start from the ground up on any device you wish (you just need to give the correct device focus – on startup, the Subtractor has focus). Since all parameters are set to zero, you have to build the whole patch from scratch. The Matrix devices are in there so that you can use a simple pattern to play the device, instead of playing via your key controller. This can make it easier when you want to focus on changing parameters and let the Matrix handle the device playback. Note that you should also test out your patches using the key controller, as this can help you with things like key range, velocity settings, etc. Either way, you can use the Matrixes or not.
What is a Template?
A Template, put simply, is a Reason song file (.reason). It cannot be any other file type. It is used as a starting point for document development (usually a song; however, it can also be used as a Mastering Template, Sound Design template, Loop Template, or any other purpose that you have for Reason files). It can contain anything that can be saved in a Reason file, which pretty much means anything and everything in the Reason universe.
The concept of Templates is nothing new. You find them in Microsoft Word, Excel, and Adobe products, such as InDesign as well. If you think about what happens when you first use any of your programs, you usually start off with a New, empty document. Then you perform a few common tasks. For example, you open up a new Word document to a blank page, then you may change your styles to reflect what you want to write, show hidden text to show you paragraph markers, maybe add a specific layout, create a two-column setup, write a basic introduction, and add a Table of Contents. After a while, you realize that you keep performing these same tasks at the start of every new document. Well, what if instead when you open that new document, all of these tasks were already performed, allowing you to “skip over them” and get straight to writing the content of the document. This would save you a lot of time right?
Enter the concept of the “Template.” The Template takes all of the common tasks that you perform at the start of a new document, and puts everything in place for you so you can get right to work. In the Reason world, this might be including a set of Send effects, or your own personal mastering template before the audio output goes to your audio card. If you use the same drums or bass or other instruments, you can include them and they, in turn, can have their own inserts. If you find you are always including 3 audio tracks in every song, you can add the tracks and have them ready to go the next time you start off your document. Channel strip settings, MIDI data on the sequencer, automation, Blocks, CV and Audio routings. All of these things can be saved into a Template.
Then, the next time you want to start a song, you can open up your Template and get to work unfettered by all the repetitious and dull start-up nonsense. It’s the equivalent to starting off a road race half-way to the finish line. While everyone around you starts way back at the starting gun. Then, once you’ve added your new (unique) work into the mix, and save your document, you’re NOT saving over top of the Template. You’re saving your work to a new file. It’s like using “Save As” in reverse. Instead you’re using “Start As” to start off a new document as a Template. And this is an important point. Your template remains the same and is stored into its own special folder. When you open it to start a new document (from File > New from Template), you are opening a “copy” of that Template document. When you then go to File > Save or File > Save As, you saving this “copy” of the file, not the Template itself. The only time you can overwrite a Template is if you actually go into the Template folder and save over your Template, or delete the Template from the Templates folder directly.
Navigating Templates
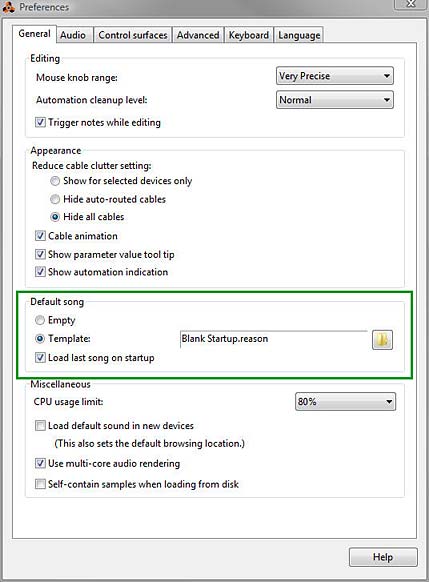
Let’s start with a simple premise: A lot of users don’t know where the templates file is stored. Furthermore, most people confuse a “Template” with a “Default Song.” These are not the same thing. The Default Song can be accessed from the Edit > Preferences folder (on the General tab), as shown below:
The Default Song options from the Edit > Preferences > General Tab Menu
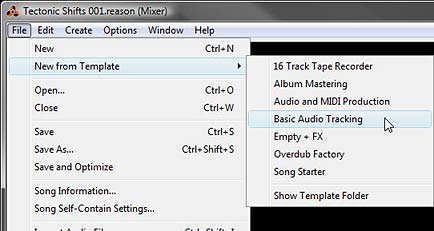
The Default Song parameters set up what you want to happen when you open Reason. If you want to always open Reason with a Template song, you can do so by selecting the “Template” option. However, this is very different from the Templates you can access once Reason is open. In this case, a Template is accessed from the File > New from Template menu, as shown below:
The File > New from Template sub-menu where you can access all your stored Templates.
You’ll notice a few things. First, you already have a few default templates stored here, which are nice to look at and explore. You might also find a Template or two that fit your own working process. Second, you’ll see that there is a “Show Template Folder” option at the bottom of the list. This is handy to point you to where your Template Folder is on your machine (I’ll get to this in a minute, as it’s different for different operating systems), and also a handy way to open the Template folder and delete Templates quickly (again, more on this below). Third, and most importantly, after a while the inevitable question will pop into your head: “How do I add my own Templates”?
So let’s deal with the question: “Where are your Templates stored”? All templates are stored in the following folder. Note that your location varies depending on your operating system:
PC (Win Vista)*:C:\Users\[User Name]\Application Data\Propellerhead Software\Reason\Template Songs
PC (Win7)*:C:\Users\[User Name]\AppData\Roaming\Propellerhead Software\Reason\Template Songs
MAC (OSX):\user\Library\Application Support\Propellerhead Software\Reason\Template Songs
* Note that in Windows, this folder may be hidden. You will have to unhide your system folders in order to see it. In Windows 7, open your “Control Panel > Folder Options > View Tab,” and select the “Show hidden files, folders, and drives” radio button.
* Note also that if you have moved the “Users” folder or mucked about with the system folders in Windows, you can open an Explorer window and type “%appdata%” into the path entry (search field) at the top. This will open up the “Roaming” folder. From there, you can navigate to “Propellerhead Software/Reason/Template Songs.
So once you have your template set up the way you want, you’ll need to first save your song into the above folder. Then you can open it from File > New from Template > [Your Template File].
Note to Props: It would be nice to have a direct command under the File menu that allows you to “Save As Template” which opens the “Save As” dialog directly navigated to the “Template Songs” folder. This way you could easily save any document you’re working on into the Template Songs folder. Just a thought.
Building a Template: The Checklist
Everyone will have their own purpose for creating and using a Template. As you create your template, it’s a good idea to look at the checklist below and cross out those areas that don’t pertain to you, and check off those that do. Doing this while you create a Template will ensure you don’t forget something in the process. As you create more Templates, you’ll need to rely on this list less and less. I might have missed a few things, and if so, let me know and I’ll update the list below. Print it out and make a few copies the next time you create your Template.
Purpose of Template? (Song Structure, Mastering, Startup document)
Edit > Remote Override settings
Master effect inserts (Rack)
Send effects (Rack)
Audio channel devices (Rack)
Audio track (Sequencer)
Audio track clips (Sequencer)
Audio track clip labels (Sequencer)
Audio track clip colors (Sequencer)
Audio data in the clips (Sequencer)
Mix channels (Rack)
Instrument devices (Rack)
Instrument track (Sequencer)
Instrument track clips (Sequencer)
Instrument track clip labels (Sequencer)
Instrument track clip colors (Sequencer)
MIDI data in the clips (Sequencer)
Instrument device inserts (Rack)
Pattern devices (Rack)
Pattern data in the devices (Rack)
Pattern track (sequencer)
Pattern lanes (Sequencer)
Pattern lane clips (Sequencer)
Pattern lane clip labels (Sequencer)
Pattern lane clip colors (Sequencer)
Blocks (Sequencer – Block mode)
Blocks (Sequencer – Song mode)
Block labels (Sequencer – Song mode)
Block colors (Sequencer – Song mode)
Audio routings (Rack)
CV routings (Rack)
Mixer Channel Strip settings for each device (Mixer)
Master Channel Strip settings (Mixer)
Master Bus Compressor settings (Mixer)
Device labels (Rack)
Screen Layout (Rack/Mixer/Sequencer combined or split, F4 Keyboard on/off, etc)
Now for the naming of your Template file. Create a naming structure that you will understand. It may not seem important right now, and yes you can always change file names later. But if you start off organized, you’ll benefit as your Template list grows in size. Since you can’t currently create folders for hierarchy, the Template name becomes even more important. So keep the first word in the file name reserved for hierarchical purposes. Here’s what I recommend as an idea:
Mastering – Dubstep – Brickwall
Mastering – Dubstep – MidSide
Mastering – Electronic – Kompact
Mastering – Rock – Subtle
Mastering – Rock – Wide
Startup – Empty – 3 Windows
Startup – Empty – 1 Window
Startup – Sound Design – Combi
Startup – Sound Design – Synths
Structural – Electronic
Structural – House – ICVCVO
Structural – House – ICVBCVBO
Structural – Rock – CCVCVO
This type of hierarchy is merely a small example. It provides for the three main reasons for using templates at the top level: Mastering, Song Startups, and Song Structures. The second level provides for the type of genre you’re working on. And the third level provides the type of Mastering or the type of Song Structure (I=Intro, C=Chorus, V=Verse, B=Break or Interlude, O=Outro). Song Starters are a little different. I usually use the second level to provide the focus, and the third level to narrow that focus. This will make navigating your template folder easy and save you time when looking through a very large list. You could even add numbers if you have two different templates for the same type of Mastering or Song Structure Template. If you do this, the numbering should probably go at the end as a fourth level. And with everything, this is only a suggestion for keeping things neat and tidy.
I also didn’t include a category for “Album Mastering” but of course you can add this as well. There are two or 3 default templates that show how Templates can be used in this manner. In this case, you add the amount of audio tracks (Audio Channel devices) into your Template document. Each track represents a song in your album project. You then add the appropriate sends/mastering devices that will be used for all the tracks. Then anytime you have a project, you open up that document and start adding your tracks into the existing channels. In this way Reason becomes your track recorder/master.
Templates for Power Users
Once you get comfortable with Templates, you’ll realize you can create as many of them as you like. Perhaps you’ll create a new Template for each album or EP project. Or, you might want to create a few different templates for different genres or recording situations. The point is, you’ll start developing your own Template folder. There’s a few key things that I would recommend if you’re going to become a Power Template User:
Unless you use any of the default Templates regularly, create a “Default” folder in your “Template Songs” folder and move them all into this folder. Note: Any folders created under the “Template Songs” folder won’t show up in the “File > New from Template” subfolder in Reason. Then enter any Reason song files you want to use as Templates into the main “Template Songs” folder. These songs will show up in the File > New from Template submenu, and it’s dynamic, meaning that you don’t have to first shut down and then restart Reason in order to see them in the submenu. They are just magically there once you place them.
Note to Props: It would be nice if the folder hierarchy does show up under the File > Template Songs folder, in the event that power users want to categorize their Templates. Just a thought.
Remote Overrides (under Options > Remote Override Edit Mode) can also be saved with your Template. This means that you can use Templates as a “Remote Template” for any controllers you have connected to your computer. A nice handy way to instantly call up a Controller setup (especially for live recording).
I have it on pretty good authority that some artists use Templates to create their own “song structure” templates, complete with instruments, sends, inserts, mastering, MIDI, etc. Then they use these templates to switch out instruments. This becomes their entire process, creating several songs that have the same basic structure but sound different. While this is perfectly valid and I wouldn’t argue against doing this (I think it’s quite ingenious actually), I would add a word of caution. Templates are powerful things. But don’t let them stop you from starting off your songs with a completely empty slate as well. It’s the only way to grow and enhance your skills. So if you DO end up going in this direction, don’t neglect the artistic or creative side of starting projects off without a Template, at least every now and then.
As with anything you do on your computer, make a backup of your entire “Template Songs” folder somewhere outside this folder and outside the evil clutches of the Reason install (and preferably on a completely separate external drive or backup drive). I’m joking of course, as I don’t know if any files in this folder get overwritten. It’s quite possible that on your next install, the default Template songs will merely be added back into the folder in a gleefully chummy way next to your other personal Template files. But if not, or if something crashes, you can just copy this backup folder and paste it over the post-installation “Template Songs” folder. And hey, it’s backup. You should do this regularly!
So that’s Templates in a nutshell. I really didn’t think this article would end up being so long. But it seems there were a lot of things to discuss. Hopefully this helps you understand them, navigate through them, create them, and use them. So go forth and create some cool templates and please share them with me if you have some great ideas. I’d love to take a look at your inner workings. If we all shared a few templates, we’d all raise our game and learn a few things along the way. So let’s see what you’ve got! All my best and happy music making.


 Robert Anselmi’s Reason101 Visual Guide to the Reason Rack