Basic Subtractor Patch Pack

Most people that have used Reason since version 1.0 might already be very familiar with the Subtractor. It was the first synth in Reason, and at the time, was the only synth in Reason. However, if you are just coming into Reason right now (version 6.5), you may not have ever used the Subtractor. Or maybe you haven’t touched it in a very long time. So this article will present some of the basic building blocks of Subtractor sounds. Use these 25 patches as starting points for your own creations, or use them as is. What I tried to do here is show some of the capabilities of the Subtractor synth via example patches. There’s no CV, no Combinators. Just straight single Subtractor sounds. As well as some tips for working with this — still amazing — synth.

Basic Subtractor Patch PackMost people that have used Reason since version 1.0 might already be very familiar with the Subtractor. It was the first synth in Reason, and at the time, was the only synth in Reason. However, if you are just coming into Reason right now (version 6.5), you may not have ever used the Subtractor. Or maybe you haven’t touched it in a very long time. So this article will present some of the basic building blocks of Subtractor sounds. Use these 25 patches as starting points for your own creations, or use them as is. What I tried to do here is show some of the capabilities of the Subtractor synth via example patches. There’s no CV, no Combinators. Just straight single Subtractor sounds. As well as some tips for working with this — still amazing — synth.

You can download the patch pack here: Basic-Subtractor. It contains 25 Subtractor patches that are used as examples to show how various basic sounds are generated with the device. Use these as they are, or use them as springboards for your own designs.

So try out the patches, and if you like them please consider donating: [paypal-donation]

The Subtractor is a very straightforward 2-Oscillator synth that is based on subtractive synthesis. It’s modelled to react in the same way an Analogue synthesizer would, even though it’s a digital recreation of one. Its subtractive synthesis engine means that the Oscillators make up the tones, and these tones can be shaped and whittled down between each other, and with mixing and filtering to remove or subtract parts of the sound for a final outcome. Creating sounds is like covering up an entire canvas with a coat of black , and then painting by removing those black areas to reveal the painting underneath. Or rather, painting using the negative space, as opposed to the positive space. This is the basic idea that forms the wealth of sounds you can gleen from the device.

The following shows the Subtractor device, with the “Init Patch” loaded. The Init Patch is used as a starting point for building sounds. Note that the Init Patch does not start at ground zero, and instead is an actual patch that generates an actual sound. I find that in some circumstances you may want to start at ground zero. In this case, you can set all the sliders and knobs to their zero or center position and save the patch. This way, you can always load your new “Init Patch” anytime you like. I’m sure only the die hard sound creation gurus will go to this trouble, but if you are new to any synth, it’s always better to learn from the bottom up, than to have half a sound already generated for you. But that’s just my own opinion.
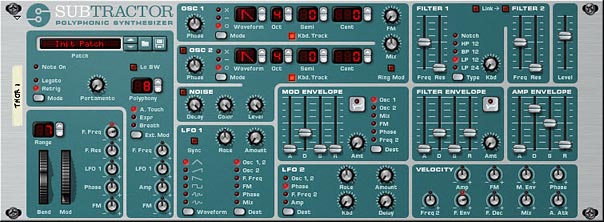
The Subtractor Synth Device
The Subtractor Synth Device. When the device is “Reset” from the context menu, the initialized patch is entered. This is used as a starting point from which you can build your sounds.

The Patches

Following are the various patch examples you will find within the patch pack, along with a brief description and key features of each. The idea behind these patches are to show you the versatility of the synth, and show some of the types of sounds it can produce. Of course, there are many more kinds of sounds. An oboe, bassoon, an ambulance siren, and the list can go on. I encourage you to try your own. But hopefully these can get you started and give you some ideas of how to work with the Subtractor.

  • Bass Example
  • Bass Wobble Example
  • TB303 Example 01
  • TB303 Example 02

These patches are probably the type of sound that is most commonly associated with the Subtractor: Bass. Octave separation between the two oscillators is key here, along with the right kind of filtering and amp envelope.

  • ChipTune Example

This type of sound is one that you’d find on any video game console from the ’80’s. The key to this kind of sound is use of the LFO set to square wave and modifying Oscillator Pitch. This creates the arp feel of the patch. In addition, the Band Pass Filter and setting the envelopes to a full decay and all other envelope parameters to zero gives the sound a minimal 8-bit feel. If you wanted to, you could use the Noise generator to add a little distortion to the sound. But it’s usually better to add a Scream FX unit set to “Digital” damage mode in order to recreate some “crunch” to the sound. Be sure to also keep the Oscillator waves simple as well. Remember, you’re trying to recreate very basic technology here.

  • Filter Sweep Example

This shows you how the Filter Envelope can be used to sweep the filter in your sounds.

  • Flute Example
  • Horn Example

These two patches show you how you can create some wind instruments. One of the keys to recreating these types of sounds is using the sawtooth oscillator and proper filtering. A little modulation helps as well. Generally, I find wind instruments use either Sawtooth or Sine waves, and benefit from a HP filter in Filter 1 and a then the Low Pass filter 2. Some tweaking with the envelopes and a little modulation affecting the pitch to give it a jump in pitch at the beginning can recreate the “blowing” sound that starts at the beginning of these sounds. As with everything in patch design, the devil is in the details.

  • FM Texture Example

Shows how using FM can give a whole new perspective to your sound, and can often generate interesting textures. FM, as well as Ring Mod can make the sound very unnatural, distorted, or even metallic. See the next “Glockenspiel” patch.

  • Glockenspiel Example

This is an example of a glock — or bell-like sound. The use of the Ring Mod feature is what really makes the sound here. The example presented is tonal, because the Oscillators are set one octave apart. But you can get some really interesting atonal bell sounds by separating the Octave in weird degrees (for example, try separating them by 6 or 9 semitones, or play around with odd “Cent” differences).

  • Guitar Example

Guitars are difficult — probably the most difficult — to reproduce. But if you can reproduce a piano sound with a synth, you can take an extra leap to try a Guitar sound as well. The two actually share some similar concepts I think. And while the Subtactor isn’t perfect for guitars, they are still do-able. I found that using Wave 15 in Oscillator 1 paired with a sawtooth provided the raw tones. Then a Bandpass filter 1 going to the Low Pass filter 2 seemed to work out well. I then set the Filter and Amp envelopes to similar values, with medium Decay and Release on both. Keep the Attack at zero to give that initial hard attack. The sustain is tricky, and you can leave it out if you want, or add just a little bit to keep the sound going. That’s your call. The other key to this sound is adding a little FM for a metallic sound. Then turn the Mix knob all the way left so that you’re only hearing the FM Carrier (Oscillator 1). That’s the basis for a typical Subtractor Guitar sound. But play around to see what type of sounds you can build from this technique.

  • Hi Hat Example
  • Kick Drum Example
  • Snare Drum Example
  • Tom Tom Example

These are some Drum examples. While all the drums are different and Subtractor is capable of producing a wide variety of drum sounds, there are some common characteristics. For example, most drum sounds don’t have any Sustain, and also have extremely short Attack — usually set to zero. There is minimal Decay and Release as well. So set up the Amp envelope with this in mind. In addition, your drums may or may not require pitching up or down, so you can disable the keyboard tracking for the Oscillators. Then use the Oscillator tuning to get them to sound accurate (usually in the lower register). This way, the drum will sound at the same pitch no matter where you play it on the keyboard. However, this may or may not be what you want.

Filtering is also important for drums. Generally, Bass, Snare, and Tom drums use Low Pass filtering. While Hi Hats, Crashes, Cymbals, and the like use Hi Pass filtering. The Noise generator can be very helpful here as well. For low Bass Drums, be sure to turn the Color knob closer or all the way left. This brings the register of the noise downward. For more of a biting drum, like a Snare, turn the Color knob closer or all the way to the right.

  • Mod Pad Example

Here’s an example of a Pad – a String Pad actually, which use two Sawtooth Oscillators (great for achieving nice string pad sounds). The idea behind creating a nice Pad sound, in my opinion, lies in two areas: A) The Amp Envelope settings, which are fairly slow. This means that the Attack, Decay, Sustain, and Release are generally pushed up quite high (over a value of 60 in most cases). And B) The modulations you create, which are usually slow as well. This can be anything from the LFO affecting the Mix or Amp, while the Mod Envelope affects the Phase of the Oscillators. The Rates for the LFOs should be set fairly slow (Rate knob more to the left) and the amount values should be subtle (more to the left) as well. This creates very soothing and meandering sounds which work well for Pads.

Of course, never forget that rules are meant to be broken, and nothing here is set in stone. I’m just presenting you with some generalities.

  • Morse Code Example
  • Noise Doppler Example
  • UFO Effect Example

These three show how you can create various special effects with the Subtractor. The Morse Code patch is a good example of how you can use the Random LFO 1 applied to the Filter Frequency in order to create a random Morse Code Sonar sound. Depending what Oscillator you are using and how it’s filtered, you can have it sound like a Telegraph, if you like. So give that a try.

The Noise Doppler Effect is a good example of how you can use the Noise generator on its own, without any Oscillators. The noise is modulated with the two LFOs to create a pseudo-doppler effect. Then the Mod Envelope is used to control Frequency Cutoff on the Low Pass Filter 2. And the Filter Envelope is affecting Filter 1. This all creates a double filter sweep that brings the sound in slowly as it’s sustained. Try playing a chord and note how the sound gets louder over time (as the filters are opened). The LFO 2 plays its part as well by cycling the Amp. A lot of mods working in tandem to affect a very simple Noise generator. Fun stuff!

And finally there is the UFO effect which showcases how you can create some interesting Alien-type sci-fi sounds. As with all the patches here — but moreso in this particular patch, try using the Mod Wheel to show some variation in the sound.

  • Organ Example 01
  • Organ Example 02
  • Piano Example 01
  • Piano Example 02

These four patches are examples of how to recreate organ and piano sounds using the Subtractor. I don’t know about you, but I find programming Pads, Pianos, Organs, and Basses are probably among the easiest types of instruments to reproduce with the Subtractor. I’m not going to go into all the details of how these patches are put together, because they all use different settings, Oscillators, Filters, etc. And you can take a look at them for yourself and then try your hand at creating similar kinds of sounds. I would say that a good starting point is a Sine wave and Low Pass filter though. Sometimes a Notch filter can work well. It all depends. So here are four examples.

  • PWM Lead Example

This shows how the Phase is used to offset and modulate the Oscillator wave, creating “Pulse Width Modulation” (or PWM for short). This is also referred to as “Phase Offset Modulation” (POM). Essentially, its the same thing.

  • Rhythmic Example

In this patch I tried to show how you can get some very complex rhythms using the two LFOs and the Mod Envelope together. The Mod envelope is applied to the pitch to create a sound that continually moves downward. LFO 1 is applied to the Filter 1 Frequency Cutoff to create a gate-like rhythm to the sound. And LFO 2 is applied to the Phase to create a PWM as Phase is swept back and forth. 2 things you can do: A) Try reversing the direction of the sound by inverting the Mod Envelope (click the upside down ADSR graphic button at the top right of the Mod Envelope section). B) Try adjusting the Rates of the LFOs. You can sync them to each other by keeping their rate values identical. You can separate their sync by using two different rates. It’s up to you. But this is different than syncing the LFOs to the tempo of the song; something else you can try out.

Tips for working with the Subtractor

Aside from the basic Oscillators, there are several other wave samples that are hard-coded into the device (represented by waves 5 through 32 in the Oscillator slots). Then there are the usual things that are familiar to most analog synths: 2 filters, 3 envelopes (Amp, Filter, and Mod), 2 LFOs, Noise generator, FM and Ring Modulation, Pitch Bend & Mod Wheels, and a very extensive Velocity parameter section. All of this should be familiar to the synthesist and sound designer, and I’m not going into all the ins and outs here. The Reason User Guide is an excellent resource which goes over most everything you will need to know in order to get familiar with the Subtractor.

What I do want to cover here are a few pointers that may not be obvious when using the Subtractor, or might cause some confusion when you begin to work with it. Think of this as some additional insight into the device which sooner or later you would figure out on your own. Maybe this might save you the trouble?

  • The Subtractor is monaural in two senses: It creates a single channel of sound, and can only generate one sound at one time. However, the device is polyphonic, in that you can play that same sound using multiple keys (think: chords). The number of keys that can be played at the same time is set up in the Polyphony setting (1-99). However, what you may not know is that some of the modulation is polyphonic as well. I know this sounds a little counter-intuitive, but here’s the deal: If you set up your patch to have a Polyphony setting above 2 (usually you want this higher at 8 or 12), then you can use LFO2 to affect the Oscillator 1 & 2 Pitch, Phase, Filter 2 Frequency Cutoff, or Amp. If you do this, playing a broken chord (one note after another) results in an LFO that retriggers separately for each note. This is different than the LFO 1 in the Subtractor, which is a global or monophonic LFO, meaning it does not retrigger with each new note.
  • Using the LFO 2 to affect the Amp is the way in which you set up Tremolo. It’s a shame that you can’t apply this Tremolo to the Mod Wheel inside a Subtractor patch (a fairly common Mod Wheel assignment), however, you can do this if you put the Subtractor inside a Combinator, and assign the Subtractor’s LFO 2 Amount to the Combinator’s Mod Wheel.
  • Those who are new to the Subtractor may not know that in order for FM or Ring Mod to function, you need to have both Oscillators enabled. This is because both of these features rely on the interaction between the two Oscillators. In addition, if you want to hear only the Frequency Modulated sound, without the Modulator, turn the Mix knob fully left. If you want to hear the Ring Mod sound without the Modulator, turn the Mix knob fully right.
  • The Noise generator is also similarly connected to the second Oscillator output, which means turning the Mix knob fully left while the Noise generator is on will reveal nothing from the Noise generator. To hear the Noise generator fully, turn the Mix knob fully right. Therefore, to get a mix between the Noise generator and an Oscillator, turn off Oscillator 2. Instead, set up Oscillator 1, turn on the Noise generator, and keep the Mix knob centered. If you instead want a pure noise sound, keep Oscillator 2 turned off, and turn the Mix knob fully right. This removes Oscillator 1 from the Mix and fully introduces the Noise generator.
  • And as with all rules of thumb, there are always exceptions. If you disable Oscillator 2 and enable the Noise generator, you can still use the FM knob to modulate Oscillator 1 with the Noise generator (remember that the Noise generator outputs where Oscillator 2 is output). You are effectively using the Noise generator as the second Oscillator, and this is used as the Modulator to Frequency Modulate Oscillator 1. So yes, there are exceptions. And while all of this may sound complicated, it’s really not. Think about it. Turn on Noise, increase FM, and turn the Mix knob all the way left. Then experiment with the various Oscillator 1 and Noise generator settings to see what you can come up with.
  • If your Oscillators are set to “o” as opposed to “-” and “x,” then the Phase knobs have no effect on the sound. Phase only works with subtractive (-) and multiplied (x) modes. You can, of course, set up mode combinations where Oscillator 1 is set to subtracive (-) and Oscillator 2 is set to “0.” In this case, only the Oscillator 1 Phase knob will have any impact on the sound.
  • The Velocity section can have an amazing impact on how the sound is played, and has a wide array of options. However, where a lot of new users get confused is in how to set up the Velocity knobs. First things first. Set up a matrix or Thor Step sequencer to play a single note repeatedly at a relatively slow speed, and create a velocity ramp up and down over the duration of the sequence (ramp the full range of the velocity). This sets up the sound to be played at the same pitch, with only the velocity changing as the notes are played. It also helps you to hear what’s going on with velocity. With that done, start experimenting with the 9 velocity knobs to hear how they interact and affect your sound.
  • Another thing to keep in mind when adjusting velocity parameters: When the knobs are dead center, velocity has no effect on the parameters. Turn the knob to the left and velocity has a negative impact on the parameter in question. Turn the knob to the right and the velocity has a positive impact on the parameter in question. In simple terms, if you adjust the Amp velocity in a positive way, the sound becomes louder the harder you play your keyboard (normally what you would expect). However, you can reverse this relationship by adjusting the amp velocity knob in a negative way, so that the sound becomes quieter the harder you play your keyboard.
  • And more about the velocity parameters: Note that if you have a parameter that is adjusted fully one way (for example, the Filter 1 Frequency slider is set to 127 or fully open), then adjust velocity to increase this parameter in the same direction (for example, the Filter Frequency velocity knob is adjusted in a positive direction), the velocity will have no impact on the sound. This is because the Filter Frequency is fully open, and can’t go any further. You could, however, adjust the Filter Frequency in a negative direction in this example, in order to close the filter the harder you play your keyboard.
  • Finally, one last note about the Phase Velocity parameter. Adjusting this will adjust both Oscillator Phase knobs in tandem by the same proportion. This means if you have one Phase knob set to 40 and another Phase knob set to 80, with the Phase Velocity knob set to 10 (positive), when you play the keyboard at full velocity, the Phase knobs will sound as if they are set to 50 and 90, respectively. You can, of course, set up one of the Oscillators to a mode of “o” as outlined earlier, so that the Phase of that Oscillator has no effect on the sound. Of course, this can change the sound. This tandem shifting of Phase is also true of the Phase knob that can be used as a destination for the Mod Wheel. So bear this in mind when adjusting these two parameters.
  • In case you were ever wondering, that second filter in Subtractor is a 12 dB Low Pass Filter, and it cannot be changed to any other Filter Type. Also, when working with it, turning it on will mean that the sound passes through Filter 1 and then into Filter 2 (Serially). With this setting, you can use the Frequency Cutoff sliders of both filters independently (and in some interesting ways — for example, setting up a High Pass Filter 1 and then having it go through the Low Pass Filter 2). Alternately, you can “Link” the Filters together. When they are linked, the Frequency Cutoff of Filter 1 controls the Cutoff of both filters (but the relative position of Filter 2’s Cutoff Slider is maintained). For example, if Filter 2 is set to 50, and Filter 1 is set to 80, moving the Filter 1 Cutoff Slider down to 70 will also reduce the Filter 2 Cutoff to 40. They work in tandem. Note: Low Cutoff Frequencies with High Resonance settings can produce severely loud sounds. This is amplified by the “Link” feature. As such, it’s always a good idea to A) Turn down the Resonance for both filters to zero before applying the “Link” button. And B) Turn down the volume if you are experimenting with the Resonance of either filter while the “Link” button is activated.
  • Filter 2 does have its own dedicated Filter Envelope. Use the Mod Envelope with a destination of “Freq 2.” Now you can control Filter 1 Frequency Cutoff with the Filter Envelope and Filter 2 Frequency Cutoff with the Mod Envelope, all at the same time. This allows you to create some pretty complex filtering in your patches.
  • Lo BW. Unless you are rockin’ out with your PII Pentium 200 Mhz computer from 1994, you will never need to enable this feature. Just pretend it’s not there.
  • Want a fatter sound? If both Oscillators are set to the exact same settings, detune them by a few centos in opposing directions (Oscillator 1 = -4 Cents / Oscillator 2 = +4 Cents). You’ll have to venture outside a simple Subtractor for other fattness tricks, but two of my favorites are A) creating a Unison device under the Subtractor (between the Subtractor and the Mix Channel). This automatically fattens your sound. B) After you have the Subtractor patch set up exactly as you want, duplicate the Subtractor and send both subtractors to separate Mix Channels. Then on the Mixer, pan Subtractor 1 fully left and Subtractor 2 fully right.

So that’s a little bit about the basics of the Subtractor synth, along with a new patch pack. I hope you’ve enjoyed it, and if you have any tips or ideas related to using the Subtractor, please share them. All my best, and happy sound designing!

 

Reason 6.5 Update

With the latest Propellerhead Reason 6.5 announcement, there’s a lot to discuss in the world of Reason. I have been fairly silent over the last few days, even though the forums have been ablaze will all kinds of chatter. Until the dust settles, it’s never wise to jump out and state your opinion. Did that once and it bit me in the behind. But I wanted to provide some of my thoughts on all these new changes, since they are fairly huge, and developing rapidly. So here are my preliminary musings.

With the latest Propellerhead Reason 6.5 announcement, there’s a lot to discuss in the world of Reason. I have been fairly silent over the last few days, even though the forums have been ablaze will all kinds of chatter. Until the dust settles, it’s never wise to jump out and state your opinion. Did that once and it bit me in the behind. But I wanted to provide some of my thoughts on all these new changes, since they are fairly huge, and developing rapidly. So here are my preliminary musings, all of which are subject to change.

By now you’ve probably heard of two new changes to the Reason environment. If not, here’s the official news release. And here are the two core changes that you’ll see in the Reason 6.5 update:

  1. Figure: The iPhone / iPad app that will be available in the Apple App store soon.
  2. Re (Rack Extensions): Propellerhead’s own proprietary Plugin format, which opens the Reason rack up to new devices that are developed by third party companies. In other words, Korg, U-He, Arturia, Peff, or any other developer or instrument company keen on developing a Reason Rack device can now do so. Propellerheads are launching the “Rack Extension” store on their site, where Extension devices will be sold and delivered, via the click of a button, to your Reason software.

Out of the two features, “Re” is the earth-shattering news, and “Figure” is exciting for those on the Mobile iOS platform who enjoy music-making on the go, but not so much for those of us that already use the full version of Reason on their computer. Figure is slated for release in the next few weeks, while Re is slated for release at some point in Q2 of 2012, and in my opinion, it will take some time to see how this will all unravel.

First, let’s take a look at the Keynote speech by Propellerhead:

So, what I’m getting from this video, other than the fact that I need to get a cool Reason tattoo in order to be included in a slide during the next Propellerhead release, is the fact that this is a huge paradigm shift for Propellerhead.

Figure

On the one hand, Figure is the first real outing for Propellerhead into the world of Mobile devices. Sure, we had ReBirth for a while, but that seemed like a test run. This is the real deal; a new introduction into the app market.

While all of this is preliminary, based on what I see in the above video, I have my own personal list of Pros and Cons. Bear in mind none of this is released yet, so it’s all subject to change. But these are just my own thoughts on Figure:

First, let’s look at the Pros:

  • It’s built with Kong and Thor as the background devices for your sound, so it probably sounds fantastic!
  • It’s easy to use. Big plus in a mobile environment
  • It brings some of Reason into the mobile realm. Never a bad thing.
  • It probably won’t crash your device, being a Propellerhead product.
  • Price. It’s a buck (one dinero, one dollar, one smackaroo). So there’s no reason not to pick it up. Even if you only want to try it out a few times and never use it again. I spend more on a cup of coffee. So yeah. Of course I’ll get it.

Now for the cons:

  • If you already own Reason, this isn’t going to add anything new in the way of sound.
  • If you don’t use mobile devices or make music on-the-go, then you can probably pass it up.
  • Like most other iOS music apps, it looks like great toy, and should be fun to tinker with, but is it as functional as Nanostudio or Beatmaker? Not sure yet, but doubtful. Of course, Nanostudio and Beatmaker are also 20x more expensive at $20 each.

In summary, if you own an iPhone or an iPad, getting Figure is a no-brainer, even if you own the full version of Reason. It brings a little bit of Reason into the mobile world, and if it lives up to the Props mantra, it will be easy to use and simple to sketch out some nice ideas. And it opens up more creativity, which appeals to me. I have to give the Props a big thumbs up for their official first step into the Mobile world.

Re (Rack Extensions)

Now let’s look at Re (Rack Extensions) — and don’t call it “ReRack” or the Props will give you a sour look and shake their finger at you (just kidding).

As with any preliminary announcements, it’s hard to judge how it will work, and how accepting people will be towards the technology. Again, going by the video above, I’m going to throw out a few thoughts on it, all of which are just my own personal assessment, questions, and the like. Let’s look at it from three different perspectives: The Musician, The Sound / ReFill Designer, and The Re Device Developer.

The Musician:
  1. As a musician, you’re probably having an orgasm right now. You finally have your dream of plugin instruments and effects inside Reason, as long as they get developed. And I have no doubt that the floodgates will open, and you’ll see all kinds of great new devices in Reason.
  2. The Re Store is a great implementation. You have a single location where you can try out or buy any of the Re devices. With one click, you purchase the device and it gets downloaded and installed on your computer. I assume it’s tied to your license so that wherever you go and wherever you install Reason, the new devices can get installed.
  3. It’s interesting to note that very few people have discussed the Re Store concept yet. The Re Store seems like an exact replica of Apple’s App Store, and as such, you could say that most of the arguments that people levy against the App Store could also be levied against the Re Store. For example, this means that the Props are the ultimate arbiters of which devices make it inside the store and which are left out of the store. Is that a good thing or a bad thing? I’m not going to take any sides in this debate. I’m just pointing it out.
  4. Anytime you switch from a closed-architecture to an open-architecture (or rather, like Thor, this seems like a semi-modular Rack system now), you also open yourself up to the potential of having lots of poorly constructed devices. So are we going to see hundreds of poorly contructed devices? Or are we going to see only the best of the best? Or some combination of both? This ties in with #3 above. Are the Propellerheads going to decide which devices make it in and which don’t?
  5. On the other hand, as Ernst said in the above video, this does make it easier for musicians to a) get Plugins downloaded and installed on their systems, and potentially allows for an easier experience sharing music and collaborating. However, as anyone who has collaborated with fellow Reason users understands, if the other party does not have a specific ReFill, it’s more difficult to collaborate successfully (but still easier than collaborating with non-reason users, more or less). Both parties must have the same ReFill in order to open and play the songs (or self-contain the song). With the introduction of Re devices, this existing issue that was in the ReFill domain now extends itself into the Reason Rack. If the other party doesn’t have the rack device, they won’t be able to open the song, or at the very least, they will be able to open the song, but won’t hear the same thing that the other party intended them to hear. What’s more, there’s no “self-contain” setting that will rectify this issue. What you will have to do is bounce down the audio and share the audio track. And while this is a perfectly valid solution, it is limiting because once it’s audio, you can’t edit the effects from the devices directly. The audio is static.
  6. Because collaboration of the .reason song files can pose these kinds of problems, I predict that most people will collaborate using bounced audio files only, even between reason users. If you think about it, that’s the only logical way we can go. Otherwise, the onus is on the Musician to figure out which extension devices they have and also figure out which extension devices the other party has; making collaborations more complex. And if you share audio files, as I said, this is limiting in certain ways.
The Sound Designer / ReFill Developer
  1. Looking closely at the video with my “ReFill designer’s eye,” I noticed that some of these devices have the ability to save patches and some don’t. Possibly this is because the devices are not completely developed yet. But it brings up the question of whether or not Re developers can allow their device patches to be saved or not. Or do all the devices have to have a “Save Patch” option? This has implications for ReFill developers who want to design patches for the Re devices. It also brings up the issue of whether or not ReFill developers will be allowed to design patches for these devices? My hope is that all devices allow for the ability to save patches, and the developer SDK demands that patches can be saved.
  2. If patches can be saved on all devices, this opens up some new questions. Firstly, it creates a lot of different patch formats for all the different devices that we expect will flood the Re Store. Things could get a little confusing and convoluted.
  3. Are the Propellerheads going to stop producing new instruments for Reason? In some ways, Re removes the need for them to put together new instruments for Reason. And if they still produce new instruments for Reason (which I highly hope they do), will they continue to be a part of the core program, or a new Re device? There’s something to be said for a closed system. As a Patch designer, if the Props don’t provide new instruments as part of the core program, this means those devices are subject to the same potential problems outlined in #3C below.
  4. This fragments the ReFill developer into a few different camps:
  1. Those that develop for the traditional Reason devices. This is the safest bet for ReFill designers, as anyone that owns Reason will own all these devices, and so the ReFill will work for all Reason owners.
  2. Those that develop for specific Re Devices. Designing for specific Re devices is more of a niche market than group “A” above. This doesn’t mean sales will be less than in group “A,” but it does mean that your market is a smaller subset.
  3. Those that develop for a combination of both A & B. As a ReFill designer, if you develop Combinators that contain both traditional Reason devices and Re Devices, you then have to worry about whether or not your users have those Re devices installed on their computer. If not, the Combinator won’t work, or it may work, but not work as expected because it can’t load the proper Re device(s). This is another “to be determined” question which is left unanswered. I’m speculating here, but I am willing to bet that most ReFill designers will either a) not use the Re devices in combination with traditional devices, or b) they will limit usage of Re devices to just one or two that are the most popular. And if my bet is true, then this limits the development of some really interesting and creative Combinators that make use of many different Re devices.
  4. Those that develop using traditional Reason devices to imitate Re devices. Now here’s where it gets interesting, and my mind is always looking for new opportunities. So I said to myself, well, if Re devices are now available, wouldn’t it be interesting if intelligent sound designers attempted to recreate the sounds or capabilities of a particular Re device using the core Reason devices. This can potentially open up a new avenue for designers.
The Re Device Developer
  1. This is a brand new position that just opened up where Propellerhead and Reason are concerned. So as a developer, if you want to try your hand at creating a Re device, you simply need to ask for the SDK. From there, you can potentially get a device inside the Reason Rack.
  2. If you are BOTH a ReFill Designer AND a Re Device Developer, you’re probably in the catbird’s seat. You can now develop both a Plugin product and a ReFill product; taking both to the Reason market. Not a bad deal for you.

In summary, Re seems like it’s going to be very beneficial for most everyone concerned; musicians, sound designers, production engineers, etc. And I’m cautiously optimistic. But there’s no question that this brings up a few concerns or additional questions, at the very least. Anytime a company make such a sweeping paradigm shift, there’s bound to be some rough patches; call them growing pains. How the Propellerheads address these questions, and how this all develops over time is going to be very important for all of us. And right now, it’s still too early to tell. But I don’t want to be a naysayer either. I think the future looks bright and creative overall.

A little note about pricing. While it’s true that Reason 6.5 is a free update from Reason 6, and I commend the Props for providing it for free (I’m sure there was quite a bit of development work that went into the core update), that doesn’t mean that the new Re devices are free. So upgrading will have to take into account the fact that you will have to pay for each device individually, and that cost is as yet to be determined. This means that you need to factor this into your purchasing decisions. I’m also not sure if the 6.5 update will include any new devices inside the core product for free? But I don’t think so.

Lastly, here’s a little preview of the Bitspeek Rack Extension device for Reason 6.5:

And here’s an update from Rack Extension developers “U-He” on their plugins, also from Musikmesse in Germany:

http://www.musicradar.com/video/uhe-demos-reason-rack-extensions-k9PvK1gIICYu2

Until next time, don’t stop working with Reason as it is, and don’t stop supporting the Musicians and ReFill developers. From the sounds of it, nothing that currently exists inside Reason will change. All of the news centers around added functionality. All the beautiful bells and whistles that work in Reason 6 today will work in version 6.5 tomorrow. And please share any thoughts you might have. I’m interested to hear everyone’s opinion. Cheers!

19 – Spatial-based FX

In a previous tutorial I spoke about how you can create frequency-based FX and divide your FX, sending different delays or phasers or any combination of FX to different frequencies in your mix. This time we’re going to send those same FX to different locations in your mix: Front, Back, Left and Right. This way, we’ll create different FX for 4 different corners of your mix.

In a previous tutorial I spoke about how you can create frequency-based FX and divide your FX, sending different delays or phasers or any combination of FX to different frequencies in your mix. This time we’re going to send those same FX to different locations in your mix: Front, Back, Left and Right. This way, we’ll create different FX for 4 different corners of your mix.

The tutorial files can be downloaded here: 4-corner-spatial-fx This zip file contains 2 Combinators: 4-corner delay FX and 4-corner phaser FX.

Starting of creating the Front and Back sections

First, the video:


  1. First, we’ll start in Reason, and start by opening a new document with all the usual suspects. Create a main mixer, and a sound source (an initialized Thor would do just fine).
  2. Next, create a Combinator under the sound source. Inside the Combinator, hold down shift and create a Unison device (UN-16), Audio Merger/Splitter, 6:2 Line Mixer, Stereo Imager, RV7000, and for our FX device, let’s create a Phaser (PH-90).
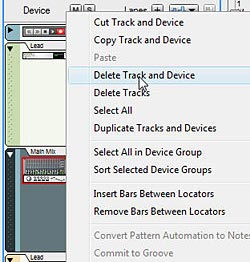
  3. Now holding shift down, select the Stereo Imager, RV7000, and PH-90 Phaser, then right click and select “Duplicate Devices and Tracks.”
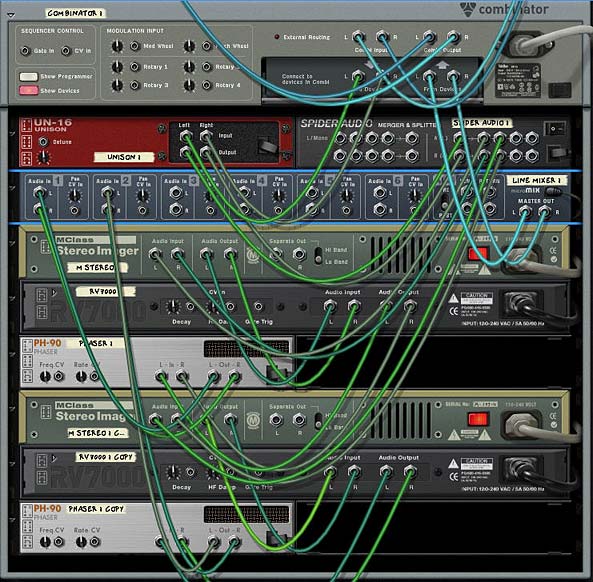
  4. Routing time (note that all the audio routings we’re going to create here are in Stereo pairs): Flip the rack around, and move the Thor Audio outputs into the Combinator Audio inputs. Send the Combinator outputs to Channel 1 on the main mixer. Send the Combinator To Devices outputs into the Unison inputs. Then send the Unison outputs to the Audio Splitter inputs. Send 1 split into the first Stereo Imager’s inputs (we’ll call this the Front Imager), and the second split into the second Stereo Imager’s inputs (we’ll call this the Back Imager).
  5. Continuing with our routing, send the Imager outputs to the RV7000 Inputs (do this for both front and back imagers). Then send the RV7000 outputs to the Phaser inputs (both front and back). Then send the front and back Phaser outputs to Channels 1 and 3 on the 6:2 line mixer. Finally, send the Mixer’s master output to the “From Devices” inputs on the Combinator.

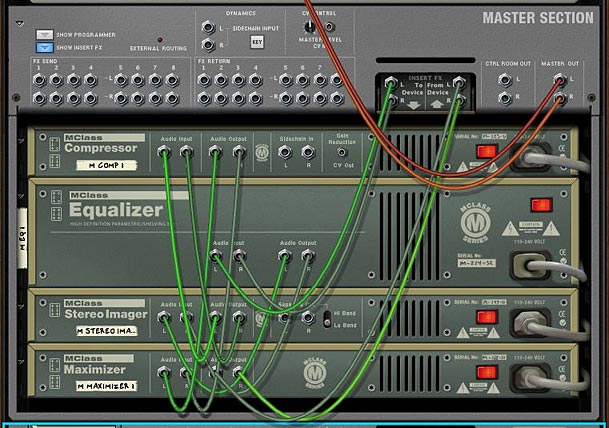
    The Routings on the back of the rack. Looks complicated, but it's really pretty straightforward.
    The Routings on the back of the rack. Looks complicated, but it's really pretty straightforward.
  6. Flip the rack around to the front. Now it’s time to set up some parameters. On the Front Imager, send both the Lo and Hi bands fully Mono (fully left). On the Back Stereo Imager, send both the Lo and Hi bands fully Wide (fully right).
  7. Open up the Remote Programmer on both the front and back RV7000 Reverbs. The Hall algorithms are the default and these are fine for now. On the front Reverb, reduce the size fully (to 13.2 m) and reduce the Global decay to around 50. Increase the HF Dampening to around 84. On the back Reverb increase the size fully (to 39.6 m) and increase the decay to around 98. Also leave the default HF Dampening at around 28. Finally, decrease the Dry/Wet knob on both reverbs to around 30-40 or thereabouts.
  8. Open up the Combinator’s Programmer, select the 6:2 Line Mixer and enter these settings:

Rotary 1 > Channel 1 Level: 0/85

Rotary 3 > Channel 3 Level: 0/85

Now, the First Rotary controls the Front Mix, and the third Rotary controls the back mix. If you play your sound source through this FX Combinator, you’ll hear the front and back sounds by adjusting the Rotaries. But what makes things more interesting is if you apply different settings to your two Phaser devices. Even some subtle changes to the Frequency and Width parameters can provide a much more rich soundscape which makes even Thor’s initialized patch sound pretty interesting.

You can also leave things as they are, or you can move on and create two more spatial corners in our mix by adding both Left and Right panning. In this way, you create a 4-Corner FX split for Front Left, Front Right, Back Left, and Back Right.

Moving from side to side

Now, for the second part in the Video Series:

So let’s continue on our journey and create a split for left and right.

  1. First thing we’ll have to do is hold the shift key down and create two other phasers; one next to the front phaser and another next to the back phaser. Then select the front RV7000 and holding shift down, create a Spider Audio Merger/Splitter. Do the same for the back by holding down the back RV7000 and creating another Spider Audio Merger/Splitter.
  2. Flip to the back of the rack and let’s set up some new routings. Move the cables from the inputs on both Phasers and move these cables to their respective Spider Splitters (in the main Split). Then send one split to the Front Phaser 1 (let’s call this left) and send another split to the Front Phaser 2 (let’s call this right). Then send the outputs from the two new phasers to Channel 3 and 4 respectively.
  3. Flip to the front of the rack and on the 6:2 Line Mixer set the panning for Channels 1 and 3 to about -22 (left) and Channels 2 and 4 to +22 (right). How far left or right you set the panning is really a matter of taste. With this all set up, the 6:2 Line Mixer will be set up as follows:

    Channel 1: Front Left Phaser

    Channel 2: Front Right Phaser

    Channel 3: Back Left Phaser

    Channel 4: Back Right Phaser

  4. Open up the Combinator Programmer, and assign the 6:2 Line Mixer Channel 2 and Channel 4 to Rotary 2 and 4 respectively as follows:

    Rotary 2 > Channel 2 Level: 0/85

    Rotary 4 > Channel 4 Level: 0/85

  5. Now you can provide labels for all 4 rotaries as follows:

    Rotary 1: Front Left

    Rotary 2: Front Right

    Rotary 3: Back Left

    Rotary 4: Back Right

And there you have it. A 4-corner mix with different FX for each corner. You don’t have to restrict yourself to Phasers. With some ingenuity you can assign any FX to any location, or any combination of FX to any of these 4 locations, and all of those with different parameters too. The only thing left is to adjust the Phasers to have different settings as you see fit.

Here’s a video showing you some of the things you can do to modulate the Phasers:

A few other notes:

  • The reason we set up a Unison device in front of the mix is because this ensures that the signal sent into both the imagers is in Stereo. This is needed for the Stereo Imager to function as it should. It won’t work with a Mono signal. It means that even if you use a Subtractor, for example (which is mono), it can still be sent into the Imagers and the Imagers can work their magic.
  • Using the Width / Mono setting on the Imager bands helps to create the illusion of front and back audio locations. Used in conjunction with the Reverbs, you can create some sophisticated positioning not only with your FX, but also audio of any kind. When you move towards Mono, the sound appears to come from the front of the mix. By widening the bands, the sound becomes more spread out and appears to come from the back.
  • Just as with the Imagers, changing the space size and decays on the Reverbs helps the illusion along. Smaller sizes and shorter decays means a tighter reverb space which appears as though the sound is closer. For the back Reverb, the opposite is in effect. By creating a wider space with a longer tail reverb, you end up with a sound that is pressed further back. Keeping the same algorithm type still binds the two reverb spaces together. However, there’s nothing preventing you from trying to use different algorithms altogether (for example, a Small Space reverb for the front and an Arena reverb for the back).
  • Ever look at those Escher drawings where the staircases keep looping back into themselves? They are impossible pictures. Well, the same can be achieved with sound. You can create some really weird effects by creating an impossible space. Try switching the Reverbs around but keeping the Imagers as they are. The Imagers will tell your ears that the sound should be coming from the front and back, but the reverbs will be telling you the reverse. It can be a disturbing effect. But in the virtual world, you can create these “Impossible” sounds easily. Try that one out.

As always I’d love to hear what you think? Show some love and drop me some feedback or any questions you might have. Until next time, good luck in all your musical endeavors.

Is the New Apple iPad Worth it?

Here’s the lowdown: I own an iPod Touch, and so I have a scaled down version of the iPad. Do I produce music on it? Nope. Do I want to? Maybe. Why don’t I? Because it’s finicky, toyish and still doesn’t have the feel of working in a real DAW or control of working in a real DAW. And worst of all, it doesn’t have any Propellerhead software on it.

“Magical” and “Revolutionary” is the way Apple is describing their new 9.56 x 7.47 inch iPad to the public. But does this device really deliver for Musicians like you and me, who use Propellerhead Reason and Record?

Here’s the lowdown: I own an iPod Touch, and so I have a scaled down version of the iPad. Do I produce music on it? Nope. Do I want to? Maybe. Why don’t I? Because it’s finicky, toyish and still doesn’t have the feel of working in a real DAW or control of working in a real DAW. And worst of all, it doesn’t have any Propellerhead software on it.

On the positive side, I love the flat surface touch control. There’s no doubt that this is the most intuitive and tactile way to control any software. Give me touch, and give me more of it. Let me glide the faders and knobs with a single finger. Let me zoom in and out of areas by pinching and prying apart with my thumb and forefinger. Yeah! I love that.

I was reading in the latest issue of CM (Computer Music magazine) — issue 150, that the App developers were saying this would be a really great product. No offense, but that doesn’t tell me anything. Of course the App developers are going to start promoting the iPad. It gives them a platform to build more and better Apps for which they will make more and better money. Then I read how a certain person from a certain controller company thought the iPad wouldn’t be good for live performance (I share his belief, btw). But again, of course he’s going to dismiss the iPad because it will mean less sales for his company. Everything points to the fact that nobody really knows the impact the iPad will have. And it’s just too early to tell. And way too early to buy IMHO.

And then I read in the CM article that a certain head of Propellerhead software gave the iPad cautious praise. Does this perhaps hint at the possibility of the Props putting together an App of their own, specifically for the iPad? Perhaps. If that happens, I would most definitely give it a great deal more consideration. But this is all rumors and heresay for now. Nobody really knows. So save your money and put the $500 iPad cost to better use by getting an audio interface or nice set of monitors (ok, maybe just 1 monitor, but it’s a start).

Here’s what keeps nagging at me:

  1. Playing “Live” might be a problem due to the fact that the sensor technology is such that when you get all sweaty, the touching might not respond. And even if you’re not all sweaty, the touch system on my iPod Touch can be finicky and non-responsive at times. This still needs to be worked on.
  2. If you’re in the studio, it’s just an overgrown iPod (for now). It’s got the same apps, and the same OS running it. This means that you still can’t multitask, and existing apps don’t take advantage of the additional space.
  3. Did you hear me? It can’t MULTITASK. You can run one app at a time, no more. Which means you can’t run two plug-ins at once, or control a DAW and a synth at the same time.
  4. If it’s one thing I’ve learned from Apple, it’s never to buy the first product release. Why? Because they save all their goodies for v.2 and v.3 product launches. Right now this is nothing more than a larger iPod Touch. Wait 6 months for the iPad v.2 when Apple has had a chance to a) sort out the bugs, b) add new and improved functionality and c) app developers have had a chance to catch up.

    Case in point: my girlfriend bought me the first release of the iPod Touch and 4 months later the iPod Touch release came out with double the amount of space for the same price. I understand that technology keeps moving forward, but Apple just doesn’t take a breather. And as a result, I become a very jaded customer who will never buy the first release. Of course, Apple probably doesn’t care one bit about this situation. There are plenty of others who will jump on the bandwagon to buy this device and even — god forbid — PREORDER! But hey, to each their own. And if you preorder, I wish you the best of luck with your new iPad. Don’t say I didn’t warn you.

The additional screen real-estate is great, and there’s no question that there is some promise here. It’s also light-weight. But let’s see some Apps built for it first. Let’s see Reason and Record for the iPad. And let’s see how the iPad can be the next super DAW controller and music-making machine. Then, and only then can we assess whether or not this product really is “Magical” or “Revolutionary.” Right now it’s a lot of hype.

There used to be an expression when I was a debt collector talking to deadbeats and trying to get them to pay their bills. It went something like this: There’s a lot of smoke on the barbecue, but I don’t see any meat. Somehow the imminent Apple iPad release made me think of that expression. We’ll see how much “meat” is actually there in the coming months.

What are your thoughts on the new iPad from Apple?

Here’s an interesting article on the subject of iPads and Tablet PCs, which have been around for at least 6 years now. And I think this author is bang on right! http://www.tomshardware.com/news/tablet-islate-ipad-netbook-notebook,9929.html. Thanks Doinky for the link!

Mono, Poly and Stereo

This article will explore Monophonic versus Stereo and Monophonic versus Polyphonic. Two very different concepts, but both very important concepts. This is also a good opportunity to discuss the Effects devices and go over the suggested audio routing options for each.

This article will explore Monophonic versus Stereo and Monophonic versus Polyphonic. Two very different concepts, but both very important concepts with which everyone needs to get to grips. The reason I’m going to explain them both in one article is because they have similar terminology (they both share the term “Monophonic”). This can lead to some confusion. This is also a good opportunity to discuss the Effects devices and go over the suggested audio routing options for each. 

When I originally put together my Reason wishlist and posted it here on my blog, I made the fatal mistake of saying that I wanted the Matrix to be “Stereo.” I actually meant to say I wanted the matrix to be “Polyphonic.” Oh gasp! I know. The horror. So just in case anyone else is confused by these terms, let’s see if we can set the record straight. 

First, there are two concepts: 

  1. Monophonic versus Stereophonic: This refers to channels in an audio system. Monophonic is 1 channel (or any single-channel system). Stereophonic is a two-channel system (left and right audio channels) which are reproduced by 2 speakers (left and right).
  2. Monophonic versus Polyphonic: This refers to the number of voices that a Synthesizer can play at one time. Monophonic means the synth can play a single voice (single note). Polyphonic means the synthesizer can play multiple voices (2 or more notes). In Thor, you can have 32 voice polyphony, meaning you can have 32 notes playing simultaneously. In addition, Thor has Release Polyphony and can also have 32 notes sustain after you lift your finger off the key, or after the note’s end in the sequencer (in the case of midi).

There is also the term “Monophony” which refers to the melody line of the song. It is a song which contains only a melody line without an accompanying Harmony. So strictly speaking, if you have two notes played at once, each one octave apart, the song can still be considered “Monophonic.” Confused yet? I’ll let Wikipedia explain this concept of Monophony

A few other notes: 

  • In Reason, as in the real-world, CV relates to Monophonic and Polyphonic voices of a synthesizer. While Monophonic and Stereophonic channels in an audio system are audio-specific. The RPG-8 Arpeggiator and Matrix are termed “Monophonic” which means they can only control one voice of a synth at a time. If you want to create a “faux” Polyphony, you must first duplicate the RPG-8 or Matrix as well as the sound sources they are controlling, and then send the output of both these sound sources to their own audio channels; either mono or stereo, it doesn’t matter. You now have two-voice polyphony.
  • The above points out also that you can have a Monophonic synth that has a Stereophonic “audio” output OR you could have a Polyphonic synth with a Monophonic “audio” output. Plus, you can take a Stereophonic signal and make it Monophonic (panning both channels to center), but if you take a polyphonic CV and make it mono (sending it to a mono synth) you will just drop all the notes beyond the first or last one (just like playing a chord on a mono synth).

Effects Devices in Reason, and Reason’s Routing Suggestions

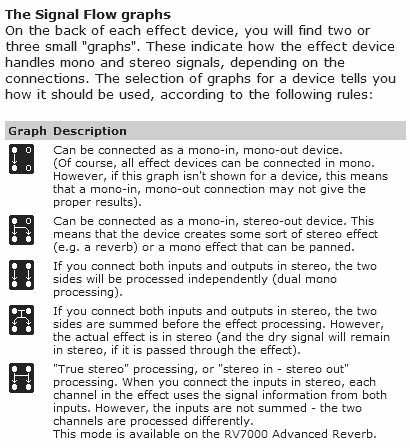
According to the literature in Reason and Record, there are specific ways in which the Effect devices should be connected. I’m going to plagiarize for a moment and take an excerpt directly from the help file. This excerpt explains the way Monophonic and Stereophonic signals are processed by the effects devices in Reason, and shed light on those little tiny diagrams on the back of the FX devices (come on, give me a show of hands. How many of you knew those diagrams were there to begin with? And how many knew what they meant?). 

FX Routing Legend and Descriptions

 So looking at the diagrams, we can see the following connections can be made by the Reason devices: 

RV7000 Digital Reverb: 

Mono In / Stereo Out 

Stereo In / Stereo Out 

Scream 4 Distortion: 

Mono In / Mono Out 

Dual Mono In / Dual Mono Out 

BV512 Vocoder: 

Mono In / Mono Out 

Dual Mono In / Dual Mono Out 

RV7 Digital Reverb: 

Mono In / Stereo Out 

Stereo In / Summed Stereo Out 

DDL-1 Digital Delay: 

Mono In / Stereo Out 

Stereo In / Summed Stereo Out 

D-11 Foldback Distortion: 

Mono In / Mono Out 

Dual Mono In / Dual Mono Out 

ECF-42 Envelope Controlled Filter: 

Mono In / Mono Out 

Dual Mono In / Dual Mono Out 

CF-101 Chorus/Flanger: 

Mono In / Mono Out 

Dual Mono In / Dual Mono Out 

Mono In / Stereo Out 

PH-90 Phaser: 

Mono In / Mono Out 

Dual Mono In / Dual Mono Out 

Mono In / Stereo Out 

UN-16 Unison: 

Mono In / Mono Out 

Dual Mono In / Dual Mono Out 

Mono In / Stereo Out 

COMP-01 Compressor: 

Mono In / Mono Out 

Dual Mono In / Dual Mono Out 

PEQ-2 2-Band Parametric EQ: 

Mono In / Mono Out 

Dual Mono In / Dual Mono Out 

MClass Equilizer: 

Mono In / Mono Out 

Dual Mono In / Dual Mono Out 

MClass Stereo Imager: 

Dual Mono In / Dual Mono Out 

MClass Compressor: 

Mono In / Mono Out 

Dual Mono In / Dual Mono Out 

MClass Maximizer: 

Mono In / Mono Out 

Dual Mono In / Dual Mono Out 

Phew! Now that’s quite a lot of information to take in. However, when you look at it, you can pretty much break it down into a few key points which are easier to remember: 

  • All devices can be connected in Mono In/Mono Out except the MClass Stereo Imager (makes sense right? Because you can’t separate a mono signal or make it wider/narrower. It’s already mono, so you can’t make it more mono. You also can’t magically turn a mono signal into a true stereo signal). So forget using it for anything other than Dual Mono In/Dual Mono Out.
  • Every FX device except the Delay and Reverb devices can be connected in Dual Mono In / Dual Mono Out.
  • The RV7000 device is the ONLY device in Reason which is true stereo (Stereo In / Stereo Out). The RV7 and DDL-1 are the next best thing with a Stereo In / Summed Stereo Out.
  • The Devices that can be used as Mono In / Stereo Out are: RV 7000, RV-7, DDL-1, CF-101, PH-90, and UN-16.
  • Every device can be used as an Insert effect, however not every device should be used as a Send effect. Effects that should not be used as Sends fall under 2 categories: 1. Dynamics Processors (all MClass devices, COMP-01 and PEQ-2), and 2. Distortion Units (the Scream 4, and D-11).

This last point is not really related to the issue of Mono/Stereo, but is an important consideration when connecting devices in your tracks and is another point that shouldn’t be overlooked. 

One other thing I wanted to point out. If you get a chance, you really should check out Hydlide24’s great video on different ways to create Stereo separation in Reason. There’s so much great information in this video, I thought this would be a relevant place for it. He tends to move a little fast through the video, but you can always pause and go over it a few times to follow along. Check out some of his other videos if you get a chance as well. 

Hopefully this information is accurate. I’m human and prone to many mistakes. If there is an error, please help me point it out and make sure it’s accurate. I’ll ensure I get it corrected. And if you have anything to add, I welcome your advice and opinions.

My Reason/Record Wishlist

Reason and Record together constitute one of the best all-in-one music creation and sequencing packages. I’ve tried out most all of the major DAWs out there, and I keep coming back to Reason and Record time and again. So here is my wishlist of items I’d like to see in future versions of the software; in no particular order.

Let’s just say Reason and Record together constitute one of the best all-in-one music creation and sequencing packages. I’ve tried out most all of the major DAWs out there, and I keep coming back to Reason and Record because of a few things: a) it’s easy and intuitive. This is the biggest draw for me. b) it allows me a wide latitude in sound creation. Sure some of the FX are a little lacking, but nowhere else can I create my own setups in such a simplistic way without having to know any programming or high level math. c) It’s instant and quick. Yes, I’m a little ADD, and I just love the fact that Reason and Record caters to me. I can jump in and add midi and audio tracks in a snap. I can go with an idea and get sidetracked into all kinds of wonderful tangents. It’s great. d) Finally, it’s stable and light-weight. My computer isn’t struggling unless I have an insane amount of Thors packed into a project. Sure I’d love access to VSTs but not at the expense of stability. Besides, I could spend a lifetime alone exploring the factory soundbank alone (not to mention all the great refill packages out there). So why go further.

All that being said, here is my wishlist of items I’d like to see in future versions of the software, in no particular order. I’m sure there are lots more that could be added, and this list is not meant to be exhaustive. It’s just a few of the major things I’d like to see in future versions.

For Record:

  1. Automatic Routing of the Reason mixer channels to the Record Main Mixer. Right now you can bring Reason songs into Record, but there is no mixer routings set up. You have two options: delete the mixer in Reason and then open the song in Record so that all devices get their own channels, or you can manually reroute in Record once your song is brought in. A user preference or dialog which opens and allows you to select the mixer you want to automatically route to separate channels should be available so that bringing a completed Reason song into Record maps all the Reason channels to new channels on the Record main mixer. Maybe in the next version PLEEEEEEZE!
  2. Comping for Midi as well. The new Comping Feature is great. Love it. However, it is reserved for Audio Lanes. If you want to do something similar in Note Lanes you have to use the New Dub / New Alt features. Overall, these two concepts are very similar. I’m wondering if there is a way to be more consistent with implementation. Why can’t we implement comps, for example, in note, and even in parameter automation lanes, and then do away with the new dub/new alt features altogether. This would make recording in loop mode in a Note Lane so much easier and workable. When you’ve laid down 4 or 5 takes in a note lane, you go into comp mode where you can have all the note lanes right there automatically waiting for you. The only real difference would be that in note lanes, you can have overlapping takes (audio and parameter automation can’t do this). But everything else would be pretty much identical for all types of track lanes. Seems a little clunky to have different methods which essentially do the same thing.
  3. Split Performance Controller Data into Separate Lanes. Would be nice to have the ability to split performance controller/note data from each other into two different clips on two different lanes. Right now it’s a tedious process of copying clips, deleting notes out of one clip and then deleting performance automation out of the other.
  4. Record Performance Controllers as automation. Would be nice if you can elect to record the “Performance Controllers” (Pitch Bend/Mod/etc) as automation instead of performance. Currently you have to record once for the notes, and once for the performance to get them on separate lanes OR you have to draw in the performance controller data. There is no way to click a button to record performance controllers as automation lanes (opposite to the “Automation as perf ctrl” button).
  5. Tempo automation/changes on a per-track basis. In the documentation on Page 161, it says “Automating tempo is done much in the same way as with other parameter automation. You record the tempo changes by changing the Tempo value on the Transport Panel. When you later play back, audio clips will automatically be stretched to follow the tempo changes (unless you have disabled stretch for the clips – see “About disabling Stretch for audio clips”). Note clips and automation clips will always follow tempo changes.” It woud be nice if you could opt to leave note lanes at the current tempo, thereby being able to change some note lanes or clips to a different tempo, and leaving other note clips / lanes as they are. This would be a nice advance in both Reason and Record.
  6. Display Masked Audio portion in the Audio Clip. In the documentation on page 169: Nice touch showing whether or not a clip has masked notes/areas! Nice improvement (Having this same feature added to audio clips would be nice as well). What would be even nicer is if masked areas were displayed the same way muted clips are displayed in the Arrange view, as there is really very little difference between the two. In fact, if you take this idea a step further, when you resize a clip (making it smaller) so that a masked area is created, it should automatically create the masked area as a new muted clip separate from the “active/visible” clip. When you resize back, it should automatically join the clips again. I think that would make sense, but I’m not sure if this would have undesired consequences in other places? But off the top of my head, it’s a suggestion. The benefit is that you would then be able to visualize how far the masked area goes in a given direction. Right now, there’s no visual indicator to show how far and wide the masked area is. It’s worthwhile to note that this is already pretty much implemented in the audio comp tracks. Now if we could bring that into the main arrange view, we’d be golden.
  7. Synch Reason / Record Favorites. I wish there was a way to automatically import your reason favorites into the Record Favorites and synch them together. I don’t like having to recreate all my favorites over again. It’s one of those time-wasters.
  8. Cut Note Events in the Clips. It might be nice to have the option when cutting clips, to cut the note events in the clip as well (if the note goes between split clips). This should be a toggle button on every track. Sometimes you DO want to split the notes, and it’s easier than going into edit mode for each clip and cutting them manually one by one (especially over several tracks). By doing this, you could select which tracks split notes and which don’t. Would be ideal if you are cutting several clips along multiple lanes, or inserting bars between locators.
  9. Scale Transposition of Notes. This is imminently more useful than chromatic transposition of the notes. Having both in the software would be a wonderful addition.
  10. Multiple Left and Right locators. When using Record to master a series of tracks, it would be nice if you could set things up with L/R locators and bounce all the tracks at once instead of bouncing them one at a time.
  11. More Training/Tutorials and videos included in the user documentation. At 850+ pages, the manual is getting absurd. Time to start moving with the times. More creative and advanced documentation please!

For Reason:

  1. Adding some new Effects, especially a glitch box such as “Glitch
  2. Having the ability to Randomize the entire Matrix or Redrum device with one click of a button. Currently you have to create random patterns in each and every slot in all the banks, and then (if you want), you need to randomize the Steps AND Resolution. Having a button, which when clicked, allows you to select what you want to randomize on the matrix or redrum (steps / resolution / how many patterns, notes, curves, both notes and curves) AND also providing the ability to randomize percentage-wise (for example, randomize 10% gives you less randomization than 90%). This would turn a very tedious process into a simple one. Same thing in the automation lanes. How about random automation? This would be a godsend for glitch music.
  3. Combinator updates: In the Programmer, subdivide the right-click context menus into submenus (a la Thor modulation matrix menus). Also, adding an option for step increments for the Rotaries would be welcome. In cases where steps are needed, you could switch the Rotary to use steps. If you need the rotary as it is, you could switch it back. Also, give the user the ability to choose how many steps are required (up to 16 or 32 would be nice).
  4. Integrate ReCycle into Reason (or Record). Yes, Reason and Record are not considered DAWs, but when most other DAWs have slicing capability built in, it makes for a good justification to integrate this capability into the software.
  5. The ability to reverse midi and audio for backward playback. You can reverse a small sample in the NN-XT, but it would be nice if you could reverse the midi notes (and in record if you could reverse the audio) within the sequencer.
  6. Tap Tempo. This is important on so many levels.
  7. When in edit mode in the sequencer, providing the ability to move notes from one clip into another. Right now you need to combine the two clips, then move the notes around, then cut them up again. It’s very finicky to do this. Further to this, having the ability to see all the tracks while in edit mode is important if you’re trying to line up one set of notes or automation with another track. You can get around this somewhat by using the L/R markers, but it’s limiting.

Do you agree with these points? Is there anything in your wishlist that isn’t here? Anything else you want to see improved in Reason?

4 – Map Reason Songs to Record

Learn how to transfer all settings from one channel in the Reason Mixer to one channel in the Record Main Mixer. With this technique you can properly tranfer any song with any mixer settings from Reason to Record.

As a beta tester, when I got Record I was super excited. I promptly downloaded and installed, and went to open it up. I was salivating by the time all three record windows were opened stacked in front of me on my screen. The “AHHHHH” moment. A halo emanated around my computer. Come on, you know what I mean. I first saw the double rack and was amazed. Then I looked at the main mixer and my jaw hit the ground. Beautiful! A work of art. now I can finally work on making my tracks truly sing.

Then I opened a Reason song. And everything that I had hoped and dreamed got shattered in one swift moment. What? My mixer with 9 tracks and automation applied to the sends, EQ settings, panning, levels got reduced to a measly single track attached to the new main mixer in Record. All my earlier praise now turned to dismay.

I’m sure most of you know exactly what I mean. You’ve been there. You’ve gone through the same agony. So what do you do now? Curl up in a ball? Send Record back to the Props? Well, you could do that. Or you can read this tutorial and learn how to properly transfer all your settings from the 14:2 mixer in Reason into the SSL Main Mixer in Record. It’s not that hard, as you’ll see. But it is a little time consuming, depending how many tracks you have. And I’m not going to undertake doing an entire song mix. What I’ll do is show you how to transfer all settings from one channel in the Reason Mixer into one channel in the Record Main Mixer. Once you have that down, you can do any number of channels, no matter how complicated the song. So let’s get busy.

Before starting, I’ve put together a zip package with the project files. It contains the Reason song with a single channel and the Record version of the same song once it was converted: Download the Project Files.

It should be noted here that if you have not yet done any serious mixing in your main reason mixer, and don’t have any automation set up for any mixer parameters AND don’t have any CV setup for the Pans/Levels on the back of the mixer, then you can safely open the Reason song in Record and delete your main mixer. Then you can select all the (now disconnected) devices, right-click, and choose “Auto-route Device.” This will create Mix Channels for all the devices. Depending on how creative your connections were to begin with, you may find a few devices that require some custom routing after you do this. [thanks to Mattpiper from the Props forum for this excellent tip]

However, if you already have your mix set up with a lot of automation applied to the Reason main mixer device, then read onward, because this article is for you!

  1. First thing, open the Reason song, mixer and all, in Record.
  2. Next, you’re going to have to move any mastering Combinator or devices into the Master Section in Record. Let’s say we have a “Dance” Combinator inserted between the Reason Mixer and the Hardware Interface. Select all the devices in the Dance Combi and move it into the Master Section. Flip the rack around, and move the “From Devices” and “To Devices” cables from the Dance Combi to the same ins/outs of the Master Section. Then delete the audio ins/outs from the dance Combi, and delete the Dance Combi altogether. You don’t need it anymore.
  3. Adding the mastering Combi into the Master Section
    Adding the mastering Combi into the Master Section
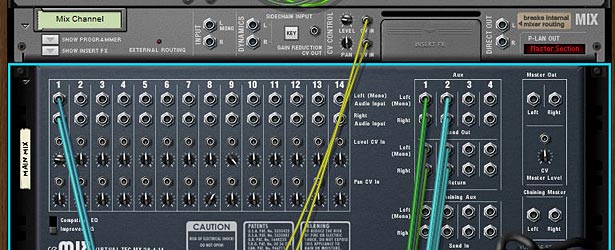
  4. Now let’s assume you have a Matrix set up to control the Panning of the channel, and another Matrix set up to control the Level of the channel. You’ll have to flip to the back of the rack, and move the CV inputs from the Reason Mixer to the CV inputs of the Mix channel. Then adjust the pots to the same settings they were at in the Reason Mixer. Level and Pan is done. Note that if you have several channels set up in your song, you’ll have to create the same number of Mix devices in Record.
  5. Pan / Level CV rerouted through the Mix Device
    Pan / Level CV rerouted to the Mix Device
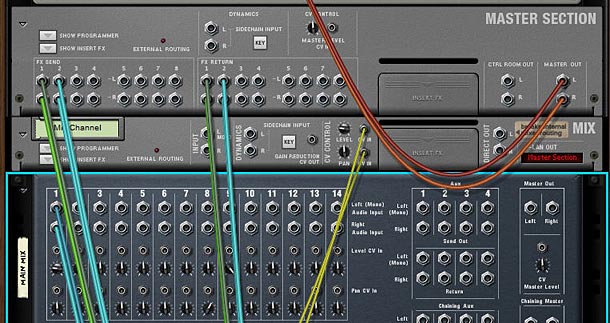
  6. Next, let’s move the Aux Sends/Returns from the Reason Mixer to the Master Section’s Sends/Returns in Record. This is pretty straightforward. Plus in Record you can now set up 8 Aux sends if you want, which is more than enough power. But in the example I’ve provided there was a Reverb and a Delay set up. So we’ll move those over now.
  7. Send / Return cable rerouting to the Master Section
    Send / Return cable rerouting to the Master Section
  8. Our last cable job is to move the Lead Audio Cables from the first channel in the Reason Mixer over to the Main L/R input on the Mix Device. You can now flip the rack around. You’re done with the cabling.
  9. Cabling the Main Audio outs from the Lead track
    Cabling the Main Audio outs from the Lead track to the Input on the Mix Device
  10. Now let’s move to the Record mixer. Press F5 and F6 at the same time to show both the rack and the main mixer in record. If your channels have any settings that ARE NOT automated, but are static for the entire duration of the song (and are different from their default setting), then you can adjust those settings on the main mixer channels in Record. For example, if a channel is set to a level of 90 in the main Reason mixer, and stays at 90 through the duration of the entire song, then you can change the dB level on the Main Record Mixer’s channel to -2.8 dB and leave it there. If the Level stays at 100 for the duration of the entire song in Reason, then you won’t need to change a thing in Record, because the level is already set to 0.0 dB. Make sense so far?
  11. At this point, you’ve probably realized that the new Mixer in Record use decibel values, not midi values. This is a good change, however, it makes it a little difficult to translate levels and send values from the old mixer. So I put together this little chart in PDF format that you can download to see the values. You may not get to use those exact values shown in the chart due to the jumps between values in the Record Mixer, but you can get pretty close. Thanks to Selig on the Props forum for the chart values. Download the Midi to dB Conversion Chart. Note that the chart is also included in the Project Files zip above.

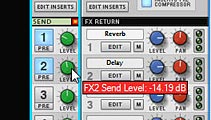
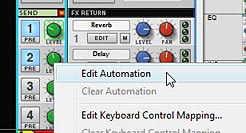
  12. Next, turn the sends 1 and 2 on in the Main Mixer’s Send section in Record. Since the example file has automation set up for these sends, right-click and select Automate. Do this for both sends. However, don’t move to the sequencer just yet. Instead, Look at the other elements on the channel that are automated, and do the same for those as well. So in our example, the solo and level parameters are automated, so right-click and select “Edit Automation” for those two parameters as well.
  13. Turning on and adjusting the Send settings
    Turning on and adjusting the Send settings
    Selecting "Edit Automation" for all parameters which were automated in the Reason Mixer
    Selecting "Edit Automation" for all parameters which were automated in the Reason Mixer
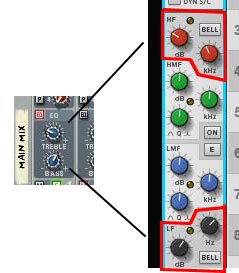
  14. One last thing in the Mixer. If you’ve adjusted the Reason Mixer’s EQ settings for Bass and Treble, you’ll have to map that over to the Record mixer as well. The best way to do this is to adjust the HF (High Frequency) and LF (Low Frequency) settings in the EQ section of Record’s main mixer. This is a shelving EQ which controls your bass and treble. Note that it gives you more control over the Bass/Treble settings that you’d find on the 14:2 Mixer in Reason, because it allows you to dial in the proper frequency range to affect. So you’ll have to use your ears for this one. For more on the EQ settings found in the new Record Mixer, you should read Ernie Rideout’s great article: Tools for Mixing: EQ (Parts 1 and 2).
  15. Converting the Treble and Bass EQ settings
    Converting the Treble and Bass EQ settings
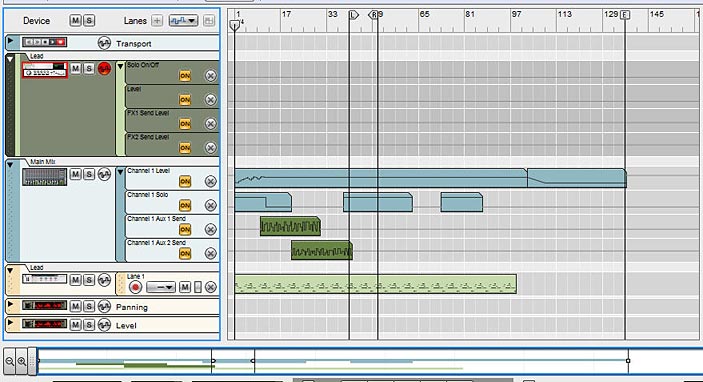
  16. Finally, we move to the sequencer. Press F7 on your keyboard to open the Sequencer. Notice that you have the Mixer with all the parameter automation, but since you selected “Edit Automation” for all those same parameters in Record’s mixer, you have all those lanes set up under the Mix Device. Now it’s just a matter of moving the clips from the Mixer into the proper lanes in the Mix Device. To make things easier (if your song is very long), expand the view by dragging the view window along the bottom of the sequencer all the way to the right, or click the “Zoom Out” magnifying glass at the bottom-left in the horizontal scroll view.
  17. Zooming out to see the whole track in view along the timeline
    Zooming out to see the whole track in view along the timeline
  18. When you move the automation over, some lanes may show “Alien Clips.” To convert the lanes to proper automation, right-click and select “Adjust Alien Clips to Lane.”
  19. Adjusting Alien Clips to Lane
    Adjusting Alien Clips to Lane
  20. And last but not least, right-click on the Mixer device in the sequencer and select “Delete Track and Device.” You won’t need it anymore. You’ve now converted your Reason song into Record and are free to mix and master your song using the SSL Mixer in Record. The sound should be pretty darn close to the original mix in Reason.
  21. The Final step: Deleting the Mixer
    The Final step: Deleting the Mixer

Be sure to save your song as a .record file. You’ll still have the original Reason song saved away which you can open as a reference, as opening Reason songs in Record does not overwrite your Reason song. It leaves it as is. The really nice thing about the Record mixer is that it gives you a wide array of other options which cannot be found on the Reason mixer, such as High and Low Pass filters, Compression, and a Main Compressor you can apply to the overall mix. More Sends, and handling of rotary and button controls for your devices makes this mixer a huge and powerful addition to your Reason software. So go forth and convert. It takes some time, but the more you do it the better you’ll get at it.

What are your experiences with song conversion from Reason to Record? Did you find this helpful? Is there anything I’ve missed? Please comment and let me know.

Top 10 Reason Pitfalls

This post is intended to answer some very common pitfalls that new Reason recruits have when it comes to using the software. Let’s face it, we were all new once, and we all had the same questions. So let’s get all of this out of the way right now so that we never lock our keys inside our cars again.

This post is intended to answer some very common pitfalls that new Reason recruits have when it comes to using the software. Let’s face it, we were all new once, and we all had the same questions. So let’s get all of this out of the way right now so that we never lock our keys inside our cars again.

The Top Ten list below is an attempt to answer the most frequent questions that are heard time and time again, and to help you in the event you get caught up in the program and can’t untangle yourself. Use it as a checklist before posting on the Props forum or elsewhere for answers.

  1. Coming in at number 1 is the Midi In/Out and Audio In/Out question. Reason is Midi In / Audio Out. Plain and simple. You can’t directly record audio into Reason (try using Audacity to do that – it’s a great free audio editor). And you can’t use Reason to output to Midi of any kind. It should be noted, however, that you can record something in Audacity or any other editor for that matter, and then bring the audio into Reason as a sample in one of the Sampler Devices in Reason (the NN-19, NN-XT, Dr. Rex, or Redrum). It should also be noted that if you want to bring audio into Reason, Propellerhead offers “Record” as a solution. As a third and final alternative, you can ReWire Reason as a slave to your favorite DAW, which essentially opens up the possibility of using Reason devices as VSTs within the DAW environment (though they are NOT VSTs per say, they just act like them). This also allows you to tempo synch Reason to other instruments in your DAW environment. You also can’t use Reason to control external midi instruments. It just doesn’t do it. Keep thinking Midi-In/Audio-Out and you’ll be safe in understanding the Reason workflow.
  2. HELP! There’s nothing displayed in the Browser. I can’t see any samples or patches. Did I lose or erase them? Relax, grab a cup of coffee and listen carefully. You didn’t lose them and you didn’t erase them. Chances are that you opened the File Browser from a specific device (from the little folder icon on your device), and you started to navigate through the other folders in the Factory Sound Bank. When you do this, the Browser is only going to report back any samples or patches that can be loaded into the device in question. This is a feature, not a mistake, as it’s meant to keep the browser focussed on only the right areas. For example, let’s say you create an NN-XT and click the patch browser icon — little file icon — to open the Browser again. Then you navigate to the “Combinator Patches” folder. You won’t see anything, because there are no NN-XT patches for the Browser to report back to you. Here’s the fix. Look at the top right side of the File Browser where it says “Shows: NN-XT Sampler Patches.” Click the drop-down and select “All Instruments.” You’ll now see all the Combinator Patches, as well as any other instrument patches that are available. Furthermore, if you select a Combinator Patch after doing this, the NN-XT device you were working with changes to a Combinator automatically. Note that it’s usually a good idea to right-click in the rack and select Create > Instrument or Create > Effect when creating new devices. This way, when the Browser opens you’re not limited to a specific set of patches for a specific device. Note also that the File Browser does distinguish between an instrument and a device, and this is hard-coded into the software. So you can’t truly see all patches and samples at once. You can only see “All Instruments” or “All Effects.”
  3. How come I can’t automate the parameters in an NN-XT or elsewhere, or rather, how do I know what I can and can’t automate? First off, you can automate any parameters that are in the main NN-XT device (Global and Performance controls at the top). You cannot automate any of the parameters you find within the Remote Editor. This is because automation would get out of control. Think about this: if you have 100 samples and each of them have separate parameters within the Remote Editor, that’s way more parameters than your computer could handle if you were to start automating them. So think of this as the price for power. You have complete control over all samples, but you just can’t automate them (note that you can adjust them in real-time and during performances). As for finding out what can and can’t be automated, there are 2 easy ways to figure it out. First, you can right-click on any parameter and look at the context menu. If you see “Edit Automation” and it is available, you can automate it. If you don’t see “Edit Automation” or it is grayed out, then you can’t automate it. Alternately, click on the device in question, then go to Options > Remote Override Edit Mode. You’ll see small blue downward arrows over all the controllable (ie: automatable) parameters. Anything you can control from a controller, you can automate in the sequencer. Once in edit mode, you can click any other device to see their automatable parameters as well.
  4. Why can’t I record anything into “x” device? Why don’t I hear anything? Why is there no sequencer track? This is most likely because you are trying to record parts for a device that is inside a Combinator. By default, when you create a Combinator, the Combinator gets a sequencer track. But devices that are combined within the Combinator do not. If a device is created on it’s own (not part of a Combinator), it will automatically get its own track. To record parts into a device which is nested inside a Combinator, first select the device inside the Combinator (the device you want to record on a sequencer track). Right-click and select “Create track for ‘x'” which will create a sequencer track for the device in question. Then you can go into the sequencer, give the track focus (if you just created it, it will already have recording focus), and start recording parts for it. This goes for all instrument devices, FX devices, and mixers (basically everything except the spiders).
  5. I’m recording via my controller, but nothing is recorded in the track on the sequencer. This could be due to the fact that you didn’t give the right track Recording focus (Enable Recording) on the track in question. First, look to the sequencer and see if anything was recorded. Do you see a clip on any of the tracks that was just generated. If so, that’s the track you’ve been focusing. To enable recording on a sequencer track, click the circle located next to the device thumbnail to the left on the sequencer track. Also, click the track itself to make sure it’s highlighted. Then click record in your transport and start recording. You should be all set.
  6. I added an Arpeggiator and adjusted settings, but it’s not affecting the sound. This is another common pitfall. The Arp is much like the Matrix in that it doesn’t generate any sound, it is used to sequence another sound device, but your parts need to be located on the Arp track, not the sound device track. You probably have your clips on the sound device track in the sequencer. You’ll hear the sound device, but the arp won’t be affecting it. Just move the clips to the Arp track and you’re done. Once your parts are on the Arp track, you’ll hear the sounds. If you want to make the notes permanent, give your sound device track focus in the sequencer, then go to the rack and right-click on the Arp device, and select “Arpeggio Notes to Track.” Don’t forget to delete the clips on the Arp track or delete the Arp device and track entirely, otherwise you’ll be doubling up on the sound.
  7. I can’t load samples or Patches in my NN-XT. The NN-XT is divided into two sections: 1. the top section is the Global Parameter section for the entire device. Here you can load patches, but not samples. 2. The Remote Editor. If you click the tiny drop-down arrow at the bottom left of the device, you’ll open the “Remote Editor” which is similar on the RV7000 Advanced Reverb. Basically, this opens up the sample editor. Here you can load your samples, but not patches. It’s important to note that the NN-XT and NN19 are the only devices where you can load both patches and samples, and it’s important to note the different areas where each can be loaded.
  8. The Matrix doesn’t start or stop where I want it to start and stop. The Matrix can be thought of as a mini-sequencer. It’s monophonic so it will only play a single synth voice if you are connecting the notes via CV to another device. But another area that trips people up is the fact that it is synchronized to the timing and beats of the song tempo when playing in Real-time. It starts and stops based on the bar of your song. It cannot switch patterns between bars. It needs to follow through to the end of a bar before it can adjust to a new pattern. For this reason, it’s important to think through how you want your patterns to play. You can insert up to 32 patterns for each Matrix device, so if you need things to switch differently, it pays to have a plan and insert your patterns as you want them played for a full bar of your song (at least as much as a bar). The other alternative is to speed up the tempo of your song or track as fast as you can. Then the switching can be extremely quick between your patterns. It should be noted that you can have the Matrix start and stop as you wish if you add pattern clips on the Matrix Sequencer track. What I’m referring to here is Real-time use of the Matrix device.
  9. I am not hearing anything from the Vocoder I just inserted. The BV512 Vocoder is a special FX device which requires two sounds: 1. a Source or Carrier and 2. a Modulator. The Carrier signal is Stereo and is used as the main sound source. The Modulator, on the other hand, is monophonic and requires only a single input. If you need to cable a stereo sound into the Modulator, you can do so by spidering the left and right outputs of the sound together in a spider audio merger, and then send the output into the Modulator input. The modulator is what affects the sound. It pays to have a Modulator signal that has a lot of harmonics, while the carrier can be any kind of sound. The best way to see for yourself is to set up a nice lead synth connected to the Mixer. Then record your parts onto the lead’s sequencer track. After this, cable the lead outputs into the Carrier inputs on the back of the Vocoder. Then add a Subtractor and cable the Subtractor’s output into the Modulator input on the Vocoder. Play with the settings on the Subtractor to hear how the Subtractor is affecting your lead. You can get some really nice sounds out of this type of setup, and the Subtractor is a good Modulator with a lot of options. Of course, don’t let that limit you. You can use any sound as a source and any sound as a modulator. So experiment until you find some useful setups. After a while, you’ll instinctively figure out what works best for the Vocoder according to your own tastes.
  10. I lost the data on my hard drive / My hard drive is corrupt / My computer freaked out and I can’t find my songs. This isn’t a Reason pitfall, but it is most certainly important no matter what music you make or what software you use. So I’m adding it here. Make sure you first verify with someone who knows all there is to know about computers (your local IT guy, geek squad, brother-in-law super computer genius, or some other computer freak) that you did indeed lose the data on your hard drive. If that’s the case nothing can help you now. You’ve lost your data. You’ve lost your music and songs, and you’ll need to get a new hard drive or reinstall windows or something along those lines. Once you’re back in business with your computer, go get your backup drive, CD, or DVD media that has all your songs on it and transfer them back onto the computer. Oh wait. You don’t have a backup huh? Well then I think you’ve learned a very valuable lesson here right? ALWAYS ALWAYS ALWAYS BACKUP YOUR SONGS. Here’s my strategy. First I have a single folder called “Reason” and under this folder I have subfolders for songs, refills, output, misc, etc. Keep this folder outside the realm of the Reason folder (when you upgrade reason, you wipe out the reason folder, so you don’t want your files wiped out. This prevents that from happening). Back up the entire folder once a month on two different formats (I back it up onto a portable hard disk AND DVD media). The chances of both hard drives crashing and all my DVDs breaking at the same time are astronomically slim (incidentally I keep all the DVDs in a firebox just in case — call me paranoid. That’s ok with me ;-). I back this folder up in both places once each and every month. I even have a reminder setup in my email so I don’t forget. Every first of the month, it takes me about 1 hour. Call that hour an insurance policy against what could take me 5 years to remake all my songs, sounds, etc. and it’s doubtful I could remake it the exact same way twice. So it’s a good bargain if you ask me.

Do you have any pitfalls that weren’t covered here? Do you think there are other “common” ones that weren’t mentioned?