New CD Release! 2011 Kicks off

2011 is here and it’s time to kick off the new year, get back to work with some crazy ass tutorials, make music, patches, refills and all other kinds of crazy things. To start the year off, I’ve released a new CD which you can check out at CD Baby.

New EP: Standing in a Hallway Staring at a Door2011 is here and it’s time to kick off the new year, get back to work with some crazy ass tutorials, make music, patches, refills and all other kinds of shenanigans. To start the year off, I’ve released a new CD which you can check out at CD Baby: Standing in a Hallway Staring at a Door.

This CD comes out of several more melancholy ambient tracks that I’ve been toying with all year and whittled down into a 37-minute EP carpet ride. It also was part of a challenge of mine to stick to the sounds that are found in my Generations refill. To that end, about 99% of the music on the CD is from that refill. A challenge to be sure; my fingers kept venturing into some of the other finer refills in my collection. But will power called me away and demanded I try creating something fully “mine” this time around. It was the first time I did and I’m pleased with the turnout.

I’ve also released a free download which is an alternate demo version of the last song on the CD (Locked), which you can find here in my trusty Soundcloud widget below. Feel free to have a listen, download, and share the tune. Just be sure to let them know where they can find the full CD if you do. Your help spreading the word is always greatly appreciated.

Locked (Demo) by Phi Sequence

Enough about that blatant self-promotion stuff. Now what tutorials do you want to see in the coming year? What types of sounds would you like to have in a refill? What general thoughts do you have about Reason and Record. Share your tips and tricks and fantastic creative voyages you’ve had with the software. I’m all ears.

34 – Breaking out of Kong

Exploring the Advanced features of Kong, learn how to use Kong’s FX modules on audio from other devices, process your Kong sounds through other Effects units not included in Kong, expand your Drum processing abilities by parallel drum processing or processing each drum module individually.

In this tutorial I’m going to explore some of the advanced features of Kong. We’ll learn how to use Kong’s FX modules on audio from other devices, process your Kong sounds through other Effects units not included in Kong, expand your drum processing abilities by parallel drum processing, and process each drum module individually.

Break Out / Break In

The first foray into exploring some outside routing came from an email request I got. The person who emailed me wanted to know how the first tip from “Music Radar’s Top 10 Essential Reason 5 Tips” worked. The tip went like this:

“One of Kong’s best features is its powerful level-setting system, but another key point is its connectivity. Instead of mixing internally within Kong, try routing the pads out through a 14:2 Mixer and then back into Kong via the Break-in connections. This enables you to set levels and EQ with the mixer, and still use the powerful master output FX. Save your construction as a Combinator for future use.”

Well, here’s how it works. The basic idea is that the Break-out jacks on the back of Kong act as an additional way to insert Effect devices between the FX2 and Bus FX modules in the signal flow. The flow works something like this:

Drum Module > FX1 > FX2 > [Your Insert FX here / Break-out & Break-in jacks] > Bus FX > Master FX > Main Output

That’s essentially the signal flow. Keep in mind though, that if your Drum output is set to “Master FX” which is the default, or any of the output jacks (3-4, for example), you will need to use the Bus FX Send knob on the drum panel on the front of Kong to adjust the level of the external effects devices. Also note that the external effects devices are global. You can use them as an insert for all the drum modules inside Kong. If you don’t want them used on a specific drum, then just keep the Bus FX Send for that specific drum at it’s zero (0) default.

I know this sounds a little complex, so I put together this video to show you an example:

Parallel Drum Processing, Kong Style

Here’s an interesting way to create Parallel processing on your kick via Kong. And it’s stupid-easy!

Parallel processing is when you use the same drum sound both wet and dry at the same time. You can tune the amount of each, but both together add up to a beefier sound. Again, the idea is to trigger both a processed and unprocessed drum sound at once and then mix both together to create a punchier beefier kick. So here’s the easy way to do it in Kong. Note that we’ll do it inside a Combinator so you can save the patch for later use.

  1. First, Create a Combinator and inside create a 14:2 Line Mixer (we’ll do this to have access to the Mixer’s EQ, otherwise you can create a 6:2 mixer instead, that’s totally up to you). Then create a Kong.
  2. Open up Kong and add a Physical Bass Drum into drum module 1. Set the drum output to the 3/4 stereo pair. Add a Parametric EQ device into the Bus FX slot and a Compressor into the Master FX slot.
  3. Flip the rack around and send a pair of audio cables from the 3 / 4 Audio outputs on the back of Kong into the second channel of the 14:2 Mixer.
  4. Now comes the fun part. Flip back to the front. Turn up the Drum’s Bus FX send to about 100, and start playing the Drum Pad. As you play, adjust the EQ and Compressor to taste. You’ll hear the effect it has on the sound.

The reason this works is because you are sending the same drum sound two different places. The unprocessed sound is going straight through ouput 3/4 (and into channel 2 on the Mixer), while the processed sound is running through the Bus FX and Master FX and back out the main outputs into channel 1 of the 14:2 Mixer. Both are playing at once. Instant parallel sound.

If you want to ease back on the level of processed sound (ie: the sound going through the EQ and Compressor), simply reduce the Bus FX send knob. If you want to adjust the level of dry sound, use the Channel 2 Level fader. You can also turn on the EQ and adjust the EQ parameters directly on the 14:2 Mixer. This setup provides loads of options.

7 Drums to 7 Channels: Hooking up each Drum Module Separately

And now for something completely different. I’ve heard many people ask how they can send their drum pads to individual channels in the mixer. The easy answer is to send each drum module through the different outputs available on the back of Kong; 7 stereo pairs in all.

In actuality, if you count the Master FX, Bus FX, and Direct output, you have 10 in total. But for our purposes here, let’s focus on sending 7 drum pads out to 7 different channels in the Mixer. In this way, all the drums operate exactly the same in terms of signal path and it’s the easiest to work with when you’re first starting out.

To set this up, first create a Combinator as we did earlier (so we can save this as a template for use later). In the Combinator create a 14:2 Mixer and holding the shift key down, create a Kong device.

On Kong, click the Show Drum and FX button. Then load up 7 drums in the first 7 drum module slots. These can be any drum modules you like, and they can have any associated FX inserted into the FX1 and FX2 slots.

At the bottom right of the drum module select the appropriate outputs as follows:

Drum Module 1 > Output 3 – 4

Drum Module 2 > Output 5 – 6

Drum Module 3 > Output 7 – 8

Drum Module 4 > Output 9 – 10

Drum Module 5 > Output 11 – 12

Drum Module 6 > Output 13 – 14

Drum Module 7 > Output 15 – 16

Flip the rack around to the back, and route each of the above audio outputs to their own Left/Right channels in the 14:2 Mixer (7 channels in total).

That’s all there is to it. Now, you can control each of the drums via the Mixer channels. This means that you can control the Level, EQ, Panning, etc. from the Mixer channel strip. This also opens you up to using 4 different sends on the drums via the Mixer sends if you like (if you did everything through Kong, you’d have access to only 2 sends via the Aux 1 and Aux 2 cables on the back of Kong).

One caveat. In this type of setup, you can control the Level of the individual drums via the Drum Level knob on each drum panel, if you so choose. So don’t get confused. Essentially, this means you have three junctures at which to control each of the drum levels: The Drum Module’s Level knob, the Drum panel Level knob, and the Mixer Channel Level fader. It’s important to know the proper signal chain between all these various levels. It goes exactly in that order:

Drum Module Level > Drum Panel Level > Mixer Channel Fader > Mixer Master Fader

Since there is nothing routed from the main output of Kong, Kong’s Master Level isn’t even utilized (put another way, it’s useless and does nothing in this setup).

Processing Audio Through Kong

Finally, here’s how you can process your audio through Kong. It’s drop-dead simple, and you can process Any audio from any device (and from any audio track if you have Record) through any number of Kong FX devices. Watch the video to find out how it’s done.


So that’s it. A few advanced ideas for breaking outside Kong and using the device for more than just drum processing. I’m sure there’s many others. But these are the ones that came to my mind. What’s your favorite idea or feature of Kong? Drop me a line or comment on this post and let’s see just how far we can push Kong.

Mono, Poly and Stereo

This article will explore Monophonic versus Stereo and Monophonic versus Polyphonic. Two very different concepts, but both very important concepts. This is also a good opportunity to discuss the Effects devices and go over the suggested audio routing options for each.

This article will explore Monophonic versus Stereo and Monophonic versus Polyphonic. Two very different concepts, but both very important concepts with which everyone needs to get to grips. The reason I’m going to explain them both in one article is because they have similar terminology (they both share the term “Monophonic”). This can lead to some confusion. This is also a good opportunity to discuss the Effects devices and go over the suggested audio routing options for each. 

When I originally put together my Reason wishlist and posted it here on my blog, I made the fatal mistake of saying that I wanted the Matrix to be “Stereo.” I actually meant to say I wanted the matrix to be “Polyphonic.” Oh gasp! I know. The horror. So just in case anyone else is confused by these terms, let’s see if we can set the record straight. 

First, there are two concepts: 

  1. Monophonic versus Stereophonic: This refers to channels in an audio system. Monophonic is 1 channel (or any single-channel system). Stereophonic is a two-channel system (left and right audio channels) which are reproduced by 2 speakers (left and right).
  2. Monophonic versus Polyphonic: This refers to the number of voices that a Synthesizer can play at one time. Monophonic means the synth can play a single voice (single note). Polyphonic means the synthesizer can play multiple voices (2 or more notes). In Thor, you can have 32 voice polyphony, meaning you can have 32 notes playing simultaneously. In addition, Thor has Release Polyphony and can also have 32 notes sustain after you lift your finger off the key, or after the note’s end in the sequencer (in the case of midi).

There is also the term “Monophony” which refers to the melody line of the song. It is a song which contains only a melody line without an accompanying Harmony. So strictly speaking, if you have two notes played at once, each one octave apart, the song can still be considered “Monophonic.” Confused yet? I’ll let Wikipedia explain this concept of Monophony

A few other notes: 

  • In Reason, as in the real-world, CV relates to Monophonic and Polyphonic voices of a synthesizer. While Monophonic and Stereophonic channels in an audio system are audio-specific. The RPG-8 Arpeggiator and Matrix are termed “Monophonic” which means they can only control one voice of a synth at a time. If you want to create a “faux” Polyphony, you must first duplicate the RPG-8 or Matrix as well as the sound sources they are controlling, and then send the output of both these sound sources to their own audio channels; either mono or stereo, it doesn’t matter. You now have two-voice polyphony.
  • The above points out also that you can have a Monophonic synth that has a Stereophonic “audio” output OR you could have a Polyphonic synth with a Monophonic “audio” output. Plus, you can take a Stereophonic signal and make it Monophonic (panning both channels to center), but if you take a polyphonic CV and make it mono (sending it to a mono synth) you will just drop all the notes beyond the first or last one (just like playing a chord on a mono synth).

Effects Devices in Reason, and Reason’s Routing Suggestions

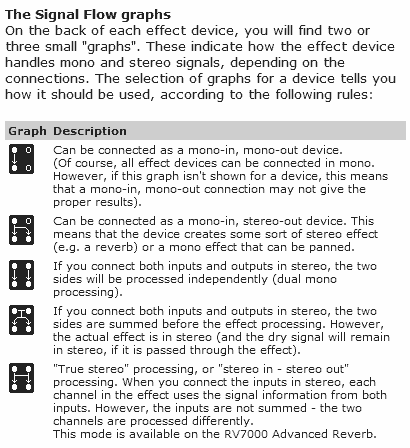
According to the literature in Reason and Record, there are specific ways in which the Effect devices should be connected. I’m going to plagiarize for a moment and take an excerpt directly from the help file. This excerpt explains the way Monophonic and Stereophonic signals are processed by the effects devices in Reason, and shed light on those little tiny diagrams on the back of the FX devices (come on, give me a show of hands. How many of you knew those diagrams were there to begin with? And how many knew what they meant?). 

FX Routing Legend and Descriptions

 So looking at the diagrams, we can see the following connections can be made by the Reason devices: 

RV7000 Digital Reverb: 

Mono In / Stereo Out 

Stereo In / Stereo Out 

Scream 4 Distortion: 

Mono In / Mono Out 

Dual Mono In / Dual Mono Out 

BV512 Vocoder: 

Mono In / Mono Out 

Dual Mono In / Dual Mono Out 

RV7 Digital Reverb: 

Mono In / Stereo Out 

Stereo In / Summed Stereo Out 

DDL-1 Digital Delay: 

Mono In / Stereo Out 

Stereo In / Summed Stereo Out 

D-11 Foldback Distortion: 

Mono In / Mono Out 

Dual Mono In / Dual Mono Out 

ECF-42 Envelope Controlled Filter: 

Mono In / Mono Out 

Dual Mono In / Dual Mono Out 

CF-101 Chorus/Flanger: 

Mono In / Mono Out 

Dual Mono In / Dual Mono Out 

Mono In / Stereo Out 

PH-90 Phaser: 

Mono In / Mono Out 

Dual Mono In / Dual Mono Out 

Mono In / Stereo Out 

UN-16 Unison: 

Mono In / Mono Out 

Dual Mono In / Dual Mono Out 

Mono In / Stereo Out 

COMP-01 Compressor: 

Mono In / Mono Out 

Dual Mono In / Dual Mono Out 

PEQ-2 2-Band Parametric EQ: 

Mono In / Mono Out 

Dual Mono In / Dual Mono Out 

MClass Equilizer: 

Mono In / Mono Out 

Dual Mono In / Dual Mono Out 

MClass Stereo Imager: 

Dual Mono In / Dual Mono Out 

MClass Compressor: 

Mono In / Mono Out 

Dual Mono In / Dual Mono Out 

MClass Maximizer: 

Mono In / Mono Out 

Dual Mono In / Dual Mono Out 

Phew! Now that’s quite a lot of information to take in. However, when you look at it, you can pretty much break it down into a few key points which are easier to remember: 

  • All devices can be connected in Mono In/Mono Out except the MClass Stereo Imager (makes sense right? Because you can’t separate a mono signal or make it wider/narrower. It’s already mono, so you can’t make it more mono. You also can’t magically turn a mono signal into a true stereo signal). So forget using it for anything other than Dual Mono In/Dual Mono Out.
  • Every FX device except the Delay and Reverb devices can be connected in Dual Mono In / Dual Mono Out.
  • The RV7000 device is the ONLY device in Reason which is true stereo (Stereo In / Stereo Out). The RV7 and DDL-1 are the next best thing with a Stereo In / Summed Stereo Out.
  • The Devices that can be used as Mono In / Stereo Out are: RV 7000, RV-7, DDL-1, CF-101, PH-90, and UN-16.
  • Every device can be used as an Insert effect, however not every device should be used as a Send effect. Effects that should not be used as Sends fall under 2 categories: 1. Dynamics Processors (all MClass devices, COMP-01 and PEQ-2), and 2. Distortion Units (the Scream 4, and D-11).

This last point is not really related to the issue of Mono/Stereo, but is an important consideration when connecting devices in your tracks and is another point that shouldn’t be overlooked. 

One other thing I wanted to point out. If you get a chance, you really should check out Hydlide24’s great video on different ways to create Stereo separation in Reason. There’s so much great information in this video, I thought this would be a relevant place for it. He tends to move a little fast through the video, but you can always pause and go over it a few times to follow along. Check out some of his other videos if you get a chance as well. 

Hopefully this information is accurate. I’m human and prone to many mistakes. If there is an error, please help me point it out and make sure it’s accurate. I’ll ensure I get it corrected. And if you have anything to add, I welcome your advice and opinions.

Panning to Punch out your Mix

Kevin Parks is a former architectural designer, artist, and boatbuilder with a life-long love of music. Learn how he uses Panning in Record to punch up his mixes, giving them enough sonic space to have a fighting chance.

Your mastering will go a lot better when your mix is fine tuned.

These are some procedures that have evolved for me through time, advice, and experience. Everyone’s work flow is different, but we are all trying to solve the same sorts of problems, so I hope what follows will add something to your bag of tricks.

Before adding a lot of FX to try to punch out a mix, there are some things I like to do to give my mixes enough sonic space to have a fighting chance.

Working with Audio

First of all, since Record gives us audio capability now, let’s start with audio.

For all audio recording, I want to get the cleanest signal possible going into my computer.  Electronic noise takes up space better used for actual audio content.

I spent weeks routing and re-routing cables, getting rid of bad connections, separating all my power cords from my audio cables, and gain-staging to get the cleanest signal I could going into my computer.

While my input signal is *much* improved, it isn’t perfect, and electronic noise is cumulative. So if you mix a lot of tracks, each with a little noise, it adds up. If you don’t have noise reduction software, what can you do?

One thing you can do about that in Record is to use the razor tool and cut out the silent stretches in each audio track.  That will eliminate your hardware’s noise profile, at least from those stretches.  Nothing worse than teaching people’s ears how to tune into the static, just as they are ready for the music to start. This can make a really surprising difference. Noise can hide rather nicely within the audio content when the listener isn’t being trained how to hear it.

So now that we have gotten off to a good start by getting rid of obvious  problems with the audio tracks. Now what?

Next step , before adding a lot of FX to the mix, is to make sure to give all your tracks a place to be in the mix,  their own sonic space. No sense to start cutting freqs with EQ to solve problems that will go away with proper panning.  So start out with panning before using EQ.

To pan your tracks well, the first thing to consider is what goes center stage?

Be careful not to stack too many things in the center. 

Keep in mind that bass  frequencies are non directional to a great extent, so try to avoid panning low freqs very far if at all. The farther you pan a low frequency track the muddier your mix will get. (I have sometimes panned a bass and a kick a little bit, say 10-15%, and then gone back later to help separate them with some judicious EQ work.)

Separate freq ranges work OK together in the center, but if the freqs are too close to each other it will get “crowded” very quickly.  Think in terms of low, medium and high frequencies, and choose what  tracks you will stack in the center. Then  preview just  those tracks in your center channel.  You can try out different instruments until your center shines.

Next idea to remember:  The higher the frequency, the easier it is for it to sit farther from center. Since I use a lot of guitar tracks, I often balance the rhythm and lead guitars by placing them approximately the same distance from center, say 30-50%.

I like to continue to keep balance in my mix by pairing up higher freq tracks and placing them likewise the same distance apart. Higher freq tracks I place farther out than the guitar tracks. More often than not, it is better not to go all the way to 100% .  

Placing higher freqs farther apart is a good rule of thumb to start off with. I  get a sense of how many pairs I have and then divide up the space between pairs accordingly. Then preview different ideas; it’s fun, it’s free, and it’s going to improve your mix.

On the psycho-acoustic side, keep in mind that people tend to rely more on their right ear for things that they pay more attention to, so I like to place the lead somewhat, but not extremely, to the right. It helps hold peoples attention.

So remember,  you will need to do less fiddling with EQ when the tracks each have their own place in the sound field. Panning is powerful stuff.

Now, just to touch on EQ and Reverb:

OK, at this point,  panning has just given you the ability to place your tracks/instruments in different locations from left to right across the sound field. Then if there is a conflict, if  there is an instrument or track that is masking another one, then use EQ to tweak that  problem specifically.  Using a bass track and a kick drum as an example, solo those two tracks and tweak the EQ gently on each  until you can hear them both clearly. (Research this aspect if necessary.) 

Apply reverb last: Now I evaluate where I need/want reverb. Reverb will push a track farther back in the mix.  Sometimes you might need some reverb on a guitar track to help it cut through the mix. I often like to give my guitar tracks an ethereal feel with reverb. Avoid using reverb on low freqs; it makes muddy, harmonics. Reverb is much more pleasant and clean when used on higher freqs.

Once in a while I find that a *little* reverb applied globally to the finished song, can help integrate the tracks. Be careful though. If you are having to do very much of that, chances are that there is a track that needs more attention.

That’s all for now.  Knock ’em out, baby!


Kevin Parks is a former architectural designer, artist, and boatbuilder with a life-long love of music.  Translating uncharted realms of emotion using rhythm, space, and harmony..weaving real world instruments and software synths into experiential ambient synthesis. You can visit his website at http://www.soundclick.com/ambientsynthesis where he showcases several of his musical works.

3 – Filtering Audio through Thor

In this project I’m going to demonstrate a few ways you can use Thor’s filters, FX (Delay and Chorus), and LFOs creatively by routing any of your audio sources through Thor. This can be a great way to punch up some drums or create new innovative sounds from any of the synths. So let’s start our exploration.

In this project I’m going to demonstrate a few ways you can use Thor’s filters, FX (Delay and Chorus), and LFOs creatively by routing any of your audio sources through Thor. This can be a great way to punch up some drums from a Redrum, or to create some new innovative sounds from any of the synths. Furthermore, you’re not limited to using only 1 filter. You can connect your audio through a series of Thor devices to gain access to more than 1 filter at a time. So let’s start our exploration.

Basic Audio Filtering through Thor:

  1. Open Reason. In the rack create a Combinator and inside the Combinator create a Thor, initialize the patch, and then create a Redrum underneath. Add a drum kit and create a simple pattern with a kick, high hat and a few other drums. Don’t make it too complex. Use about 4 or 5 drum samples to create the pattern.
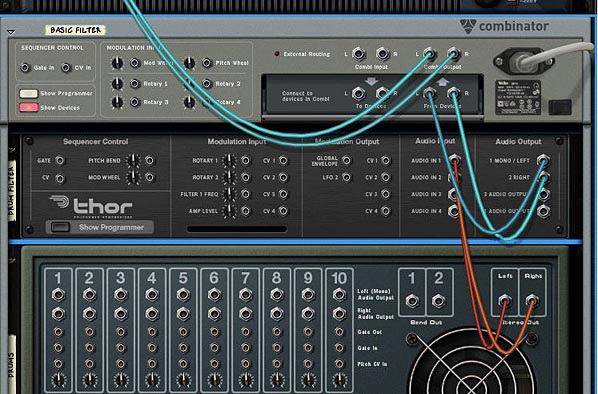
  2. With all the hard work done, now we’ll do some routing. Flip the rack around and route the Left and Right audio output from the Redrum into the “Audio In 1” and “Audio in 2” on the Thor.
  3. Basic cable routing to pipe audio through Thor
    Basic cable routing to pipe audio through Thor
  4. Flip the rack back around, show the Programmer for Thor, and uncheck all the little green lights in the “note” section (the section that is dark and not light brown). Also, turn the analog osc.1 off, and bypass the Ladder Filter (Filter 1). Then turn off the routing between Osc.1 and Filter 1 (the little red “1” light). In the top device section, set Polyphony and Release Poliphony to “0” and turn off both trigger lights (Midi and Step Seq). The point is that you don’t need any of that mumbo jumbo.
  5. Add a Filter into the third Filter slot of Thor. A Low Pass Ladder or Comb filter works well with Drums, but you can use any filter you like.
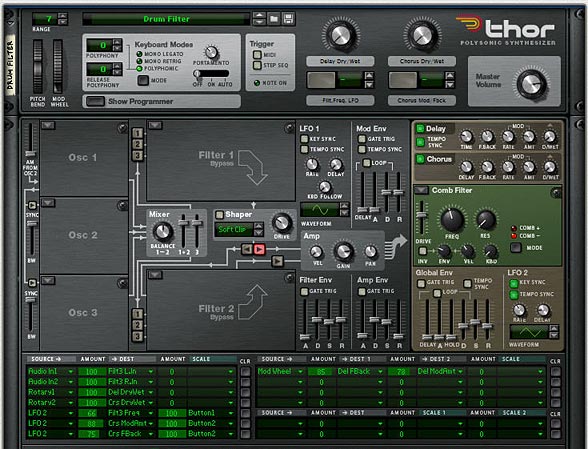
  6. At this point, most people will press play and think that they should be hearing something. But we’re not finished yet. We need to reroute the default Thor audio signal. Here’s how to do that: In the MBRS (short for “Modulation Bus Routing Section”) of Thor, in the first row on the left, click on the “Source” and select the bottom-most option “Audio Input > 1” then set the “Amount” column to “100.” Click the “Destination” column and select “Filter 3 > Left In.” On a new row, do the same thing, but for Audio Input 2 as a source and “Filter 3 > Right In” as the destination.
  7. The MBRS at the bottom of Thor
    The MBRS at the bottom of Thor
  8. Now press play. You’ll hear the drum pattern, which is routed through Filter 3 in Thor, then to the Chorus and Delay section, and back out to the mixer.
  9. Optionally, you can use the FX (Delay and Chorus), or route the LFO2 to affect any of the parameters in Filter 3 or the FX. One thing I like to do is turn on both the Delay and Chorus. Then in the MBRS section, program the two FX Dry/Wet parameters to the two Rotaries. If you use amounts of +100 for both, then turn the actual Dry/Wet knobs on the FX all the way down, you create a controllable Delay and Chorus effect via the Rotaries. I also use the Mod wheel to control the Filter 3 Frequency or Resonance or both. That way, it’s all controllable. If you want to push it further, you can assign the LFO2 to affect the Frequency or Resonance via one of the Thor buttons. This all gives you a great degree of control over affecting the sound. Download the example file (at the bottom of this post) to see these routings.
The front of Thor, with all routings for the FX and LFO2

First, here’s an example of the original sound:
[ti_audio media=”177″ repeat=”1″]

Second, here’s an example with the audio filtered through Thor (remember, you can adjust the filter to taste):
[ti_audio media=”175″ repeat=”1″]

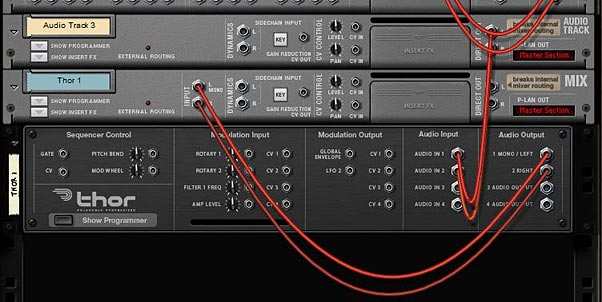
As an aside, if you’re using Record and have an audio track, you can still route your audio through Thor, by cabling the direct output of the audio track to the Thor inputs 1 + 2 as shown below.

Routing an audio track in Record through Thor

Audio Filtering through a Series of Thor Filters:

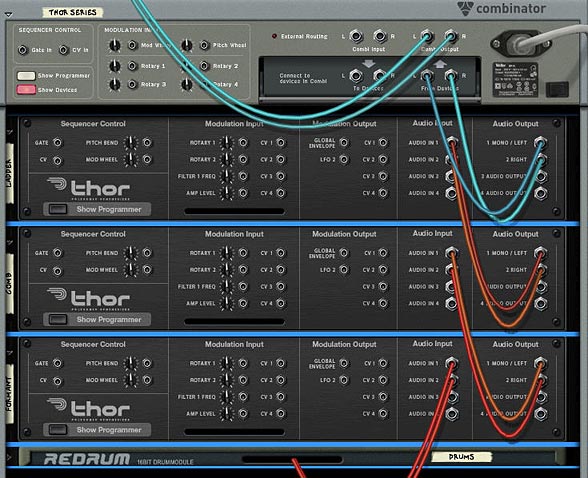
By now, you will have noticed that plugging audio through Thor gives you access to the global section (the parts of Thor that are light brown). What if you want the use of more than one filter. Let’s say you want your audio path to move this way: Audio Device > Formant > Comb > Low Pass Ladder? Well, it’s really quite simple. Follow the above directions to set up your first Thor, and then build upon that as follows:

  1. Flip the Rack around. Right-click over Thor and select “Duplicate Devices and Tracks.” Do this one more time. You should now have 3 Thor devices.
  2. Move the “Audio In” cables from the first Thor to the bottom-most Thor’s “Audio Ins” and then cable the “Audio Outs” from that bottom-most Thor into the Thor above’s “Audio Ins.” Finally, cable the “Audio Outs” from the middle Thor to the “Audio Ins” of the top-most Thor.
  3. Flip the rack around again to see the front. Then switch the bottom-most Filter 3 to “Formant” and top-most Filter 3 to “Low Pass Ladder.”
  4. Press Play and adjust the three filters to taste. It might help to bypass the filters on the top two Thors. Adjust the bottom filter, then turn the middle filter on, adjust it, and then finally turn the top Thor filter on and adjust it. That’s all there is to it. 3 filters affecting one sound source.
Routing Thor filters in series to affect a sound source

Example of the Filters in Series:
[ti_audio media=”178″ repeat=”1″]

Audio Filtering separate Drums through Thor:

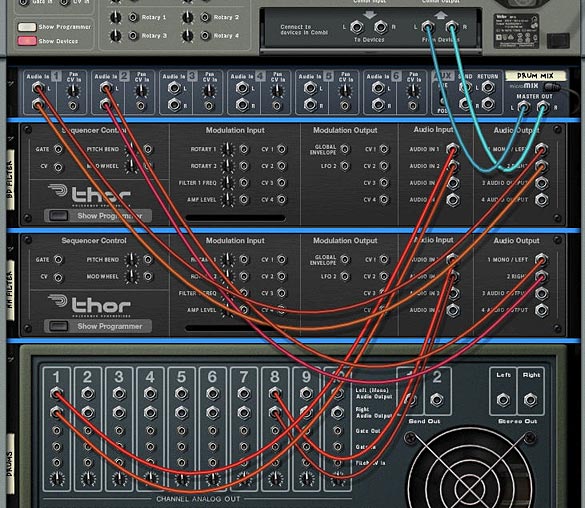
All of the above is fine and dandy, but what if you don’t want all the Drums filtered the same way. Let’s say, for example, you want the Bass Drum to be filtered by a Low Pass Ladder filter and the High Hat to be filtered through a High Pass in a State Variable filter. Well, without getting too complicated, here’s what you do:

  1. Follow the steps to create a Basic Thor Filter above.
  2. Create a Line Mixer 6:2 and move it to the top of the Devices in the Combinator.
  3. Flip the Rack around, and delete the audio output cables from the Redrum.
  4. Duplicate the Thor device (so you now have two Thor devices under the Line Mixer.
  5. Move the Audio Outputs from the first Thor into the Master Audio Outputs of the Line Mixer.
  6. Cable the Bass Drum Audio Outputs from the Redrum to the first Thor’s Audio Inputs 1 + 2
  7. Cable the High Hat Drum Audio Outputs from the Redrum to the second Thor’s Audio Inputs 1 + 2
  8. Cable the Audio Outputs from the two Thors into Channels 1 & 2 on the Line Mixer.
  9. Routing two separate filters to control the Bass and High Hat Drums
    Routing two separate filters to control the Bass and High Hat Drums
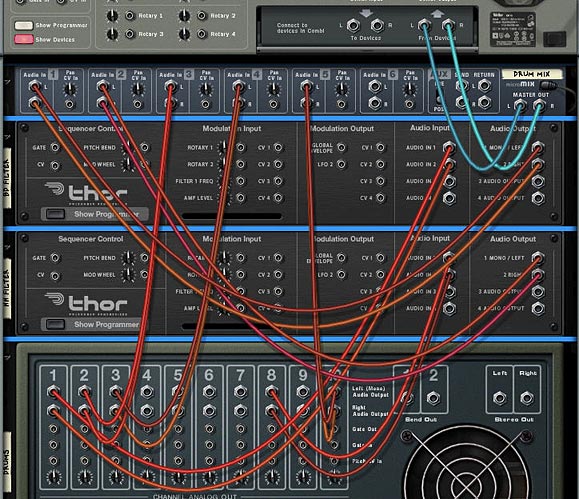
  10. Cable the other Drums into the free channels on the Line Mixer.
  11. Routing all the drums to the Line Mixer
    Routing all the drums to the Line Mixer
  12. Flip the Rack around again to the front, and then insert the Filters of your choice into the Filter 3 slots of both Thors. Adjust them to taste in order to affect the Bass and High Hat Drums

Example of separately filtered Drums (with a little delay on the High Hat):
[ti_audio media=”176″ repeat=”1″]

Some Final Thoughts:

Finally, just because you filter one sound through the Global section of Thor, this doesn’t mean you can’t use the Thor to generate a sound of its own. This way, you end up merging two sounds together in a kind of layering. If you want to see how this is done, look at the “Synth+Filter – Droid Chatter” Combinator in the example files. You can do some pretty interesting things this way. Additionally, you can take one sound source, split it into two different Thor filters and then route them to two separate channels in the mixer, or back into one channel if you like. A wealth of options and possibilities, for sure. 

Example of a Synth Arp + Thor with an Analog Oscillator, both generating sound. The Synth Arp is being filtered through Thor while Thor is generating a sound of it’s own. This creates a layered effect:
[ti_audio media=”179″ repeat=”1″]

So as you can see, routing audio through Thor is not difficult, but most people miss the step about the Modulation Bus Routing Section. If you remember to reroute the audio signal, you’re golden. That’s it in a nutshell. nothing fancy.

I mainly use Thor’s comb or Low Pass Ladder filter to affect drums and then put it all in a combinator. But that’s just one way you can use Thor.  Are there any other ways you Route your audio through Thor? Do you have some creative ideas that I haven’t covered here? Please share them. I’m curious to see how people are using Thor to affect external sources.

Download the Example Files