Today let’s take a nice little look into the world of The Echo. New to Reason 6, this is one of 3 new effects which were much anticipated by the User Community (Do we all remember posts with subject lines reading “We need better effects in Reason”? I do).
You can download the project files here: Echo-Techniques. There are some Combinators and a .reason file showcasing the examples found below. In the .reason file, I’ve used mutes to silence all the tracks. To listen to a track, unmute it. I hope you find some of these tricks useful.
Also don’t forget that my latest Refill, Pureffects, is available with 1,250 effect patches designed specifically with Reason 6 in mind. There’s 200 Echo patches alone, and about 30 or so Echo Combinators with all kinds of interesting routing ideas. For example, ever thought about setting up Kong to “Play” the various “Delay Times” via your pads? Since there are 16 “synched” times in The Echo delay, they are perfect for mapping to the Kong pads. Yup. It’s in there. Read More about the ReFill.
Overview of The Echo
The Echo brings some nice new features into Reason. It’s an Echo / Delay device that can also phlange things around, and purports a new Algorithm to the Echo that you won’t find inside the RV7000. As with all Reason devices, it doesn’t replace anything, but instead adds something new into Reason. So it’s not meant to be a replacement for the DDL-1 or the RV7000 Echo algorithm. They all have their place inside Reason.
One of the nice things I like about the Echo is the “Keep Pitch” button. Essentially, this will keep the pitch as you adjust the Delay Time, so that you don’t get those insane squelches that you get if you were to change the Delay Time in Thor or the DDL-1 devices. This is unique to The Echo.
Another unique offering is the way in which you can control The Echo. There are 3 ways to control it:
- Normal: Allows you to use The Echo as an insert or send device in any situation. The Dry / Wet knob determines the amount of Echo produced. This mode is probably the one you will be most familiar with, as it’s the way most effects are set up in Reason.
- Triggered: Allows you to Trigger The Echo via the Trigger button or by sending CV to the back of The Echo device. The only thing to remember with this mode is that Any Audio being processed through The Echo will not sound unless the Triggering is enabled. Something that can be a little confusing at first. Honestly, I would have preferred if the Audio was sent through the device dry when not triggered, so that you could still hear the unprocessed audio, and then triggering allowed you to hear The audio processed through The Echo, but I’ll show you a way around that later.
- Roll: This is a really nice option when you want to play a stuttering effect on the Audio. The Roll Feature will boost both the Feedback and “Wet” signal as the Roll lever is moved to the right. When this lever is all the way right, both Feedback and the Wet signal = 100%. Fully left, and both Feedback and the Wet signal are 0%. This makes it very useful as a “Freeze” or “Beat Repeat” function.
And of course you have the Color, Modulation, Ping-Pong mode, Offsets for Delay and Feedback, and Ducking. I’m not going to go into all of these features because the manual does a pretty good job of explaining them. Instead, I’m going to show you a few practical ways you can use them in your compositions.
Trick #1: Echoing Slices in a Loop via Parallel Processing
This idea uses 2 instances of the same loop to parallel process the drum beats. One will be the original unprocessed Loop, and the other will have a few slices of the same Loop run through The Echo. It’s a very simple process, but it can be a lot of fun when you’re spicing up your loops.
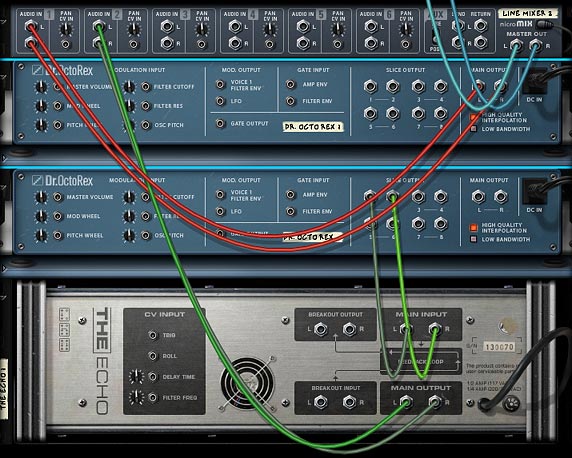
Start by creating a 6:2 Mixer inside a Combinator. Then create a Dr. OctoRex Loop player and initialize the device. Open up the lower section of the Dr. OctoRex and load up one of your favorite loops into slot 1. Now Duplicate the Dr. OctoRex Loop player. Flip around to the back panel (Tab), and connect the second Dr. OctoRex to Channel 2 (the first Dr. OctoRex should be connected to Channel 1). Flip back to the front, and select the Second Dr. OctoRex. Right-click and select Effects > The Echo. This will automatically connect The Echo as an insert device between the second Dr. OctoRex and the 6:2 Mixer. Perfect.
Now for the important part. Flip to the back of the Rack, and move the output of the second Dr. OctoRex from the Left / Right output to the 1/2 output instead.

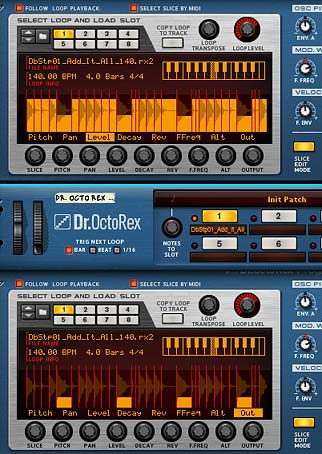
And now comes the fun part. Set both Dr. OctoRex devices to “Select Slice By Midi.” This allows you to see the slice focus as the loops are running. On the first Dr. OctoRex, select the “Slice Edit Mode” button and select the word “Level” in the Loop display area (not the “Level” knob). In the second Dr. OctoRex, select the “Slice Edit Mode” button and select the word “Out” in the Loop display area (not the “Out” knob).
Find a few key slices as the loop is played (Bass Drum is a pretty good choice in most cases), and in the second Dr. OctoRex, pencil in a quarter of the way up over these key slices. You should be hearing The Echo affecting those slices. In essence, the slices you select to be output from 1/2 (a quarter of the way up in the display) will be processed through The Echo. The reason it’s a parallel process is that the original loop is still playing simultaneously. If you don’t want the slices processed in a parallel way, go to the first Dr. OctoRex and reduce the level completely on the same slices you just sent to the Echo. You can introduce a little of the original signal back in by raising this level for the first Dr. OctoRex loop slices, or you can reduce/raise the levels in different ways to add a little variation and groove. It’s a very versatile method.
If you really want to start tweaking things, try transposing the second Dr. OctoRex loop by a few semitones or a whole Octave. If it sounds good, go with it. And when you’re done, save your creation in a Combinator.

Trick #2: Using a Matrix to Trigger Echoes
This idea is very basic but shows you how to use the Trigger Mode of The Echo. The idea is to use a Spider Audio to split the signal of a Dr. OctoRex Loop, and have one split going into a Mixer Channel, and another Split processed by The Echo and then sent to another Mixer Channel. Then take a Matrix Pattern Sequencer, and send the Curve CV from the Matrix into The Echo’s Trigger CV input on the back of the device. On the front panel, Set The Echo to “Triggered” mode, and set the Matrix to “Curve” mode. Start the Main Sequencer by pressing the “Play” button, and start drawing in some steps in the Matrix curve. The steps should be draw in at full level, and you don’t need a lot of them. Start by drawing in one or two on a few key beats. You’ll start to hear how The Echo is affecting the loop, so draw in your steps by letting your ears decide where they should go.
Here’s a video that showcases how to set up the above 2 tricks. Don’t worry, it’s really not as hard as it sounds. Once you understand the concepts, you can really have some fun with these methods.
Trick #3: The Echo’s Feedback Loop
Using the built-in Feedback loop of The Echo is something that hasn’t been talked about very much since Reason 6 was released a few days ago, but I’ll bet this will be one area that will get a lot of attention in the coming weeks and months. If not, then it should. The Feedback Loop is one helluva tremendous feature. And it’s really simple to implement with a lot of possibility. The only thing I would advise when you start fiddling with the Feedback loop is to reduce the Feedback of the Echo down to zero before you start connecting devices to it. Also make sure there is no feedback offset either. Keep that knob centered at zero (0). Otherwise you can really destroy your ears if Feedback is set very high and you accidentally connect a Scream to it, for instance.
No doubt someone will eventually do this. And for that poor soul I guarantee it will end up being the last time they do it.
So now that you know the rules of the road, here’s how you set it up:
Load up a sound device, like your favorite Thor, Malstrom, Subtractor, or any Audio Track if you prefer.
Create an Echo device underneath the sound source device (or you can place it inside the Audio/Mix Channel’s “Insert Effects” section). Turn the Feedback knob down to zero. I also turn the Delay Time down to zero as well, but this isn’t necessary.
Hold your Shift Key down and under The Echo device insert your favorite Effect device from the “Effects” subfolder (to make it interesting, select a Pulveriser).
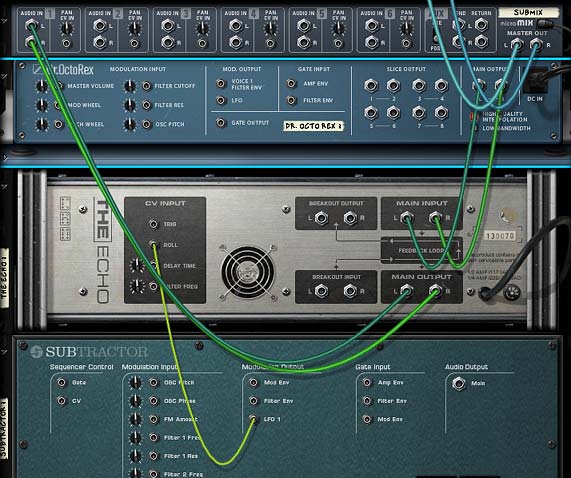
Flip to the back of the rack and connect the Pulveriser’s audio outputs to The Echo Feedback Loop audio inputs (Breakout Input). Then connect The Echo Feedback Loop audio outputs (Breakout Output) to the Pulveriser’s audio inputs.
The basic setup is complete. Now you can flip to the front of the rack and slowly raise The Echo’s feedback knob. I would probably set the knob to somewhere around 20. Then start to play with the parameters on the Pulveriser. Don’t go crazy. Just slowly introduce a few things such as some dirt, filtering and dry/wet blend. If you don’t hear anything too exciting, keep experimenting by turning up the feedback a little more, then increase the dirt and perhaps the squash settings. Try out the various filters.
You’ll start to hear how it all affects the feedback inside The Echo. And believe me, there are hours of fun found just in creating weird feedback loops. I created a lot of different feedback loops inside my Pureffects refill for Reason 6. I even fed a second Echo device through the feedback loop in one patch, and an RV7000 in another patch. Though when you feed delay effects through the Feedback Loop, you really need to mind your manners. As you can imagine, piling delays upon delays can be a recipe for disaster. Though with the right settings, you can produce some phenomenal results. It goes without saying, but I’ll say it again and again: Experiment! Experiment! Experiment!
Here’s the Video for setting up a Feedback Loop in The Echo:
Trick #4: The Zipper Effect
Here’s a little trick to create an off-the-wall sound with The LFO feature of The Echo. I personally like it for a very rapid delay which sounds somewhat like a zipper. So I’m calling it the zipper effect. It’s also very simple to set up.

Here’s a short video on how this is set up:
Trick #5: Automating the Roll feature in The Echo with an LFO
This is another one of those simple ideas that can produce some nice results. Try automating the Roll in The Echo with an LFO. Any LFO will do. You can even use the Pulveriser’s Tremor feature (essentially an LFO) to control your Rolls.

Here’s a short video on how this is set up:
Bonus Trick #6: Processing a Kong Snare Drum through The Echo
Much like Trick #1, where the Slices are independently sent out to The Echo, you can also set up a Kong Drum Kit, and send specific drums out to The Echo for processing. This video shows how you can set up a Snare Drum to be processed by a Pulveriser and an Echo, while all the other drums are sent out Dry. Once you understand these concepts, there’s no end to how you can process things with The Echo, as well as other effects devices in Reason. Have fun with it!
And here’s a really nice tutorial that Selig put together on parallel processing and sidechaining with The Echo, which I just found the other day. Really nice method to parallel process using nothing more than a single Echo. Sweet.
I hope that opens up some new ideas for those of you using The Echo. Any other ideas, please share them here. Until next time, have a blast with your new Reason 6 upgrade.
