64 – Creative Thor Synth Tricks

This tutorial is one that might show you a few new tricks with Thor. Recently I’ve been doing a lot of new sounds in the Reason rack, and I wanted to show off a few new things I’ve found out as I was creating inside Thor. This will also take you on a journey showing how I would come up with a simple synth lead in Thor.

This tutorial is one that might show you a few new tricks with Thor. Recently I’ve been doing a lot of new sounds in the Reason rack, and I wanted to show off a few new things I’ve found out as I was creating inside Thor. This will also take you on a journey showing how I would come up with a simple synth lead in Thor.

Trick #1: Creating a Dry / Wet control for the Kong effects using Thor’s Mod Wheel

This trick was one I stumbled upon when I was trying to figure out how to create a control which allows you to crossfade between the dry and wet control in the Kong effects device (since some of the Kong effects don’t allow you to automate the dry/wet knob directly. This method uses Thor as a pass-through for both the dry and wet signals, and then assigns them to the Mod Wheel. Once this is done, you can use the Combinator mod wheel to effectively switch between a fully dry signal (when the mod wheel is lowered), and a wet signal (when the mod wheel is raised).

This little strategy also has one other benefit: It doesn’t require you to utilize any modulation lines inside the Combinator programmer. This means that if you have a Crowded set of modulations for a particular device which uses all the Combinator modulation lines, you can still add this to the Mod Wheel of the Combinator without having to sacrifice any of those crafty modulations you’ve set up.

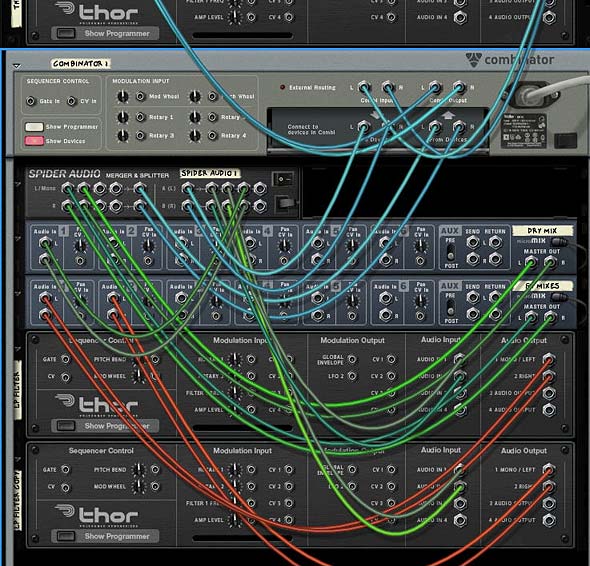
The general idea is that you use a Spider Audio splitter to send one split into the Kong effect, and the other split directly into 2 Thor inputs (input 1 & 2). Then you send the Main outputs of Kong into another 2 inputs on Thor (input 3 and 4). The 2 main audio outputs of Thor are then sent to a Mixer or to the final output.

Inside the Kong, you would add your effects devices in the Bus FX and Main FX slots. Set up the effects to your liking.

Then in the Thor pass-through, ensure that all the parameters are turned off or turned down (remove Osc 1, bypass filter 1, etc.). In the Modulation Bus Routing Section (MBRS), you would create 4 lines as follows:

Audio In 1 : 100 > Audio Out 1 : -100 > Mod Wheel

Audio In 2 : 100 > Audio Out 2 : -100 > Mod Wheel

Audio In 3 : 100 > Audio Out 1 : 100 > Mod Wheel

Audio In 4 : 100 > Audio Out 2 : 100 > Mod Wheel

Now when you raise the Mod wheel in the Combinator, the affected split (going into Audio in 3 and 4) on Thor, is going to be heard. When you lower the Mod Wheel, you have a dry signal.

Bear in mind in the video below, I had these splits switched around in the back of the rack (Audio in 1 and 2 were the wet splits and Audio in 3 and 4 were the dry splits). Since this was the case, I had to switch the scaling on all four Mod Wheel lines in the MBRS. So Audio in 1 and 2 had a scaling of “100” and Audio in 3 and 4 had a scaling of “-100” — it’s really the same idea, just in reverse.

Here’s the video which outlines how to use Thor as a dry/wet control for your Kong effects:

Trick #2: Creating some Movement for your Thor Sounds

This isn’t so much a trick, as it is a way to add some modulations and movement to your sound. So here’s a quick way to introduce some LFOs and Looped Mod/Global envelopes to affect the various Oscillators, Delay and Pan in Thor. Let me tell you, there’s hours, days, and months of fun to be had in Thor just by adjusting various parameters such as these.

Here’s the video outlining how to get a bit more movement from some of the parameters in Thor:

Trick #3: Gating and Transposing your Thor Sequences along the Keyboard

I have to give a big round of thanks to James Bernard for stearing me in the right direction with this. And when I found out how to do this, it was a “D’OH!” moment. As soon as he showed it to me, I felt completely stupid for not realizing how to do this in the first place.

In this method, you create a wonderful sequence to play your Thor patch, but instead of having to hit the “Run” button each time you want to hear the sequence, you trigger it from the “MIDI Key Gate,” which is a fancy way of saying, turn on the “Run” button in Thor’s step sequencer whenever you press a key on the keyboard.

Next, you set up Sequence to follow the “MIDI Note value” that is input, which again, is a fancy way to say that where you play the keyboard will determine the notes that are played in the Thor sequence.

So putting this together is a piece of cake. Assuming you have a sequence set up in Thor’s Step Sequencer, and your sequence in, set the Run Mode to “Repeat” and direction to “Forward” (or any other direction you wish). Turn off the “MIDI” light on Thor’s global panel, otherwise you get duplicated notes playing the same instrument (probably not what you intended). Finally, enter the following in the MBRS:

MIDI Gate : 100 > S. Trig

MIDI Note : 100 > S. Transp

Now when you play the sequence, it will be tracked along the keyboard and will only run when a key is pressed down.

Here’s the video that shows how this is done (building on the Thor patch I was building in the video above).

Note, if you want, you can also add Velocity information into the mix. Just add a new line in the MBRS as follows: “MIDI Vel : 100 > S. Vel.” If you do this, be sure to change the sequence edit knob to “Velocity” and ensure that all the steps for velocity are set to zero (0). You “can” set them to values higher than zero if you want, but then this will affect the velocity in tandem with the MIDI velocity from your keyboard. It’s these two values “combined together” that merge to form the final velocity value of the notes that are played.

Trick #4: Using Frequency Modulation between Oscillators

This isn’t so much a trick really, but something I like to try out once in a while. When the patch you’ve created is pretty much finished and you like the way it sounds, it never hurts to try this out. Set one Oscillator to modify the FM Frequency (in Thor’s menu list, this is shown as “Frequency (FM)”). You can often get some weird and wonderful new sounds that you didn’t know were hidden behind the scenes. Add to that a few effects like a Vocoder and some Scream “Tape” compression, package it up in a Combinator, and you just found your new lead sound. Here’s a video that shows how to do just that:

So there you go. A few interesting ways to utilize Thor and create a nice little synth lead. Let me know what you think, and also let me know if you have any other tricks along the same lines. Perhaps I can keep going with this whole Thor idea and show off a few other things you can do in an upcoming tutorial. For now, thanks for stopping by, and good luck in all your creative Reason productions.

The Musician’s Manifesto

The Musician’s manifesto. Or, subtitled: “The Reason Guide to getting Zen and Musical” — these are just some of the things I’ve learned throughout my life and more specifically being a musical-minded person working with Reason for the past 5 years

Or, subtitled: “The Reason Guide to getting Zen and Musical” — these are just some of the things I’ve learned throughout my life and more specifically being a musical-minded person working with Reason for the past 6 years.

I caution that you might find these points a bit preachy or moral or spiritual or whatever, or you might find it total bunk, but these are some of the rules by which I try to live, and they have served me pretty well over the past years. I keep coming back to them again and again because I realize nobody is perfect, and on a day where I find I’m slipping or feel like giving up, they are there to help me get out of that funk.

  1. Admit you know nothing and start from that vantage point. Everyone has something to teach us. Open yourself up to realizing that, humble yourself, and learn wherever and whenever you can from whomever you can.
  2. Ultimately be creative and make music! We all have the ability to be artistic and creative. We just have to find it inside ourselves and turn on the tap to let it out. Easier said than done, I know. But the journey is so worth it.
  3. Experiment, experiment, and then experiment some more. Devote as much time as you can each and every day to music. If you truly love it, then this will simply come naturally.
  4. Challenge Everything. Don’t be complacent. Question things. Come to your own conclusions. Think outside the box. Never sit still. Be your own person. Set artificial limits for yourself. Cherish the mistakes and the accidents. Be better than good. Music does not have to be formulaic, so don’t be satisfied with a formula. Challenge yourself to make things different.
  5. It’s all about the journey, not the destination. Be mindful of your past while looking forward to your future. As Winston Churchill wrote: “The farther backward you can look, the farther forward you will see.”
  6. If you are truly enjoying working in music, then count yourself lucky. You’ve found something that really does help fulfill you! And buddy, that means you’re ahead of about 90% of the population. Don’t believe me? Next time you’re on public transportation during morning rush hour, look around and see how many happy faces are in your vicinity.
  7. Never stop learning, because knowledge is truly power. Suck it up like a sponge. Be as curious as you can. Seek out the answers to all your questions. If you don’t know how a chord is created, go online and read about chords. Don’t know what an ADSR is? Look it up! Don’t be afraid to admit you don’t know something. And don’t be afraid to make mistakes. They are just as important as your successes.
  8. Stop lamenting what you don’t have or don’t own, and focus on what you do have and what you can do with it. Specifically learn Reason and Record inside out. Believe me, you can spend a lifetime solely exploring the base Reason Package with Factory Sound Bank and still never know it all. In addition, Google is your friend. YouTube is your friend. Wikipedia is your friend. Bloggers are your friends. The 800+ page Reason/Record manual is also your friend. Get to know them all intimately.
  9. Stop blaming the tools. It’s not the guitar’s fault you don’t know how to play it. Just as it’s not Reason nor Record’s  fault you don’t know how to use them. The blame and responsibility are squarely on your shoulders. Put on your big girl panties and suck it up Rockstar!
  10. Check your ego at the door. Don’t step on those around you to get a leg up, or fall into the trap of trying to “be better than the next guy.” It’s stupid, petty, unnecessary, and worthless. There’s nothing competitive about music and art. It’s not a competition to get to the top. It’s a fundamental ability that all humans have to let their voice be heard. It’s the most free-spirited part of being human. Focus on honing your voice and market yourself with respect as you would expect others to market themselves to you. Don’t belittle others in the process. That’s just counterproductive.
  11. Stand up for your art!
  12. It’s not wrong to be a perfectionist, but it may as well be. 90% of tracks are completed in 10% of the time. Stop spending 90% of your time trying to perfect the last 10% of a track. Learn to let go at some point or stop if you find yourself struggling or getting nowhere. Nothing is more frustrating than going nowhere for a long period of time. Avoid getting stuck by stopping and/or focusing your attention on something else: another song, another device, a new genre or just stop completely and take a break. Also learn how to brainstorm and finish things at a quick pace. Try completing a song in an hour just for the hell of it. Creating these artificial deadlines can help your creativity, just as brainstorming can.
  13. Seek out help, discussions, collaborations, and healthy relationships in general. They might be able to help you  finish up that last 10% of a track in less time than you could. You just have to realize that no man or woman is an island. We all need the help of others from time to time. And you’ll find great friendships in the most unusual places, or partnerships that you never thought would come about. They can often inspire you by steering you in different directions. It’s a natural form of networking. And it’s important. Probably more important even than your music, your art, or anything else really. It’s our connections with each other that make us who we are and define us.
  14. Give back to your community in some way, shape, or form, and to the best of your own abilities. You’ll feel more positive, and you may provide the spark in someone else’s life which ignites their passion or sends their life on a careening course which fundamentally changes who they are for the better! Charity is important and fundamental. And you’ll feel good too.
  15. Ignore negative chatter. Pay close attention to positive criticism. It’s the same 90/10 rule all over again and in various respects. 90% of the internet is mere chatter. 10% of the internet is solid and where you should focus. Also, spend 90% of your time on this 10% which is important. Also, knowing the difference between negativity and positive criticism is crucial. We all need — no, we must have criticism in order to grow as artists. Be mindful and humble of that. Believe me, I’m humbled every day at some of the songs I hear, videos I watch, images I see, places I visit. I could go on and on.
  16. Never under any circumstances send out an email, post, Soundcloud message, YouTube comment, etc. which starts and ends with “yo check out my track” or any variation thereof. Guess what? No one will check out your track. And people will purposely ignore your track. Your time can be better spent by getting to know people and checking out THEIR tracks and their work, and talking to them about their work, not yours. This requires a fundamental shift away from what you are doing. This is just common sense.
  17. In opposition to the point above, if you are providing free resources, such as tutorials and refills, then do the opposite. Shout it from the rooftops. In this case you should let everyone know and open everyone up to discussion about it and make it available. Here there be free things!
  18. Understand the difference between “I really hate this” and “God this is difficult but worthwhile and enjoyable.” In the former, if you really hate what you’re doing, try to figure out what you really do enjoy and go out and do that instead. Give it your all, no matter what anyone says. If you find that working in music or with Reason is incredibly difficult, but you just spent 10 hours without realizing it in front of Thor, then hey, you’re on the right track. Keep at it. And don’t stop. You do enjoy it.
  19. Use your ears 90% of the time and your mouth 10% of the time. I know this goes right back to the 90/10 rule, but it’s vital. If you think I talk too much here on my blog, what you don’t see is the other 90% of the time when I’m reading posts, watching videos, seeking out the latest tips and tricks from everyone out there, digging through refills and song files for more ways I can abuse Reason. And now we’ve come full circle back to points #1-3.
  20. Finally, remember that there’s a life outside of Music and Reason and Record. And that all of this alone cannot fully sustain you. Make time for all the other people in your life, vacation, hobbies, work, breaks, taking your sweetheart out for a night on the town or a quiet evening in. We are all made up of many facets. Try to gain a deep understanding of all those facets in your own life.

So there you have it. My views on what it takes to succeed and more importantly, what it takes to live up to your full potential as a creative and artistic human being.

And for some further reading, I would recommend the following:

Any other thoughts?

25 – No-Nonsense Tips (Part 2)

In this second part, I’m going to provide even more quick tips that can be used as food for thought while you develop your tracks. These aren’t earth-shattering or advanced. They are just some easy tips to help out with some problems you might have or tips that show you a few capabilities you may have missed.

In this second part, I’m going to provide even more quick tips that can be used as food for thought while you develop your tracks. These aren’t earth-shattering or advanced. They are just some easy tips to help out with some problems you might have or tips that show you a few capabilities you may have missed. So let’s jump in.

Tip #1: Did you know this could be Automated? I didn’t.

This is probably the simplest of tips. While I learned about a year ago that you can assign the Destination and Scale Amount parameters from Thor’s Modulation Bus Routing System (MBRS) to a rotary on a Combinator, I completely neglected to realize that you can indeed automate any of the “Amount” parameters directly in Thor. So for example, if you setup a Vibrato in Thor, it would look something like this:

LFO2: 25 > Osc1 Pitch: 100 > ModWheel (Read Thor’s back panel — this is your basic Vibrato).

Great, but now, let’s automate that LFO2 amount so that the vibrato increases or decreases the pitch over time. Easy as easy can be. Simply right-click over the amount parameter on the front of Thor in the MBRS and select “Edit Automation.” Now you can automate the amount directly in the Sequencer. Pretty cool right?

The Amount settings in Thor's MBRS can also be automated

Tip #2: Stealing unused CV from devices that are already there.

This is a great tip, and it’s one I use all the time. Let’s say you have most of the sound sources set up in your track. Now you want to modulate and automate parameters. Instead of creating new devices like the Subtractor, Malstrom, Matrix, etc. to modulate those destinations, why not steal modulation sources from the devices that are already in your track. This saves on CPU, and it means you ultimately have a less cluttered rack with less devices. The only thing you need to be careful about is making things overly complex, as it can get confusing quickly. But this is another trick I use all the time.

For example, if you have a Thor as one of your devices in your rack, you have access to a multitude of CV sources you can use to modulate other parameters and devices. Here’s just a few:

  • Curve 1 in the Step Sequencer
  • Curve 2 in the Step Sequencer
  • LFO 1
  • LFO 2
  • Mod Envelope
  • Amp Envelope

So if any of these are not currently being tapped for use by the Thor sound itself (and even if they are, you can still use them for other purposes), you can enlist them for CV duty anywhere else in your rack. Simply create the CV connection from the back of Thor to the destination CV input in the other device location. If you are using LFO2 or the Global Envelope outputs, then all you need to do is set up the LFO 2 or Global Envelope parameters on the front of Thor and you’re done. If you are using LFO 1 or the Amp envelope, you’ll have to set these up using the CV outputs on the back of Thor, and then setting them up in the MBRS. If using the Curves in the Step Sequencer, you can route the CV from the Curve CV outputs on the back of Thor.

You literally have an amazing supply of CV modulation sources all from one Thor device. So much so, that this may be all you need. You might not need to use the LFO from another Subtractor or the Mod A and B from a Malstrom, and you may not need to add a bunch of Matrix units. With Thor, you can keep everything contained in one location. And chances are that you probably already have a Thor unit in your track already. So save yourself some CPU. That reminds me to put together a tutorial on all the CV possibilities of Thor. hmmm. Perhaps in a tutorial down the road. More to come on this. . .

Tip #3: Add a Scream to shape your sound.

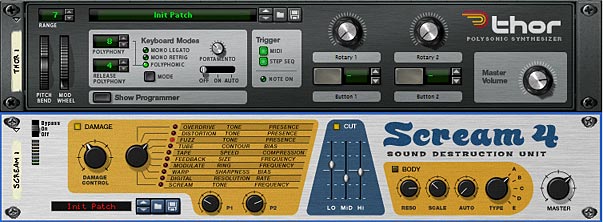
I have to say that this came out of watching Hydlide run through some videos about my latest refill. He had a really solid idea to turn pretty much any drum sound into a punchier kick sound. But this is also a nice trick to try out variations on your own sound and is kind of like the tip I showed you where we added a unison to give things a wider thicker sound. This time however, let’s add a Scream device after any sound source and just play with the settings until it shapes into a sound you like. Something a little beefier or meatier. And it only takes a minute or so.

The other added benefit to doing this is that you have access to a 3-band EQ using the “Cut” section. While this isn’t as powerful as the M-Class EQ, it does a great job for quickly sculpting the sound. So when you’re in a rut, try out a Unison on those thinner synth sounds, but try out a Scream as well, to sclupt your drum and bass sounds.

The Scream can be inserted anywhere as a great sound sculpting tool

Tip #4: Turn your Combinator buttons into Radio buttons.

This tip came out of a request on the PUF (Propellerhead User Forum) where the original poster wanted to convert the Combinator buttons into Radio buttons. If you don’t know what a Radio button is, it’s ok. You’ve used them everyday in all kinds of software. Here’s a quick rundown: Radio Buttons.

You can download the template for this trick here: radio-buttons. The zip file contains the RNS file (and Combinator) which turns your Combinator buttons into radio buttons. Don’t pay too much attention to the synths at work here. They are just put there at random to highlight the difference in sound when selecting each of the buttons. I didn’t choose them for their stunning sound quality when played together (reset).

Now as all of you know, you can’t change the way the buttons work. They are toggle buttons by design, turning something on or off. So to turn them into a radio button is like taking a two-dimensional object and turning it into a one-dimensional object. It’s going backwards slightly. But there’s a good reason behind it.

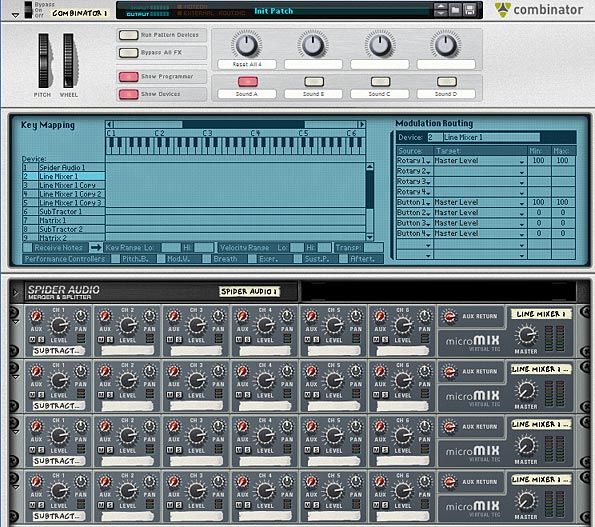
To start, you probably want to have the buttons trigger something. In this case, I’ll take something very basic like 4 synths tied to each of the 4 buttons. Pressing one button will trigger its corresponding synth. Pressing another button will trigger the next synth, and so on. So first create a Combinator, and inside create four 6:2 line mixers and four synth devices. And then tie each of the synths to its own line mixer by sending the audio output to channel 1 on each of the four line mixers. Then open up the Combinator programmer, and program the following:

Line Mixer 1:

Rotary 1: Master Level: 100 / 100

Button 1: Master Level: 100 / 100

Button 2: Master Level: 0 / 0

Button 3: Master Level: 0 / 0

Button 4: Master Level: 0 / 0

Line Mixer 2:

Rotary 1: Master Level: 100 / 100

Button 1: Master Level: 0 / 0

Button 2: Master Level: 100 / 100

Button 3: Master Level: 0 / 0

Button 4: Master Level: 0 / 0

Line Mixer 3:

Rotary 1: Master Level: 100 / 100

Button 1: Master Level: 0 / 0

Button 2: Master Level: 0 / 0

Button 3: Master Level: 100 / 100

Button 4: Master Level: 0 / 0

Line Mixer 4:

Rotary 1: Master Level: 100 / 100

Button 1: Master Level: 0 / 0

Button 2: Master Level: 0 / 0

Button 3: Master Level: 0 / 0

Button 4: Master Level: 100 / 100

You’re pretty much done. Now, the buttons act as rotaries. However, you’ll have to disregard the fact that they light up at all. The fact that they are enabled or disabled means nothing. The only thing that means anything is if you switch from one button to the next. Remember our analogy: we’re taking a 2-dimensional object and turning it into a one-dimensional object. There’s no toggling. It’s a straightforward button to button switch.

The front of the Combinator showing the Programmer and the Line Mixers. The Synths are stacked underneath.

Also, Rotary 1 acts as a “Reset” button. Turning this rotary to any location will turn all four attached synths on at the same time. The reason I did this is due to the fact that when you start pressing buttons you will only be able to hear one synth at any given time and there was no way to “go back” to having all of the synths on at once. So I programmed the rotary to do this. As any good programmer knows, you should always provide a way to get back to the default. So this was my “Default” — however, if you don’t need it, you can remove the programming behind Rotary 1 if you really want to.


As always, I hope you enjoyed some of these quick tips. They are definitely fun to figure out and dream up. So keep the questions coming, and share some of your favorite tips with the rest of us. Happy Reasoning!

24 – A few No-Nonsense Tips

In this tutorial I’m going to outline some of my favorite quick tips that you can use when you find yourself in a bit of a bind with Reason. Hopefully these little tips open you up to a new way of thinking with the software, or else at least point you in the right direction if you get stumped.

In this tutorial I’m not going to outline any grandiose Combinator or showcase some majorly complex CV routing scheme (though I have a few interesting ones that I may show down the road). Instead, I’m going to outline just some of my favorite quick tips that you can use when you find yourself in a bit of a bind with Reason. Hopefully these little tips open you up to a new way of thinking with the software, or else at least point you into a direction in case you get stumped.

All of the tips below came out of a need I had to get out of jail with the software. In other words, I’d find myself at a standstill unable to go further because I’d locked myself in a hole. Here’s a few ways I found to get out and escape. I hope you find these tidbits useful.

Tip #1: Unison = Stereo (It’s not just big fat sound).

The first tip came out of a post I’d seen on the PUF (Propellerhead User Forum) entitled “Confessions.” In this post, a few people had stated that they never used the Unison device, and didn’t really understand what it was for. “I think it has something to do with fattening up the sound, but I don’t really use it and don’t really know what it’s for.” Fair enough. Here’s what I think:

Yes, it fattens up the sound. But it does more than that. For instance, take any monophonic sound device; The Subtractor and Thor come to mind. If you start playing either device, you can tell it sounds monophonic. In the case of Thor, you can do some clever things like add some Chorus and Delay. Perhaps in the Subtractor, you’ll add some ring modulation or FM synthesis, detune two oscillators together. But here’s the dilemma: you add a Stereo Imager after the device and nothing happens? Why?

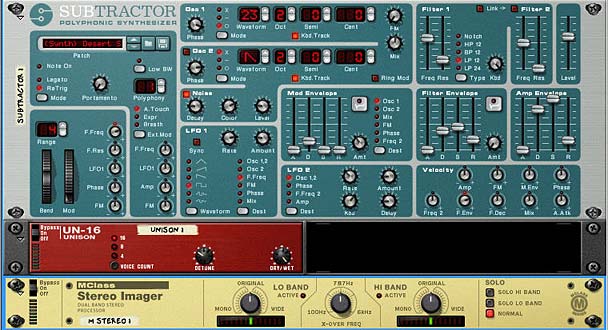
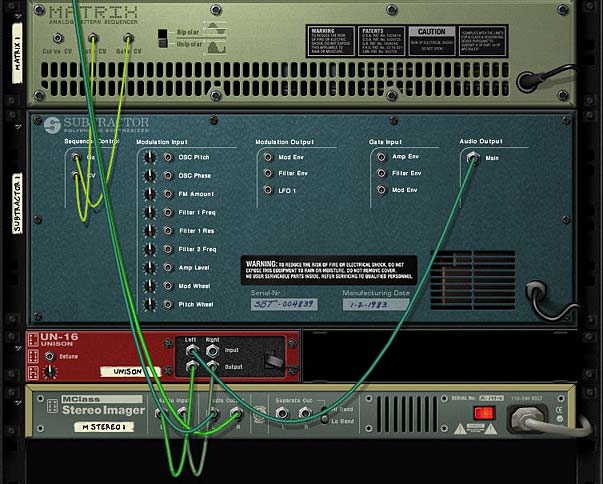
This is because the Stereo Imager only works on Stereo audio, and since you have a device which is monophonic, nothing is going to happen. The simple fix: add a Unison device between the sound source and the Stereo Imager. Instantly, you’ve turned your sound into a Stereo audio pair going into the Stereo Imager, which can now effect the sound as you want (point of fact, it’s more of a faux stereo, but it works).

The unison device is there to “Stereo-ize” your monophonic sound. At the same time, it fattens the sound by creating multiple detuned voices out of the audio you send into it. Good enough!

The front of the rack showing the Unison device creating Stereo out of Mono
The back of the rack showing the Unison setup

Tip #2: Mixer Pan/Level CV automation is holding me back!

Ever automate the level and/or Pan info on your main mixer in Reason or Record and then realize you can’t alter it at all. For instance, if you send a Subtractor LFO to fully automate the level of your track, you end up unable to alter or change the level to fade it in or out right? Whatever is playing in a clip in your sequencer will be affected by the LFO as is. No fade ins, no fade outs, no changes along the way. Same goes for panning.

Here’s a simple tip to allow you to have both. And again it involves inserting a device between the sound source and the mixer. In this case, it’s another line mixer. Insert a 6:2 mixer between your main mixer and the sound source. Then flip the rack around and move the audio cables from the sound source into Channel 1 on the 6:2 line mixer. Then send some audio cables from the main output on the line mixer into the previous channel on the main mixer. Now you can flip back to the front again and right-click on the Channel 1 level knob, select “Edit Automation” and enter your fade-ins and fade-outs. You can also adjust your panning on this line mixer as well. This will affect the panning of the sound source before it gets sent into the main mixer where the CV is affecting the panning. In this case, the panning is combined together.

The front of the rack showing the Line Mixer inserted between the audio signal and main mixer.
The back of the rack showing the connections for the audio signal.

There you go. Total control over your mix, even when your mix is being controlled by CV.

Tip #3: While we’re on CV, don’t forget you can automate any CV trim knob on the back of any device

I discussed this tip in full here: #7 – Adjustable CV, but it bears repeating. If you want to control the trim pots for any CV connection (you know, the tiny knobs on the back of your devices into which you send the CV cables), simply insert a Thor device between the CV source and the CV destination. Route the CV into the CV in 1 within Thor, and send it out from CV out 1. Then in the modualtion Bus Routing Section of Thor (MBRS), use CVin1 as a source and CVout1 as a destination. Enter 100 as an Amount, and then use Thor’s Rotary 1 as a Scale (also with an amount of 100). Put everything (source/destination devices as well as the Thor “CV Pass-Through” device) into a Combinator, and program the Combinator’s Rotary 1 to adjust Thor’s Rotary 1.

This means that you’re adjusting the Scale amount value using the Combinator Rotary 1. Essentially, this will have the same effect of adjusting your CV trim pot. Sounds complicated, but it’s really quite simple.

Tip #4: Damn it, there’s no CV connection. But I want to automate it with an LFO!

Enter the Combinator to the rescue. For this trick to work, you have a device which has a parameter you want to affect with an LFO (or any other mod envelope or anything you like) and the device with the LFO which is going to affect it. This couldn’t be easier, but it’s not at first obvious. Here’s what you do:

Put both devices in a Combinator. Flip the rack around. Send the CV from the LFO device into the Rotary 1 CV in of the Combinator. Then flip back around to the front, and open up the Combinator programmer. Select the sound device. In the Modulation Matrix, use Rotary 1 as the Source andthe parameter you want affected in the destination device as the “Destination.”

Now, when the LFO is enabled and running, it gets sent along the CV cable and affects Rotary 1 on the Combinator. Rotary 1 on the Combinator in turn is affecting the parameter on your destination device. In other words, the Combinator Rotary 1 is used as a CV pass-through to affect any parameter you like, not just the ones that have CV slots on the back of the devices.

Tip #5: That nasty bypass click.

Not all glitch sounds are good sounds. Such is life when you are dealing with bypass switches in Reason. Sometimes you’ll get this nasty clicking sound when switching from on to bypass or vice versa. Sometimes you’re lucky and you don’t get it. It’s like Russian Roulette audio-style. This is why I never ever use the bypass switch. And also why I never ever automate it. Instead, here’s a few simple ways to get the same benefit without the horrible clicks.

First off, if you’re using a device that has a dry/wet knob, put it in a combinator and tie the dry wet knob to a button or a rotary. There’s your bypass button.

If, on the other hand, you need to get around bypassing an entire Combinator, try this trick. Inside the combinator create a spider and a second line mixer (assuming you already have a line mixer for the main audio). Then split the audio coming into the combinator, and have one split going to the main line mixer and the other going to the second line mixer. Merge the master outputs of both line mixers in the merge section of the spider, and then back out to the Combinator “From Devices” output. Ensure all your FX and Instrument devices go into channels on the main mixer. Leave the second mixer for the dry signal only, and nothing else.

In the Combinator programmer, program a button to switch between the two mixers. So when the button is off, the master level on the main mixer is at 0, while the master level on the secondary mixer is at 100. When the button is on (lit), the master level on the main mixer is at 100, while the master level on the secondary mixer is at 0. The button now acts as a bypass. When off, the signal is bypassed and the audio goes right through the Combinator unaffected. When the button is on, the Contents of the Combinator are enabled and the sound affected can be heard. Instant bypass without any clicking issues.

The back of the rack with the Bypass setup
The front of the rack with the Bypass setup shown on Button 4

Keep in mind there are some things that just can’t be stopped on a dime. For instance, changing the delay time or automating changes to the delay time will result in a very distinct sound, almost like a pitch shifting. You just can’t get around this. That’s the nature of audio. So while bypassing most things works without any side effects, other things can still be noticeable. The idea, however, is to minimize the unwanted audio problems as much as you can.


I hope you found these tips useful. I’ll keep posting more as time permits. In the meantime, feel free to share your thoughts or your own tips here by posting a comment. Happy Reasoning!