9 – Creative ReDrums (Part 1)

I decided to try out some Redrum creativity by taking a standard Redrum patch from the Factory Sound Bank and punching it up. At the same time, I tried to get creative with the Filtering and Routings. A new way to use your Redrum device.

I often get asked and see on the Props forum many complaints that the supplied drum kits are lacking in depth and sound flat. Often this takes the form of slams against the props for providing lacklustre drum kits in the Factory Soundbank. Truth is, the drum sounds can be expanded upon, and if you’re willing to take some time, they can be made to sound much deeper and more punchy. It’s all in what you do with them. The power is all there in front of you, and with the Redrum there’s a lot of flexibility.  

With this in mind, I decided to try out some Redrum creativity and put together a flexible drum kit that takes a basic kit from the props and turns it into something unique . There’s two things I want to accomplish with this tutorial: First: Create a Drum Kit that is more expansive sounding, and Second: Find some creative ways in which the Redrum can be used. So let’s see how far we can take it.  

Before jumping in let me first say that this template is fairly massive. It contains a lot of Thor filters, and as such it can be a little expensive on CPU. If you find it taxing your CPU, you can scale it down (see my notes in the “Where do you go from here” section below), or you can bounce it to an audio track to be put into a Dr. Rex device or as a separate audio track entirely. Second, there’s two main ways I find can bolster the sound of your drums: Compression/Mastering, and Filtering the drums, so those methods will be explored below.  

Download the Project files here: creative-redrums. The project files contain two Combinators inside an rns file. The first Combinator is the Original untouched kit put through the same Matrix sequencing. The second Combinator is the Drums we’re going to create below. Mute/unmute the channels in the mixer to listen to how they sound compared to one another.  

  1. As with all great Reason patches, let’s start by creating a Combinator. Inside the Combinator, create in order, an M Class Compressor, M Class Equilizer, M Class Stereo Imager, M Class Maximizer, 14:2 Mixer, Redrum Drum Machine, Thor Synth, DDL-1, and Spider Audio Merger/Splitter. Then hold Shift down and create a Matrix Pattern Sequencer.
  2. Flip the Rack around and let’s start working on our Routings. First, move the Cables from the Combinator’s “From Devices” ins to the Audio Inputs of the Compressor. Then connect the Audio Outputs from the Maximizer to the “From Devices” inputs on the Combinator. This sets up the main mastering for the Redrum.
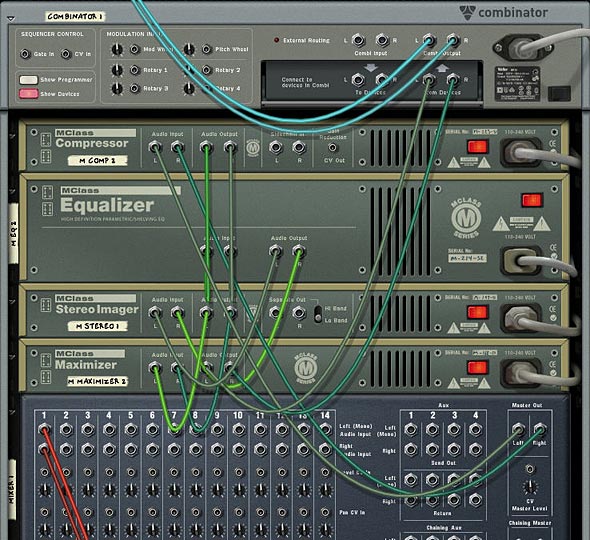
    The Mastering setup on the back of the rack
    The Mastering setup on the back of the rack
  3. Next, move the DDL 1 Left and Right input cables to the Left and Right Channel 1 on the 14:2 Mixer. At the same time, disconnect the Chaining Aux cables from the 14:2 Mixer. Also, connect the Left output from Channel 1 on the Redrum to the Audio In 1 on the Thor. Then connect the Right output from Channel 1 on the Redrum to the Left input on the DDL-1.
  4. Next, move the Left and Right Audio Inputs from Channel 2 on the Mixer to two Left Audio Inputs on the Merger side of the Spider. Then route a cable from the Left Merged Output to Audio In 2 on Thor. With this setup, you’ll have no delay on the Left audio channel for the drum, while the Right Channel goes through the delay device.
  5. Moving to our CV routing, plumb a CV cable from the Gate CV output of the Matrix to the Gate In on Channel 1 on the Redrum. And plumb a CV cable from the CV 1 Output on the Thor to the Pitch CV In on Channel 1 of the Redrum. Also cable the Note CV output from the Matrix to the CV 1 Input on the Thor, and the Curve CV output from the Matrix to the CV 2 Input on Thor. If this is all starting to get confusing for you, check out the routings in the Combinator file download, or else check out the image below.
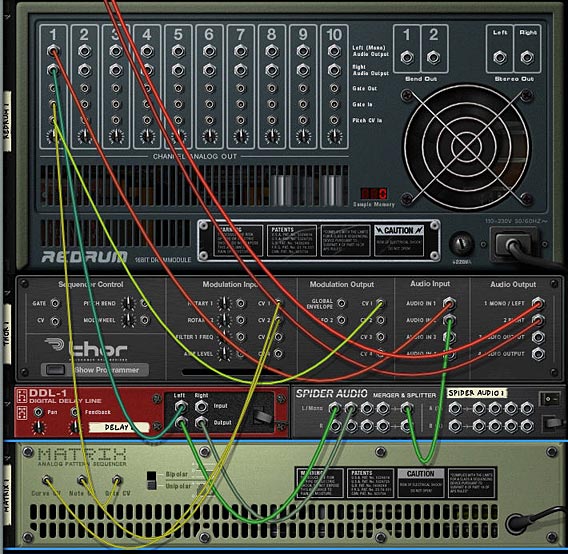
    The routings for the Thor Filter, Delay, and Matrix Sequencer
    The routings for the Thor Filter, Delay, and Matrix Sequencer.
  6. Next, let’s flip the rack around and start working on applying settings to the front of the devices. First, click the “Enable Pattern Section” button on the Redrum so that the pattern is disabled. Click the browse button and load a patch (drum kit) into Redrum. I used the Chemical Kit 7 from the Factory Soundbank (under Redrum Drum Kits > Chemical Kits). Now you have a basis from which to work.
  7. In Thor, we’re going to use multiple filters which will be applied to the Bass Drum (Channel 1 on the Redrum). So the first thing to do is to ensure that the Bass Drum Left and Right channels are routed into Filter 1 and Filter 2. In the Mod Matrix, apply the following settings:

    Audio In1: 100 > Filt1 In  

    Audio In2: 100 > Filt2 In  

    This setup means that the Left (dry) Channel goes through Filter 1, while the Right (delay) Channel goes through Filter 2, and then both are sent in Stereo to be output to the Submixer. 

  8. Next, since Thor is not free running, like the Subtractor, we need to use the step sequencer to keep Thor “On.” To do this, set up a one step long pattern in the sequencer. Turn Button 1 on (so it’s Red) on the top panel of Thor. Then add the following setting into the Mod Matrix:

    Button1: 100 > S. Trig  

    To be honest, since everything will be triggered when you hit the play button, you probably don’t need to setup the above (step 8). But it will ensure that Thor remains on and is running, which will ensure you can use the filters in the Voice section of Thor (the first two filter slots), as well as the Global filter section (Third Filter slot).  If I’m wrong, please feel free to correct me.

  9. Add a Low Pass Filter into Filter slot 1, and a Formant Filter into Filter slot 2. Route both the filters parallel into the Amp section of Thor. Turn off any Oscillators and Oscillator routings, as well as the Mod Envelope and Global Envelope sections. And Then add the rest of the MBRS settings as follows:

    CV In1: 100 > CV Out1 (sends the Note CV data from the Matrix to the CV Pitch in on the Redrum Channel — yes you can send the CV cable directly from the Matrix to the Pitch In on the Redrum, but If you set it up this way, you can then use the Note CV to affect other parameters in Thor, if you wish).  

    CV In2: -75 > Filt1 Freq (sends the Curve CV data from the Matrix to the Filter 1 Frequency).  

    CV In2: 75 > LFO 1 Rate (sends the Curve CV data from the Matrix to the LFO 1 Rate).  

    LFO1: -46 > Filt2 Y (sends the LFO 1 to the Filter 2 – Formant Filter – Y Parameter).  

    Here’s the image which shows the front of the Thor Device and the Filter settings:  
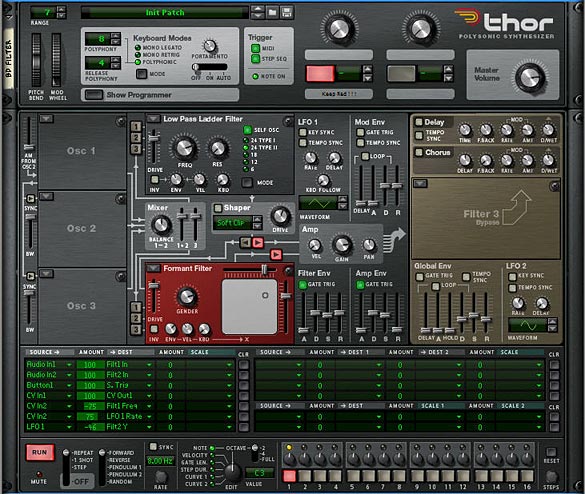
    Thor settings for the main Bass Drum Filtering
    Thor settings for the main Bass Drum Filtering
  10. Next, on the DDL-1, select 4 Steps, and in the Matrix, create a Random pattern. Alternately, you can build your pattern as you play the sequence. The Matrix will trigger the Drum’s Channel 1 gate, and play the pattern you enter. So it can be much easier to build up a drum pattern as you play. Also, as you play, adjust the filter settings in Thor until you come up with your own unique brand of Drums. At the same time, flip the rack and adjust the Pitch In Trim knob on the Redrum Channel 1 to taste.
  11. Now comes the tedious part. Select the Thor, DDL-1, Spider Audio Merger/Splitter, and Matrix. Then right-click and select “Duplicate Devices and Tracks.” Once duplicated, flip the rack around to the back of the devices, and set up the routings into the second Channel of the Redrum and Submix (along with the CV routings, etc.). Do this for each Channel of the Redrum.
  12. Once everything is routed properly, you can start to work on filtering each individual drum channel. Try out different Thor filters, as well as different Matrix patterns (right-clicking and using “Alternate Pattern” works well here, along with shifting the patterns left or right). Also try alternating some of the delay routings from left and right (by reversing the audio inputs on the back of the Thor. Finally, try out different delay steps for each of the delays. There’s lots you can do to fine tune this type of setup.

Combinator Mod Matrix

Going into all the modulations in the Combinator is pretty intense, so instead I’ll let you download the project files and see what’s going on. But a few words about how the Rotaries/Buttons work:  

The Pitch Bend moves all the drum pitches up or down. This can be fun to play with while performing with the drums. The downside is that when the Pitch Bend is static center, so are all the drum pitches. But you can always automate it so that it stays in a non-static, non-centered position.  

The Mod Wheel is tied to a basic drum Reverb which also affects all the drums equally. If you don’t like this Reverb, you can use your own. This way you can apply a little or a lot of Reverb to the overall mix. And then of course there’s nothing saying you can’t add a Reverb or other FX as Send FX on the Submixer. This was a last-minute thought.  

Rotary 1-3: Applies Compression, EQ, and Maximizer Gain to the overall mix. In this way you can master the drums to your liking.  

Rotary 4: Affects the Delay Levels for all drums at once. You can go from no delay (at the far left) to a pretty heavy delay (on the far right).  

Buttons 1-3: Turns on/off the delays for the Bass Drums (1), Snare Drums (2), and High Hats (3).  

Button 4: Turns on/off the Ride by muting it on Channel 10 of the Submixer.  

Where do you go from here?

  • Add different variations and drum patterns (fills and rolls) in the Matrix pattern sections. Then create sequencer tracks for all the Matrixes. In this way you can play the patterns for each of the drums in their own separate tracks on the sequencer, and they are all pattern-based. This makes creating several variations very easy not only to explore, but also to apply in your song.
  • If things are a little too chaotic having all 10 drums running at once, simply mute some of them in the Drum Submixer, so let’s say you have a Bass Drum, Snare, and Hi Hat instead of an all-on cacophony of drums.
  • At the same time, if the CPU load is a little too much, try minimizing the number of filters used, and instead run each drum channel through only one filter, instead of two. Or delete the drums you aren’t using, along with their associated Thor/Delay/Splitter/Matrix.
  • Once you have this template built (and you already have mine done for you), you can add different drum kits into Redrum, and adjust settings for your filters, mastering, etc. One thing that helps is to work on the drums in a build-them-up-as-you-go way. So first do the Bass Drum, then mute the bass drum and go on to the Snare, then unmute and see if they work together. Once they do, move on to the next drum.

And no more than a few days after I posted this article, Matt Piper posted a great little youtube tutorial on how to process your drums through a BV512 Vocoder. You have to check it out. It sounds awesome. Great inspiration for those that want another way to beef up your drum kits: propellerhead-record-reason-vocoding-with-drums

So let me know what you think of this setup. Do you know of some great methods for getting more out of the drum sounds provided in the Factory Soundbank? Do you have any creative drumming techniques. Please feel free to share them. I’d love to see what can be done to boost the supplied drums and learn some new creative ways to ReDrum the kits. Good luck in your Reason projects!

6 – Vocoder Arp Machine

A very flexible Combinator mashup that plays an Arped up Thor run through a Vocoder. A second Thor is used to modulate the sound. Use this Combinator as a template to drop in your own Thor patches and then take it out for a spin at your next live gig. All the Combinator parameters are assigned to toy with the Arp / Vocoder settings. After all, the more flexible the Combinator is, the more use you will get out of it.

I was looking through eXode’s fabulous collection of free patches and combinators in his massive synthesis refill (available from the Propshop’s Free Refill Download Page – A must have for anyone who is looking for a great collection of new sounds!) when I came across a few patches that were hidden away with (arp) in parentheses after the patch names. Being one who loves a good arp sound I started to delve a little deeper into how it was put together. So this became the inspiration for this project. It fuses an arp with two thors — one for the modulation and another as the carrier, and both Thors feed through a Vocoder to the final output.

Now taking things a few steps further, I decided to deviate from what eXode did and add on a few modifications. Firstly, the sounds I used were completely my own (I didn’t want to copy eXode’s brilliant work). And I then took things another step further by assigning parameters to the Combinator rotaries and buttons. This way, you can use the Combi as a performance tool as well. And you can experiment with your own Thor sounds for the carrier and change the way the vocoder operates by toying with the Thor synth parameters, creating your own endless variety of Arp Vocoder machines.

So this is a bit of a mashup, being a Combinator that plays just fine as it is, or used as a template where you can drop in your own Thor patches. Finally, it can be used in live performance, since all the Combinator parameters are assigned for this purpose. After all, the more flexible the Combinator is, the more use you will get out of it.

The project files can be downloaded here: vocoder-arp. It contains an .rns file with a single Combinator which is pre-programmed to most of the major parameters you’ll need to adjust the Filter Frequency, Arp and Vocoder parameters.

Setting up the Vocoder Arp Template.

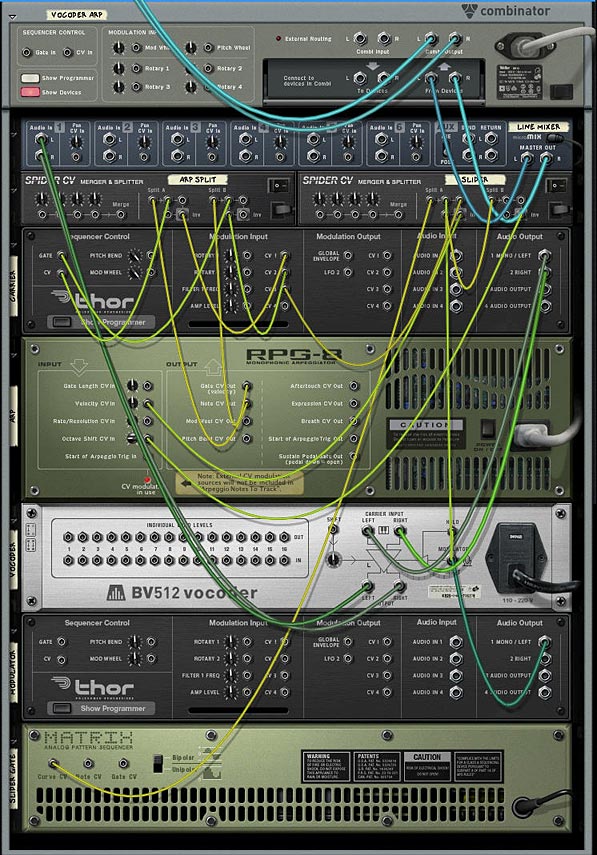
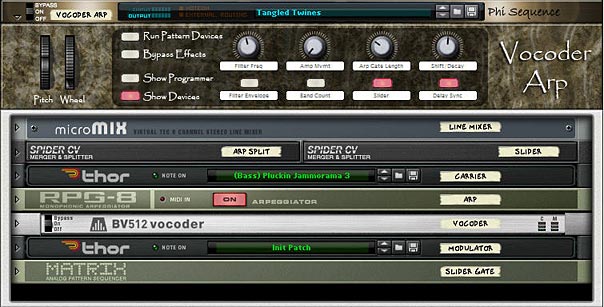
  1. First, create a Combinator, then inside the combinator create a 6:2 Line Mixer, Thor, RPG-8 Arpeggiator, BV512 Vocoder, and then holding Shift down (to disable auto routing), create another Thor. Flip the rack around and route the bottom-most Thor’s 1 Mono / Left Output to the Modulation input on the Vocoder. This is the basic setup for the arped-up vocoder. The first Thor in the Combi is the carrier, and an Arp is tied to this Thor. In other words, this is the main sound going into the Vocoder. The second Thor in the Combi is used to Modulate that Carrier sound through the Vocoder.
  2. Next, holding Shift down, create two Spider CV Merger/Spliters below the Combinator’s Line Mixer. Then hold Shift down and create a Matrix at the bottom of the stack. Set the steps to 4 and the resolution to 1/4th. Switch the Matrix mode to Curve, flip the rack around to the back and switch the curve mode to Bipolar. Then flip the rack around again and set up a curve pattern so that step 1 and 3 are +64 and step 2 and 4 are -64.
  3. The front of the Vocoder Arp with all devices
    The front of the Vocoder Arp with all devices
  4. Flip the rack around and on the first Spider connect the Arp Note CV out to Split A in and the Arp Gate CV out to Split B in. Connect one of the splits from Split A to the Carrier Thor’s CV in. Then connect the inverted split from Split A to the  Carrier Thor’s CV1 Modulation input. Connect one of the splits from Split B to the Carrier Thor’s Gate input, and another split from Split B to the Carrier Thor’s CV2 Modulation input.
  5. On the second Spider connect the Curve CV output from the Matrix to Split A’s input. Then connect one of the splits from Split A to the Split B input on the same Spider. Connect another split from Split A to the Vocoder Hold input. Connect the third split from Split A to the Carrier Thor’s CV3 Modulation input. Then connect the inverted split from Split A to the Arp’s Velocity CV in. on the Spider’s Split B, connect the inverted split to the Arp’s Octave Shift CV in. That just about does it for the CV routings. Luckily you can see the Combinator for yourself when you download the project files, because that was a mouthful. But it sounds more complex than it actually is.
  6. Moving to the Arp, and while you’re on the back of the rack, remove the CV cables from the Mod Wheel and Pitch Bend CV out. This way when you use the Pitch Bend, it will only affect the Thor Carrier’s Pitch Bend setting. Now flip the rack around again. Set up the Arp with an Octave Range of 2, and Insert set to Low. On the Vocoder, set the Attack to 8.
  7. The back of the rack with all the routings in place
    The back of the rack with all the routings in place
  8. Now we move to the Combinator programming. Click the Show Programmer button and enter the following settings:

    For the Thor Carrier:

    Performance Controllers > uncheck the Mod Wheel

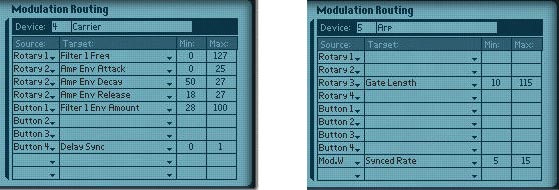
    Rotary 1 > Filter 1 Freq: 0 / 127

    Rotary 2 > Amp Env Attack: 0 / 25

    Rotary 2 > Amp Env Decay: 50 / 27

    Rotary 2 > Amp Env Release: 18 / 27

    Button 1 > Filter 1 Env Amount: 28 / 100

    Button 4 > Delay Sync: 0 / 1

    For the Arp:

    Rotary 3 > Gate Length: 10 / 115

    Mod.W > Synced Rate: 5 / 15

    For the Vocoder:

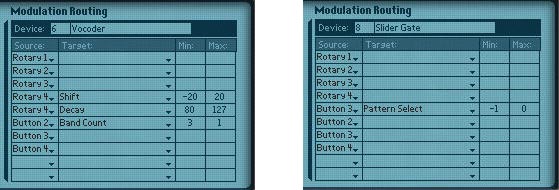
    Rotary 4 > Shift: -20 / 20

    Rotary 4 > Decay: 80 / 127

    Button 2 > Band Count: 3 / 1

    For the Thor Modulator:

    Performance Controllers > uncheck the Pitch Bend and Mod Wheel

    For the Matrix:

    Button 3 > Pattern Select: -1 / 0

  9. The Combi's mod programming for the Thor Carrier (left) and Arp (Right)
    The Combi's mod programming for the Thor Carrier (left) and Arp (Right)
    The Combi's mod programming for the Vocoder (left) and Matrix (right)
    The Combi's mod programming for the Vocoder (left) and Matrix (right)
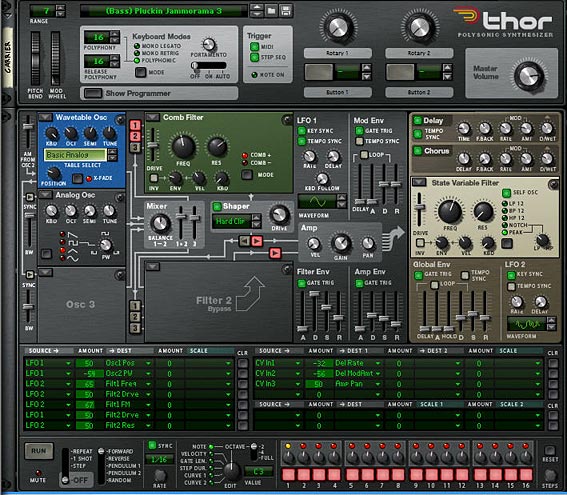
  10. Now flip the rack to the front now, and load up your favorite patch in the Thor carrier. Usually a bright lead will work best, but experiment with any sound you like. You can take a look at how I programmed the Thor in the image below. I won’t go into all the settings that were used. You can pretty much see them here. However, there are some core settings that are needed in the Modulation Bus Routing Section (MBRS) in order to have the Combinator function properly. On the right side of the Bus, create the following routings*:

    CV In1: -32 > Del Rate

    CV In2: -56 > Del ModAmt

    CV In3: 50 > Amp Pan

  11. The front of the Thor Carrier
    The front of the Thor Carrier
  12. Add a matrix below the Combinator so that it is playing the Combi. Then enter a pattern and hit play. This tests out the sounds of the Combi as you experiment with your Carrier and Modulator. For the modulator, you usually want something atonal or heavy on the noise. Unmusical is best. Droning is perfect to affect your carrier signal. This is the fun part where you toy with the Thor until you get something you like. The nice thing is that you have a wide variety of sounds to choose from using the Thor synth.

An explanation of the Combinator Programming

Pitch Bend: This affects only the Thor Carrier as you would expect a pitch bend to operate.

Mod Wheel: The Mod Wheel controls the Arp’s Synched Rate from 1/4 to 1/128th. You can use this as a performance controller to create some interesting arp variations. Let your ears be your guide on this one.

Rotary 1: This controls the full range of the Filter 1 Frequency from the Thor Carrier. Fully left and the filter is closed, fully right and the filter is fully open.

Rotary 2: This controls the Amp’s Attack, Decay, and Release from the Thor Carrier. Fully left and you’ll have very short ADR setting. Fully right and you’ll have much longer ADR settings

Rotary 3: This controls the Gate Length on the Arp. This is one of my favorite settings to play with because it can drastically alter the sounds coming from the Arp. Fully left and you have very short note lengths where the notes are staccato. Turn the knob fully right and you’ll have very long notes – to the point where the notes blend into each other much more smoothly (legato).

Rotary 4: This controls the Shift and Decay of the Vocoder at the same time, affecting the phase of the sounds you hear. This actually shifts the filters of the Vocoder’s Carrier signal down (turning the knob left) or up (turning the knob right). This can be a fun parameter to play with, and you’ll have to experiment to hear what sounds pleasant to you.

Button 1: This controls the filter envelope for the Thor Carrier’s Filter 1. Use it as a sound mode switch, and as with the Rotary 4, you’ll have to hear what sounds pleasant to your ears.

Button 2: This adjusts the band count of the Vocoder. When off, Vocoder has 32 bands. When turned on, the Vocoder has  8 bands. One note about this button: it takes a little time to catch up with itself when you alter the bands. So this may not be great for performance, and you might want to keep this button either on or off. But it’s great fun to test out your sounds through different band counts. If you don’t like these settings, you can change them in the Combinator’s Programmer to switch between any 2 bands you like.

Button 3: For lack of a better word, I named this button “Slider” — as it sounds like the notes from the Arp are being slid on the last beat of the bar. In addition, the Slider button will Pan the sound from left to right in the stereo field based on the Panning settings that were set up in the Carrier Thor’s MBRS. Remember that CV3 in we set up in the Carrier Thor? That’s affecting the Pan of the signal. In addition, the Matrix we placed at the bottom of the Combinator Device Stack is waving the sound up and down like a pulse wave. With a resolution of 1/4, the signal is synched to the 4 beats of a 4/4 tempo. But the Slider does a bit more than that. It also controls the Hold parameter of the Vocoder via CV. This means that on the fourth beat of the bar, the Vocoder is held for the duration of that last beat (one full 1/4 note). Finally, it also controls the Velocity and Octave Shift of the Arp. Yep. One of those spiders and the matrix were set up to perform a simple switch. But I thought it was a pretty cool way to affect the signal. When you turn the button on, it starts up the Matrix pattern to control everything via CV. When you turn it off, the Matrix doesn’t play any pattern at all, essentially shutting down the CV triggers.

Button 4: Finally, we have a simple switch which either keeps the Global delay of the Thor Carrier free running (when left off), or synched (turned on).


* One note about switching the Carrier Thor’s patch. If you switch the patch, you’ll have to remap the settings in the Modulation Bus section for the CV1, CV2, and CV3 sources (all the settings on the right side of the Modulation Bus section). Otherwise, the Delay and Slider functions won’t work properly. Alternatively, you don’t have to switch the patch at all. You can play with the settings in the note / global sections of the Thor until you come up with a sound you like. Point is that since this Combinator is so heavily programmed, switching patches requires a little more tweaking than normal.

Switching patches in the Modulator Thor won’t require any remapping because none of its parameters are used externally.

Any thoughts on this setup? Any ways you can see to improve it? Let me know what you think. . .

1 – Record as a CD Mastering Tool

My task a few weeks ago: To turn Propellerhead Record software into a CD mastering tool. Learn how to master 12 audio tracks in Record. A Record Template file is included.

So my task a few weeks ago: to turn Propellerhead Record software into a CD mastering tool. Keep in mind most of my tracks were already created in Reason and mostly fully formed. I had 12 tracks to master. My results:

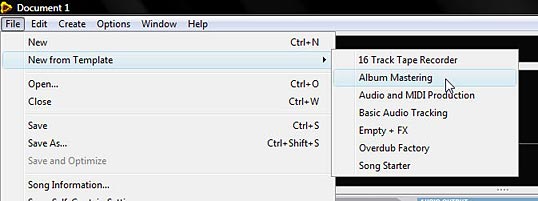
  1. Open Record and go into File > Create from Template > Album Mastering. The template opens with the default mastering suite as an insert effect before 10 empty audio tracks. Ok. not great. But just ok. I think what would have made it better here is if there were some reverb already plugged into the master FX sends, with all the sends switched on the master mixer and set to a low value (saving some steps here would do wonders). Though, since you can create your own templates out of anything, it’s not a major issue.
  2.  
    Opening the Record Album Mastering Template Opening the Record Album Mastering Template


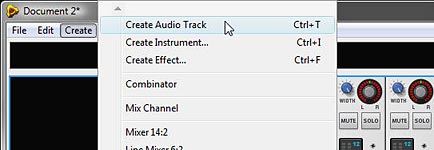
  3. I created two additional audio tracks (I have 12 tracks in total on my new CD project, not 10).
  4. Adding 2 more audio tracks to the template
    Adding 2 more audio tracks to the template
  5. I updated the master insert effects with the mastering combinator. Under the Master Section, click “Show insert FX” to expand the FX section, and update the empty mastering suite with your own mastering FX. In this case, I used the “Dance” combinator, as I really like the sound that this mastering combinator gives to my own music. I realize that usually this is the last step when mastering the mix, and this may seem kind of backwards, but I find that once I have all the tracks laid out and they are ready to be mastered, I’d rather listen to how these FX work with each track and do all the final adjustments from there. And if you don’t want to do it this way, you can always bypass the Insert FX with the click of a button, toggling the dance combi on and off. A great way to see how it affects each track.
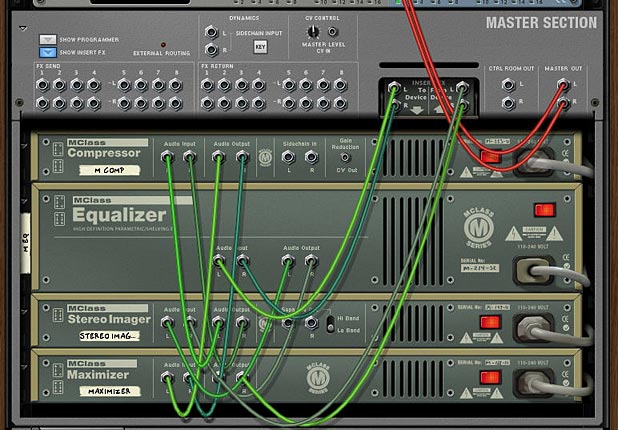
  6. Note: since you can’t insert a combi inside the master section, one way to add the Dance mastering combi in there is to first right-click over the front of the master section and select “Clear Insert FX,” then create the dance combi underneath the master section (hold down shift, so it is not auto connected. Expand it, select all the devices inside it and then drag them into the master section. Flip the rack around and move the blue “To Devices” L and R cables which are still connected to the dance combi to the master sections “To Devices” L and R cables. Do the same for the “From Devices” cables and then delete the now-empty dance combi. Voila, the Dance combi and all connections are inside the master section as Insert FX (see the image below for a look at the back of the rack and the connections.

    Back of the Master Section with a Mastering Suite Combi attached
    Back of the Master Section with a Mastering Suite Combi attached
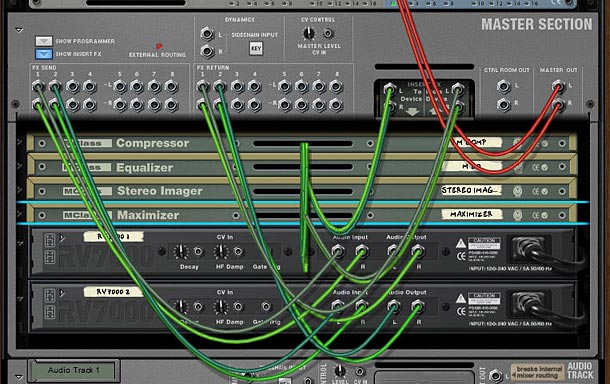
  7. I added two reverbs as send effects I added the “All Plate Spread” and “All Warm Plate” RV7000 units as send FX in the Master Section. I also set the dry/wet amounts very low (setting on 5 for each). This was done to add a little smooth reverb to all my tracks and make them “fit” or “glue” better together (see step 1 above — would have been nice if this step was already done).
  8. Adding the two Reverbs as Send FX
    Adding the two Reverbs as Send FX
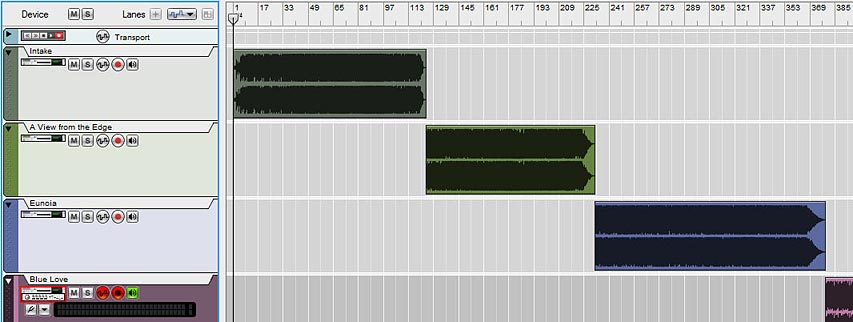
  9. Added each song (wav) file to each of the audio tracks using the File > import audio track on each channel and set them up one after the other in the sequencer timeline.
  10. Note: You can also set your tracks up on top of each other in a stack if you prefer. This is probably a wiser course of action, but as this was my first time using Record to master my CD, I opted to try laying things out on a timeline. The benefit to laying it out sequentially is that you can track the total time of your songs combined. The downside is that it makes for a real pain when it comes to bouncing each song individually to a wav file. There’s a lot of movement of the L / R markers in the sequencer at that stage.

    The tracks laid out in series within the Sequencer
    The tracks laid out in series within the Sequencer

    Note: it was at this point I realized something. I had one track out of the 12 whose tempo was faster than it should have been. It took me a while, but I figured out that this was the only track that was output from Record, not Reason. When you import an audio track that was produced with record, it understands the tempo data from the file (The track was 100 bpm, while my “CD Mastering” project tempo was 120). If you import a wav file that was created via Reason’s export, it shows “no tempo data” which I still find a little odd.

    Soooooooo…. I went to the tempo transport in the sequencer and switched the tempo to 100 for the duration of that one track. Problem fixed.

    It was also at this point that I was glad that Record didn’t make the connection and understand the Reason song tempos. Otherwise I’d have to go back and write down the tempo of each of my songs, and then change the transport’s tempo over each song to match. What a pain that would have been.

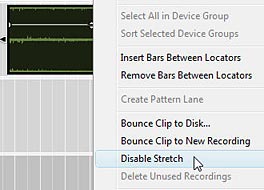
    Update: Mattpiper provided this nice little tip which avoids having to use the Tempo Automation Track: “In Record, you can right-click on any clip and select “Disable Stretch.” Then the clip will not have its tempo affected by the song tempo.” — Thanks Matt!

    Disabling Stretch by right-clicking on the audio clip in the Sequencer
    Disabling Stretch by right-clicking on the audio clip in the Sequencer

    Back to my strategy:

  11. Turned on “send 1” and “send 2” for all the audio tracks so the reverbs I set up were audible. Adjusted the send levels for each track to taste.
  12. Adjusting the Send levels in the Main Mixer
    Adjusting the Send levels in the Main Mixer
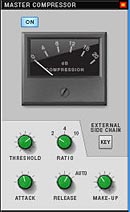
  13. Now the hard part: On the Main Mixer I adjusted compression settings for the Master Compressor, as well as for individual tracks. Also adjusted the LPF/HPF on some tracks, though not very much because as I say, all the work was already done in reason, and I didn’t want to go overboard. This process took a few days as I didn’t want to rush it and suffer from ear fatigue when adjusting these settings.
  14. Final adjustments with the Master Compressor
    Final adjustments with the Master Compressor
  15. Now the hard part (part 2): listened to each track once or twice and adjusted the volume levels so that they were just below clipping. My intention was to have them all evened out. I got about halfway through and called it quits for the night. Finished it in about 2 nights. For what it’s worth, I find that even if the song shows clipping in Reason or Record here and there (via the clip out light on the transport panel), as long as the clipping light is shown infrequently, and they are short clips, it doesn’t affect the final mixdown or output. Since this is the final adjustment before bouncing, I don’t mind pushing it. If I were still in the mixing stage, I would leave more headroom (about 2-3 dB). 
  16. Set up the L/R markers in the sequencer and bounced each song (LOOP) to an audio file individually. Loop is in caps for a reason. Since all the tracks are in the sequencer in sequence (how self-reflexive), each song is really considered a loop by the software. So don’t make the mistake of bouncing the song, otherwise you’ll end up with one huge wav file of the whole CD (of course, this may be what you’re after, but probably not).
  17. It’s times like this I wish I could set up multiple start/stop markers within Record, and bounce them all to individual tracks with one click of a button. But Record just isn’t there yet. Note to props: this would be a great addition! Also, the whole project turned out to be 1.5GB, so it’s not for the feint of heart. But it’s worthwhile to do if it’s going to make all my tracks have a certain amount of consistency across the board.

Now tell me: do you think this is an approach that makes sense? I know we all have different approaches when it comes to mastering, but is there anything you would do differently? Anything you would add or subtract from this process? Any suggestions to improve this process? Would anyone care to share their own process using Record?

If you would like to listen to the final result, all the tracks on the CD can be found here: http://www.phisequence.com

Also, if you would like the template file, I’ve created the one I set up here, with the Dance Combi and Reverbs in the Master Section, as well as all the sends turned on. I also added the extra two audio tracks:

Download the cd-master-tpl (zip file)