71 – Entering Song Contests

One of the best things you can do to learn, improve, contribute, and generally be creative is to enter your music in contests. Usually there are several contests through magazines, online music forums, bandcamp, soundcloud, and the like. I would strongly urge you to look up some of them and enter into the contests you feel are appropriate for your style of music.

One of the best things you can do to learn, improve, contribute, and generally be creative is to enter your music in contests. Usually there are several contests through magazines, online music forums, bandcamp, soundcloud, and the like. I would strongly urge you to look up some of them and enter into the contests you feel are appropriate for your style of music.

First, some Suggestions and Tips when Contributing

There’s a few suggestions I would make when looking at which contests to enter.

  • Look for a contest where you find like-minded people and musicians that will be accepting of your work. For example, if a contest is put on by a cinematic club, you wouldn’t post country music. So first, read up about the contest, listen to some of the tracks done for previous competitions of the same contest, try getting in touch and networking with individuals that are a part of the contest or group submitting their tracks to the contest. And then get up the courage to submit your work.
  • Read the rules! I can’t stress this enough. Read the rules and then follow those rules. The worst thing you could have happen is that you win a contest only to be disqualified because you didn’t follow the rules properly. Remember that unless YOU are the organizer, you can’t make the rules. Therefore, don’t argue about them. Just follow them. If you have a question, don’t hesitate to ask for clarification. And suggest ways to improve the competition in the future. But remember the goal is to get your music out there, connect with others, and learn more about music in general (others’ music and your own).
  • Generally, don’t submit a work longer than about 4 minutes, unless the competition specifically asks you to. Long drawn-out tracks are a surefire way to bore even the most die-hard music enthusiast, and will probably tire out the judges and those that will have to listen to your music. Make it interesting and get your point across in a reasonable length of time. Sure there are exceptions to this rule, but if it’s not specified, assume a length of 3-4 minutes is standard. And see the previous point: if you don’t know, ask!
  • Listen to the music of others and participate when you have a point and when and where you can. Discuss what you like about other peoples’ work. Provide “Constructive Criticism” and DO NOT give an opinion without any feedback. You know what I mean. Don’t say “this sounds good” or “love it.” That’s not helpful at all. And if you have nothing to provide, then just keep your mouth shut! A helpful comment always comes with honest feedback which helps the musician learn what is working and what is not working, and always with zero negativity. For example, “The compression on that kick drum seems a little too high for my taste, and the melody line comes across too rigid. Perhaps try to lower the compression on the Kick drum and try using and arpeggiator on the melody. That could be one approach to enhancing the track. But that bass you have going on is perfect. The frequency is just where it needs to be.” Notice here that you’ve not said anything negative and you’ve provided some helpful ideas. As an aside, it’s usually good form to tell the musician what you enjoy about the track and what you feel works in the track if the majority of your comments are things you would do differently in the track.
  • Don’t overdo it! If you are commenting 10 times on every song or in response to every single comment, people are going to get tired of listening to you, and you’re probably cluttering up the competition with a lot of crap. Tone it down. Think about your responses. And if you’re impulsive (hey, we’re all impulsive from time to time, especially about things that we feel passionate about), instead write your comment down in notepad and save it for one day. Then go back to it and see if you still want to post it. The one day rule gives you some time to ponder what you’re saying, maybe you want to rework what you previously wrote as well. And it gives you a break from the forum / competition. Most importantly, it gives the other people a break from YOU. And remember, a well-formed and well thought-out comment is usually greeted with much more acceptance than an impulsive one.
  • Most importantly, have fun submitting your track(s). Well-run competitions are fun places where everyone shares ideas. Make the most of them. Listen to what others have to say about your work. And try to grow from the experience. You will find many useful ideas that others suggest are often ideas you hadn’t thought about before, and it may be just what you need for some new inspiration.

Always remember that competitions are NOT about winning, despite what others might say. Competitions are about people getting together to share their passions. They are about learning how to take your music to the next level. They are about learning from the techniques about others. Winning is merely a by-product and a cherry on the cake. If you win, great. But if you lose, you still win. Those that enter competitions merely for the sake of winning are actually the ones that are losing. Because they are stagnant. Those that get the most out of the competitions are those that open themselves up to the process and learn from the experience. They are the ones that go home with new friends, new ideas, new techniques, and new ways to improve themselves. Ask yourself which one do you want to be?

My Song Contribution to the Reason Song Challenge III

So with all of that said, here’s my own entry from the Reason Song Challenge III put on by Rob (FailedMuso). In order to use this file, you will need to download Patrick’s (Bitley’s) DeLight Fairlight Demo ReFill. The whole idea for this competition was to create a full song from the sounds found in that demo ReFill. Lots of entries were created. I think a total of 32 songs were submitted. Mine did not make the grade. But as I said, that’s totally ok with me. I’m just very happy to be listening, talking, and sharing with such a talented group of people. That’s why I wanted to share my track with everyone. That way you could take a look at how it was put together, and perhaps find a few ideas in there which may spark your own creative juices or inspire you in some way.

So here is the final entry I submitted to the contest (sadly, it did not come in first, second, nor third place. Nor did it get any honourable mentions). But that’s ok. As I said, even when you don’t win, there’s a lot you can take away from it, and a lot you can learn.

Enlightened v2 by Phi Sequence

And you can download the song here: Enlightened. The file is zipped up, and when you open it you’ll also need Reason 6 to inspect it (since it was done in Reason 6 and is a .reason format). Feel free to look it over, play around with it, remix it and send it back to me. Have at it. But remember it’s still copyrighted and I still own the rights to it. So no distributing it without letting me know first.

Finally, here’s a video I put together on YouTube to show you what’s inside the file. I think the hardest thing was coming up with Hi Hats (none were included in the demo ReFill), and making the song “my own.” It was also interesting to try to cull the proper sounds I wanted out of the demo. For instance, there were no sweeps inside the demo, so I had to make changes to the synth parameters to get some sweeps out of them. Little things like this add up to a lot of fun hours working inside the song document and making the demo sounds do what I wanted them to do. But in the end, I can honestly say it’s all worthwhile.

Also, limiting your song palette in this way forces you to work within boundaries. And that is sometimes a great source of inspiration. Especially when all the ReFills out there have massive libraries of sounds and effects. It’s very easy to get lost in a sea of sounds. Sometimes a competition like this comes along and it forces you to work in a limited way. Or else it forces you to find workarounds you might not have ever thought about before. In short, it’s a great way to stimulate your musical mind.

I hope you found some of this useful information. Drop me a comment and let me know what you think? I’d love to hear from you.

67 – 7 Songs in 7 Days

When you get a creative spurt, don’t dismiss it! Make sure you embrace it, accept it, harness it, and get it out of you immediately. Most importantly, learn to understand it’s happening (or when it’s about to happen), and let it ride for as long as you can. I can tell you this because from experience you will have dry spells and they tend to last longer than the creative spells. So it’s important to read the signs and act on them.

When you get a creative spurt, don’t dismiss it! Make sure you embrace it, accept it, harness it, and get it out of you immediately. Most importantly, learn to understand it’s happening (or when it’s about to happen), and let it ride for as long as you can. I can tell you this because from experience you will have dry spells and they tend to last longer than the creative spells. So it’s important to read the signs and act on them.

You can download the project files here: 7-Songs-in-7-Days. There are 2 song files zipped up. Note that they are a “.reason” format, which means you need Reason 6 in order to open them. But even if you don’t have Reason 6, you can follow along with the project below, watch the video and adjust it for previous versions of Reason. You’ll probably also learn more by doing it this way. The first song is “7-songs” which is outlined in the videos below, and the second is “Crease Kink” which I threw in there in case you want to remix it or play around with it. Have some fun with it, but remember that I own the rights to it. So if you use it, please let me know and I’ll showcase it here (to date no one has yet to do something with one of my files, but there’s always hope). 🙂

Usually when I’m in a dry spell, I tend to notice it pretty quickly. And when I do, I immediately shift gears and work on a different project. For example, recently I was creating nothing. It happened about 3 months ago. So shifting focus, I started working on designing sounds — LOTS of sounds. Rather than sit at my computer with a blank canvas open or hacking away at nonsense, I shifted focus. This does two things:

  1. It gets your mind out of the clouds and away from the blank slate.
  2. It usually rejuvinates you and lets you recharge your batteries. Kind of like a holiday. We all need them from time to time to rest and clear the mind.

When I got back (and after producing my latest Pureffects ReFill), I was more creative than I’d ever been. And this is all just a long-winded way of saying I brought on a new challenge for myself. Let’s create 7 songs in 7 days. Not an easy challenge, to be sure, but a very fun challenge nonetheless. And though not every song is spot on, most I’m happy about, and with a few modifications, I could say they are finished.

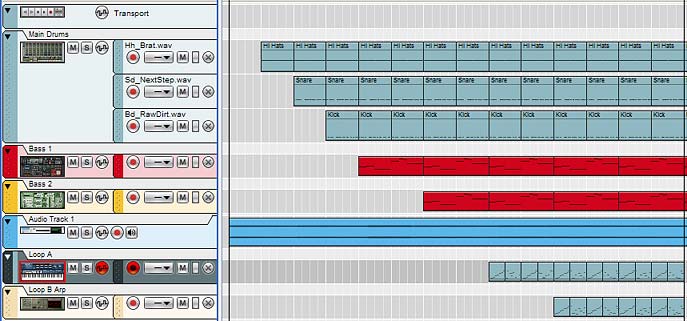
The Main Sequencer after adding some of the elements you'll learn in this creative project.
The Main Sequencer after adding some of the elements you’ll learn in this creative project.

First: The Songs

So first, here’s the songs in order of creation (day by day). Skip all of this if you just want to get to some of the good tricks that I used inside them. You’ll find some of those tricks down below. Otherwise, please have a listen and comment. One can never have too much feedback.

Day 1: Friday October 14, 2011 – Crease Kink (Glitchcore)

Crease Kink by Phi Sequence

Day 2: Saturday October 15, 2011 – Redaction (Dark Ambient)

Redaction by Phi Sequence

Day 3: Sunday October 16, 2011 – 200 Years (Dark Ambient)

200 Years by Phi Sequence

Day 4: Monday October 17, 2011 – Lens Fold (Dark Experimental)

Lens Fold by Phi Sequence

Day 5: Tuesday October 18, 2011 – Vicious Viscous (Dance)

13 – Vicious Viscous by Phi Sequence

Day 6: Wednesday October 19, 2011 – Severed (Electronica)

Severed by Phi Sequence

Day 7: Thursday October 20, 2011 – Palatinate (Electronica Dance)

Palatinate by Phi Sequence


Second: The Methods & Tricks

Now for a few tricks. I thought I would show a few ways I went about creating some of these songs. It’s not really a formula, but it’s a way I used to start off these songs and keep going in order to create so many in such a short time. There are, of course, a million and one ways to create songs. This hopefully will show you a few techniques that might inspire you to jump into a new direction with your own music. I hope so.

Before I start, let me first say that a lot of the time, I’ll create all the sounds from scratch using the Reason synths. But for the sake of efficiency, and in order to create a song every day, I opted for the approach of using patches in the Factory Sound Bank (FSB) for all the instrumentation, and my Pureffects ReFill for some of the effects. Since I had already created thousands of effects patches (and some in the FSB as well), why not put them to good use. In this respect, it was a bit of a novel approach for me, but one that was very rewarding.

Let’s start by looking at the videos on how I started out a song. This gets you about 50% done in less than an hour.

Of course, after these tutorials, there is still work to be done. Mainly some EQ work on the various elements, continuing with the arrangement in the sequencer, throwing in additional elements to spruce it up a little, adding compression here and there, gluing the track together with a Reverb or two, adding a mastering suite to open up the track, and finally using the Master Bus Compressor from the main mixer (if you choose). But this is where I’m going to leave you for now. If you want to pursue these tracks, I have put two in the Download up at the top of the tutorial. Feel free to work on those and come up with your own mix. If you do, please share it with us so we can have a listen.

Starting off with a few Drums

Let’s start at the beginning. Usually the first thing is to start with your drums. That’s a normal starting point for most tracks. So we’ll start with a Redrum. Now normally, you have an idea in mind before you start a track. But I seldom work that way. In truth, I usually lay down a few drum sounds in a pattern in the Redrum and wait until I hear it. I then start to get a certain idea of how to shape the sound and where it’s going to go. In this respect, the song becomes a combination of what I hear first, and then I make decisions on how to shape it as its playing. This is usually backwards from the way most people would compose. But it’s worked for me in the past. So I’m going to do the same thing here.

Once you create a redrum, open up the assorted kick drums in the FSB, and add one into the first channel. I usually keep them playing as I’m selecting them so I can get a feel for what I’m going to use as a Kick drum. Once that’s done, I flip to the back of the rack and send the Gate Out from Channel 1 into the Gate In on channel 2. I do the same thing between channels 2 & 3. Then flip to the front of the rack and select Drum Channel 1. Lay down a pattern (usually I lay down a 64 step pattern to take full advantage of all the steps in the Redrum, and to have something that sounds like it has a lot of changes throughout). Since I’ve connected the Gate channel 1 to channels 2 & 3, I can layer the kick with 2 other kick sounds, but I only have to enter 1 pattern in the Redrum. This speeds up the workflow a little (and is why you should get familiar with your CV connections!).

So now add two more kick drums in Channels 2 & 3. Once this is done, I shape the levels, length & pitch of all 3 drums together. It’s at this point that I start to get a feel for how things work together. If something isn’t working right, I’ll either change one of the samples, or adjust those parameters.

Next, I add 2 Snare drums in channels 4 & 5 and use the same gate CV trick between the two. This means I need to create a snare pattern on channel 4.

And finally I’ll create 2 Hi Hats on channels 8 & 9 – and set the button  to have exclusive sounds between those two channels. This way I can set up an open hi hat on 8 and a closed hi hat on 9. Though, I don’t always use open / closed Hi Hats. But it’s there if you want.

Now create 2 additional mix channels and put them under the first mix channel for the Redrum. Label each Mix Channel Kick, Snare and Hi Hat. Create 3 Spider merger/splitters and use them to merge the sounds from each single channel through them and back into their respective mix channels. This way you end up with 3 channels for the 3 different drums. You’ll see why we do this in a minute.

And now copy the Redrum pattern to the track. Go to the track and using the Tools window (F8), go to the “Explode” function and explode the drum clip to their own lanes (you may want to delete the old lane and label the 3 different clips so that you know what’s what. I’ve done this enough times to know that the order is the Hi Hats at the top, the Snare Drum in the middle, and the Kick drum on the bottom. Easy enough.

So why separate mix channels? The reason is because you want to be able to process each drum differently. And this ensures that we can do this with a minimum of fuss. So first off, select the Kick mix channel, right click, and go to Effects > Pulveriser. The device is automatically routed inside the Mix Channel’s “Insert FX” section — if you’re new to Reason 6, this might be confusing at first. But think of each Mix Channel as having its own built-in Combinator where you can place effects and even route / program them as you would a normal Combinator. It keeps your rack clean and makes working with effects easier. Trust me on this.

With the Pulveriser, I’m going to set up a nice beefy Kick — watch the video for how this is done. After that, I’m going to have a little bit of fun by varying the pitch somewhat on 2 out of 3 of the kicks. Flip to the back and you’ll see that the Pulveriser can not only be used to beef up the kicks, but we can steal some of it’s modulation to affect the pitch on those kicks as well. So use the Tremor / Follower outputs and send them into the Pitch inputs of 2 kick drum channels on the Redrum. It’s a nice idea also because it doesn’t require any extra devices to set up.

Now I’m not going to go into processing for the snares and kicks, but I think you get the idea now. Don’t be afraid to add a few effects, and when done, you can also add an EQ to each drum individually to cut the low end and boost certain frequencies a bit. That’s one method to work with the drums. Now on to the Bass.

Working the Bass into the Mix

Now we move on to the bass. Again, this is just one of the methods I used to come up with this song challenge. It’s nothing fancy. Start out by adding a Bass instrument and ensure you have a bass that you like. Something with a long sustain so our notes can ring through. Don’t worry if the notes sound too long. We’ll adjust their note lengths in a minute. For now, just find a bass sound in the FSB that works with the drums and that gives you some degree of pleasure when you hear it.

Now go to the sequencer and draw in a 4-8 bar bassline. Again, don’t get too caught up in the composition. You can always change it later. Just something simple. This will be the driving sound for the song, for the most part. At least that’s what it is for me.

Now Loop the clip. This is so that you can audition the effect we’re going to add. And also so that we can switch out the bass with another bass instrument if we don’t like it. I do both of these things. I also add another one or two basses and copy the clip to those other instruments. This way we have a nice thick layered bass; just as the drums are layered.

For the effect, my go-to device is an Alligator. This is because it really is a nice way to add some movement and also since I’ve created a bazillion Alligator patches, I can audition them as they play through. Once I find one I like, I keep it. And since I usually have at least 2 bass instruments, I have the lower bass line kept as the sub bass without any effects, and the higher basses utilize the Alligator. In this way, you end up with a nice lush line playing through your song.

Another Fun Audio/Alligator Trick: Introducing some Pad-like Elements.

Here’s something fun that I’ve been toying with in most of these songs. It involves adding one or two audio channels, and then dropping a short melodic sample into the audio track. Then I’ll take the sample and stretch it the entire length of the song (or beyond, depending how the waveform looks). The idea is to have the audio act as a Pad sound for the entire length of the song. And since you’re stretching it out beyond recognition, you end up with a real twist on the sample.

Once you do this, make sure to lower the level significantly. The idea is to have the sound running in the background so it’s audible, but doesn’t take over the drums or bass. A nice subtle sound.

To complete the trick, I add an Alligator to the audio channel. It’s important to remember that the Effects work on audio just as they would on MIDI clips. So adding an Alligator provides some nice movement to your pad sounds. I wouldn’t go crazy with the Alligator in this situation. Just a slight movement to the sound is all you need. So again, audition some of the Alligator patches in the FSB, or get my Pureffects Refill for a selection of 200+ Alligators. 🙂

 Finally: Some Dr. OctoRex accents to really Kick it up a Notch

Lastly, let’s add some accents using a loop. You’d think a single loop can’t do much, but wait until you see this fun little trick. It’s not so much a mystery, but while the song is playing, create a Dr. OctoRex and find a loop that goes along with the song. In this experiment I wanted to find something with a hard edge, so I opened up the “Hardcore” folder in the FSB and found a loop that I thought had some possibilities. I then set about filtering it and adjusting the Octave setting, and adding the LFO for some modulation. Once this is done, copy the loop to a portion of the track (4-8 bars long) and then turn off the “Enable loop playback” button, so you don’t get double-note sounds.

Now in the sequencer you can go about altering the notes and creating some variation.

Finally, copy the Dr. OctoRex and Track. Using this copy, make some adjustments. Then combine the Dr. OctoRex and create an RPG-8 Arpeggiator to play the Combinator. Go to the sequencer and move the notes from the second Dr. OctoRex down to the Arpeggiator track. Then go back to the rack and copy the loop into all 8 slots. This is so that if the notes on the sequencer playing the RPG-8 switch the loop slot, the same loop is still playing.

From there, you can go to town switching things around in your loop. Usually changing the octave, updating some settings on the RPG-8, etc. will produce some interesting results. The nice thing is that both loops have the same groove and timing, so they will sound like they belong together. Indeed, this is where I had the most fun: playing around with settings until you find the right balance between the loops.

Don’t forget you can also edit the slices directly, or use some CV to modulate things further. Experiment and play until you make the loop your own. That’s really the key here.


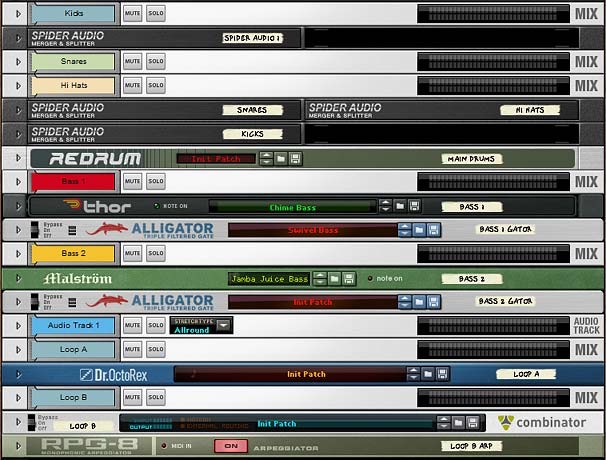
The front of the rack after adding the Drums, Bass, Audio Track (Pad), and some Dr. OctoRex Loop accents.

So there you have it. One method I used to create seven songs in seven days. Now go out there and challenge yourself to create your own group of songs using your own methods, or incorporating some of the methods I outlined here. The sky is the limit. So reach for the sky!

62 – Song without a Sequencer

After working with the Thor step sequencer, and in honor of Music Making Month at Propellerhead Software, I posted a challenge on TSOR (The Sound of Reason): Create an entire song without the main sequencer in Reason. So here is my attempt at a song without a Sequencer. And I’m here to say, it can definitely be done!

After working with the Thor step sequencer, and in honor of Music Making Month at Propellerhead Software, I posted a challenge on TSOR (The Sound of Reason): Create an entire song without the main sequencer in Reason. So here is my attempt at a song without a Sequencer. And I’m here to say, it can definitely be done! The following were the basic rules:

  1. You can’t use the main sequencer. This means you can’t have any note, audio, pattern or automation lanes or clips. Kindly step away from the Main Sequencer!
  2. The song has to be a decent length: about 3-5 minutes.
  3. You can use the L / R and End markers in the sequencer (to indicate the end of the song, or to loop the song over again so we at least know the song’s end location).
  4. It can’t be a “live jam” and it can’t consist of the same one note sound over 4 minutes in length (yes, I get the joke Mr. Marcel Duchamp — Har dee har har). In the spirit of a challenge, this is put out there to challenge you as a musician who loves making songs in Reason. So give it a good shot.

What you end up with is a song that is pretty much controlled via CV and the device sequencers (Thor, Redrum, and the Matrix). After a few days, here’s what I came up with:

Song without a Sequence by Phi Sequence

I thought this was an interesting challenge, given it’s not easy to throw the Main Sequencer aside. For one thing, how do you mute or fade in / out? For another, how do you automate your sends? All very interesting challenges and all will require those that participate to flex their CV muscles. And I strongly encourage you to do so, because the more you learn about CV and the back of the Reason rack, the more you will understand inner connections, and the easier it will be to take what’s in your head and spit it out in Reason.

So enough preaching. Here, I’m going to explore a few tricks to overcome the lack of the Main Sequencer in our song challenge.

You can download the project files here: Song-without-a-Sequencer. This is a zip file that contains a reworked copy of the 128-step forward sequencer Combinator that is used extensively below (works with Reason 4 & 5, and Record 1.5), as well as a finished song file I created without the use of the Main Sequencer or any automation, notes, or pattern lanes / clips (the Song file works with “Record 1.5 + Reason 5”). Note: please respect that the included song file, like everything else on this site, is under the Creative Commons 3.0 licensing, meaning you can mix, remix, share, and play around with the song to your heart’s content, but you will need to provide the source info and a link back to my site here in any productions you do with this file. Share and share alike ok? And you can’t make any money off the file. But if you remix or play with the file, send them back to me privately and I’d be happy to showcase them here in a new posting (send to my email in the top menu), I’d love to see what you come up with. Don’t be shy! 😉

To start tackling this pickle, I first thought about how the song would be sequenced? Since I can’t use any note lanes, the notes would have to be placed inside one of two possible devices: The Thor Step Sequencer or the Matrix. You can also use the RPG-8 to help play your notes and the Redrum could be used as a sample player/sequencer. But I thought I would stick to the Thor and Matrix for most of my song. As I have already explored creating a song entirely using Matrix sequences on my blog, I thought it would be a better challenge to use Thor as my main sequencer. Note: it also helped that I just came off a Thor Step Sequencer bender in the last 2 tutorials I wrote. So it was fresh on my mind.

With that accomplished, I had to set out using Thor as the sequencer for the song. The next step is to figure out the length of your song. If my song is 120 beats per minute, and I use 4/4 time, each bar is 2 seconds long, or 30 bars per minute. If I set up Thor’s step sequencer rate to be 4/4, that means each step is one full bar long (2 seconds). Using this rate/resolution, I can calculate that I will need 8 Thors to sequence a song 4 minutes long (4 minutes = 120 bars or 120 steps in Thor. Thor can produce 16 steps, so 120 / 16 = 7.5 Thors). I promise that will be the only math you’ll need to do in this tutorial. 😉

So the way I started was to create a Combinator with 9 Thors all strung together. See the Generative Ideas tutorial for a complete explanation, or you can download the Project Files at the top of this tutorial. We’re using the forward running Thor 128-step sequencer as a starting point. This is a Combinator that you can modify for use as a forward running sequencer to control various sounds and their levels. You can set all the rates on these Thors to 4/4 and you’ll have yourself a 4-minute sequencer. Now comes the modifications:

Since we can’t use the Main Sequencer at all, we need a way to a) Trigger the Step sequencer via CV, and b) modify the sound source levels via CV. Here’s how you do that:

Triggering the Step Sequencer via CV

The biggest problem you will encounter when doing things this way is how to trigger the step sequencer to start, and ensure it is only triggered once, and never again. The solution I came up with is to use 2 Matrix Curves inside the step sequencer Combinator.

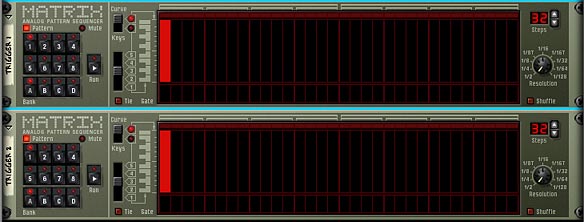
  1. Hold your Shift key down and create a Matrix under the set of sequenced Thors (we’ll call this “Trigger 1”). Switch to “Curve” mode, and on pattern A1, set it to 32 steps with a resolution of 1/2 (though I don’t think the step length or amount of steps really matters, as long the step length is above 2 steps, but as these settings worked for me, I’m not going to deviate from them). On step 1, set the curve to it’s full height (MIDI 127).
  2. Select this Matrix, right-click and select “Duplicate Devices and Tracks” to create a copy of the first Matrix (we’ll call this “Trigger 2”).

    The 2 Matrix Triggers (Trigger 1 and Trigger 2) with the exact same settings.
    The 2 Matrix Triggers (Trigger 1 and Trigger 2) with the exact same Curve settings.
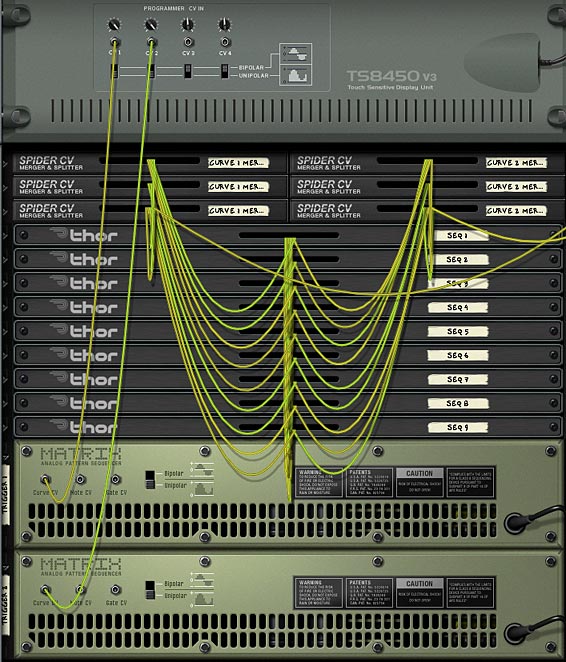
  3. Now flip to the back of the rack and send the Curve CV from Matrix 1 into CV input 1 on the Combinator. Send the Curve CV from Matrix 2 (Trigger 2) into CV input 2 on the Combinator. Set the Trim knobs on both CV inputs to full 127, and switch to “Unipolar”

    Note: If you have Reason 4, you can still do this trick, just send the Curve CVs from both Matrixes into Rotary 1 and Rotary 2 CV inputs, set their trim knobs to full, and on the front of the Combinator, turn Rotary 1 and 2 down to 0 (zero; fully left).

    The two Matrix Triggers' Curve CV cables being sent to CV 1 & CV 2 inputs on the Combinator, respectively.
    The two Matrix Triggers' Curve CV cables being sent to CV 1 & CV 2 inputs on the Combinator, respectively.
  4. Flip to the front of the rack and in the Combinator’s Programmer, select the first Thor device in your sequence. Enter the following into the Modulation Routing:

    CV in 1 > Button 1 : 0 / 1 (For those using Reason 4, change “CV in 1” to “Rotary 1”)

    The first Thor Step Sequencer Triggered to start by the Curve of the Trigger 1 Matrix.
    The first Thor Step Sequencer Triggered to start by the Curve of the Trigger 1 Matrix.
  5. Select the Matrix 1 (Trigger 1) device and enter the following into the Modulation Routing:

    CV in 2 > Pattern Select : -1 / 0 (For those using Reason 4, change “CV in 2” to “Rotary 2”)

    The Trigger 1 Matrix's Pattern switched by the Trigger 2 Matrix.
    The Trigger 1 Matrix's Pattern switched by the Trigger 2 Matrix.

Now what happens is as soon as you hit the Play button on the Transport, the second matrix triggers the pattern of the first Matrix, which kicks off the first Thor step sequencer (provided Button 1 on this Thor is set to trigger the start of the Sequencer — turning it on, which should already be set up if you downloaded the 128-step sequencer). The great thing about this setup is that it’s a “one-time” trigger setup. Every time the Matrixes come around to trigger again, Matrix 1 will be one step ahead of Matrix 2, and so the first Thor will never be triggered twice. If it were triggered twice, you’d end up with all kinds of problems with multiple CV values output and summed together. Trust me, it’s not what you want to hear coming out of your sequencer.

Ask me why the steps of both Matrixes go out of sync or lag 1 step behind each other and I couldn’t tell you. I’m just happy that they do in this instance. I’m sure somewhere down the road I’ll be doing something totally different with the Matrix and need them in sync, and get all upset because they aren’t. But not here. Here I’m happy happy happy.

Modify your Sound Source Levels via CV

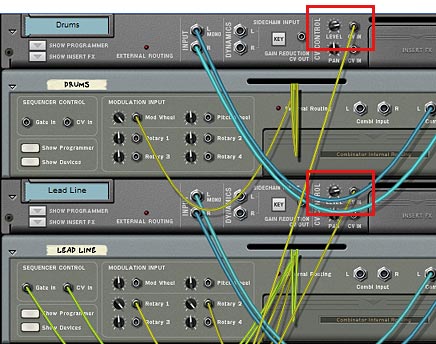
Now that we have the sequencer setup properly, it’s time to add in our sounds. If you look at the song I uploaded, you’ll see that I am using Curve 1 and Curve 2 of all the “Level” Combinators to output 2 level values from each “Level” Combinator. The final output of both curves are sent to the CV input on the Mix channels of the sound devices. This way, you can use the Thor Step Sequencer as a “Level” sequencer for each sound device.

The 2 Curve Outputs: The final Merged Output is sent to the splitter side of the Spider, and then one of the splits is sent to control the level of the sound device.
The 2 Curve inputs: The CV controls the level of the sound device. Input is on the Mix Channel, and the Trim Pot is set to 100.

If you need more level controls, just duplicate the 128-step sequencer Combinator and send the Merged Curve outputs to the devices you wish. Just make sure to keep all the Step Sequencer rates the same in all Thors so that you don’t go out of sync. Not that you can’t change the rates, but things will be much easier if all the Thors in each of the Combinators move at the same time through their steps.

Using this method, you can now fade in your song and fade out your song by adjusting the steps’ curve values in the first Thor sequencer (fading in) and adjusting the steps’ curve values in the last Thor (fading out). You can also control what is heard at any point in time along the song. For instance, I added a Trance Lead “Fill” in the middle of the song by adjusting the steps of the curve that controls the Fill’s Mix Channel Level CV. If you open up this Combinator, you’ll see that all the curve CV values of all the Thor steps are 0 (zero), except for Thor 4, 5 and 6. The curves in these Thors are raised up to around 64 gradually (fading in), and then lowered back down to 0 (zero) gradually (fading out). This has the effect of bringing the fill into the soundscape in the middle of the song. At the same time, most of the other devices except the Basses are lowered during the fill. If you wanted to mute any part along the way, just make sure that the curve value is set to zero. To have it sound, bring it upward to the level you desire (any non-zero level).

Alternately, if you want to mute the sound for a given device, you can just turn off the step where you want to mute the sound (the small red square beneath the steps). However, if you mute this way, it will mute both curves, so if you are controlling 2 devices with the 2 different curves of the same Thors, you’ll end up muting both devices. To get around this, have only one curve from Thor controlling one device (put another way, use only one 128-step sequencer Combinator to control one sound device).

So that shows you how to Trigger your song, change the sound device levels over time, and mute the sounds in your song.

Adding Send Effects

Another thing I wanted to try and accomplish is adding a send effect into the Record Main Mixer and control when and where this effect gets added. If you look at my song, you’ll see a Delay device connected to “Send 2” of the Master Section. This is a nice send effect to use because it already comes equipped with a “Dry/Wet” control on Rotary 4. The crux of the biscuit is this: You need to set up a similar Dry/Wet control for any send that you want to control during the duration of your song. This way, you can use another Curve from a 128-step sequencer Combinator into the Rotary 4 CV input on the back of the Combinator, and turn the CV Trim Knob all the way up to 127. Then flip the rack around and reduce Rotary 4 to 0 (zero; all the way left).

Rotary four (dry/wet knob) is reduced to 0 (zero) shown on the left, and a "128-step sequencer curve" is sent into the Rotary 4 input on the back (with the trim knob set to 127), shown at right.

Next, you need to turn on the Send effect for the devices that will use it (you’ll see in my song that the drum and  Rex Loops take advantage of this delay send effect). Now, in much the same way as the sound devices are being controlled by the other step sequencer Combinators, the level of the “wet signal” of the delay is being controlled by yet another merged Curve value from another Sequencer Combinator. It’s as easy as saying “right-click Duplicate Device and Tracks” — of course you’ll have to go into each Curve and tweak the levels of the Curve’s step values in all the Thors, but I think by now you get the gist of it.

The Send settings for my song. The delay is set to Send number 2.

Now just for the fun of it go into the Main sequencer, and delete all the tracks (Don’t delete the devices, just the tracks). Set the End marker to somewhere after 4 minutes and press Play on the Transport. Your song will play through from start to finish. You’ve now created an entire track without the Main Sequencer. I knew you could do it!

Bye Bye Main Sequencer. Asta la vista. Adios. Arivaderce!

Where do you go from here?

This tutorial touches on a few ways you can control your song via CV. It’s by no means the only way it can be done. Not by a long shot.

Another way you could control devices without the main sequencer is to send them through a 14:2 Mixer. If you place the mixer inside a Combinator, you can check the box in the Combinator programmer, to have the Mixer receive notes. Then you can send CV into the Combinator’s Gate/CV input and play the appropriate keys to Mute or Solo your tracks connected to the Mixer. You could also send the Curves from the 128-step sequencer into the Mixer’s Level CV input, much as I have done in my song. This would control your fade-ins and fade-outs.

You could also use a Matrix device inside a Combinator and string together patterns going from A1 – D8. Then map the “Pattern Select” to a Rotary and use a very long slow LFO to move the Rotary over time. The matrix can then control any number of other devices with the Note/Gate CV source, and then you can use the Curve CV to adjust levels of the device, in much the same way I have done here. The only downside to the Matrix is that you don’t have any read-out of the CV levels, as you do in Thor, and so this can be a little daunting.

I hope this creative exercise inspires you to try it out yourself. Or at least shows you a few new hints and tricks when working with the Thor Step Sequencer and CV. Now back to making more music. It is music making month after all. 😉

4 – Map Reason Songs to Record

Learn how to transfer all settings from one channel in the Reason Mixer to one channel in the Record Main Mixer. With this technique you can properly tranfer any song with any mixer settings from Reason to Record.

As a beta tester, when I got Record I was super excited. I promptly downloaded and installed, and went to open it up. I was salivating by the time all three record windows were opened stacked in front of me on my screen. The “AHHHHH” moment. A halo emanated around my computer. Come on, you know what I mean. I first saw the double rack and was amazed. Then I looked at the main mixer and my jaw hit the ground. Beautiful! A work of art. now I can finally work on making my tracks truly sing.

Then I opened a Reason song. And everything that I had hoped and dreamed got shattered in one swift moment. What? My mixer with 9 tracks and automation applied to the sends, EQ settings, panning, levels got reduced to a measly single track attached to the new main mixer in Record. All my earlier praise now turned to dismay.

I’m sure most of you know exactly what I mean. You’ve been there. You’ve gone through the same agony. So what do you do now? Curl up in a ball? Send Record back to the Props? Well, you could do that. Or you can read this tutorial and learn how to properly transfer all your settings from the 14:2 mixer in Reason into the SSL Main Mixer in Record. It’s not that hard, as you’ll see. But it is a little time consuming, depending how many tracks you have. And I’m not going to undertake doing an entire song mix. What I’ll do is show you how to transfer all settings from one channel in the Reason Mixer into one channel in the Record Main Mixer. Once you have that down, you can do any number of channels, no matter how complicated the song. So let’s get busy.

Before starting, I’ve put together a zip package with the project files. It contains the Reason song with a single channel and the Record version of the same song once it was converted: Download the Project Files.

It should be noted here that if you have not yet done any serious mixing in your main reason mixer, and don’t have any automation set up for any mixer parameters AND don’t have any CV setup for the Pans/Levels on the back of the mixer, then you can safely open the Reason song in Record and delete your main mixer. Then you can select all the (now disconnected) devices, right-click, and choose “Auto-route Device.” This will create Mix Channels for all the devices. Depending on how creative your connections were to begin with, you may find a few devices that require some custom routing after you do this. [thanks to Mattpiper from the Props forum for this excellent tip]

However, if you already have your mix set up with a lot of automation applied to the Reason main mixer device, then read onward, because this article is for you!

  1. First thing, open the Reason song, mixer and all, in Record.
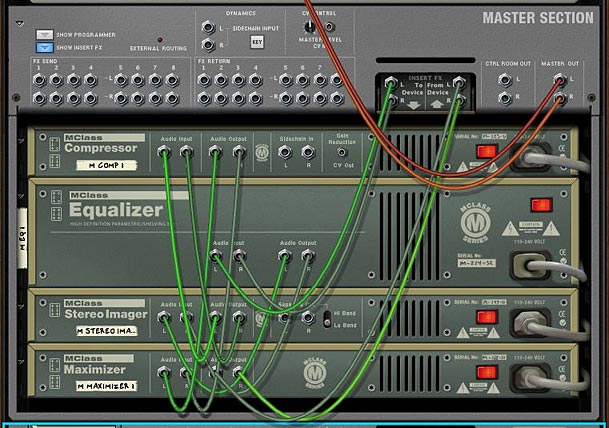
  2. Next, you’re going to have to move any mastering Combinator or devices into the Master Section in Record. Let’s say we have a “Dance” Combinator inserted between the Reason Mixer and the Hardware Interface. Select all the devices in the Dance Combi and move it into the Master Section. Flip the rack around, and move the “From Devices” and “To Devices” cables from the Dance Combi to the same ins/outs of the Master Section. Then delete the audio ins/outs from the dance Combi, and delete the Dance Combi altogether. You don’t need it anymore.
  3. Adding the mastering Combi into the Master Section
    Adding the mastering Combi into the Master Section
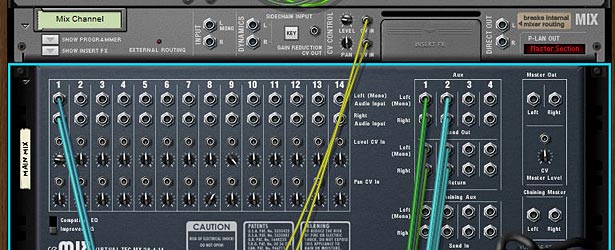
  4. Now let’s assume you have a Matrix set up to control the Panning of the channel, and another Matrix set up to control the Level of the channel. You’ll have to flip to the back of the rack, and move the CV inputs from the Reason Mixer to the CV inputs of the Mix channel. Then adjust the pots to the same settings they were at in the Reason Mixer. Level and Pan is done. Note that if you have several channels set up in your song, you’ll have to create the same number of Mix devices in Record.
  5. Pan / Level CV rerouted through the Mix Device
    Pan / Level CV rerouted to the Mix Device
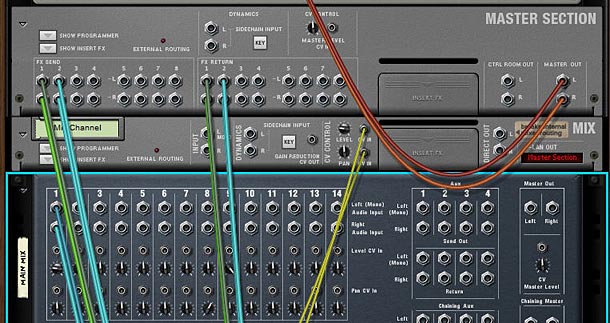
  6. Next, let’s move the Aux Sends/Returns from the Reason Mixer to the Master Section’s Sends/Returns in Record. This is pretty straightforward. Plus in Record you can now set up 8 Aux sends if you want, which is more than enough power. But in the example I’ve provided there was a Reverb and a Delay set up. So we’ll move those over now.
  7. Send / Return cable rerouting to the Master Section
    Send / Return cable rerouting to the Master Section
  8. Our last cable job is to move the Lead Audio Cables from the first channel in the Reason Mixer over to the Main L/R input on the Mix Device. You can now flip the rack around. You’re done with the cabling.
  9. Cabling the Main Audio outs from the Lead track
    Cabling the Main Audio outs from the Lead track to the Input on the Mix Device
  10. Now let’s move to the Record mixer. Press F5 and F6 at the same time to show both the rack and the main mixer in record. If your channels have any settings that ARE NOT automated, but are static for the entire duration of the song (and are different from their default setting), then you can adjust those settings on the main mixer channels in Record. For example, if a channel is set to a level of 90 in the main Reason mixer, and stays at 90 through the duration of the entire song, then you can change the dB level on the Main Record Mixer’s channel to -2.8 dB and leave it there. If the Level stays at 100 for the duration of the entire song in Reason, then you won’t need to change a thing in Record, because the level is already set to 0.0 dB. Make sense so far?
  11. At this point, you’ve probably realized that the new Mixer in Record use decibel values, not midi values. This is a good change, however, it makes it a little difficult to translate levels and send values from the old mixer. So I put together this little chart in PDF format that you can download to see the values. You may not get to use those exact values shown in the chart due to the jumps between values in the Record Mixer, but you can get pretty close. Thanks to Selig on the Props forum for the chart values. Download the Midi to dB Conversion Chart. Note that the chart is also included in the Project Files zip above.

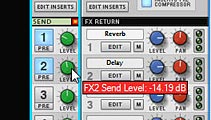
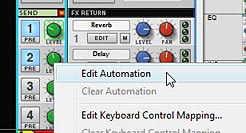
  12. Next, turn the sends 1 and 2 on in the Main Mixer’s Send section in Record. Since the example file has automation set up for these sends, right-click and select Automate. Do this for both sends. However, don’t move to the sequencer just yet. Instead, Look at the other elements on the channel that are automated, and do the same for those as well. So in our example, the solo and level parameters are automated, so right-click and select “Edit Automation” for those two parameters as well.
  13. Turning on and adjusting the Send settings
    Turning on and adjusting the Send settings
    Selecting "Edit Automation" for all parameters which were automated in the Reason Mixer
    Selecting "Edit Automation" for all parameters which were automated in the Reason Mixer
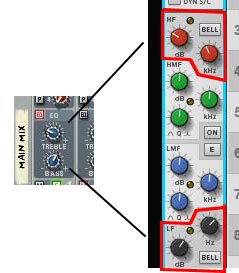
  14. One last thing in the Mixer. If you’ve adjusted the Reason Mixer’s EQ settings for Bass and Treble, you’ll have to map that over to the Record mixer as well. The best way to do this is to adjust the HF (High Frequency) and LF (Low Frequency) settings in the EQ section of Record’s main mixer. This is a shelving EQ which controls your bass and treble. Note that it gives you more control over the Bass/Treble settings that you’d find on the 14:2 Mixer in Reason, because it allows you to dial in the proper frequency range to affect. So you’ll have to use your ears for this one. For more on the EQ settings found in the new Record Mixer, you should read Ernie Rideout’s great article: Tools for Mixing: EQ (Parts 1 and 2).
  15. Converting the Treble and Bass EQ settings
    Converting the Treble and Bass EQ settings
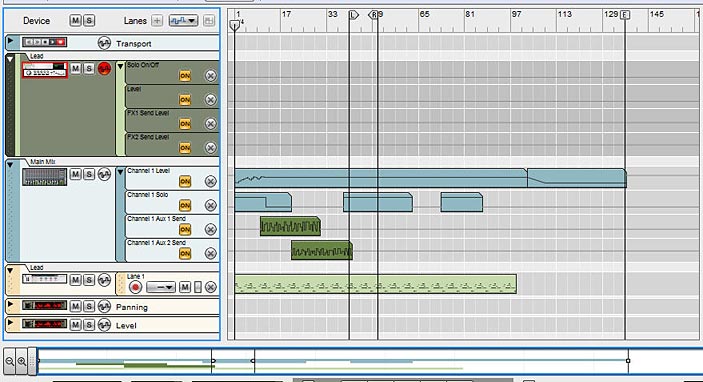
  16. Finally, we move to the sequencer. Press F7 on your keyboard to open the Sequencer. Notice that you have the Mixer with all the parameter automation, but since you selected “Edit Automation” for all those same parameters in Record’s mixer, you have all those lanes set up under the Mix Device. Now it’s just a matter of moving the clips from the Mixer into the proper lanes in the Mix Device. To make things easier (if your song is very long), expand the view by dragging the view window along the bottom of the sequencer all the way to the right, or click the “Zoom Out” magnifying glass at the bottom-left in the horizontal scroll view.
  17. Zooming out to see the whole track in view along the timeline
    Zooming out to see the whole track in view along the timeline
  18. When you move the automation over, some lanes may show “Alien Clips.” To convert the lanes to proper automation, right-click and select “Adjust Alien Clips to Lane.”
  19. Adjusting Alien Clips to Lane
    Adjusting Alien Clips to Lane
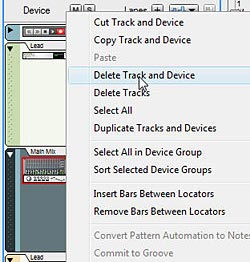
  20. And last but not least, right-click on the Mixer device in the sequencer and select “Delete Track and Device.” You won’t need it anymore. You’ve now converted your Reason song into Record and are free to mix and master your song using the SSL Mixer in Record. The sound should be pretty darn close to the original mix in Reason.
  21. The Final step: Deleting the Mixer
    The Final step: Deleting the Mixer

Be sure to save your song as a .record file. You’ll still have the original Reason song saved away which you can open as a reference, as opening Reason songs in Record does not overwrite your Reason song. It leaves it as is. The really nice thing about the Record mixer is that it gives you a wide array of other options which cannot be found on the Reason mixer, such as High and Low Pass filters, Compression, and a Main Compressor you can apply to the overall mix. More Sends, and handling of rotary and button controls for your devices makes this mixer a huge and powerful addition to your Reason software. So go forth and convert. It takes some time, but the more you do it the better you’ll get at it.

What are your experiences with song conversion from Reason to Record? Did you find this helpful? Is there anything I’ve missed? Please comment and let me know.