57 – Kong FX Chain Builder

In this tutorial I’m going to show you how to create a flexible FX chain that has 8 stops along the chain, and at each of these stops, allows you to select from 1 of 6 different FX devices. This means you have a total of 48 different FX devices to select from in the chain, and the possible permutations of all these FX are 8×7 possible FX combinations, which amounts to 40,320 possible FX chain permutations.

In this tutorial I’m going to show you how to create a flexible FX chain that has 8 stops along the chain, and at each of these stops, allows you to select from 1 of 6 different FX devices. This means you have a total of 48 different FX devices to select from in the chain, and the possible permutations of all these FX are 8×7 possible FX combinations, which amounts to 40,320 possible FX chain permutations. Don’t believe me? Go here: http://www.vpgenius.com/tools/combin.aspx. That’s a hell of a lot of possibilities. Now change the order of your FX chains, and you end up with double, triple and even more possibilities. So let’s see how it’s all done.

You can download the project files here: Kong-FX-Chain-Builders. The file contains 3 different FX chain combinators that are outlined below. The effects in each chain are the same. The only difference is that they each present the chain in a different order. You can take this idea and build any number of effects chains in any order you wish to combine both “Serial” and “Parallel” processing of your audio signal through various FX that you create in Reason. It’s all only limited by your own imagination.

Introducing the “Kong FX Chain Builder” Patch

The beauty of this type of system lies also in the fact that you can combine a “Serial” and “Parallel” audio system together. So when I was working on my “Key Flux FX Processor” in project number 56 here on my site, I introduced the notion of a Parallel system, whereby the same audio was sent through many different FX chains and then sent out to the soundcard. In this tutorial, I’m going to introduce the idea of a Serial FX system, and merge it with a Parallel FX system so that you get much more flexible audio routing and audio possibilities.
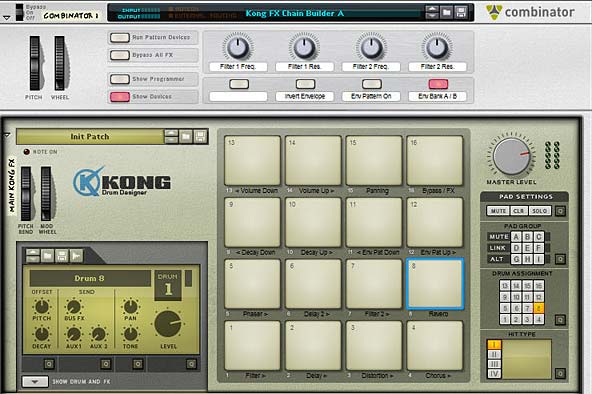
The main controls for the Kong FX Chain Builder (and Combinator Controls)

The idea is pretty simple. First you have a set of FX in a chain, as follows:

Filter > Delay > Distortion > Chorus > Phaser > Delay 2 > Filter 2 > Reverb

Now, each of these “stops” along the chain also has 7 different selectable FX sound possibilities, as follows:

Filter>

(Pad 1)

Delay>

(Pad 2)

Distortion>

(Pad 3)

Chorus>

(Pad 4)

Phaser>

(Pad 5)

Delay2>

(Pad 6)

Filter2>

(Pad 7)

Reverb>

(Pad 8 )

FX 1 FX 1 FX 1 FX 1 FX 1 FX 1 FX 1 FX 1
FX 2 FX 2 FX 2 FX 2 FX 2 FX 2 FX 2 FX 2
FX 3 FX 3 FX 3 FX 3 FX 3 FX 3 FX 3 FX 3
FX 4 FX 4 FX 4 FX 4 FX 4 FX 4 FX 4 FX 4
FX 5 FX 5 FX 5 FX 5 FX 5 FX 5 FX 5 FX 5
FX 6 FX 6 FX 6 FX 6 FX 6 FX 6 FX 6 FX 6
Dry Audio Dry Audio Dry Audio Dry Audio Dry Audio Dry Audio Dry Audio Dry Audio


The Dry audio is there so that you have a selection that sets things back to being the original audio, like a pass-through. Using this table you can come up with an amazingly large array of different sounds by mixing and matching the different FX together. You can, for instance, create the following:

Filter >

(Pad 1)

Delay >

(Pad 2)

Distortion >

(Pad 3)

Chorus >

(Pad 4)

Phaser >

(Pad 5)

Delay 2 >

(Pad 6)

Filter 2 >

(Pad 7)

Reverb >

(Pad 8 )

FX 1 FX 1 FX 1 FX 1 FX 1 FX 1 FX 1 FX 1
FX 2 FX 2 FX 2 FX 2 FX 2 FX 2 FX 2 FX 2
FX 3 FX 3 FX 3 FX 3 FX 3 FX 3 FX 3 FX 3
FX 4 FX 4 FX 4 FX 4 FX 4 FX 4 FX 4 FX 4
FX 5 FX 5 FX 5 FX 5 FX 5 FX 5 FX 5 FX 5
FX 6 FX 6 FX 6 FX 6 FX 6 FX 6 FX 6 FX 6
Dry Audio Dry Audio Dry Audio Dry Audio Dry Audio Dry Audio Dry Audio Dry Audio


And that is just one example.

Switching the Order of Effects in the Chain

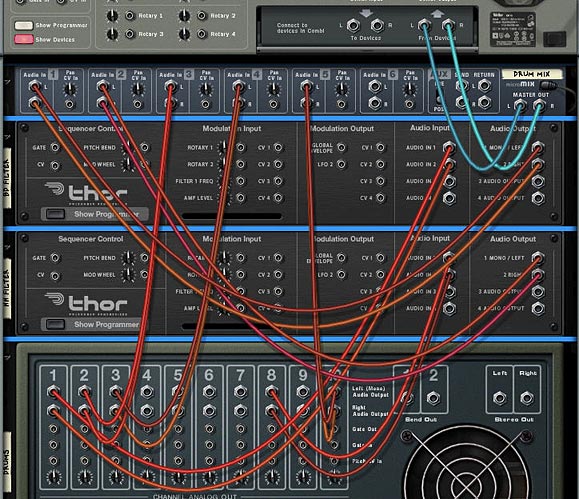
The Kong FX Chain builder from the back of the rack

Now I know some of you are going to say, “well why can’t I switch the order of the FX chain?” So instead of having the Filter come before the Delay, how about switching it so that the Filter comes after the delay. And to that I’ll say that Reason is not the easiest software to work with when it comes to making routing decisions such as these and building it into a single setup is very difficult. But thankfully it’s pretty easy to build multiple instances of the Combinator to come up with any FX chain order you like. The trick is to flip to the back of the rack and change the following:

  1. The order of the “Gate Out” CVs from the first 8 Kong Pads
  2. The order of the 14:2 Submixers and their associated splitters. The signal flow goes from the “To Devices” of the Combinator into the first Effect’s splitter. Then the 14:2 Submix main output of the first effect goes into the second effect’s splitter. And so on down the chain, until the final output goes into the Pan splitter device. The Pan also has a bank of different “Global” LFO Panning selections. This can be selected on Pad 15.

So anyway, this just shows you that with a little thought, you can create a variety of FX of your own and route them in a serial way. Then use the “Parallel” processing idea to create multiple effects at each stop in the chain. Simple enough right?

Here are the other 2 effect chains I came up with. Feel free to create your own based on variations that work for you. You can either change the routing scheme as I outlined above, or you can change the actual effects at each stop. As you can see, you don’t even need to have all the FX in play within the chain. You can keep any part of the chain set to “Dry Audio” so that it will not be affecting the chain at all. This means you can make your chain simple with only 1 effect in play, all 8 in play, or any amount in between. Here are the other two effect chains I put together:

Delay > Filter > Phaser > Delay 2 > Chorus > Filter 2 > Reverb > Distortion

Phaser > Chorus > Filter > Reverb > Distortion > Delay > Delay 2 > Filter 2

Working with the “Kong FX Chain Builder”

There are 2 components to working with the Kong FX Chain Builder: 1. The Combinator and 2. The Kong device. Both work together to create your FX chain. You can also use them “Live” and play the different effects out on the pads in real-time, or else build them up in the studio until you find a combination of effects that works for your sound, and then just leave this setting as it is (or save it for future recall).

I’ll start off with the Kong device. Note that if you want to fully utilize the device, you should create a track for it in Reason or Record’s Main Sequencer. This way, you can not only play the Kong device, but also record your Kong pad changes over time. And you can also lock your pad control surface to the Kong device and another controller to the Combinator; essentially controlling them both via 2 different controllers at the same time. So here are all the Kong pad settings:

  • Pads 1 to 8: These are the 8 stops in the FX chain going from Pad 1 > 2 > 3 > 4 > 5 > 6 > 7 > 8. In the original file I created (Kong FX Chain Builder A), this goes from Filter > Delay > Distortion > Chorus > Phaser > Delay 2 > Filter 2 > Reverb. The Pads act as a cycle, starting with a dry signal, then going through 6 different possible FX. The pad cycles through these 7 positions. So each time the pad is pressed, you’ll hear a new effect inserted into the chain.
  • Pads 9 and 10: Decay Down / Decay Up – These pads will shift the decay of all the Reverb effects upward or downward. So you need to have the Reverb effect turned on (in other words, you need to have one of the 6 Reverbs enabled; not the dry signal).
    Note that there is an upper and lower limit, which, when reached, will not go any further. However, the pad can continue to go upward or downward for a few more times. This means that if you push the decay all the way to zero, and still hit the “Decay Down” pad, it will continue to move downward. So it may take a few more Pad pushes on the “Decay Up” pad to get it back to a “zero” postion (until you start hearing the decay again). This is true of all the Up/Down pads.
  • Pads 11 and 12: Envelope Pattern Down / Envelope Pattern Up – These pads will shift the matrix pattern banks upward or downward. These curve patterns are used to “play” the envelope amount on all the filters in the system. Therefore, you need to have at least one filter turned on to hear anything. You also need to have the “Env Pattern On” button (button 2 on the Combinator) enabled. There are 25 patterns on each Matrix (from A1 to D1), for a total of 50 patterns from which to select (you need to use Button 4 on the Combinator to switch between Matrix A and Matrix B).
    Note that there is an upper and lower limit, which, when reached, will not go any further. However, the pad can continue to go upward or downward for a few more times. This means that if you push the patterns all the way down to A1 on the Matrix, and still hit the “Env Pat Down” pad, it will continue to move downward. So it may take a few more Pad pushes on the “Env Pat Up” pad to get it back to the “A1” postion (and get the patterns to start moving forward again). This is true of all the Up/Down pads.
  • Pads 13 and 14: Volume Down / Volume Up – These pads will shift the global volume upward or downward. Note that there is an upper and lower limit, which, when reached, will not go any further. However, the pad can continue to go upward or downward for a few more times. This means that if you push the volume all the way down to zero, and still hit the “Volume Down” pad, it will continue to move downward. So it may take a few more Pad pushes on the “Volume Up” pad to get it back to a “zero” postion (until you start hearing the volume again). This is true of all the Up/Down pads.
  • Pad 15: Panning. You can select from 6 different Auto-panning effects, which are global and affect the signal after it has gone through all 8 effect stops in the chain. There is also a seventh “dry” position, which is on by default. The Pad cycles through all 7 positions (6 “auto-panners” and 1 “dry” position).
  • Pad 16: FX / Bypass – this allows you to switch between hearing the effects chain or hearing the original “dry” signal.

The Combinator controls are outlined below:

  • Pitch Bend: Not assigned.
  • Mod Wheel: Controls the envelope amount on all the filters. This is used in conjunction with the Envelope patterns in both Matrixes that also control the envelope amount. In other words, you can use the Mod Wheel to scale the envelope amount, and therefore, how much the envelope is affected by the patterns or not. If you wish to control the envelope amount without having any patterns control the envelope, disable button 3 on the Combinator, and then use the Mod Wheel, which will now be the only parameter affecting the amount of envelope applied to the filter(s).
    Note also that both the Mod Wheel and the Patterns affect all filter envelopes globally; both “Filter 1” and “Filter 2.” And of course, at least one filter needs to be added into the FX chain for you to hear the effect of the Mod Wheel or Patterns applied to the Filter Envelope amount.
  • Rotary 1: Filter 1 Frequency. Adjusts the Frequency of the first filter in the chain. All the filter selections for “Filter 1” are affected using this rotary, so that as long as you have one of the six filters enabled in the Filter 1 slot, the Frequency can be adjusted.
  • Rotary 2: Filter 1 Resonance. Adjusts the Resonance of the first filter in the chain. All the filter selections for “Filter 1” are affected using this rotary, so that as long as you have one of the six filters enabled in the Filter 1 slot, the Resonance can be adjusted.
  • Rotary 3: Filter 2 Frequency. Adjusts the Frequency of the second filter in the chain. All the filter selections for “Filter 2” are affected using this rotary, so that as long as you have one of the six filters enabled in the Filter 2 slot, the Frequency can be adjusted.
  • Rotary 4: Filter 2 Resonance. Adjusts the Resonance of the second filter in the chain. All the filter selections for “Filter 2” are affected using this rotary, so that as long as you have one of the six filters enabled in the Filter 2 slot, the Resonance can be adjusted.
  • Button 1: Not Assigned.
  • Button 2: Invert Envelope. This is a simple envelope invert button, and affects all filters in both the “Filter 1” and “Filter 2” slots in the FX chain.
  • Button 3: Envelope Pattern On. This turns on the envelope pattern Matrixes so that the curve pattern that is selected in Matrix A or B will affect the envelope amount of all Filters in both “Filter 1” and “Filter 2” slots in the FX chain. There are 2 parameters that both affect the Filter Envelope Amount: The pattern here, and the Mod Wheel. The higher you raise the Mod Wheel, the higher the Envelope amount. You can use a combination of the pattern and Mod Wheel to effectively “play” with the Filter Envelope Amount parameter. The reason I set it up this way is that you have ultimate control over the envelope amount. For example, you can turn off the pattern by keeping this button (button 3) disabled. Then use the Mod Wheel to scale the amount upward or leave it fully off (when the Mod Wheel is fully down). Or you can turn on the pattern and leave the mod wheel fully down to have the amount controlled solely by the pattern. Or use both in combination to play around with the envelope amount.
  • Button 4: Envelope Bank A / B. Selects between the two pattern banks (2 Matrixes) that affect the Envelope Amount parameter on all filters (read above for more information). There are 25 patterns on each Matrix (from A1 to D1), for a total of 50 patterns from which to select. Button four switches between the first 25 patterns on Matrix A (when the button is disabled) to the second set of 25 patterns on Matrix B (when the button is enabled).

Visualizing the active FX Chain

Sterioevo over at  Mute.Hate.Loud.Love was kind enough to provide two methods for visualizing the active effect chain (see the comments below this post for more info about this CV method). He used the Gate Length of the Thor Trigger devices to change the Modulation Level Bands of the BV512 Vocoder and the delay steps in the DDL delay devices to show visually which effect was enabled at each stop in the FX chain. So I updated the patches (just download the Project files again if you haven’t already) using his “Vocoder Visualization” method. You’ll now see a Vocoder under the main Kong device. This uses an 8-band setting to display the position of each effect on Pads 1-8 in the Kong device. This way you can visualize what’s going on as you play the pads. Very cool and handy little tool! Thanks Steve!
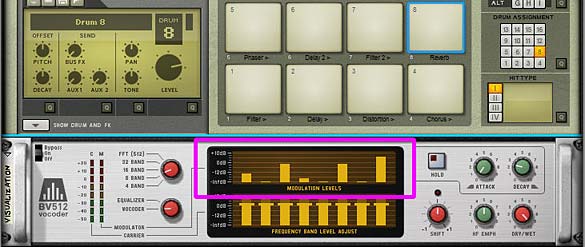
Visualizing the active FX chain using the Modulation Levels of the BV512 Vocoder

So what do you think of this combination of “Parallel” and “Serial” effects processing using Kong? Any other ideas come to mind on how these ideas can be used? I can envision setting both this and the “Key Flux FX Processor” ideas on the alternate devices. For example, you could set up the “Key Flux FX Processor” on Kong and you can probably set up the “FX Chain Builder” on a Combinator. The device is somewhat irrelevant. What matters is the concepts and what you want to accomplish. And as you can see, Reason can usually provide an avenue to make your systems come to life.

Until next time, hope you can make this work for you and use it in your own productions. If you do, drop me a line and let me see what you come up with. I’m always interested to see how others’ use my patches. Cheers for now.

34 – Breaking out of Kong

Exploring the Advanced features of Kong, learn how to use Kong’s FX modules on audio from other devices, process your Kong sounds through other Effects units not included in Kong, expand your Drum processing abilities by parallel drum processing or processing each drum module individually.

In this tutorial I’m going to explore some of the advanced features of Kong. We’ll learn how to use Kong’s FX modules on audio from other devices, process your Kong sounds through other Effects units not included in Kong, expand your drum processing abilities by parallel drum processing, and process each drum module individually.

Break Out / Break In

The first foray into exploring some outside routing came from an email request I got. The person who emailed me wanted to know how the first tip from “Music Radar’s Top 10 Essential Reason 5 Tips” worked. The tip went like this:

“One of Kong’s best features is its powerful level-setting system, but another key point is its connectivity. Instead of mixing internally within Kong, try routing the pads out through a 14:2 Mixer and then back into Kong via the Break-in connections. This enables you to set levels and EQ with the mixer, and still use the powerful master output FX. Save your construction as a Combinator for future use.”

Well, here’s how it works. The basic idea is that the Break-out jacks on the back of Kong act as an additional way to insert Effect devices between the FX2 and Bus FX modules in the signal flow. The flow works something like this:

Drum Module > FX1 > FX2 > [Your Insert FX here / Break-out & Break-in jacks] > Bus FX > Master FX > Main Output

That’s essentially the signal flow. Keep in mind though, that if your Drum output is set to “Master FX” which is the default, or any of the output jacks (3-4, for example), you will need to use the Bus FX Send knob on the drum panel on the front of Kong to adjust the level of the external effects devices. Also note that the external effects devices are global. You can use them as an insert for all the drum modules inside Kong. If you don’t want them used on a specific drum, then just keep the Bus FX Send for that specific drum at it’s zero (0) default.

I know this sounds a little complex, so I put together this video to show you an example:

Parallel Drum Processing, Kong Style

Here’s an interesting way to create Parallel processing on your kick via Kong. And it’s stupid-easy!

Parallel processing is when you use the same drum sound both wet and dry at the same time. You can tune the amount of each, but both together add up to a beefier sound. Again, the idea is to trigger both a processed and unprocessed drum sound at once and then mix both together to create a punchier beefier kick. So here’s the easy way to do it in Kong. Note that we’ll do it inside a Combinator so you can save the patch for later use.

  1. First, Create a Combinator and inside create a 14:2 Line Mixer (we’ll do this to have access to the Mixer’s EQ, otherwise you can create a 6:2 mixer instead, that’s totally up to you). Then create a Kong.
  2. Open up Kong and add a Physical Bass Drum into drum module 1. Set the drum output to the 3/4 stereo pair. Add a Parametric EQ device into the Bus FX slot and a Compressor into the Master FX slot.
  3. Flip the rack around and send a pair of audio cables from the 3 / 4 Audio outputs on the back of Kong into the second channel of the 14:2 Mixer.
  4. Now comes the fun part. Flip back to the front. Turn up the Drum’s Bus FX send to about 100, and start playing the Drum Pad. As you play, adjust the EQ and Compressor to taste. You’ll hear the effect it has on the sound.

The reason this works is because you are sending the same drum sound two different places. The unprocessed sound is going straight through ouput 3/4 (and into channel 2 on the Mixer), while the processed sound is running through the Bus FX and Master FX and back out the main outputs into channel 1 of the 14:2 Mixer. Both are playing at once. Instant parallel sound.

If you want to ease back on the level of processed sound (ie: the sound going through the EQ and Compressor), simply reduce the Bus FX send knob. If you want to adjust the level of dry sound, use the Channel 2 Level fader. You can also turn on the EQ and adjust the EQ parameters directly on the 14:2 Mixer. This setup provides loads of options.

7 Drums to 7 Channels: Hooking up each Drum Module Separately

And now for something completely different. I’ve heard many people ask how they can send their drum pads to individual channels in the mixer. The easy answer is to send each drum module through the different outputs available on the back of Kong; 7 stereo pairs in all.

In actuality, if you count the Master FX, Bus FX, and Direct output, you have 10 in total. But for our purposes here, let’s focus on sending 7 drum pads out to 7 different channels in the Mixer. In this way, all the drums operate exactly the same in terms of signal path and it’s the easiest to work with when you’re first starting out.

To set this up, first create a Combinator as we did earlier (so we can save this as a template for use later). In the Combinator create a 14:2 Mixer and holding the shift key down, create a Kong device.

On Kong, click the Show Drum and FX button. Then load up 7 drums in the first 7 drum module slots. These can be any drum modules you like, and they can have any associated FX inserted into the FX1 and FX2 slots.

At the bottom right of the drum module select the appropriate outputs as follows:

Drum Module 1 > Output 3 – 4

Drum Module 2 > Output 5 – 6

Drum Module 3 > Output 7 – 8

Drum Module 4 > Output 9 – 10

Drum Module 5 > Output 11 – 12

Drum Module 6 > Output 13 – 14

Drum Module 7 > Output 15 – 16

Flip the rack around to the back, and route each of the above audio outputs to their own Left/Right channels in the 14:2 Mixer (7 channels in total).

That’s all there is to it. Now, you can control each of the drums via the Mixer channels. This means that you can control the Level, EQ, Panning, etc. from the Mixer channel strip. This also opens you up to using 4 different sends on the drums via the Mixer sends if you like (if you did everything through Kong, you’d have access to only 2 sends via the Aux 1 and Aux 2 cables on the back of Kong).

One caveat. In this type of setup, you can control the Level of the individual drums via the Drum Level knob on each drum panel, if you so choose. So don’t get confused. Essentially, this means you have three junctures at which to control each of the drum levels: The Drum Module’s Level knob, the Drum panel Level knob, and the Mixer Channel Level fader. It’s important to know the proper signal chain between all these various levels. It goes exactly in that order:

Drum Module Level > Drum Panel Level > Mixer Channel Fader > Mixer Master Fader

Since there is nothing routed from the main output of Kong, Kong’s Master Level isn’t even utilized (put another way, it’s useless and does nothing in this setup).

Processing Audio Through Kong

Finally, here’s how you can process your audio through Kong. It’s drop-dead simple, and you can process Any audio from any device (and from any audio track if you have Record) through any number of Kong FX devices. Watch the video to find out how it’s done.


So that’s it. A few advanced ideas for breaking outside Kong and using the device for more than just drum processing. I’m sure there’s many others. But these are the ones that came to my mind. What’s your favorite idea or feature of Kong? Drop me a line or comment on this post and let’s see just how far we can push Kong.

3 – Filtering Audio through Thor

In this project I’m going to demonstrate a few ways you can use Thor’s filters, FX (Delay and Chorus), and LFOs creatively by routing any of your audio sources through Thor. This can be a great way to punch up some drums or create new innovative sounds from any of the synths. So let’s start our exploration.

In this project I’m going to demonstrate a few ways you can use Thor’s filters, FX (Delay and Chorus), and LFOs creatively by routing any of your audio sources through Thor. This can be a great way to punch up some drums from a Redrum, or to create some new innovative sounds from any of the synths. Furthermore, you’re not limited to using only 1 filter. You can connect your audio through a series of Thor devices to gain access to more than 1 filter at a time. So let’s start our exploration.

Basic Audio Filtering through Thor:

  1. Open Reason. In the rack create a Combinator and inside the Combinator create a Thor, initialize the patch, and then create a Redrum underneath. Add a drum kit and create a simple pattern with a kick, high hat and a few other drums. Don’t make it too complex. Use about 4 or 5 drum samples to create the pattern.
  2. With all the hard work done, now we’ll do some routing. Flip the rack around and route the Left and Right audio output from the Redrum into the “Audio In 1” and “Audio in 2” on the Thor.
  3. Basic cable routing to pipe audio through Thor
    Basic cable routing to pipe audio through Thor
  4. Flip the rack back around, show the Programmer for Thor, and uncheck all the little green lights in the “note” section (the section that is dark and not light brown). Also, turn the analog osc.1 off, and bypass the Ladder Filter (Filter 1). Then turn off the routing between Osc.1 and Filter 1 (the little red “1” light). In the top device section, set Polyphony and Release Poliphony to “0” and turn off both trigger lights (Midi and Step Seq). The point is that you don’t need any of that mumbo jumbo.
  5. Add a Filter into the third Filter slot of Thor. A Low Pass Ladder or Comb filter works well with Drums, but you can use any filter you like.
  6. At this point, most people will press play and think that they should be hearing something. But we’re not finished yet. We need to reroute the default Thor audio signal. Here’s how to do that: In the MBRS (short for “Modulation Bus Routing Section”) of Thor, in the first row on the left, click on the “Source” and select the bottom-most option “Audio Input > 1” then set the “Amount” column to “100.” Click the “Destination” column and select “Filter 3 > Left In.” On a new row, do the same thing, but for Audio Input 2 as a source and “Filter 3 > Right In” as the destination.
  7. The MBRS at the bottom of Thor
    The MBRS at the bottom of Thor
  8. Now press play. You’ll hear the drum pattern, which is routed through Filter 3 in Thor, then to the Chorus and Delay section, and back out to the mixer.
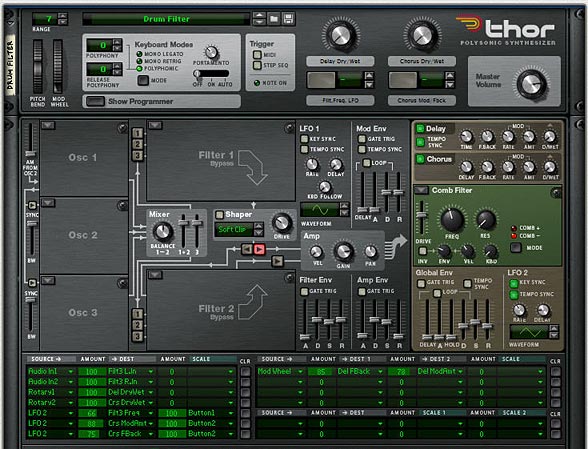
  9. Optionally, you can use the FX (Delay and Chorus), or route the LFO2 to affect any of the parameters in Filter 3 or the FX. One thing I like to do is turn on both the Delay and Chorus. Then in the MBRS section, program the two FX Dry/Wet parameters to the two Rotaries. If you use amounts of +100 for both, then turn the actual Dry/Wet knobs on the FX all the way down, you create a controllable Delay and Chorus effect via the Rotaries. I also use the Mod wheel to control the Filter 3 Frequency or Resonance or both. That way, it’s all controllable. If you want to push it further, you can assign the LFO2 to affect the Frequency or Resonance via one of the Thor buttons. This all gives you a great degree of control over affecting the sound. Download the example file (at the bottom of this post) to see these routings.
The front of Thor, with all routings for the FX and LFO2

First, here’s an example of the original sound:
[ti_audio media=”177″ repeat=”1″]

Second, here’s an example with the audio filtered through Thor (remember, you can adjust the filter to taste):
[ti_audio media=”175″ repeat=”1″]

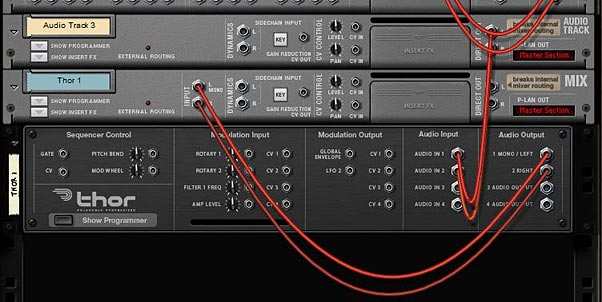
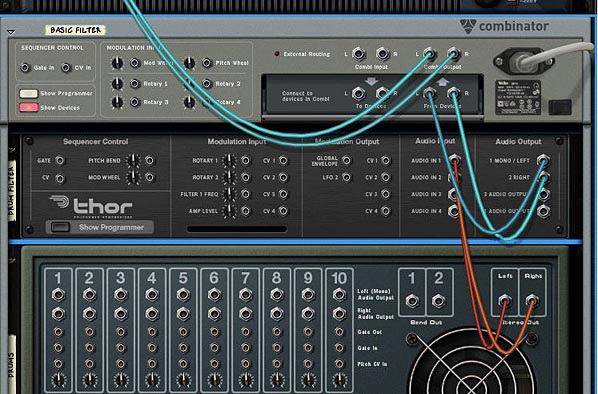
As an aside, if you’re using Record and have an audio track, you can still route your audio through Thor, by cabling the direct output of the audio track to the Thor inputs 1 + 2 as shown below.

Routing an audio track in Record through Thor

Audio Filtering through a Series of Thor Filters:

By now, you will have noticed that plugging audio through Thor gives you access to the global section (the parts of Thor that are light brown). What if you want the use of more than one filter. Let’s say you want your audio path to move this way: Audio Device > Formant > Comb > Low Pass Ladder? Well, it’s really quite simple. Follow the above directions to set up your first Thor, and then build upon that as follows:

  1. Flip the Rack around. Right-click over Thor and select “Duplicate Devices and Tracks.” Do this one more time. You should now have 3 Thor devices.
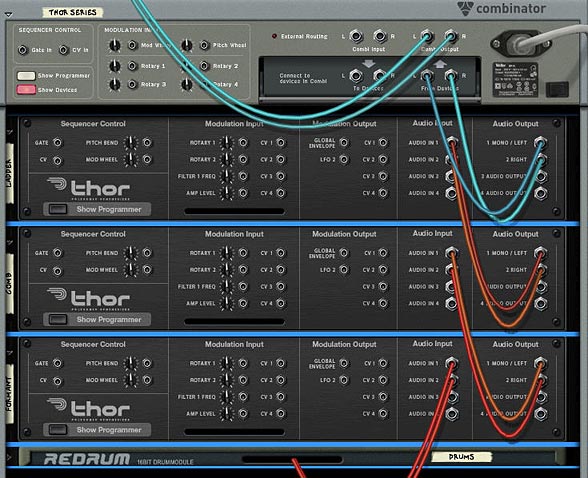
  2. Move the “Audio In” cables from the first Thor to the bottom-most Thor’s “Audio Ins” and then cable the “Audio Outs” from that bottom-most Thor into the Thor above’s “Audio Ins.” Finally, cable the “Audio Outs” from the middle Thor to the “Audio Ins” of the top-most Thor.
  3. Flip the rack around again to see the front. Then switch the bottom-most Filter 3 to “Formant” and top-most Filter 3 to “Low Pass Ladder.”
  4. Press Play and adjust the three filters to taste. It might help to bypass the filters on the top two Thors. Adjust the bottom filter, then turn the middle filter on, adjust it, and then finally turn the top Thor filter on and adjust it. That’s all there is to it. 3 filters affecting one sound source.
Routing Thor filters in series to affect a sound source

Example of the Filters in Series:
[ti_audio media=”178″ repeat=”1″]

Audio Filtering separate Drums through Thor:

All of the above is fine and dandy, but what if you don’t want all the Drums filtered the same way. Let’s say, for example, you want the Bass Drum to be filtered by a Low Pass Ladder filter and the High Hat to be filtered through a High Pass in a State Variable filter. Well, without getting too complicated, here’s what you do:

  1. Follow the steps to create a Basic Thor Filter above.
  2. Create a Line Mixer 6:2 and move it to the top of the Devices in the Combinator.
  3. Flip the Rack around, and delete the audio output cables from the Redrum.
  4. Duplicate the Thor device (so you now have two Thor devices under the Line Mixer.
  5. Move the Audio Outputs from the first Thor into the Master Audio Outputs of the Line Mixer.
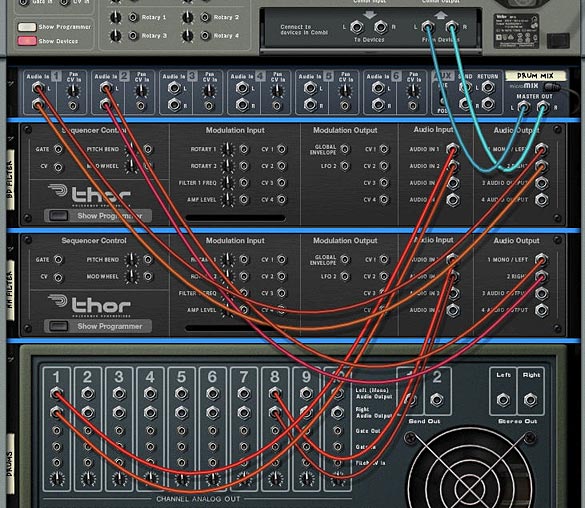
  6. Cable the Bass Drum Audio Outputs from the Redrum to the first Thor’s Audio Inputs 1 + 2
  7. Cable the High Hat Drum Audio Outputs from the Redrum to the second Thor’s Audio Inputs 1 + 2
  8. Cable the Audio Outputs from the two Thors into Channels 1 & 2 on the Line Mixer.
  9. Routing two separate filters to control the Bass and High Hat Drums
    Routing two separate filters to control the Bass and High Hat Drums
  10. Cable the other Drums into the free channels on the Line Mixer.
  11. Routing all the drums to the Line Mixer
    Routing all the drums to the Line Mixer
  12. Flip the Rack around again to the front, and then insert the Filters of your choice into the Filter 3 slots of both Thors. Adjust them to taste in order to affect the Bass and High Hat Drums

Example of separately filtered Drums (with a little delay on the High Hat):
[ti_audio media=”176″ repeat=”1″]

Some Final Thoughts:

Finally, just because you filter one sound through the Global section of Thor, this doesn’t mean you can’t use the Thor to generate a sound of its own. This way, you end up merging two sounds together in a kind of layering. If you want to see how this is done, look at the “Synth+Filter – Droid Chatter” Combinator in the example files. You can do some pretty interesting things this way. Additionally, you can take one sound source, split it into two different Thor filters and then route them to two separate channels in the mixer, or back into one channel if you like. A wealth of options and possibilities, for sure. 

Example of a Synth Arp + Thor with an Analog Oscillator, both generating sound. The Synth Arp is being filtered through Thor while Thor is generating a sound of it’s own. This creates a layered effect:
[ti_audio media=”179″ repeat=”1″]

So as you can see, routing audio through Thor is not difficult, but most people miss the step about the Modulation Bus Routing Section. If you remember to reroute the audio signal, you’re golden. That’s it in a nutshell. nothing fancy.

I mainly use Thor’s comb or Low Pass Ladder filter to affect drums and then put it all in a combinator. But that’s just one way you can use Thor.  Are there any other ways you Route your audio through Thor? Do you have some creative ideas that I haven’t covered here? Please share them. I’m curious to see how people are using Thor to affect external sources.

Download the Example Files