71 – Entering Song Contests

One of the best things you can do to learn, improve, contribute, and generally be creative is to enter your music in contests. Usually there are several contests through magazines, online music forums, bandcamp, soundcloud, and the like. I would strongly urge you to look up some of them and enter into the contests you feel are appropriate for your style of music.

One of the best things you can do to learn, improve, contribute, and generally be creative is to enter your music in contests. Usually there are several contests through magazines, online music forums, bandcamp, soundcloud, and the like. I would strongly urge you to look up some of them and enter into the contests you feel are appropriate for your style of music.

First, some Suggestions and Tips when Contributing

There’s a few suggestions I would make when looking at which contests to enter.

  • Look for a contest where you find like-minded people and musicians that will be accepting of your work. For example, if a contest is put on by a cinematic club, you wouldn’t post country music. So first, read up about the contest, listen to some of the tracks done for previous competitions of the same contest, try getting in touch and networking with individuals that are a part of the contest or group submitting their tracks to the contest. And then get up the courage to submit your work.
  • Read the rules! I can’t stress this enough. Read the rules and then follow those rules. The worst thing you could have happen is that you win a contest only to be disqualified because you didn’t follow the rules properly. Remember that unless YOU are the organizer, you can’t make the rules. Therefore, don’t argue about them. Just follow them. If you have a question, don’t hesitate to ask for clarification. And suggest ways to improve the competition in the future. But remember the goal is to get your music out there, connect with others, and learn more about music in general (others’ music and your own).
  • Generally, don’t submit a work longer than about 4 minutes, unless the competition specifically asks you to. Long drawn-out tracks are a surefire way to bore even the most die-hard music enthusiast, and will probably tire out the judges and those that will have to listen to your music. Make it interesting and get your point across in a reasonable length of time. Sure there are exceptions to this rule, but if it’s not specified, assume a length of 3-4 minutes is standard. And see the previous point: if you don’t know, ask!
  • Listen to the music of others and participate when you have a point and when and where you can. Discuss what you like about other peoples’ work. Provide “Constructive Criticism” and DO NOT give an opinion without any feedback. You know what I mean. Don’t say “this sounds good” or “love it.” That’s not helpful at all. And if you have nothing to provide, then just keep your mouth shut! A helpful comment always comes with honest feedback which helps the musician learn what is working and what is not working, and always with zero negativity. For example, “The compression on that kick drum seems a little too high for my taste, and the melody line comes across too rigid. Perhaps try to lower the compression on the Kick drum and try using and arpeggiator on the melody. That could be one approach to enhancing the track. But that bass you have going on is perfect. The frequency is just where it needs to be.” Notice here that you’ve not said anything negative and you’ve provided some helpful ideas. As an aside, it’s usually good form to tell the musician what you enjoy about the track and what you feel works in the track if the majority of your comments are things you would do differently in the track.
  • Don’t overdo it! If you are commenting 10 times on every song or in response to every single comment, people are going to get tired of listening to you, and you’re probably cluttering up the competition with a lot of crap. Tone it down. Think about your responses. And if you’re impulsive (hey, we’re all impulsive from time to time, especially about things that we feel passionate about), instead write your comment down in notepad and save it for one day. Then go back to it and see if you still want to post it. The one day rule gives you some time to ponder what you’re saying, maybe you want to rework what you previously wrote as well. And it gives you a break from the forum / competition. Most importantly, it gives the other people a break from YOU. And remember, a well-formed and well thought-out comment is usually greeted with much more acceptance than an impulsive one.
  • Most importantly, have fun submitting your track(s). Well-run competitions are fun places where everyone shares ideas. Make the most of them. Listen to what others have to say about your work. And try to grow from the experience. You will find many useful ideas that others suggest are often ideas you hadn’t thought about before, and it may be just what you need for some new inspiration.

Always remember that competitions are NOT about winning, despite what others might say. Competitions are about people getting together to share their passions. They are about learning how to take your music to the next level. They are about learning from the techniques about others. Winning is merely a by-product and a cherry on the cake. If you win, great. But if you lose, you still win. Those that enter competitions merely for the sake of winning are actually the ones that are losing. Because they are stagnant. Those that get the most out of the competitions are those that open themselves up to the process and learn from the experience. They are the ones that go home with new friends, new ideas, new techniques, and new ways to improve themselves. Ask yourself which one do you want to be?

My Song Contribution to the Reason Song Challenge III

So with all of that said, here’s my own entry from the Reason Song Challenge III put on by Rob (FailedMuso). In order to use this file, you will need to download Patrick’s (Bitley’s) DeLight Fairlight Demo ReFill. The whole idea for this competition was to create a full song from the sounds found in that demo ReFill. Lots of entries were created. I think a total of 32 songs were submitted. Mine did not make the grade. But as I said, that’s totally ok with me. I’m just very happy to be listening, talking, and sharing with such a talented group of people. That’s why I wanted to share my track with everyone. That way you could take a look at how it was put together, and perhaps find a few ideas in there which may spark your own creative juices or inspire you in some way.

So here is the final entry I submitted to the contest (sadly, it did not come in first, second, nor third place. Nor did it get any honourable mentions). But that’s ok. As I said, even when you don’t win, there’s a lot you can take away from it, and a lot you can learn.

Enlightened v2 by Phi Sequence

And you can download the song here: Enlightened. The file is zipped up, and when you open it you’ll also need Reason 6 to inspect it (since it was done in Reason 6 and is a .reason format). Feel free to look it over, play around with it, remix it and send it back to me. Have at it. But remember it’s still copyrighted and I still own the rights to it. So no distributing it without letting me know first.

Finally, here’s a video I put together on YouTube to show you what’s inside the file. I think the hardest thing was coming up with Hi Hats (none were included in the demo ReFill), and making the song “my own.” It was also interesting to try to cull the proper sounds I wanted out of the demo. For instance, there were no sweeps inside the demo, so I had to make changes to the synth parameters to get some sweeps out of them. Little things like this add up to a lot of fun hours working inside the song document and making the demo sounds do what I wanted them to do. But in the end, I can honestly say it’s all worthwhile.

Also, limiting your song palette in this way forces you to work within boundaries. And that is sometimes a great source of inspiration. Especially when all the ReFills out there have massive libraries of sounds and effects. It’s very easy to get lost in a sea of sounds. Sometimes a competition like this comes along and it forces you to work in a limited way. Or else it forces you to find workarounds you might not have ever thought about before. In short, it’s a great way to stimulate your musical mind.

I hope you found some of this useful information. Drop me a comment and let me know what you think? I’d love to hear from you.

69 – All about the Alligator (Part 2)

Let’s continue with the Alligator and find a few other tricks that it can perform. In the first part, I looked at how the Alligator works, and provided a few ideas for how to work with it. In this part, I’m going to get a little more practical and show a few new ideas you can incorporate into your tunes. Hopefully this will provide you with some new creative inspiration.

Let’s continue with the Alligator and find a few other tricks that it can perform. In the first part, I looked at how the Alligator works, and provided a few ideas for how to work with it. In this part, I’m going to get a little more practical and show a few new ideas you can incorporate into your tunes. Hopefully this will provide you with some new creative inspiration.

You can download the project files here: alligator-techniques-part2. There are some Combinators and a .reason file showcasing the examples found below. In the .reason file, I’ve used mutes to silence all the tracks. To listen to a track, unmute it. I hope you find some of these tricks useful.

Also don’t forget that my latest Refill, Pureffects, is available with 1,250 effect patches designed specifically with Reason 6 in mind. There’s 200 Alligator patches alone, and several Alligator-based Combinators with all kinds of interesting routing ideas. Read More about the ReFill.

So let’s continue where we left off last. . .

Technique #5: Using the Alligator Effects without the Gates or Filters

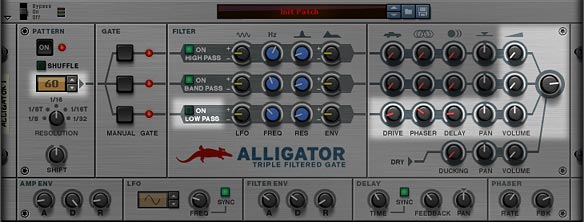
After I wrote the first tutorial, it occurred to me that you can use each part of the Alligator independantly. For example, you can use the Gates only, without the Filter and Effects section. Or you can use the Filter section only, while keeping the Gates continually open. And lastly, you can use the Effects or Mixer sections only, if that’s all you want to use (Drive, Phaser, Delay, Pan, Volume). The way to achieve it is as follows:

  1. Start with “Technique #2: Keeping your Gates Open.” To recap, you set the pattern to #60, and ensure the Amp Envelope Decay knob is set to 127 (fully right). Then flip to the back of the Alligator, and send Gate CV Output 1 to Gate CV Input 3, Gate CV Output 2 to Gate CV Input 1, and Gate CV Output 3 to Gate CV Input 2. This way all your gates are Fully open.
  2. Fully turn down the volume of the High and Band pass filters. Note: Alternately, you can move the main left/right output cables to the Low Pass Channel left/right outputs on the back of the Alligator. This way, the audio input into the Alligator is only passing through the Low Pass section of the Alligator. Note also that this doesn’t have to be the Low Pass Channel. This idea works with any of the Channels in the Alligator, since the effects and mixer sections are the same for all 3 Channels. The idea is to pick one Channel, and mute the other two.
  3. Turn off the filter section (green light) on the low pass filter.
  4. You might also want to reduce the volume of the low pass filter (I found a volume setting of 64 for the low pass volume combined with a volume setting of 100 for the master volume is equivalent to bypassing the Alligator — at least to my ears).

Now your signal is passing through the low pass Channel only, and with the Gate always open and the Filter section turned off, you can use the effects & mixer sections independently to affect your sound.

The Alligator Front Panel, showing the areas of importance when trying to use a single channel for effects and Mixer only; in this case, using the Low Pass Channel

Technique #6: Using External Effects

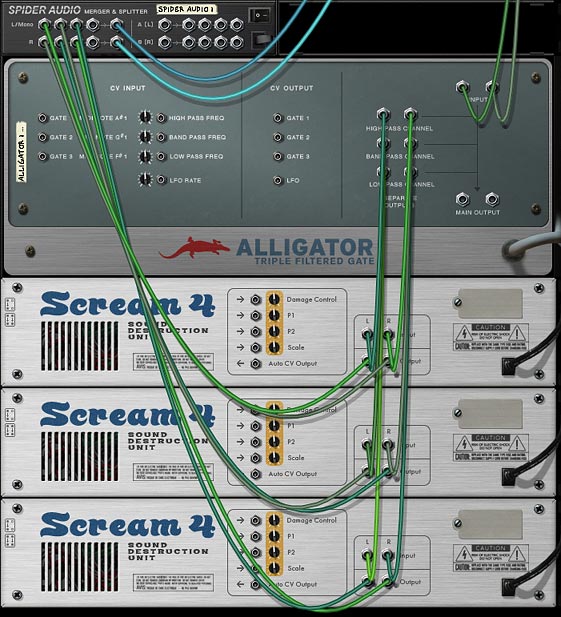
As with all Reason devices, you can very easily set things up to use external Reason devices. In other words, you are not limited to using the Drive, Phaser, and Delay that’s already built into the Alligator device. If you wish to use an external effects device, such as an Echo, Scream, or even any of the Kong FX modules, you can easily set this up. Here’s how you go about it.

  1. Select the sound source device or Audio Channel and then add an Alligator so that it’s auto-routed.
  2. Determine if you want the external effect to be applied to all three Channels or just one of the Channels.
  3. If you want the effect applied to all three Channels, it’s super easy. Just select the Alligator and add your effect device (a Scream, for instance). The Scream is auto-routed after the Alligator and will be applied to the Gated signal from all three Channels.
  4. If, however, you want to have the effect applied to specific Channels, select the Alligator and add your effect device (a Scream, for instance). Then flip to the back of the device (Tab), and move the main left/right Alligator audio output cables to one of the three desired Channel output pair (High, Band, or Low Pass Channel).
  5. If you desire, you can do the same thing for the other two Channels by adding other effects and routing them in a similar way. This way, you could have a Chorus effect inserted into the High Pass Channel, a Scream inserted into the Band Pass Channel, and a Pulveriser inserted into the Low Pass Channel. Or you could have three different screams inserted into the three different Channels, and set the parameters/settings for all three Screams differently to get more variation.

The more you experiment with external devices, the more I’m sure you’ll find how versatile the Alligator is in processing your sounds. You might even wonder how you ever lived without this device.

The back of the rack, showing how to process the audio through single Alligator channels and external effects.

Here’s the video showing you the above two techniques:

Technique #7: Gating Three different Audio signals across Three Different Gate Channels.

Here’s an interesting way to go about using the Alligator Effect device. How about taking three different sound sources and passing them through the three different Alligator Gate Channels, and then outputting them to three different Mixer Channels? Confused yet?

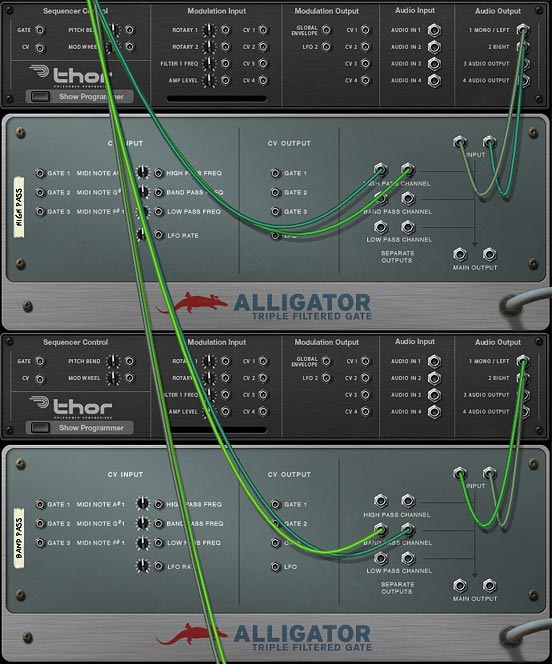
No, you can’t really do this with a single Alligator because the Alligator only has one pair of Inputs. However, you can create three Alligators, and then send your three audio sources into the three different Alligators (one audio source for each Alligator). Once this is done, you can send the separate channel outputs on to their own Mix Channel Inputs. The setup would look like this:

  • Audio Source 1 > Alligator “A” main left/right input > High Pass Channel left/right output > Mix Channel “A” left/right input
  • Audio Source 1 > Alligator “B” main left/right input > Band Pass Channel left/right output > Mix Channel “B” left/right input
  • Audio Source 1 > Alligator “C” main left/right input > Low Pass Channel left/right output > Mix Channel “C” left/right input

The nice thing about this setup is that you can choose to keep all three Alligators’ “Pattern” section the same, in which case the “Pattern” sounds sync nicely together between all three Alligators, or you can spice it up by setting up different parameters in each of the Alligator “Pattern” sections. For example, you could set Alligator “A” to have a resolution of 1/8, Alligator “B” to have a resolution of 1/16, and Alligator “C” to have a resolution of 1/32. And/or you can set all three Alligators to different patterns entirely. This way, you can attain some very intriguing and unique gate patterns going on, and all your friends will wonder how the hell you did it. Well, maybe not, but it’s something worth a try!

Showing different audio sources processed by different alligator channels to achieve an interesting result.

Technique #8: Oh Hell, let’s just dive off the cliff already!

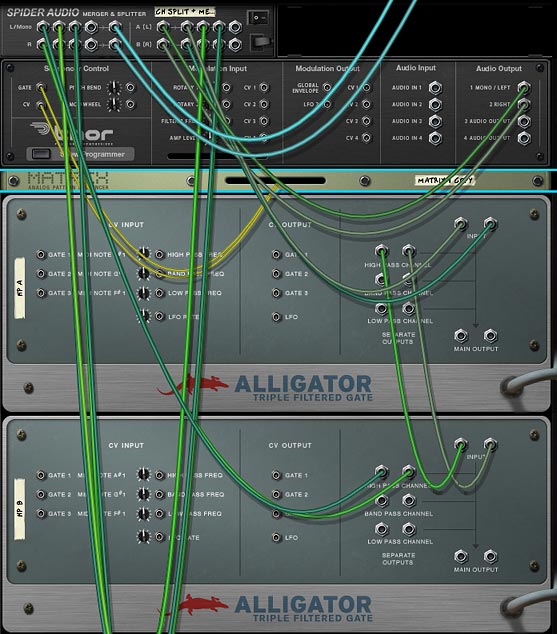
You want something completely off the wall right? Well here goes. Since the Alligator contains separate outputs, you could theoretically “Nest” the Alligators one after the other. This creates a Double-Gate-Filter-FX Channel for any audio source passed through it. Here’s how this little trick works at it’s most simplest (note that you can create Triple- Quadruple- and so on, nested Channels up to the point where it probably just won’t sound good anymore and your CPU will have a heart attack and lie dead on the operation table). This technique goes down one nested level, and only highlights the “High Pass” Channel. Of course, there’s nothing stopping you from mixing/matching nested channels either. For example, a High Pass Channel goes into a Low Pass Channel, or a Low Pass Channel goes into a Band Pass Channel. Just be warned that you may need to write this out as a diagram on paper first before you lose yourself in Cables.

  • Audio Source > Alligator “A” main left/right input > High Pass Channel left/right output. . .
  • . . . Alligator “A” High Pass Channel left/right output > Alligator “B” main left/right input > High Pass Channel left/right output > Mix Channel left/right input

So now that you’ve set it up in this way, if all your Alligators are set to the exact same parameters, adding on these additional “nested” Alligators won’t produce a different sound. Where things get interesting is when you start changing the parameters so each of the Alligators are set with unique parameters. See the Project Files at the top of this tutorial for a Combinator that shows this type of setup.

Of course, if you want to use all three channels, you’ll need to create more Alligators, and each nested level will require a new Alligator. You’ll also need a Spider Audio Merger/Splitter to both split the Audio Source into the three channels, and then use the Merged side to merge them back again before going on to the Mix Channel input. As I said, this could get very tricky very quickly, and will probably be quite CPU-intensive. My advice would be to start off with one Channel and two levels (as the example shows above), then start setting up the parameters on both Alligators. See how that works out for you. Then build it up by moving to the next Channel (if you like), and so on.

Processing your audio source through multiple Alligator Channels. This shows the High Pass Channel in series. But you can do the same with other Alligator channels.

Technique #9: Let’s Dial it Back a Bit. Adding Filter Movement

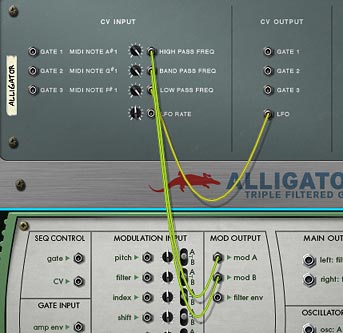
This technique is a little less freaky, and I’m going to end off with it so that you give your mind a chance to wrap around that last little technique. In this one, we’ll do something easy. We’ll take some Malstrom Curves and send them into the Alligator’s Frequency CV inputs to create some movement. Then, since there is only 2 Curve’s available with the Malstrom, we’ll steal the LFO CV output and send it into the third Filter Frequency CV input (all within the same Alligator). Sounds more complicated than it actually is. But here’s an image that shows the setup:

Showing the Malstrom's 2 Mod A/B waves and the Alligator's LFO to provide movement to the Alligator's 3 filters.

Those are all the ideas I have for the Alligator at the moment. I’m sure there’s many other interesting ways it can be used. If you have any other ideas, I’d love to hear them, so please don’t be shy and comment to let me know what you’ve come up with. I’m all ears. Until next time, go make some killer music. 🙂

67 – 7 Songs in 7 Days

When you get a creative spurt, don’t dismiss it! Make sure you embrace it, accept it, harness it, and get it out of you immediately. Most importantly, learn to understand it’s happening (or when it’s about to happen), and let it ride for as long as you can. I can tell you this because from experience you will have dry spells and they tend to last longer than the creative spells. So it’s important to read the signs and act on them.

When you get a creative spurt, don’t dismiss it! Make sure you embrace it, accept it, harness it, and get it out of you immediately. Most importantly, learn to understand it’s happening (or when it’s about to happen), and let it ride for as long as you can. I can tell you this because from experience you will have dry spells and they tend to last longer than the creative spells. So it’s important to read the signs and act on them.

You can download the project files here: 7-Songs-in-7-Days. There are 2 song files zipped up. Note that they are a “.reason” format, which means you need Reason 6 in order to open them. But even if you don’t have Reason 6, you can follow along with the project below, watch the video and adjust it for previous versions of Reason. You’ll probably also learn more by doing it this way. The first song is “7-songs” which is outlined in the videos below, and the second is “Crease Kink” which I threw in there in case you want to remix it or play around with it. Have some fun with it, but remember that I own the rights to it. So if you use it, please let me know and I’ll showcase it here (to date no one has yet to do something with one of my files, but there’s always hope). 🙂

Usually when I’m in a dry spell, I tend to notice it pretty quickly. And when I do, I immediately shift gears and work on a different project. For example, recently I was creating nothing. It happened about 3 months ago. So shifting focus, I started working on designing sounds — LOTS of sounds. Rather than sit at my computer with a blank canvas open or hacking away at nonsense, I shifted focus. This does two things:

  1. It gets your mind out of the clouds and away from the blank slate.
  2. It usually rejuvinates you and lets you recharge your batteries. Kind of like a holiday. We all need them from time to time to rest and clear the mind.

When I got back (and after producing my latest Pureffects ReFill), I was more creative than I’d ever been. And this is all just a long-winded way of saying I brought on a new challenge for myself. Let’s create 7 songs in 7 days. Not an easy challenge, to be sure, but a very fun challenge nonetheless. And though not every song is spot on, most I’m happy about, and with a few modifications, I could say they are finished.

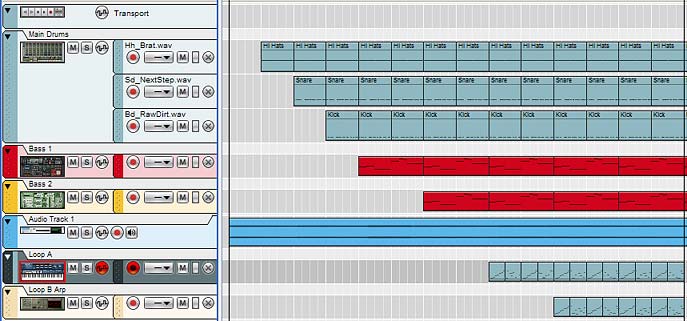
The Main Sequencer after adding some of the elements you'll learn in this creative project.
The Main Sequencer after adding some of the elements you’ll learn in this creative project.

First: The Songs

So first, here’s the songs in order of creation (day by day). Skip all of this if you just want to get to some of the good tricks that I used inside them. You’ll find some of those tricks down below. Otherwise, please have a listen and comment. One can never have too much feedback.

Day 1: Friday October 14, 2011 – Crease Kink (Glitchcore)

Crease Kink by Phi Sequence

Day 2: Saturday October 15, 2011 – Redaction (Dark Ambient)

Redaction by Phi Sequence

Day 3: Sunday October 16, 2011 – 200 Years (Dark Ambient)

200 Years by Phi Sequence

Day 4: Monday October 17, 2011 – Lens Fold (Dark Experimental)

Lens Fold by Phi Sequence

Day 5: Tuesday October 18, 2011 – Vicious Viscous (Dance)

13 – Vicious Viscous by Phi Sequence

Day 6: Wednesday October 19, 2011 – Severed (Electronica)

Severed by Phi Sequence

Day 7: Thursday October 20, 2011 – Palatinate (Electronica Dance)

Palatinate by Phi Sequence


Second: The Methods & Tricks

Now for a few tricks. I thought I would show a few ways I went about creating some of these songs. It’s not really a formula, but it’s a way I used to start off these songs and keep going in order to create so many in such a short time. There are, of course, a million and one ways to create songs. This hopefully will show you a few techniques that might inspire you to jump into a new direction with your own music. I hope so.

Before I start, let me first say that a lot of the time, I’ll create all the sounds from scratch using the Reason synths. But for the sake of efficiency, and in order to create a song every day, I opted for the approach of using patches in the Factory Sound Bank (FSB) for all the instrumentation, and my Pureffects ReFill for some of the effects. Since I had already created thousands of effects patches (and some in the FSB as well), why not put them to good use. In this respect, it was a bit of a novel approach for me, but one that was very rewarding.

Let’s start by looking at the videos on how I started out a song. This gets you about 50% done in less than an hour.

Of course, after these tutorials, there is still work to be done. Mainly some EQ work on the various elements, continuing with the arrangement in the sequencer, throwing in additional elements to spruce it up a little, adding compression here and there, gluing the track together with a Reverb or two, adding a mastering suite to open up the track, and finally using the Master Bus Compressor from the main mixer (if you choose). But this is where I’m going to leave you for now. If you want to pursue these tracks, I have put two in the Download up at the top of the tutorial. Feel free to work on those and come up with your own mix. If you do, please share it with us so we can have a listen.

Starting off with a few Drums

Let’s start at the beginning. Usually the first thing is to start with your drums. That’s a normal starting point for most tracks. So we’ll start with a Redrum. Now normally, you have an idea in mind before you start a track. But I seldom work that way. In truth, I usually lay down a few drum sounds in a pattern in the Redrum and wait until I hear it. I then start to get a certain idea of how to shape the sound and where it’s going to go. In this respect, the song becomes a combination of what I hear first, and then I make decisions on how to shape it as its playing. This is usually backwards from the way most people would compose. But it’s worked for me in the past. So I’m going to do the same thing here.

Once you create a redrum, open up the assorted kick drums in the FSB, and add one into the first channel. I usually keep them playing as I’m selecting them so I can get a feel for what I’m going to use as a Kick drum. Once that’s done, I flip to the back of the rack and send the Gate Out from Channel 1 into the Gate In on channel 2. I do the same thing between channels 2 & 3. Then flip to the front of the rack and select Drum Channel 1. Lay down a pattern (usually I lay down a 64 step pattern to take full advantage of all the steps in the Redrum, and to have something that sounds like it has a lot of changes throughout). Since I’ve connected the Gate channel 1 to channels 2 & 3, I can layer the kick with 2 other kick sounds, but I only have to enter 1 pattern in the Redrum. This speeds up the workflow a little (and is why you should get familiar with your CV connections!).

So now add two more kick drums in Channels 2 & 3. Once this is done, I shape the levels, length & pitch of all 3 drums together. It’s at this point that I start to get a feel for how things work together. If something isn’t working right, I’ll either change one of the samples, or adjust those parameters.

Next, I add 2 Snare drums in channels 4 & 5 and use the same gate CV trick between the two. This means I need to create a snare pattern on channel 4.

And finally I’ll create 2 Hi Hats on channels 8 & 9 – and set the button  to have exclusive sounds between those two channels. This way I can set up an open hi hat on 8 and a closed hi hat on 9. Though, I don’t always use open / closed Hi Hats. But it’s there if you want.

Now create 2 additional mix channels and put them under the first mix channel for the Redrum. Label each Mix Channel Kick, Snare and Hi Hat. Create 3 Spider merger/splitters and use them to merge the sounds from each single channel through them and back into their respective mix channels. This way you end up with 3 channels for the 3 different drums. You’ll see why we do this in a minute.

And now copy the Redrum pattern to the track. Go to the track and using the Tools window (F8), go to the “Explode” function and explode the drum clip to their own lanes (you may want to delete the old lane and label the 3 different clips so that you know what’s what. I’ve done this enough times to know that the order is the Hi Hats at the top, the Snare Drum in the middle, and the Kick drum on the bottom. Easy enough.

So why separate mix channels? The reason is because you want to be able to process each drum differently. And this ensures that we can do this with a minimum of fuss. So first off, select the Kick mix channel, right click, and go to Effects > Pulveriser. The device is automatically routed inside the Mix Channel’s “Insert FX” section — if you’re new to Reason 6, this might be confusing at first. But think of each Mix Channel as having its own built-in Combinator where you can place effects and even route / program them as you would a normal Combinator. It keeps your rack clean and makes working with effects easier. Trust me on this.

With the Pulveriser, I’m going to set up a nice beefy Kick — watch the video for how this is done. After that, I’m going to have a little bit of fun by varying the pitch somewhat on 2 out of 3 of the kicks. Flip to the back and you’ll see that the Pulveriser can not only be used to beef up the kicks, but we can steal some of it’s modulation to affect the pitch on those kicks as well. So use the Tremor / Follower outputs and send them into the Pitch inputs of 2 kick drum channels on the Redrum. It’s a nice idea also because it doesn’t require any extra devices to set up.

Now I’m not going to go into processing for the snares and kicks, but I think you get the idea now. Don’t be afraid to add a few effects, and when done, you can also add an EQ to each drum individually to cut the low end and boost certain frequencies a bit. That’s one method to work with the drums. Now on to the Bass.

Working the Bass into the Mix

Now we move on to the bass. Again, this is just one of the methods I used to come up with this song challenge. It’s nothing fancy. Start out by adding a Bass instrument and ensure you have a bass that you like. Something with a long sustain so our notes can ring through. Don’t worry if the notes sound too long. We’ll adjust their note lengths in a minute. For now, just find a bass sound in the FSB that works with the drums and that gives you some degree of pleasure when you hear it.

Now go to the sequencer and draw in a 4-8 bar bassline. Again, don’t get too caught up in the composition. You can always change it later. Just something simple. This will be the driving sound for the song, for the most part. At least that’s what it is for me.

Now Loop the clip. This is so that you can audition the effect we’re going to add. And also so that we can switch out the bass with another bass instrument if we don’t like it. I do both of these things. I also add another one or two basses and copy the clip to those other instruments. This way we have a nice thick layered bass; just as the drums are layered.

For the effect, my go-to device is an Alligator. This is because it really is a nice way to add some movement and also since I’ve created a bazillion Alligator patches, I can audition them as they play through. Once I find one I like, I keep it. And since I usually have at least 2 bass instruments, I have the lower bass line kept as the sub bass without any effects, and the higher basses utilize the Alligator. In this way, you end up with a nice lush line playing through your song.

Another Fun Audio/Alligator Trick: Introducing some Pad-like Elements.

Here’s something fun that I’ve been toying with in most of these songs. It involves adding one or two audio channels, and then dropping a short melodic sample into the audio track. Then I’ll take the sample and stretch it the entire length of the song (or beyond, depending how the waveform looks). The idea is to have the audio act as a Pad sound for the entire length of the song. And since you’re stretching it out beyond recognition, you end up with a real twist on the sample.

Once you do this, make sure to lower the level significantly. The idea is to have the sound running in the background so it’s audible, but doesn’t take over the drums or bass. A nice subtle sound.

To complete the trick, I add an Alligator to the audio channel. It’s important to remember that the Effects work on audio just as they would on MIDI clips. So adding an Alligator provides some nice movement to your pad sounds. I wouldn’t go crazy with the Alligator in this situation. Just a slight movement to the sound is all you need. So again, audition some of the Alligator patches in the FSB, or get my Pureffects Refill for a selection of 200+ Alligators. 🙂

 Finally: Some Dr. OctoRex accents to really Kick it up a Notch

Lastly, let’s add some accents using a loop. You’d think a single loop can’t do much, but wait until you see this fun little trick. It’s not so much a mystery, but while the song is playing, create a Dr. OctoRex and find a loop that goes along with the song. In this experiment I wanted to find something with a hard edge, so I opened up the “Hardcore” folder in the FSB and found a loop that I thought had some possibilities. I then set about filtering it and adjusting the Octave setting, and adding the LFO for some modulation. Once this is done, copy the loop to a portion of the track (4-8 bars long) and then turn off the “Enable loop playback” button, so you don’t get double-note sounds.

Now in the sequencer you can go about altering the notes and creating some variation.

Finally, copy the Dr. OctoRex and Track. Using this copy, make some adjustments. Then combine the Dr. OctoRex and create an RPG-8 Arpeggiator to play the Combinator. Go to the sequencer and move the notes from the second Dr. OctoRex down to the Arpeggiator track. Then go back to the rack and copy the loop into all 8 slots. This is so that if the notes on the sequencer playing the RPG-8 switch the loop slot, the same loop is still playing.

From there, you can go to town switching things around in your loop. Usually changing the octave, updating some settings on the RPG-8, etc. will produce some interesting results. The nice thing is that both loops have the same groove and timing, so they will sound like they belong together. Indeed, this is where I had the most fun: playing around with settings until you find the right balance between the loops.

Don’t forget you can also edit the slices directly, or use some CV to modulate things further. Experiment and play until you make the loop your own. That’s really the key here.


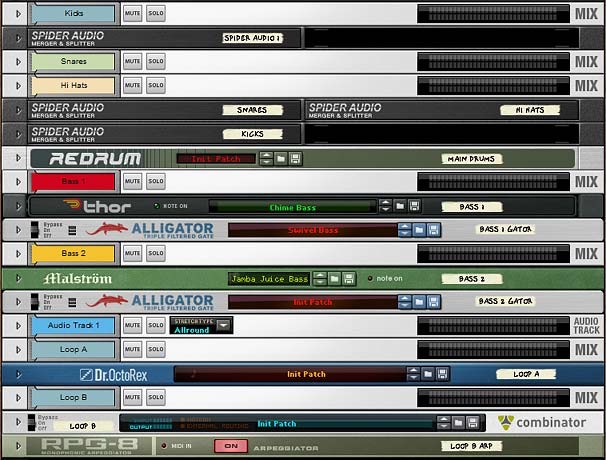
The front of the rack after adding the Drums, Bass, Audio Track (Pad), and some Dr. OctoRex Loop accents.

So there you have it. One method I used to create seven songs in seven days. Now go out there and challenge yourself to create your own group of songs using your own methods, or incorporating some of the methods I outlined here. The sky is the limit. So reach for the sky!

66 – The ECHO Echo echo. . .

Today let’s take a nice little look into the world of The Echo. New to Reason 6, this is one of 3 new effects which were much anticipated by the User Community (Do we all remember posts with subject lines reading “We need better effects in Reason”? I do).

Today let’s take a nice little look into the world of The Echo. New to Reason 6, this is one of 3 new effects which were much anticipated by the User Community (Do we all remember posts with subject lines reading “We need better effects in Reason”? I do).

You can download the project files here: Echo-Techniques. There are some Combinators and a .reason file showcasing the examples found below. In the .reason file, I’ve used mutes to silence all the tracks. To listen to a track, unmute it. I hope you find some of these tricks useful.

Also don’t forget that my latest Refill, Pureffects, is available with 1,250 effect patches designed specifically with Reason 6 in mind. There’s 200 Echo patches alone, and about 30 or so Echo Combinators with all kinds of interesting routing ideas. For example, ever thought about setting up Kong to “Play” the various “Delay Times” via your pads? Since there are 16 “synched” times in The Echo delay, they are perfect for mapping to the Kong pads. Yup. It’s in there. Read More about the ReFill.

Overview of The Echo

The Echo brings some nice new features into Reason. It’s an Echo / Delay device that can also phlange things around, and purports a new Algorithm to the Echo that you won’t find inside the RV7000. As with all Reason devices, it doesn’t replace anything, but instead adds something new into Reason. So it’s not meant to be a replacement for the DDL-1 or the RV7000 Echo algorithm. They all have their place inside Reason.

One of the nice things I like about the Echo is the “Keep Pitch” button. Essentially, this will keep the pitch as you adjust the Delay Time, so that you don’t get those insane squelches that you get if you were to change the Delay Time in Thor or the DDL-1 devices. This is unique to The Echo.

Another unique offering is the way in which you can control The Echo. There are 3 ways to control it:

  1. Normal: Allows you to use The Echo as an insert or send device in any situation. The Dry / Wet knob determines the amount of Echo produced. This mode is probably the one you will be most familiar with, as it’s the way most effects are set up in Reason.
  2. Triggered: Allows you to Trigger The Echo via the Trigger button or by sending CV to the back of The Echo device. The only thing to remember with this mode is that Any Audio being processed through The Echo will not sound unless the Triggering is enabled. Something that can be a little confusing at first. Honestly, I would have preferred if the Audio was sent through the device dry when not triggered, so that you could still hear the unprocessed audio, and then triggering allowed you to hear The audio processed through The Echo, but I’ll show you a way around that later.
  3. Roll: This is a really nice option when you want to play a stuttering effect on the Audio. The Roll Feature will boost both the Feedback and “Wet” signal as the Roll lever is moved to the right. When this lever is all the way right, both Feedback and the Wet signal = 100%. Fully left, and both Feedback and the Wet signal are 0%. This makes it very useful as a “Freeze” or “Beat Repeat” function.

And of course you have the Color, Modulation, Ping-Pong mode, Offsets for Delay and Feedback, and Ducking. I’m not going to go into all of these features because the manual does a pretty good job of explaining them. Instead, I’m going to show you a few practical ways you can use them in your compositions.

Trick #1: Echoing Slices in a Loop via Parallel Processing

This idea uses 2 instances of the same loop to parallel process the drum beats. One will be the original unprocessed Loop, and the other will have a few slices of the same Loop run through The Echo. It’s a very simple process, but it can be a lot of fun when you’re spicing up your loops.

Start by creating a 6:2 Mixer inside a Combinator. Then create a Dr. OctoRex Loop player and initialize the device. Open up the lower section of the Dr. OctoRex and load up one of your favorite loops into slot 1. Now Duplicate the Dr. OctoRex Loop player. Flip around to the back panel (Tab), and connect the second Dr. OctoRex to Channel 2 (the first Dr. OctoRex should be connected to Channel 1). Flip back to the front, and select the Second Dr. OctoRex. Right-click and select Effects > The Echo. This will automatically connect The Echo as an insert device between the second Dr. OctoRex and the 6:2 Mixer. Perfect.

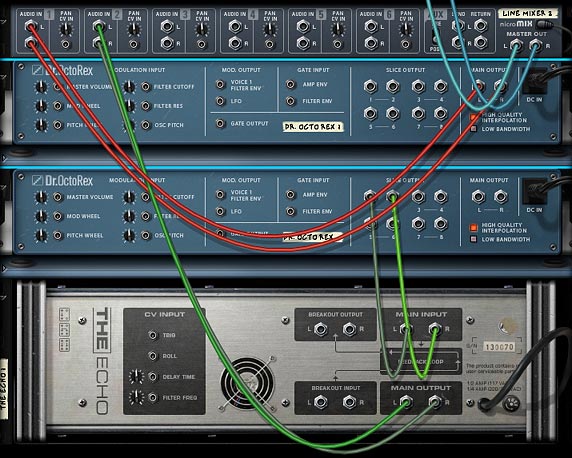
Now for the important part. Flip to the back of the Rack, and move the output of the second Dr. OctoRex from the Left / Right output to the 1/2 output instead.

Parallel Processing specific Slices in a Dr. OctoRex with The Echo
Parallel Processing specific Slices in a Dr. OctoRex with The Echo (back of the Rack)

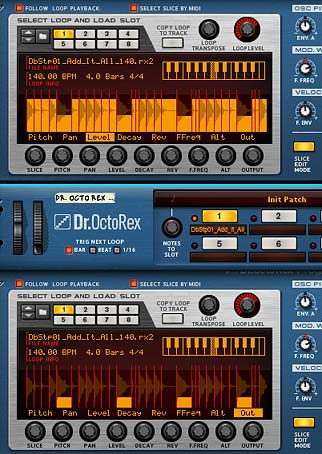
And now comes the fun part. Set both Dr. OctoRex devices to “Select Slice By Midi.” This allows you to see the slice focus as the loops are running. On the first Dr. OctoRex, select the “Slice Edit Mode” button and select the word “Level” in the Loop display area (not the “Level” knob). In the second Dr. OctoRex, select the “Slice Edit Mode” button and select the word “Out” in the Loop display area (not the “Out” knob).

Find a few key slices as the loop is played (Bass Drum is a pretty good choice in most cases), and in the second Dr. OctoRex, pencil in a quarter of the way up over these key slices. You should be hearing The Echo affecting those slices. In essence, the slices you select to be output from 1/2 (a quarter of the way up in the display) will be processed through The Echo. The reason it’s a parallel process is that the original loop is still playing simultaneously. If you don’t want the slices processed in a parallel way, go to the first Dr. OctoRex and reduce the level completely on the same slices you just sent to the Echo. You can introduce a little of the original signal back in by raising this level for the first Dr. OctoRex loop slices, or you can reduce/raise the levels in different ways to add a little variation and groove. It’s a very versatile method.

If you really want to start tweaking things, try transposing the second Dr. OctoRex loop by a few semitones or a whole Octave. If it sounds good, go with it. And when you’re done, save your creation in a Combinator.

Parallel Processing Specific Slices in a Dr. OctoRex Loop with The Echo
Parallel Processing Specific Slices in a Dr. OctoRex Loop with The Echo (Slice Edit Mode)

Trick #2: Using a Matrix to Trigger Echoes

This idea is very basic but shows you how to use the Trigger Mode of The Echo. The idea is to use a Spider Audio to split the signal of a Dr. OctoRex Loop, and have one split going into a Mixer Channel, and another Split processed by The Echo and then sent to another Mixer Channel. Then take a Matrix Pattern Sequencer, and send the Curve CV from the Matrix into The Echo’s Trigger CV input on the back of the device. On the front panel, Set The Echo to “Triggered” mode, and set the Matrix to “Curve” mode. Start the Main Sequencer by pressing the “Play” button,  and start drawing in some steps in the Matrix curve. The steps should be draw in at full level, and you don’t need a lot of them. Start by drawing in one or two on a few key beats. You’ll start to hear how The Echo is affecting the loop, so draw in your steps by letting your ears decide where they should go.

Here’s a video that showcases how to set up the above 2 tricks. Don’t worry, it’s really not as hard as it sounds. Once you understand the concepts, you can really have some fun with these methods.

Trick #3: The Echo’s Feedback Loop

Using the built-in Feedback loop of The Echo is something that hasn’t been talked about very much since Reason 6 was released a few days ago, but I’ll bet this will be one area that will get a lot of attention in the coming weeks and months. If not, then it should. The Feedback Loop is one helluva tremendous feature. And it’s really simple to implement with a lot of possibility. The only thing I would advise when you start fiddling with the Feedback loop is to reduce the Feedback of the Echo down to zero before you start connecting devices to it. Also make sure there is no feedback offset either. Keep that knob centered at zero (0). Otherwise you can really destroy your ears if Feedback is set very high and you accidentally connect a Scream to it, for instance.

No doubt someone will eventually do this. And for that poor soul I guarantee it will end up being the last time they do it.

So now that you know the rules of the road, here’s how you set it up:

Load up a sound device, like your favorite Thor, Malstrom, Subtractor, or any Audio Track if you prefer.

Create an Echo device underneath the sound source device (or you can place it inside the Audio/Mix Channel’s “Insert Effects” section). Turn the Feedback knob down to zero. I also turn the Delay Time down to zero as well, but this isn’t necessary.

Hold your Shift Key down and under The Echo device insert your favorite Effect device from the “Effects” subfolder (to make it interesting, select a Pulveriser).

Flip to the back of the rack and connect the Pulveriser’s audio outputs to The Echo Feedback Loop audio inputs (Breakout Input). Then connect The Echo Feedback Loop audio outputs (Breakout Output) to the Pulveriser’s audio inputs.

The basic setup is complete. Now you can flip to the front of the rack and slowly raise The Echo’s feedback knob. I would probably set the knob to somewhere around 20. Then start to play with the parameters on the Pulveriser. Don’t go crazy. Just slowly introduce a few things such as some dirt, filtering and dry/wet blend. If you don’t hear anything too exciting, keep experimenting by turning up the feedback a little more, then increase the dirt and perhaps the squash settings. Try out the various filters.

You’ll start to hear how it all affects the feedback inside The Echo. And believe me, there are hours of fun found just in creating weird feedback loops. I created a lot of different feedback loops inside my Pureffects refill for Reason 6. I even fed a second Echo device through the feedback loop in one patch, and an RV7000 in another patch. Though when you feed delay effects through the Feedback Loop, you really need to mind your manners. As you can imagine, piling delays upon delays can be a recipe for disaster. Though with the right settings, you can produce some phenomenal results. It goes without saying, but I’ll say it again and again: Experiment! Experiment! Experiment!

Here’s the Video for setting up a Feedback Loop in The Echo:

Trick #4: The Zipper Effect

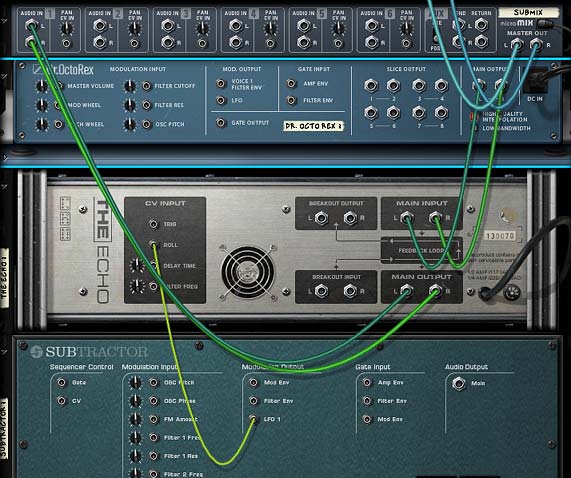
Here’s a little trick to create an off-the-wall sound with The LFO feature of The Echo. I personally like it for a very rapid delay which sounds somewhat like a zipper. So I’m calling it the zipper effect. It’s also very simple to set up.

The "Zipper" effect in The Echo

Here’s a short video on how this is set up:

Trick #5: Automating the Roll feature in The Echo with an LFO

This is another one of those simple ideas that can produce some nice results. Try automating the Roll in The Echo with an LFO. Any LFO will do. You can even use the Pulveriser’s Tremor feature (essentially an LFO) to control your Rolls.

A Subtractor LFO connected to The Echo's Roll CV Input

Here’s a short video on how this is set up:

Bonus Trick #6: Processing a Kong Snare Drum through The Echo

Much like Trick #1, where the Slices are independently sent out to The Echo, you can also set up a Kong Drum Kit, and send specific drums out to The Echo for processing. This video shows how you can set up a Snare Drum to be processed by a Pulveriser and an Echo, while all the other drums are sent out Dry. Once you understand these concepts, there’s no end to how you can process things with The Echo, as well as other effects devices in Reason. Have fun with it!


And here’s a really nice tutorial that Selig put together on parallel processing and sidechaining with The Echo, which I just found the other day. Really nice method to parallel process using nothing more than a single Echo. Sweet.


I hope that opens up some new ideas for those of you using The Echo. Any other ideas, please share them here. Until next time, have a blast with your new Reason 6 upgrade.