In this tutorial I’m going to talk about the new Alligator device in Reason 6. I think no other device has mystified so many since the RPG-8, and a lot of people have reluctance to really dive into it, thinking it’s mainly built for electronic musicians. Truth is that it’s a very easy device to work with, and it has applications for all kinds of instruments and all kinds of genres. So don’t be intimidated by all the knobs and levers. It’s a veritable evil laboratory, but getting it under control is easier than you think, and that’s the focus here.
You can download the project files here: alligator-techniques. They contain a .reason file with all the techniques described below, as well as the separate combinators. You will of course need Reason 6 in order to load and use any of the files.
Introduction to the Alligator
The Alligator is billed as a “Triple Filtered Gate” and that’s exactly what it is. However, it’s quite a bit more. It contains 64 patterns that can be manipulated, it has a few built in effects (Drive, Phaser, and Delay), it has 9 LFO’s that can be used to affect the filters, and the Panning capabilities allow you to create some movement in the stereo field. That’s not even taking a look at what you can do with the CV connections on the back of the device.
To start, let’s take a look at the various sections of the Alligator. When I’m starting off creating a patch for this device, I usually first load up a sound I want affected. So if it’s a Bass or a Synth or a Drum sound, all of these sounds will require a different approach to the Alligator. In other words, the sound I feed into it coupled with what I want to do to that sound in my head, will decide how I proceed with the device.
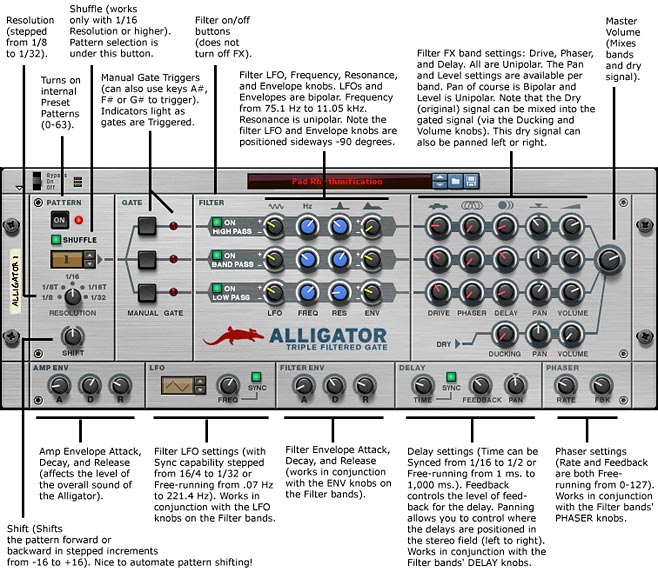
Following is an explanation of the parameters you will find on the front panel of the Alligator device.

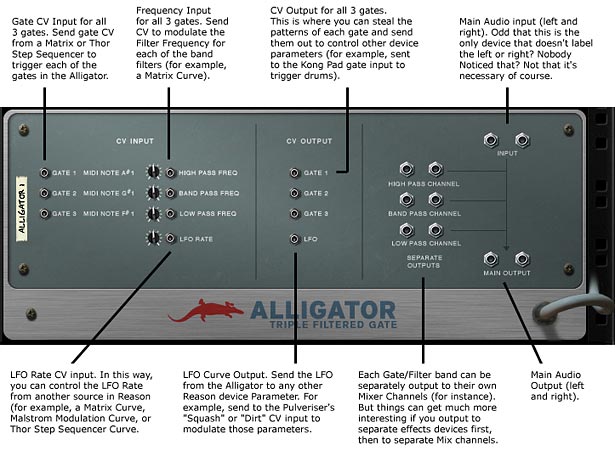
And following is an explanation of the inputs and outputs found on the back panel of the Alligator device.

And here’s the quick introduction video to show you the main components of the Alligator:
Technique #1: Creating a Dry / Wet Knob for the Alligator
Since the Alligator does not have a Dry / Wet knob, we have to go about getting a little creative. This means wrapping the device inside a Combinator. Once there, you can use the Dry Level Knob and program its direction to be inverse to the individual Band level knobs. Set that up on a rotary in the Combinator and you have an instant Dry / Wet control for our Mister Alligator.
Technique #2: Keeping your Gates Open
You’ll notice that the Alligator by default uses a pattern to open/close the gates. You can turn them off or turn the pattern on, but what if you want to keep the gates open all the time. The easy solution is to do the following:
- Set the Alligator pattern to #60
- Flip to the back of the Alligator and send the Gate 1 CV output to Gate 3 CV input (both on the same Alligator device)
- Send Gate 2 CV output to Gate 1 CV input (both on the same Alligator device)
- Send Gate 3 CV output to Gate 2 CV input (both on the same Alligator device)
If you flip back to the front of the Alligator you will see all the gates are permanently on. This means that you can still use the LFO, Frequency, Resonance, all the Effects (Drive, Phaser, Delay), and Mixer controls to affect the sound, but you bypass the Gate section of the Alligator. It’s always on.
Just note one thing when you do this: You want to keep the Amp Envelope Decay set to full (fully right). If you lower the Amp Envelope Decay knob, the gate will fade out (even though it is completely open). If this happens, you’ll have to first move the decay knob all the way right, and then reset the CV on the back of the Alligator (unplug all 3 CV connections, and plug them back in again).
Alternately, you can send a one step tied curve pattern in a Matrix split 3 ways through a Spider and then sent to all 3 gate inputs, but this means creating additional devices when it can all be accomplished with a single Alligator.
This video will show you how to set up the above 2 Techniques:
Technique #3: Creating your own Patterns to Control the Gates
You’re not limited to the 64 patterns that are built into the Alligator (though you can definitely have a lot of fun with so many different patterns). You can easily use 3 Thors or 3 Matrix Curves/Gate CV to control all 3 gates in a single Alligator. To do this, first turn off the pattern section in the Alligator (the big “ON” button at the top of the Pattern section). Once you do this, you’ll need to create your Thors or Matrixes and flip to the back of the rack. Send the CV from the Step Sequencers into the 3 Gate CV inputs and then start all of the pattern devices up (this is easier to do if everything is Combined in a Combinator. That way when you press the “Run all Pattern Devices” or press “Play” on the Transport, the Step Sequencers start gating the Alligator. Dead simple my friends!
Best of all, this means you can create any kind of gate of any length you can imagine (See my “Matrix” series of tutorials #48-51 or Thor sequencing ideas #60-62 for ways in which you can extend the length of your patterns).
Technique #4: Stealing the Patterns to sequence other Reason Device Parameters
Forgetting about the Alligator’s intended purpose for a second, you can use its built-in patterns to affect any other parameter in any of Reason’s devices (just about). In this way I got pretty excited to see that you can use the Alligator as an “already pre-configured Matrix with double the amount of patterns” — yeah that’s pretty exciting for a nerdy nerd like me. It means I don’t have to tediously program two matrixes filled with patterns (though truth be told, if you’ve read article #3 in my 101 Creative Projects category, you already have a huge array of Matrixes from which you can copy/paste into any of your projects, right?).
In any event, to get the ball rolling, pick a pattern you like. Then flip to the back of the Alligator and disconnect the audio cables. You’re only using the pattern section here to trigger something else in Reason. And since you have 3 gates, this means you can modulate three other parameters from a single Alligator device (or how about using a spider to combine the three gates and sending the merged output to control a single parameter). I think you get the picture. This is a very quick and easy way to control things via CV.
One idea is to use the Gates in the Alligator to play the Kong drum designer. Send the three gates of an alligator into 3 drum pad CV inputs on the back of Kong, and then you can set up some pad groups in Kong so that you get even more variation. Finally, set up a Matrix curve to control the “Shift” knob via one of the CV inputs in a Combinator, and you have instant “Groove” for your drums, without ever using the ReGroove. It’s a nice alternate way to get some drums going quickly in your tracks. For the full feature on how this is done, see the video below.
Tip #1: Tuning your Filters
This concept was provided by Peff when he was doing his tutoring session in Las Vegas. And I really do hope that he doesn’t mind me providing the tip here. But in the attempt at full disclosure he needs full credit on this one.
Tuning filters is not a concept I was all that familiar with, but armed with this knowledge, it actually makes perfect sense, and has applications that reach out much farther than just the Alligator. But that could be a whole tutorial in and of itself. For our purposes, tuning the Alligator filters is a way to produce a more even sound coming out of the device. The idea is that you pick a frequency as your “Base” and then set the other filters up so that they are multiples of this “Base” frequency. So if you set up the LP Filter on the low end to be 200 Hz, then the BP Filter could be set up to 400 Hz and the HP Filter could be set to 800 Hz, which should produce a “cleaner” tone than if the filters were out of sync or out of tune.
Now while this is a handy technique, I should also say that going for a sound where the filters are more out of tune is perfectly valid. This is not a practice that should be set in stone. It’s more a technique that you should understand and get acquainted with and add into your arsenal of knowledge. But don’t be afraid to venture outside this technique.
You’ll also notice that it’s not always possible to get a precise multiple of a specific Filter Frequency. But generally, the closer you are to a multiple, the more “in tune” the filters should be with each other.
Tip #2: Taming the Dreaded Pops & Clicks
One thing that still bothers me to this day is how quirky the envelopes and LFO can be in the Alligator. Under certain settings, you can hear noticeable pops and clicks which are most definitely unwanted. Here are a few ways to deal with this if you find it happening to you.
First, it’s important to note what’s causing the pops and clicks in the first place. More often than not, it’s a result of a short Attack Time in the Amp Envelope coupled with a slow-running LFO with a sharp edge (think the Pulse or stepped Waveforms). The lack of a lag feature (which is available in the Pulveriser) means that you can’t smooth out the LFO. And when it’s running too slow, and the attack time is short, this is usually a recipe for disaster. Here are a few hints to get you out of this jam. Note that all of these methods will change the sound of the gated effect, but there’s really no way around this that I’ve found.
- Use a smooth LFO, such as the Sine Wave or even the Triangle Wave. Stay away from the Stepped, Ramp, or Pulse waves.
- Adjust the Amp Envelope’s Attack time to be slower (turn the knob more to the right). Times that are above 25 or 30 work well.
- Don’t use the LFO at all. Ensure that all the LFO knobs for the bands you are using are all pointing due west! This means the LFO does not affect the bands whatsoever.
So there are a few tips and tricks for you to get acquainted with the Alligator. Give it a whirl on any kind of audio just to get a feel for it, and have some fun gating your audio. Until next time, happy Reasoning!
