Thor Tremolo-Pan-Freq FX

This patch came out of a request to have a Tremolo effect in Reason. There’s many ways you can create one. But this time I wanted to expand upon that a little bit and create a triple effect using a single Thor device. So here is a Tremolo / Pan / Frequency Modulation effect patch that you can use.

This patch came out of a request to have a Tremolo effect in Reason. There’s many ways you can create one. But this time I wanted to expand upon that a little bit and create a triple effect using a single Thor device. So here is a Tremolo / Pan / Frequency Modulation effect patch that you can use.

Download the 2 Combinator patches here in zip file format: thor-tremolo-pan-freq-fx. Note: You will need Reason 5 or above to use the Combinators, because they both use the CV inputs on the Combinator, which was a new feature of Reason 5. If you have a previous version of Reason, the Combinator will give you a “bad format” error message.

(FX) Thor Tremolo-Pan-Frequency Combinator
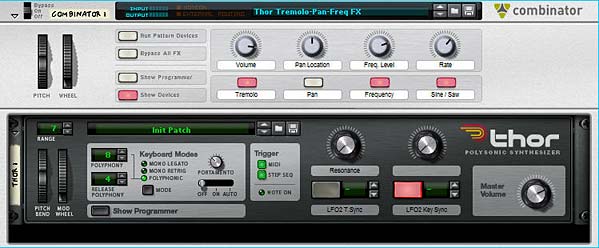
Thor Triple effect patch: Tremolo, Pan, and Frequency Modulations

This patch uses the Combinator Mod Wheel to trigger the level of the effect(s) in question. The patch is very simple in design, using only a single Thor inside the Combinator. The LFO 2 in Thor is used to modulate the following 3 effects:

  1. Tremolo
  2. Pan Modulation
  3. Frequency Modulation

Note: You must use the Mod Wheel in order to trigger these effects. You won’t hear anything happening to your audio if you don’t use the Mod Wheel!

The other nice thing about this patch is that you can have any combination of these three effects running at the same time. Or you can use only one of the effects at a time. The choice is yours.

The following explains how the patch rotaries and buttons work:

Pitch Bend: This parameter is not used.

Mod Wheel: Controls the level of the effects globally (i.e.: all three at once).

Rotary 1: Volume – Controls the global volume of the audio going out of the Combinator via the Master Level on the Thor device.

Rotary 2: Pan Location – Controls the location of the Audio in the stereo field. If the Pan modulation is turned on (see Button 2), then the panning still floats from left to right and back again like a pendulum, however, the Pan location is static and can be set anywhere along the stereo field. Try using this rotary in tandem with the Pan modulation turned on to get a feel for it.

Rotary 3: Frequency Level – Controls the Frequency of the incoming audio. Fully right cuts off the frequency entirely. Fully left opens the frequency completely. Use this in tandem with the Frequency Modulation enabled (see Button 3) for some interesting effects.

Rotary 4: Rate – This controls the rate of Thor’s LFO 2, which affects the modulation of the three effects globally.

Button 1: Tremolo – Turns on the Tremolo effect, which basically modulates the Amp Gain in Thor based on Thor’s LFO 2.

Button 2: Pan – Turns on the Panning modulation effect, which pans based on Thor’s LFO 2.

Button 3: Frequency – Turns on the Frequency modulation effect, with is modulated based on Thor’s LFO 2.

Button 4: Sine / Saw – Determines whether a Sine waveform is used or a Sawtooth wave is used. Sine is used if the button is off (disabled), and a Sawtooth waveform is used if the button is on (enabled).

And there are some extensions to this patch that I’ve set up on the Thor Rotaries and Buttons which can be accessed by Showing the Combinator devices:

Thor Rotary 1: Resonance – Controls the Resonance of Thor’s Filter 3. Minimum is set to zero (0) and Maximum is set to 96.

Thor Rotary 2: This parameter is not used.

Thor Button 1: LFO 2 Tempo Sync – Turns on the Tempo Sync for Thor’s LFO 2. When turned on, the LFO 2 Rate is tied to the song Tempo. When turned off, it is free-running.

Thor Button 2: LFO 2 Key Sync – Turns on the Key Sync for Thor’s LFO2. When turned on, the LFO 2 is re-triggered each time a key is pressed. When turned off, the LFO 2 wave is not re-triggered.

(FX) Thor Vibrato-Tremolo Combinator

This patch idea came courtesy of Eric Kloeckner. He said you could create a Vibrato in Thor by sending the audio through the Chorus effect and turning down the feedback. And voila, there it was. So now, I’ve created a second patch and placed both in the download file at the top of this posting. I also separated the LFOs in Thor, so that you can adjust the two LFOs independantly; meaning, you can turn on both the Vibrato and Tremolo and have them cycling at different rates and modulate both differently as they both act on your audio. Fun stuff.
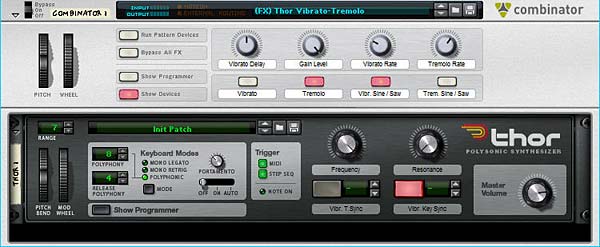
Second Thor FX Patch with separate Vibrato and Tremolo effects

The following explains how the patch rotaries and buttons work:

Pitch Bend: This parameter is not used.

Mod Wheel: Controls the level of the effects globally (i.e.: all three at once). Note again, you must use the Mod wheel to use the effect. No Mod Wheel, no effect. Very important to remember!

Rotary 1: Vibrato Delay – Controls the Chorus Delay, which can give some interesting effects and add a little more life to your Vibrato.

Rotary 2: Gain Level – Controls the Gain position of the Audio. In other words, it’s a volume level, but it’s most useful if you use it while the Tremolo is on. This way you can adjust the amount of gain (Tremolo) and the range at which the Mod Wheel affects the Tremolo.

Rotary 3: Vibrato Rate – Controls the rate of the Vibrato by adjusting the Rate of Thor’s LFO 2. In this patch, LFO 2 is tied to the Vibrato, and LFO 1 is tied to the Tremolo.

Rotary 4: Tremolo Rate – This controls the rate of the Tremolo by adjusting the Rate of Thor’s LFO 1. In this patch, LFO 2 is tied to the Vibrato, and LFO 1 is tied to the Tremolo.

Button 1: Vibrato – Turns the Vibrato effect on or off.

Button 2: Tremolo – Turns the Tremolo effect on or off.

Button 3: Vibrato Sine / Saw – Switches LFO 2 between a Sine and Sawtooth waveform, which in turn affects the shape of the Vibrato.

Button 4: Tremolo Sine / Saw – Switches LFO 2 between a Sine and Sawtooth waveform, which in turn affects the shape of the Tremolo.

And there are some extensions to this patch that I’ve set up on the Thor Rotaries and Buttons which can be accessed by Showing the Combinator devices:

Thor Rotary 1: Frequency – Controls the Frequency of Thor’s Filter 3. Minimum is set to zero (0) and Maximum is set to 127.

Thor Rotary 2: Resonance – Controls the Resonance of Thor’s Filter 3. Minimum is set to zero (0) and Maximum is set to 96.

Thor Button 1: Vibrato Tempo Sync – Turns on the Tempo Sync for Thor’s LFO 2. When turned on, the LFO 2 Rate is tied to the song Tempo. When turned off, it is free-running.

Thor Button 2: Vibrato Key Sync – Turns on the Key Sync for Thor’s LFO 2. When turned on, the LFO 2 is re-triggered each time a key is pressed. When turned off, the LFO 2 wave is not re-triggered.

Hope you find this useful. Let me know what you think?

24 – A few No-Nonsense Tips

In this tutorial I’m going to outline some of my favorite quick tips that you can use when you find yourself in a bit of a bind with Reason. Hopefully these little tips open you up to a new way of thinking with the software, or else at least point you in the right direction if you get stumped.

In this tutorial I’m not going to outline any grandiose Combinator or showcase some majorly complex CV routing scheme (though I have a few interesting ones that I may show down the road). Instead, I’m going to outline just some of my favorite quick tips that you can use when you find yourself in a bit of a bind with Reason. Hopefully these little tips open you up to a new way of thinking with the software, or else at least point you into a direction in case you get stumped.

All of the tips below came out of a need I had to get out of jail with the software. In other words, I’d find myself at a standstill unable to go further because I’d locked myself in a hole. Here’s a few ways I found to get out and escape. I hope you find these tidbits useful.

Tip #1: Unison = Stereo (It’s not just big fat sound).

The first tip came out of a post I’d seen on the PUF (Propellerhead User Forum) entitled “Confessions.” In this post, a few people had stated that they never used the Unison device, and didn’t really understand what it was for. “I think it has something to do with fattening up the sound, but I don’t really use it and don’t really know what it’s for.” Fair enough. Here’s what I think:

Yes, it fattens up the sound. But it does more than that. For instance, take any monophonic sound device; The Subtractor and Thor come to mind. If you start playing either device, you can tell it sounds monophonic. In the case of Thor, you can do some clever things like add some Chorus and Delay. Perhaps in the Subtractor, you’ll add some ring modulation or FM synthesis, detune two oscillators together. But here’s the dilemma: you add a Stereo Imager after the device and nothing happens? Why?

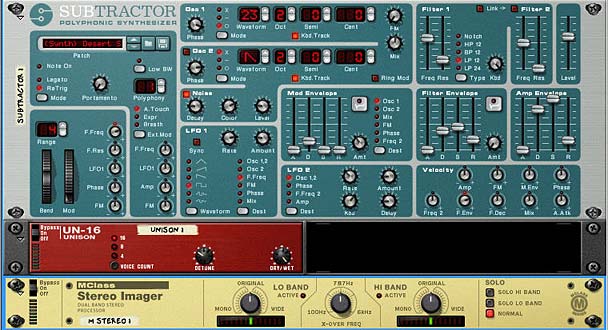
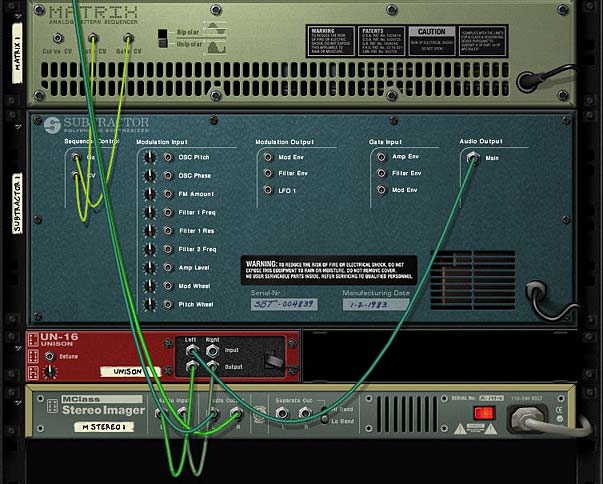
This is because the Stereo Imager only works on Stereo audio, and since you have a device which is monophonic, nothing is going to happen. The simple fix: add a Unison device between the sound source and the Stereo Imager. Instantly, you’ve turned your sound into a Stereo audio pair going into the Stereo Imager, which can now effect the sound as you want (point of fact, it’s more of a faux stereo, but it works).

The unison device is there to “Stereo-ize” your monophonic sound. At the same time, it fattens the sound by creating multiple detuned voices out of the audio you send into it. Good enough!

The front of the rack showing the Unison device creating Stereo out of Mono
The back of the rack showing the Unison setup

Tip #2: Mixer Pan/Level CV automation is holding me back!

Ever automate the level and/or Pan info on your main mixer in Reason or Record and then realize you can’t alter it at all. For instance, if you send a Subtractor LFO to fully automate the level of your track, you end up unable to alter or change the level to fade it in or out right? Whatever is playing in a clip in your sequencer will be affected by the LFO as is. No fade ins, no fade outs, no changes along the way. Same goes for panning.

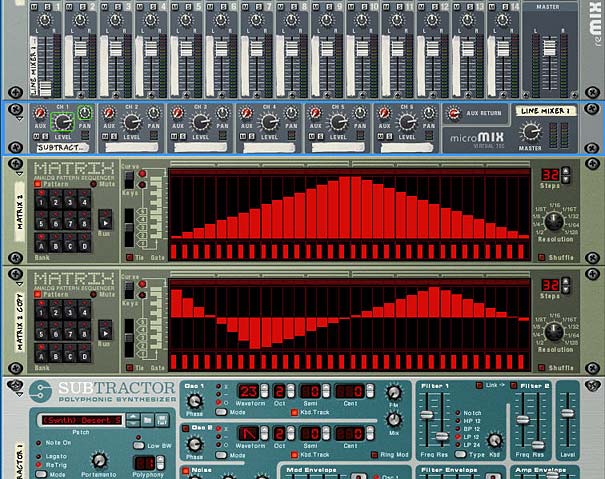
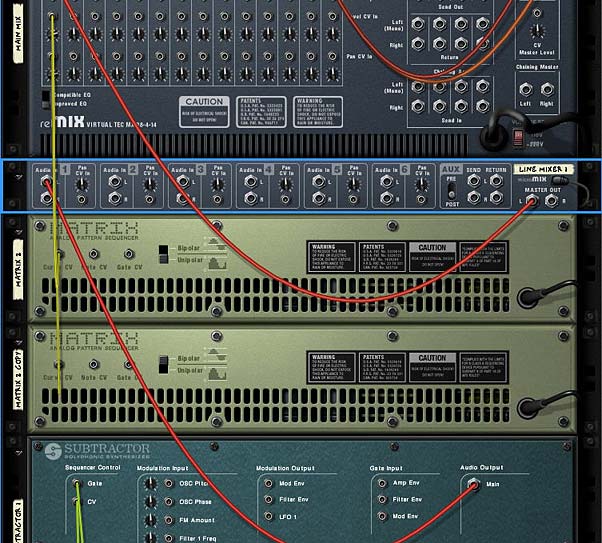
Here’s a simple tip to allow you to have both. And again it involves inserting a device between the sound source and the mixer. In this case, it’s another line mixer. Insert a 6:2 mixer between your main mixer and the sound source. Then flip the rack around and move the audio cables from the sound source into Channel 1 on the 6:2 line mixer. Then send some audio cables from the main output on the line mixer into the previous channel on the main mixer. Now you can flip back to the front again and right-click on the Channel 1 level knob, select “Edit Automation” and enter your fade-ins and fade-outs. You can also adjust your panning on this line mixer as well. This will affect the panning of the sound source before it gets sent into the main mixer where the CV is affecting the panning. In this case, the panning is combined together.

The front of the rack showing the Line Mixer inserted between the audio signal and main mixer.
The back of the rack showing the connections for the audio signal.

There you go. Total control over your mix, even when your mix is being controlled by CV.

Tip #3: While we’re on CV, don’t forget you can automate any CV trim knob on the back of any device

I discussed this tip in full here: #7 – Adjustable CV, but it bears repeating. If you want to control the trim pots for any CV connection (you know, the tiny knobs on the back of your devices into which you send the CV cables), simply insert a Thor device between the CV source and the CV destination. Route the CV into the CV in 1 within Thor, and send it out from CV out 1. Then in the modualtion Bus Routing Section of Thor (MBRS), use CVin1 as a source and CVout1 as a destination. Enter 100 as an Amount, and then use Thor’s Rotary 1 as a Scale (also with an amount of 100). Put everything (source/destination devices as well as the Thor “CV Pass-Through” device) into a Combinator, and program the Combinator’s Rotary 1 to adjust Thor’s Rotary 1.

This means that you’re adjusting the Scale amount value using the Combinator Rotary 1. Essentially, this will have the same effect of adjusting your CV trim pot. Sounds complicated, but it’s really quite simple.

Tip #4: Damn it, there’s no CV connection. But I want to automate it with an LFO!

Enter the Combinator to the rescue. For this trick to work, you have a device which has a parameter you want to affect with an LFO (or any other mod envelope or anything you like) and the device with the LFO which is going to affect it. This couldn’t be easier, but it’s not at first obvious. Here’s what you do:

Put both devices in a Combinator. Flip the rack around. Send the CV from the LFO device into the Rotary 1 CV in of the Combinator. Then flip back around to the front, and open up the Combinator programmer. Select the sound device. In the Modulation Matrix, use Rotary 1 as the Source andthe parameter you want affected in the destination device as the “Destination.”

Now, when the LFO is enabled and running, it gets sent along the CV cable and affects Rotary 1 on the Combinator. Rotary 1 on the Combinator in turn is affecting the parameter on your destination device. In other words, the Combinator Rotary 1 is used as a CV pass-through to affect any parameter you like, not just the ones that have CV slots on the back of the devices.

Tip #5: That nasty bypass click.

Not all glitch sounds are good sounds. Such is life when you are dealing with bypass switches in Reason. Sometimes you’ll get this nasty clicking sound when switching from on to bypass or vice versa. Sometimes you’re lucky and you don’t get it. It’s like Russian Roulette audio-style. This is why I never ever use the bypass switch. And also why I never ever automate it. Instead, here’s a few simple ways to get the same benefit without the horrible clicks.

First off, if you’re using a device that has a dry/wet knob, put it in a combinator and tie the dry wet knob to a button or a rotary. There’s your bypass button.

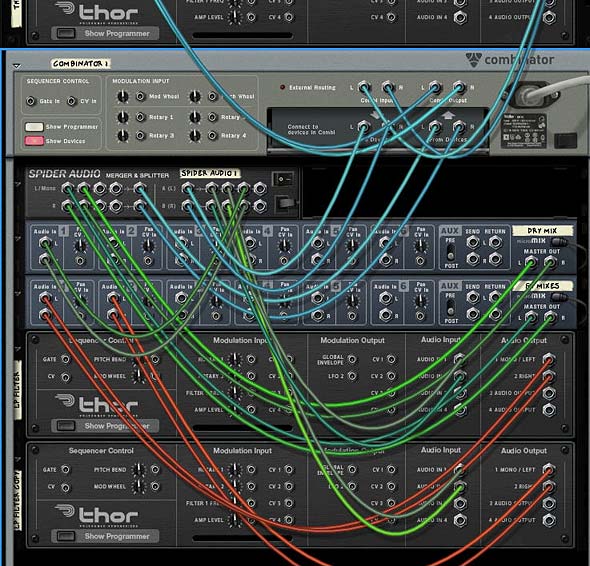
If, on the other hand, you need to get around bypassing an entire Combinator, try this trick. Inside the combinator create a spider and a second line mixer (assuming you already have a line mixer for the main audio). Then split the audio coming into the combinator, and have one split going to the main line mixer and the other going to the second line mixer. Merge the master outputs of both line mixers in the merge section of the spider, and then back out to the Combinator “From Devices” output. Ensure all your FX and Instrument devices go into channels on the main mixer. Leave the second mixer for the dry signal only, and nothing else.

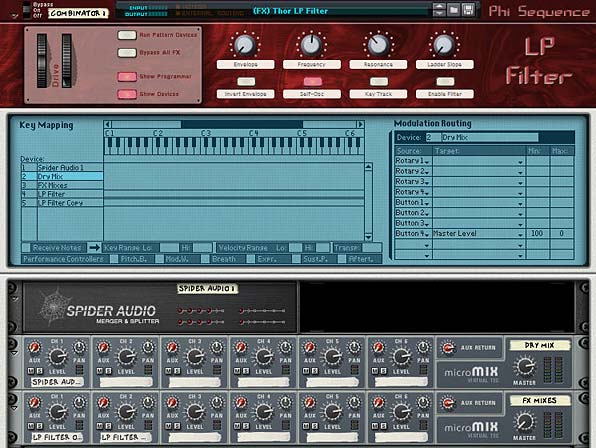
In the Combinator programmer, program a button to switch between the two mixers. So when the button is off, the master level on the main mixer is at 0, while the master level on the secondary mixer is at 100. When the button is on (lit), the master level on the main mixer is at 100, while the master level on the secondary mixer is at 0. The button now acts as a bypass. When off, the signal is bypassed and the audio goes right through the Combinator unaffected. When the button is on, the Contents of the Combinator are enabled and the sound affected can be heard. Instant bypass without any clicking issues.

The back of the rack with the Bypass setup
The front of the rack with the Bypass setup shown on Button 4

Keep in mind there are some things that just can’t be stopped on a dime. For instance, changing the delay time or automating changes to the delay time will result in a very distinct sound, almost like a pitch shifting. You just can’t get around this. That’s the nature of audio. So while bypassing most things works without any side effects, other things can still be noticeable. The idea, however, is to minimize the unwanted audio problems as much as you can.


I hope you found these tips useful. I’ll keep posting more as time permits. In the meantime, feel free to share your thoughts or your own tips here by posting a comment. Happy Reasoning!

17 – Auto-Panning Methods

Learn a few different ways to automatically pan your audio back and forth from left to right or right to left in the stereo field using the LFOs of the Reason synth devices or a Matrix pattern device. As you’ll see, these methods are not that difficult to understand or implement.

Here I’m going to go over a few different ways you can automatically pan your audio back and forth in the Stereo field. As you’ll see, the methods are not that difficult to understand or implement. Once you have this process down, you can also go on to do more complicated panning techniques, such as combining waveforms for panning, panning filter frequencies, or panning your EQ to create left to right frequency sweeps. Of course, I’m not going to go into all of these advanced techniques. Rather, I’ll delve into the world of auto-panning slowly to get your mind wrapped around some of the different methods you can use in Reason and Record.

Download the project files here: auto-panning-methods. This is a single .rns file with 4 different Auto-Panning Combinators set up for you. Each one affects the same audio source and then gets sent to their own mixer channels in the 14:2 mixer. Mute/solo the channel you want to hear to listen to the examples. Note that each Combinator in this set uses a different way to pan the signal. Each has their strengths and weaknesses, as you’ll see in the tutorial below.

At it’s heart, panning simply moves your sound from Left to Right or Right to Left in the stereo field. In order for the software to pan your sound, you must set up something that signals the audio to move from one side to the other. Usually, this means assigning an LFO or Mod Envelope to control the pan position of your audio. Since Reason and Record have CV inputs assigned to every channel in their mixers, as well as directly on the Mix and Audio Devices themselves, panning any audio source can be achieved with one simple CV connection. Also note that you can pan a mono signal from one side to the other just as you can pan a stereo signal from one side to the other.

Setting up a simple Pan using the Subtractor LFO1

Here is one of the easiest ways to create your automatic panning using the LFO of a Subtractor device:

  1. Open up your audio source in Record or Reason. This can be any synth device, audio channel, mix channel, etc. The point is that you need an audio source to affect.
  2. Next, create a Combinator. Then inside the Combinator, hold your Shift key down and create a 6:2 line mixer and a Subtractor.
  3. Initialize the Subtractor. This means reducing all the values in the Subtractor to zero (range/polyphony/ADSR envelopes, etc.).
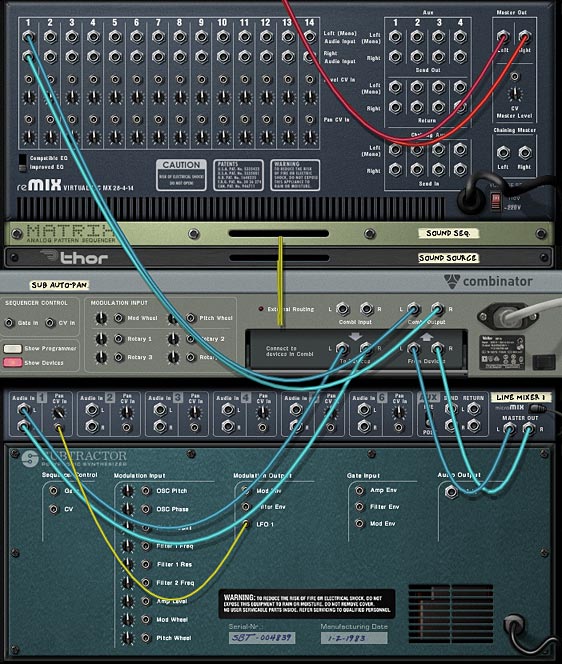
  4. Press the “Tab” key to flip the rack around to the back. Connect the Combinator’s Left and Right “To Devices” to the Mixer’s first channel’s Left and Right inputs. It’s not shown in the image below, but you’ll have to also route the audio source Left and Right output to the Left and Right Combinator input.
  5. Connect the LFO1 CV out from the Subtractor’s Modulation Output section into the Pan CV in on the mixer’s first channel. Then turn the trim knob all the way right. This means that the CV will fully control the panning of the audio source.
The back of the rack showing the Subtractor LFO1 modulating the Pan of the Sound Source.

With this setup, the subtractor’s LFO1 is controlling the audio position in the stereo field. This is a great setup, however, there are two main problems: 1. You have access to a very limited set of LFO waveforms (6 to be exact), and none of those waveforms is a straightforward “sine” wave. And 2. Since the Subtractor is free-running, there’s no way for you to turn off the LFO. It will continually pan from side to side, with the Panning speed based on the Rate in the LFO1 section. I can live with #1, however, #2 is a huge hindrance and is enough for me to say no thanks! Let’s find a better way.

Panning with the Malstrom Curves (a step upward)

Now let’s up the game a little.

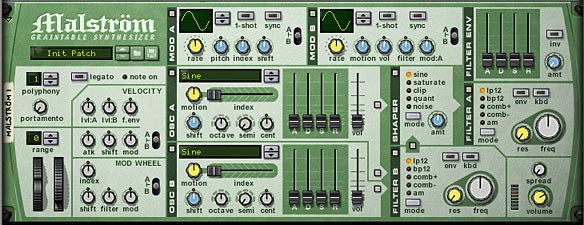
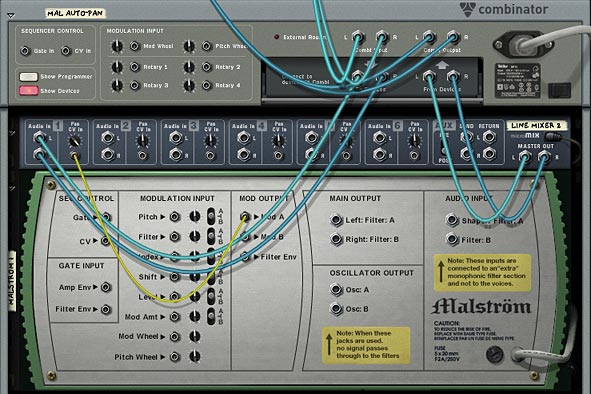
  1. Delete the Subtractor we just created, and instead hold the shift key and create a Malstrom device. Again, initialize the device by moving all the faders to zero and reducing the polyphony to 1 and the pitch range value to zero. Turn everything off except for the “Modulation A Curve” — leave that little light on.

    The fully initialized Malstrom
    The fully initialized Malstrom
  2. Flip to the back of the rack, and route a CV cable from the Mod A output to the Pan CV in on the line mixer.

    The back of the rack showing how Mod A is controlling the Pan CV in on Mixer Channel 1
    The back of the rack showing how Mod A is controlling the Pan CV in on Mixer Channel 1

Now the Curve from Mod A is controlling the Panning for the sound source. The nice thing about this setup is that you can turn Mod A on or off, which in turn turns the panning on or off (unlike previously in our Subtractor example). Furthermore, there’s another added benefit: you can select from the Malstrom’s 32 different waveforms. Now that’s some serious power.

Panning with Thor (an alternative)

The Malstrom is great if you want to play with a lot of curves to pan your sound source. However, there are a few advantages to using Thor’s LFO2 instead.

For a detailed run-through of how to setup Thor to auto-pan your sound source, have a look at the video below:

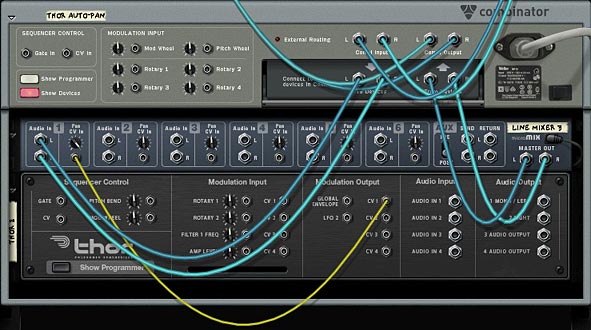
In this situation, you would delete the Malstrom, and initialize a Thor in its place. Send the CV1 Output to the Pan CV in on channel one of the line mixer. Then in Thor’s mod matrix, you use LFO2 as a source and CV1 Out as a destination. Finally, you could set up a button on the Combinator so that when the button was off, Thor’s “Mod Destination Amount” is set to zero (0), and when turned on, it is set to 100. This way, the button acts as a switch to turn the CV on/off. Just have a look in the project files to see how this is set up.

Thor CV1 out going to the Pan CV in on the first mixer channel.
Thor CV1 out going to the Pan CV in on the first mixer channel. Thor's LFO2 being sent to the CV Out1 (in turn routed to the Pan CV in on the mixer)

The benefit to using Thor is that you can assign the LFO2 delay and Key Sync parameters to the Combinator Rotaries/Buttons, which is something you can’t do with the other methods. So it all boils down to how you want to pan your sound. There’s no better or worse way to do it. If you know the panning won’t ever need to be turned off for the duration of your song, you can use the Subtractor. If you need control over the delay and Key Sync parameters of the LFO, then you know Thor is the only choice.

The Matrix (a wild card)

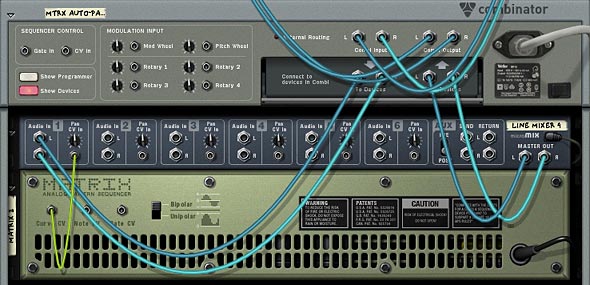
The last way I’m going to discuss is how you can use a Matrix to create your own waveform to affect the panning of a sound source. This is just like the previous methods, except you draw in a pattern inside the matrix, and on the back you connect the Curve CV to the Pan CV input on the first channel of the line mixer. Be sure to change the front panel of the matrix to “Curve” and on the back, select “Bipolar” as the curve selection. Panning is a bipolar process going from -64 to +63 with zero (0) being dead center. So the matrix needs to utilize this bipolar functionality to have the panning work correctly.

The Matrix Curve CV being sent to the Pan CV input on channel 1 of the mixer
The Matrix Curve CV being sent to the Pan CV input on channel 1 of the mixer The Matrix from the front with a Curve setup.

The drawback is that the curves are always in sync with the tempo (which may or may not be what you want), and your rate selection is limited to locked-in resolutions in the matrix. You can’t have any concept of a free-running rate system with this setup. On the plus side, you can draw in up to 32 unique patterns (on each of the matrix pattern banks), and then assign a rotary to the pattern selection to cycle through the different programmed curve patterns.

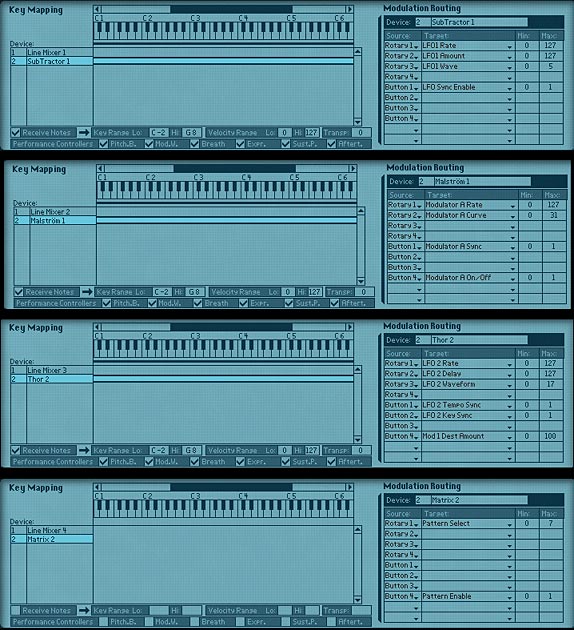
Now, I’ll show you how the Modulation Matrix is set up on each of the Combinators. Looking at these setups, you can see how each one has a different set of parameters that can be controlled. This is how you determine what the right “fit” is for your sound source. Get to know these inside out and it will become really easy to figure out which one works best for each of your audio scenarios:

From top to bottom: Sub, Mal, Thor, Matrix auto-panner Combinator setups.

So there you have it. A few different ways you can auto-pan your sound source. Things can get pretty interesting if you start crossing pans or inverting one sound source with another, so that when one sound is in the left channel, another sound is in the right channel (hint: use the spider’s “inverted” split to output one CV split to the second channel). You also don’t have to use an LFO to achieve your panning. You can easily draw in automation for the panning knob on the mixer channels and have full control over drawing in the panning curves yourself in the sequencer. Oh there’s lots of possibilities.

So do you have any suggestions or other interesting ways you’ve developed for panning your elements in Reason and Record. I’m always looking for innovative ways to use panning in my mixes. It’s a great way to add some movement and modulation to your pieces. Move up the rate fast enough and you almost have a vibrato or phased effect on your sound, which can add interest. So tell me what you’ve come up with and share it with all of us.

Here’s a bonus little rns file for Sterioevo (see his comment below). He was suggesting using an RPG-8 as a Panning device. Now the problem with this is that the Arp is not bipolar. The notes / gate CV output from the Arp is unipolar. So with a little tweaking, you can create something that comes close. A kind of pseudo-panner using the Arp. This was a pretty interesting technique so I thought I would provide the file here: arp-auto-panner-idea Enjoy!

Selig also had a comment on the Propellerhead forum that is important when talking about panning your audio. I thought I would quote him here, as it’s a very good point:

“The main problem I always had with using the CV Pan input is that the panning only goes half way to either side – I want a panner that goes ALL THE WAY!!! And the easy way to accomplish that is to route the LFO’s CV output (from any synth) to a combinator Rotary Knob’s rear input (cranking the little knob up all the way) and assign it to the mixer’s Panner with the combi’s Programmer. Check it out – NOW you have some serious P – A – N – N – I – N – G ! And all your cool tips will still apply. :-)”

Panning to Punch out your Mix

Kevin Parks is a former architectural designer, artist, and boatbuilder with a life-long love of music. Learn how he uses Panning in Record to punch up his mixes, giving them enough sonic space to have a fighting chance.

Your mastering will go a lot better when your mix is fine tuned.

These are some procedures that have evolved for me through time, advice, and experience. Everyone’s work flow is different, but we are all trying to solve the same sorts of problems, so I hope what follows will add something to your bag of tricks.

Before adding a lot of FX to try to punch out a mix, there are some things I like to do to give my mixes enough sonic space to have a fighting chance.

Working with Audio

First of all, since Record gives us audio capability now, let’s start with audio.

For all audio recording, I want to get the cleanest signal possible going into my computer.  Electronic noise takes up space better used for actual audio content.

I spent weeks routing and re-routing cables, getting rid of bad connections, separating all my power cords from my audio cables, and gain-staging to get the cleanest signal I could going into my computer.

While my input signal is *much* improved, it isn’t perfect, and electronic noise is cumulative. So if you mix a lot of tracks, each with a little noise, it adds up. If you don’t have noise reduction software, what can you do?

One thing you can do about that in Record is to use the razor tool and cut out the silent stretches in each audio track.  That will eliminate your hardware’s noise profile, at least from those stretches.  Nothing worse than teaching people’s ears how to tune into the static, just as they are ready for the music to start. This can make a really surprising difference. Noise can hide rather nicely within the audio content when the listener isn’t being trained how to hear it.

So now that we have gotten off to a good start by getting rid of obvious  problems with the audio tracks. Now what?

Next step , before adding a lot of FX to the mix, is to make sure to give all your tracks a place to be in the mix,  their own sonic space. No sense to start cutting freqs with EQ to solve problems that will go away with proper panning.  So start out with panning before using EQ.

To pan your tracks well, the first thing to consider is what goes center stage?

Be careful not to stack too many things in the center. 

Keep in mind that bass  frequencies are non directional to a great extent, so try to avoid panning low freqs very far if at all. The farther you pan a low frequency track the muddier your mix will get. (I have sometimes panned a bass and a kick a little bit, say 10-15%, and then gone back later to help separate them with some judicious EQ work.)

Separate freq ranges work OK together in the center, but if the freqs are too close to each other it will get “crowded” very quickly.  Think in terms of low, medium and high frequencies, and choose what  tracks you will stack in the center. Then  preview just  those tracks in your center channel.  You can try out different instruments until your center shines.

Next idea to remember:  The higher the frequency, the easier it is for it to sit farther from center. Since I use a lot of guitar tracks, I often balance the rhythm and lead guitars by placing them approximately the same distance from center, say 30-50%.

I like to continue to keep balance in my mix by pairing up higher freq tracks and placing them likewise the same distance apart. Higher freq tracks I place farther out than the guitar tracks. More often than not, it is better not to go all the way to 100% .  

Placing higher freqs farther apart is a good rule of thumb to start off with. I  get a sense of how many pairs I have and then divide up the space between pairs accordingly. Then preview different ideas; it’s fun, it’s free, and it’s going to improve your mix.

On the psycho-acoustic side, keep in mind that people tend to rely more on their right ear for things that they pay more attention to, so I like to place the lead somewhat, but not extremely, to the right. It helps hold peoples attention.

So remember,  you will need to do less fiddling with EQ when the tracks each have their own place in the sound field. Panning is powerful stuff.

Now, just to touch on EQ and Reverb:

OK, at this point,  panning has just given you the ability to place your tracks/instruments in different locations from left to right across the sound field. Then if there is a conflict, if  there is an instrument or track that is masking another one, then use EQ to tweak that  problem specifically.  Using a bass track and a kick drum as an example, solo those two tracks and tweak the EQ gently on each  until you can hear them both clearly. (Research this aspect if necessary.) 

Apply reverb last: Now I evaluate where I need/want reverb. Reverb will push a track farther back in the mix.  Sometimes you might need some reverb on a guitar track to help it cut through the mix. I often like to give my guitar tracks an ethereal feel with reverb. Avoid using reverb on low freqs; it makes muddy, harmonics. Reverb is much more pleasant and clean when used on higher freqs.

Once in a while I find that a *little* reverb applied globally to the finished song, can help integrate the tracks. Be careful though. If you are having to do very much of that, chances are that there is a track that needs more attention.

That’s all for now.  Knock ’em out, baby!


Kevin Parks is a former architectural designer, artist, and boatbuilder with a life-long love of music.  Translating uncharted realms of emotion using rhythm, space, and harmony..weaving real world instruments and software synths into experiential ambient synthesis. You can visit his website at http://www.soundclick.com/ambientsynthesis where he showcases several of his musical works.