79 – Introducing Pulsar

With the introduction of Rack Extensions from Propellerhead, we see a major shift of the company into the Plugin arena, although Rack Extensions are expressed as “plugins done right.” And the Props have introduced 3 new Re devices (Radical Piano, Polar, and Pulsar). Not too bad for a point release. Instead of focusing on the 6.5 release itself, and debating the cost (it’s been done to death in the forums), I thought I would start by taking a tour of Pulsar, a device that is free for 3 months, and $49 thereafter. Hopefully, by the end of this article, you’ll see why the price is justified. Pulsar is simple, fun, and capable of some very unique sound ideas. Let’s take a look at why this is the case.

With the introduction of Rack Extensions from Propellerhead, we see a major shift of the company into the Plugin arena, although Rack Extensions are expressed as “plugins done right.” And the Props have introduced 3 new Re devices (Radical Piano, Polar, and Pulsar). Not too bad for a point release. Instead of focusing on the 6.5 release itself, and debating the cost (it’s been done to death in the forums), I thought I would start by taking a tour of Pulsar, a device that is free for 3 months, and $49 thereafter. Hopefully, by the end of this article, you’ll see why the price is justified. Pulsar is simple, fun, and capable of some very unique sound ideas. Let’s take a look at why this is the case.

You can download the project files here: pulsar-synths. This zip file contains some Combinators and .reason files which go through some of the concepts I’ll discuss below.

Starting off with a simple LFO

At it’s most basic, Pulsar is a Dual LFO. But when you first add a Pulsar to your project, you’ll only be using LFO 1. In many cases, this may be all you need. And if that’s the case, you may be wondering why you would need yet another LFO in the Reason arsenal? Doesn’t Thor, Subtractor, Malstrom, and even some other devices have one or two LFOs that can be used (and have been used) by many since the birth of Reason? Sure. But Pulsar delivers something the other LFOs do not (apart from Pulveriser). It comes with a “Lag” feature. Furthermore, it comes with two other unique features: “Phase” and “Shuffle.”

To recap, the “Lag” feature is an LFO filter which smooths out the shape of the LFO. If you are using an LFO with a sharp edge (Square or Stepped, for example), increasing the Lag feature curves those sharp edges, and can reduce a lot of the abrupt “clicking” that can result from these LFOs.

“Phase” is used to shift the LFO forward or backward, kind of like a pulse width modulation for your LFO. Look at Thor’s Analogue oscillator set to a square wave. The Mod parameter works the same way by shifting the LFO forward or backward (widening or narrowing the LFO). When using two similar LFOs in Pulsar and adjusting their Phases (or automating Phase movement in real-time), you can create some really interesting modulations with the LFOs.

Finally, there’s a parameter we’ve seen time and time again, though not in an LFO: “Shuffle.” This parameter shuffles the LFO, making the movement or LFO automation more erratic. Keep in mind though, that while “Shuffle” provides some randomness to your LFO cycles, the cycles themselves will always be in sync. In other words, the start and stop of the waveform will be random, but their duration will always equal the time cycle that you set up in the timing of the LFO. And it’s important to note that “Shuffle” works in 2-cycle pairs. So looking at a 2-cycle waveform set to 1/4 Tempo Sync means that you have two cycles of the wave that equal 1/4 each. Cycle 1 will always start at the beginning of the cycle, but can end anywhere within both cycles. Then cycle 2 starts and always ends at the end of both cycles. Kind of an interesting strategy if you ask me. But putting the theory aside for a moment, the best way to get a feel for it is to try it out for yourself.

All three of these parameters are fairly unique to Pulsar. And so it might be worth your while to try using this LFO on it’s own the next time your modulation calls for it in your track.

There’s also lots of other interesting things you can do with Pulsar: Sync LFO 2 with LFO 1, Have the Level of LFO 2 affect LFO 1 (AM), have the Rate of LFO 2 affect LFO 1 (FM), trigger the envelope via LFO 2, and this doesn’t begin to get into the CV / Audio modulations on the back of the device. Using all of these features allows you to set up some very complex modulations and even use Pulsar’s LFOs as Oscillators to create some very unique sounding (somewhat Analog-style) synth instruments. We’ll dig into that further below.

But before going further, you should definitely check out the introductory video from the Props on how Pulsar can be used as an LFO and how those LFOs can be used as Oscillators. This is perfect for getting your feet wet with the device. And the final song result at the end of this tutorial is truly inspiring. So before doing anything more, let’s take a first look at Pulsar:

Accessing the Pulsar Patches

Pulsar can’t load or save patches. However, you can contain a Pulsar (along with any other devices to which Pulsar is connected) inside a Combinator and then save the Combinator. And this is a great time to bring up the fact that Pulsar comes with a wide variety of effects and instruments that were put together by some very talented patch designers. Here’s how you can access them:

  1. Right-click on the Rack and select “Create Instrument” or “Create Effect,” depending which option you want.
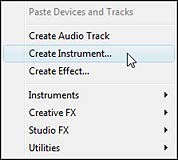
    Right-clicking on the rack and selecting "Create Instrument" or "Create Effect"
    Right-clicking on the rack and selecting “Create Instrument” or “Create Effect”
  2. The Reason Browser opens. Notice the “Rack Extensions” option under the “Locations and Favorites” area on the left side of the window? Click it, and you’ll see all your loaded Rack Extensions displayed on the right side.
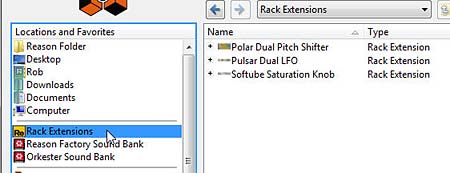
    The new "Rack Extensions" stock patch bank in Reason 6.5
    The new “Rack Extensions” stock patch bank in Reason 6.5
  3. From this list, select Pulsar directly by double-clicking it and navigating down the folders to all the available patches. Alternately, you can click the plus (+) sign and drill down to the patch you like.
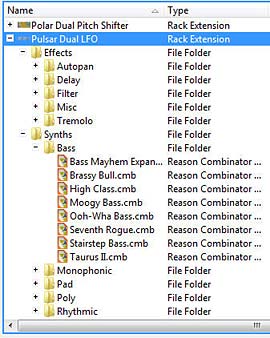
    The Pulsar stock patch bank expanded
    The Pulsar stock patch bank expanded on the right side of the Browser window.
  4. Double-click on the patch of your choice to open it in the Rack.

    The Pulsar patch loaded into the Rack (with a great new Combinator backdrop by the way).
    The Pulsar patch loaded into the Rack (with a great new Combinator backdrop by the way – nice job Propellerheads!).

Of course, if you’re saving your own patches, you’ll have to save them to your own computer location. All Pulsar patches need to be saved as a Combinator device. So all the patches you’ll find underneath the Pulsar stock patches are Combinators.

I strongly urge you to have a look at these patches. They showcase how you can use Pulsar in all manner of ways. There’s a way to use it as a dual gate, dual wah, LFO filter wobbler, FM, AM, etc. So opening the patches to get a feel for Pulsar is a great way to learn how to use it.

Pulsar as Dual Oscillators: Cheap on CPU, not Cheap on Sound.

And now for the major coup. Yes, you can use Pulsar as a dual Oscillator to create all manner of synth sounds. Trust me, I’ve tried. For those using Reason essentials, this provides a great alternative to the Subtractor synth. You now have a second synth inside Reason. And for those using Reason, you’ll be thrilled to know you not only have a simple synth, but process this synth through Thor, and you have a very amazing sound generation tool that is quite unlike the other sounds in Reason (whether that sound is good or bad is something I’ll leave for you to decide, as it’s a raw aliased sound that some like and some don’t). But nevertheless, it’s a unique sound with which you should experiment.

First, the video:

Let’s start off slow and figure out how to use Pulsar as a synth on its own. Since Reason Essentials doesn’t come with Thor, this is really the only way to go for that group of users. And yes, you can most definitely use Pulsar as a synth on its own. This is really great for Bass sounds, and in my opinion, this is where it shines. So let’s get started with a very simple setup:

  1. Right-click on the rack and select Utilities > Combinator. Inside the Combinator, right-click and select Utilities > Pulsar Dual LFO.
  2. Flip to the back of the rack and send LFO 1 Audio Output 1 from Pulsar to the Left “From Devices” Combinator Audio input. Then send LFO 2 Audio Output 1 from Pulsar to the Right “From Devices” Combinator Audio input. This way, LFO 1 produces the sound for the Left side of the stereo field, and LFO 2 produces the sound for the Right side of the stereo field.
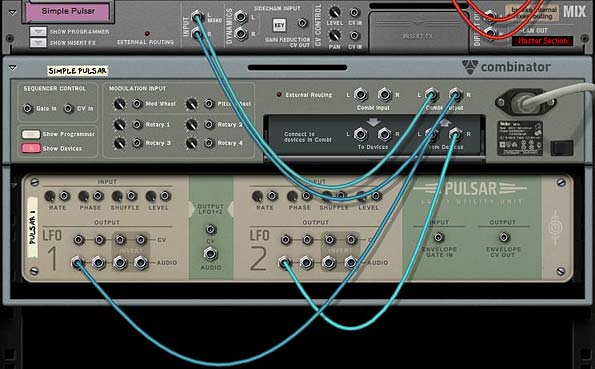
    The Routings from the Pulsar to the Combinator
    The Routings from the Pulsar to the Combinator
  3. Open the Combinator’s programmer and select the Pulsar device. At the bottom left side of the screen place a checkmark in the “Receive Notes” checkbox. This allows you to play the Pulsar through the Combinator’s MIDI note input.
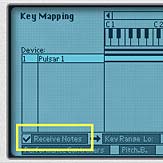
    Selecting the Pulsar device in the Combinator's Programmer and ensuring it "Receives Notes"
    Selecting the Pulsar device in the Combinator’s Programmer and ensuring it “Receives Notes”
  4. It’s important in this kind of setup to ensure that the parameters for both LFOs are set exactly the same, otherwise you’ll hear differences in the sound coming from both the left and right sides of the stereo field. Start by turning Off the Tempo Sync for LFO 1, and turn On LFO 2 (On/Off button). Switch LFO 1 and LFO 2 Waveforms to Sawtooth waves. Then reduce the “Level” rotaries to 0% for both LFOs. Increase the Shuffle knobs to 70% for both LFOs.
  5. In the Pulsar Envelope section at the right side of the device, reduce the Release amount to zero (0) ms. Increase the Envelope Rate for both LFOs to 100%, and increase the Envelope Level to about 60% for both LFOs.
  6. If you play the Combinator through your MIDI keyboard at this point, there is no key scaling. No matter what key you play, you’ll hear the same note pitch. In order to scale the keyboard, you must turn the MIDI KBD Follow knob on Pulsar fully right to 100%. Once you do that, you’ll have yourself a nice little patch that should play a pretty cool bassline in the C-1 to C2 range.
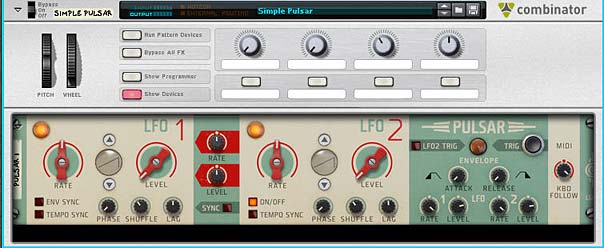
    The Pulsar's front panel setup
    The Pulsar’s front panel setup

Advanced Pulsar Synth Processing through Thor

Let’s take it up a notch:

There’s two ways you can process Pulsar through Thor: Both methods involve sending the audio outputs from LFO 1 and LFO 2 into Thor and then entering the following two lines into Thor’s Modulation Bus Routing Section (MBRS):

Audio In1 : 100 > Filt1 In

Audio In2 : 100 > Filt1 In

As long as both the Pulsar and Thor are receiving notes, and are inside a Combinator, you’re all set. Ensure that both LFO 1 and 2 on Pulsar are not Tempo Synced, and turn the rates all the way up (fully to the right). Also keep the Pulsar Envelope settings at their default, and turn the MIDI KBD Follow knob all the way right to 100%.

The cool thing about this setup is that you can use Thor’s Portamento, Shaper, Filter 1, Filter 2, Amp Envelope, Amp section, and pretty much everything else in Thor to shape the sound of the Pulsar LFOs. In this instance, you’re simply replacing Thor’s Oscillators with Pulsar’s LFOs (which are used as Oscillators).

One thing to keep in mind with this approach is that since you’re processing the audio through the Amp section, the levels of your audio are going to be adjusted using both the Thor Amp Gain and Pulsar’s LFO Level controls. So watch those levels!

The second approach builds on the first and bypasses most of Thor by sending the audio into Filter 3. So after you’ve entered the two audio lines in the MBRS as above, enter the following two lines in the bottom right two MBRS entries as follows:

Filter 1 : 100 > Filt3 L.In : 100 > Amp Env : 100 > MIDI Vel

Filter 1 : 100 > Filt3 R.In : 100 > Amp Env : 100 > MIDI Vel

With this approach, you’re bypassing everything between Filter 1 and Filter 3. This means no Shaper, no Filter 1 and 2, and normally, no Amp Envelope either. However, since you’re scaling the audio using the Amp Envelope explicitly in the MBRS, then you can still use the Amp Envelope to adjust your audio. The advantage is that you gain a 4-stage envelope (Attack, Decay, Sustain, and Release) with Thor, instead of a 2-stage envelope with Pulsar (Attack and Release). Also, you can use the Delay and Chorus FX in Thor to affect the synth sound.

One note though. You can’t use Thor’s Amp section for any adjustments. So all the volume control resides in Pulsar’s LFO 1 and 2. And it suddenly occurs to me that all of this is in the video, so check it out if any of this sounds esoteric to you. Have fun!

Oh and in case you missed it, here’s James Bernard’s take on Pulsar. Pretty awesome sampling technique. Don’t miss this one either:

http://www.musicradar.com/tuition/tech/video-how-to-use-propellerhead-pulsar-as-a-playable-synth-549579

The downside is that you need Reason to do these wonderful Thor processing tricks. No can do with Reason Essentials. So upgrade already!


So that’s how you set up Pulsar as a synth. Try out the different waveforms and have a blast making some new sounds. And if you have any other Pulsar tricks, be sure to let us all know. Cheers!

58 – Taking Komplete Kongtrol

This tutorial should prove a little enlightening for those that only think of Kong as a basic drum module. Here we’re going to twist it into the ultimate controller for everything under the sun. For starters, I’ll show how Kong can control 8 filters at once, and then I’ll move on to use Kong to control the FM Pair Oscillator in Thor. Using some of these methods, you’ll be able to control pretty much anything in Reason or Record with Kong; moving traditional device control from a basic keyboard to a Pad controller.

This tutorial should prove a little enlightening for those that only think of Kong as a basic drum module. Here we’re going to twist it into the ultimate controller for everything under the sun. For starters, I’ll show how Kong can control 8 filters at once, and then I’ll move on to use Kong to control the FM Pair Oscillator in Thor. Using some of these methods, you’ll be able to control pretty much anything in Reason or Record with Kong; moving traditional device control from a basic keyboard to a Pad controller.

Sound exciting? I thought so.

You can download the project files here: Taking-Komplete-Kongtrol. This file contains 2 .rns and 2 .cmb files that are outlined below. Both require Reason 5 or Record 1.5 due to the fact that it uses the new Kong device and new CV inputs on the back of the Combinator. There is also a “Volume Control” example .rns file for you to get your feet wet.

Note also that I’ll be unplugged until next Thursday April 15th, so don’t take it personally if I don’t respond to questions until that time. Some times you just have to unplug from things for a bit. But feel free to leave me a little love. I promise to get to all your comments or questions when I jump back online. Have a great week! 🙂

A Little Background

When I was working on my mammoth “Key Flux FX Processor” patch I got a post on the Propellerhead User Forum from someone who jokingly said “what’s next? A Kong controlling Thor? A Thong?” After I stopped laughing and rolling around on the floor, I thought about it for a minute and said “well why not?” And that was the start to this tutorial here. I decided I wanted to try to control Thor with Kong. Whether or not this is practical is for you all to decide. For my part, I can see this being a new fun way to play around with the devices inside Reason.

Understanding the Kong Control Concepts

There are two main concepts that I’d like to outline here. The first is the idea of using the Pads in Kong as an up / down selector switch to transpose MIDI values up or down. The other is the idea of visualizing these changes in Reason, since visualization in Reason (and Kong especially) is somewhat limited.

The first concept was opened up to me by Ed Bauman of EditEd4TV fame. In the midst of his working on recovers for his 80’s band, I asked him to help me figure out how to transpose from one octave to the next using the Kong pads. This helped me set up the Kong Piano Roll Keyboard (again, that was explored in another article). So credit where credit is due. Without his help on that project, I couldn’t have figured out some of these tangential concepts to control other parameters with the Kong pads.

The concept works like this: Using one pad in Kong for the upward movement and one pad for the downward movement, you use the Thor Step Sequencer “Note Transpose” function to manipulate a device parameter that goes from 0 – 127 MIDI value. Each time the up or down pad is pressed, it transposes the value by an increment of “1.” For example, you can go from 64 to 65 to 66 to 67 and so on, using the “Up” pad. Since Reason allows you to interchange CV values (using Note CV for Gate or Gate CV for Note), this isn’t difficult to accomplish.

Here’s the basic setup to control the Volume of a Channel in the Mixer (just as an example):

  1. Open up Reason with a Main Mixer. Then create a Combinator with a 14:2 Mixer.  Underneath that, create a sound generating device (for simplicity’s sake, create a Subtractor and load up your favorite Sub patch). But note that this can be any device you like. Underneath that, create a Matrix and add a pattern in, so that it is playing the Subtractor.
  2. Now holding the Shift key, create a Kong device. Still holding Shift, create a Thor device and call it “Vol Up.” Completely initialize the Thor device by pulling down all the parameters, removing the Oscillator and Filter, and turning everything to 0 (zero). Also while we’re at it, pull down the level of the Channel on the Mixer where the Subtractor is connected to 0 (zero).
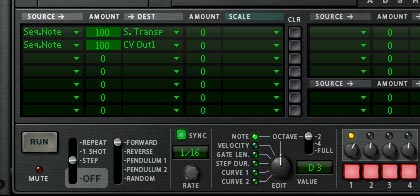
  3. Open up the Thor programmer, and in the Step Sequencer set the Run Mode to “Step,” Step Count to “1,” and set the first step’s note to “D3.” In the Modulation Bus Routing System (MBRS), set up the following 2 lines in the first 2 slots:

    Seq. Note : 100 > S. Transp (Step Sequencer Note : 100 > Step Sequencer Transpose)

    Seq. Note : 100 > CV Out1

  4. Duplicate the “Vol Up” Thor device and rename it “Vol Down.” Then go into this Thor’s Step Sequencer and change the note value of step 1 to “A#2.”

    The MBRS settings for the "Vol Up" Thor device.
    The MBRS / Step Sequencer settings for the "Vol Up" Thor device.
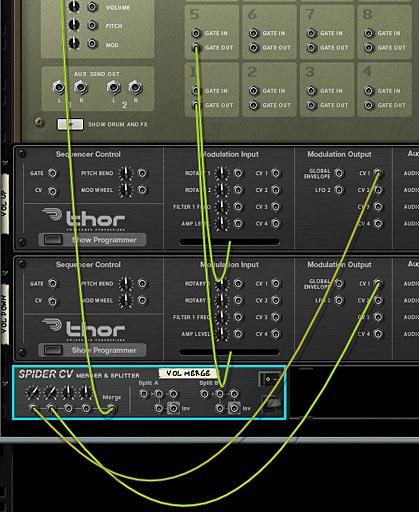
  5. Next, holding the Shift key down, create a Spider CV Merger/Splitter at the bottom of the Combinator rack and name it “Vol Merge.” Now it’s time to route everything up.
  6. Flip the rack around to the back, and on the Combinator’s 14:2 Mixer, turn the Subtractor channel’s level trim knob up to 127. Then connect the Merged output from the “Vol Merge” Spider to the Level CV input on the Mixer channel.
  7. Connect the Kong’s pad 1 “Gate Out” CV to the “Gate In (Trig)” CV input on the “Vol Down” Thor. Also connect Kong’s pad 5 “Gate Out” CV to the “Gate In (Trig)” CV input on the “Vol Up” Thor.
  8. Connect the CV 1 Modulation Output from the “Vol Up” Thor to the “Vol Merge” Spider’s Merge Input 1. Also connect the CV 1 Modulation Output from the “Vol Down” Thor to the “Vol Merge” Spider’s Merge Input 2. Set both trim knobs to a value of “84.” That’s the magic CV number that makes things happen correctly.

    The CV routing for the Up / Down Volume Control using the Kong Pads
    The CV routing for the Up / Down Volume Control using the Kong Pads
  9. Flip the rack to the front again, and label Pad 1 in Kong “Vol Down” and Pad 5 “Vol Up.” Now play your device by pressing “Play” on the Transport and you’ll hear the volume at level 64. Press Pad 5 about 10-15 times and you’ll start hearing the volume rising. Press Pad 1 and the volume drops. You’ve now set up Kong to act as your up / down fader for the volume of your Subtractor device.

Visualizing the Kong Volume Control

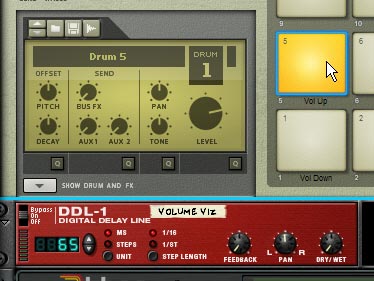
Since there’s no visualization in Kong, it’s hard for us to track where the volume is located for the Subtractor. Here’s one way to do it using the DDL-1 device. Note that this trick is curtosy of Sterioevo, and I can’t thank him enough for showing it to me. See the comments to my previous “Kong FX Chain Builder” tutorial for more information on the ins and outs of this visualizing method.

  1. Building on our previous volume level control, hold Shift down and create a DDL-1 device underneath your Kong device. Label it “Volume Viz” or something like that. Also change the Unit to “MS” for Milliseconds.
  2. Open up the Combinator programmer, select the “Volume Viz” device, and in the Modulation Routing area, set up the following line:

    CV In 1 > Delay Time (MS) : 1 / 127

  3. This sets up the CV 1 input on the combinator to change the display of the DDL-1 to show values between 1 and 127.
  4. Now we just need to send the same CV merged signal to also send a value to the CV 1 input on the Combinator, so flip the rack around to the back, and move the CV merged output to one of the A split outputs. Then connect the Merged output to the Split A input on the same “Vol Merge” Spider.
  5. Finally, send another A split output to the Combinator’s new CV 1 input and turn its trim knob all the way to 127.
The DDL-1 used as a visualizer for the Volume setting

You’re all set. Now when you flip to the front of the rack and start pressing the volume pads, you’ll see the value update in the DDL-1 device. I know, it’s pretty sweet. You now have visualization of your volume setting.

A Look at the “Thong 8-Type Filter FX Processor” Combinator

So to answer the question about controlling Thor with the Kong device, I set up 2 patches. The first one is the “Thong 8-Type Filter FX Processor” which can be used as an insert effect on any sound you like. This patch allows you to switch between 8 different filter types and control them all via the Kong pad interface. Here’s a rundown of the pad assignments. Note: You do not want to use any of the Combinator parameters, since all the CV for the Rotaries, as well as the Mod Wheel was used to create the pad assignments and visualization. So simply create a track for the Kong device in the Combinator, and use that track as your control.

Note: I made all the up / down switches bipolar so that everything starts out with a value of 64. This is because each pad press only moves up one midi value, and if you started out at 0 (zero), you’d have a long way to go to get higher up on the register. Starting out at the middle makes working with the up / down pads a lot easier IMHO.

  • Pads 5 & 1: Controls the Frequency of all filter at once. Pad 5 moves the filter frequency up and Pad 1 moves the filter frequency down. These two pads together act as the frequency rotary control. Visualization for the Frequency setting can be seen on the “Freq Viz” DDL-1 device located just below the Kong device.
  • Pads 6 & 2: Controls the Resonance of all filters at once. Pad 6 moves the resonance up, and Pad 2 moves the resonance down. These two pads together act as the resonance rotary control. Visualization for the Resonance setting can be seen on the “Res Viz” DDL-1 device located just below the Kong device.
  • Pads 7 & 3: Controls the Drive of all filters at once. Pad 7 moves the drive up, and Pad 3 moves the drive down. These two pads together act as the drive slider control. Visualization for the Drive setting can be seen on the “Drive Viz” DDL-1 device located just below the Kong device.
  • Pads 8 & 4: Controls the LPHP parameter of the “Notch” and “Peak” filters, as well as the Gender parameter of the “Formant” filter. Pad 8 moves the LPHP and Gender parameters up, while Pad 4 moves the LPHP and Gender parameters down. These two pads together act as the LPHP and Gender rotary controls. Note that the filter must be set to “Notch,” “Peak,” or “Formant” for you to hear the effects of these two pads. Visualization for the LPHP/Gdr setting can be seen on the “LPHP/Gdr Viz” DDL-1 device located just below the Kong device.
  • Pads 13 & 9: Controls the Envelope Amount of all filters at once. Pad 13 moves the envelope amount up, while Pad 9 moves the envelope amount down. Together, these two pads act as the envelope amount rotary. Note: To turn off the envelope entirely, reduce the envelope amount to 0 (zero) using the “Env Down” Pad (Pad 9). If you wish to insert your own pattern sequence to control the envelopes, change the pattern sequence in the Thor Filter device’s Step Sequencer. Each Thor Filter device Step sequencer controls the corresponding filter envelope, except for the “Peak” Thor Filter, which controls both the “Peak” Thor and “AM” Malstrom filters. Visualization for the Envelope Amount setting can be seen on the “Env Amt Viz” DDL-1 device located just below the Kong device.
  • Pad 14: Controls whether the Filter Envelope is turned on or off for all filters. Visualization for this pad can be seen on the fourth band of the “Filter Type Viz” BV512 Vocoder device.
  • Pad 12: Controls whether the “Comb” filter is set to plus (+) or minus (-). Visualization for this pad can be seen on the third band of the “Filter Type Viz” BV512 Vocoder device. Note that this is a very specific setting, and the filter type must be set to “Comb” in order for you to hear anything.
  • Pad 15: Controls which filter is heard. Visualization for the Filter Type setting can be seen on the first band of the “Filter Type Viz” BV512 Vocoder device.  Selections can be one of the following 8 different filter types:
  1. LP (Thor Low Pass Ladder Filter)
  2. HP (Thor State Variable Filter – High Pass mode)
  3. Comb (Thor Comb Filter)
  4. Formant (Thor Formant Filter)
  5. BP (Thor State Variable Filter – Band Pass mode)
  6. Notch (Thor State Variable Filter – Notch mode)
  7. Peak (Thor State Variable Filter – Peak mode)
  8. AM (Malstrom AM Filters – both Filter A and B are set exactly the same way when controlling this filter).
  • Pad 16: Filter / Bypass. This provides you with a quick way to switch between the Filtered sound and the non-filtered sound. Think of this as a Wet / Dry switch.

A Look at the “Oscillator Kongtrol – FM Pair” Combinator

The second patch is a Kong controlling an Oscillator inside Thor. To start things off easy, I decided to control the FM Pair Oscillator. Again, I made all the up / down switches bipolar so that everything starts out with a value of 64. This is because each pad press only moves up one midi value, and if you started out at 0 (zero), you’d have a long way to go to get higher up on the register. Starting out at the middle makes working with the up / down pads a lot easier IMHO.

The FM Pair Oscillator control has at least one interesting twist. Since controlling the Carrier / Modulator pair is unlike controlling a MIDI value of 0 – 127, we need to figure out the proper settings to control a MIDI value of 1 – 32. This is done by going into the Up / Down Thor devices and changing the note values of the first step to the following:

“Up” Thor device: G#3

“Down” Thor device: E2

Once this is updated, you can control parameters that have 32 options. This does not only mean the FM Pair Carrier and Modulator, but also the Matrix pattern devices, or Thor’s Wavetable Oscillator “Table” selection. Anything with 32 MIDI values can now be controlled and stepped through one at a time in Kong.

Here’s a rundown of the pad assignments. Note: You do not want to use any of the Combinator parameters, since all the CV for the Rotaries, as well as the Mod Wheel was used to create the pad assignments and visualization. So simply create a track for the Kong device in the Combinator, and use that track as your control.

  • Pads 5 & 1: Controls the Pitch of the Oscillator. Pad 5 moves the pitch up and Pad 1 moves the pitch down. Visualization for the Pitch setting can be seen on the “Pitch Viz” DDL-1 device located just below the Kong device.
  • Pads 6 & 2: Controls the FM Parameter of the Oscillator. Pad 6 moves the fm up and Pad 2 moves the fm down. Visualization for the fm setting can be seen on the “FM Viz” DDL-1 device located just below the Kong device.
  • Pads 7 & 3: Controls the Carrier setting of the Oscillator. Pad 6 moves the carrier setting up and Pad 2 moves the carrier setting down. Visualization for the carrier setting can be seen on the “Carrier Viz” DDL-1 device located just below the Kong device.
  • Pads 8 & 4: Controls the Modulation setting of the Oscillator. Pad 6 moves the Modulation setting up and Pad 2 moves the modulation setting down. Visualization for the mod setting can be seen on the “Mod Viz” DDL-1 device located just below the Kong device.
  • Pads 13 & 9: Controls the Amp Envelope’s “Attack.” Pad 13 moves the Attack setting up (slower attack) and Pad 9 moves the attack down (faster attack). Visualization for the envelope’s attack can be seen on the first and second band of the “Amp Vizualize” BV512 Vocoder device, located just below the 4 DDL-1 devices. The first band shows the upward setting, and the second band shows the downward setting (much easier to see when you are actually using the Kong controller – so download the patch and try it out).
  • Pads 14 & 10: Controls the Amp Envelope’s “Decay.” Pad 14 moves the Decay setting up (longer decay) and Pad 10 moves the decay down (shorter decay). Visualization for the envelope’s decay can be seen on the third and fourth bands of the “Amp Vizualize” BV512 Vocoder device, located just below the 4 DDL-1 devices. The third band shows the upward setting, and the fourth band shows the downward setting.
  • Pads 15 & 11: Controls the Amp Envelope’s “Release.” Pad 15 moves the Release setting up (longer release) and Pad 11 moves the release down (shorter release). Visualization for the envelope’s release can be seen on the fifth and sixth bands of the “Amp Vizualize” BV512 Vocoder device, located just below the 4 DDL-1 devices. The fifth band shows the upward setting, and the sixth band shows the downward setting.
  • Pads 16 & 12: Controls the Panning of the sound. Pad 16 moves the panning left, while Pad 12 moves the panning right. Visualization for the panning can be seen on the seventh and eighth bands of the “Amp Vizualize” BV512 Vocoder device, located just below the 4 DDL-1 devices. The seventh band shows the leftward setting, and the eighth band shows the rightward setting.

Where can you go from Here?

Sometimes it’s the smallest concepts that can lead to the biggest revelations; opening doors to new ideas and solutions. This is definitely one of those cases. Using these simple ideas, you can now control virtually every possible parameter in Reason via the Kong Pads. These are just two types of control devices I built here. But there’s nothing stopping you from building a Reverb Kong controller (ReKong 7001?), or a DDL-1 controlled by Kong (DDKong-2?). And there’s nothing stopping you from building a controller that allows you to combine Oscillators or Filters or any number of things together that can be triggered by Kong pads. Just use your imagination and come up with some cool ways to take your pad controlling to new heights. This is just the tip of the iceberg. Where you go from here is all up to your patience and ambition.

Any thoughts?

40 – Thor Oscillator Wave Mods

In this tutorial I’m going to jump into Thor’s oscillators and show you how a simple method to cycle through the oscillator’s waves (Carriers, Modulators, Phase Mod Waves) can create lots of unexpected outcomes (a la Glitch). It can also allow you to modulate the Oscillators in a way you might not have thought about previously.

In this tutorial I’m going to jump into Thor’s oscillators and show you how a simple method to cycle through the oscillator’s waves (Carriers, Modulators, Phase Mod Waves) can create lots of unexpected outcomes (a la Glitch). It can also allow you to modulate the Oscillators in a way you might not have thought about previously. So let’s jump right in.

The project files can be downloaded here: Glitch-Oscillatoriffic. This zip file contains a single RNS file with 2 different Combinators. You can use the mute buttons on the main mixer to highlight each Combinator and play with each one individually.

I also wanted to say thanks to Geoff Wakefield for talking over this idea through an email exchange. Your ideas are great, as is your music Geoff! Keep up the great work. And go check out his music here: http://soundcloud.com/raven-2741.

First, here’s a video that outlines the basic concepts of modulating Thor’s oscillator waves:

Modulating Thor’s “FM Pair” Oscillator’s Carrier and Modulator

The main trick here is to keep all the devices inside a Combinator so that you can use CV to trigger the Rotaries of the Combinator. The Modulation Bus in the Combinator is used to set up the Oscillator’s Carrier and Modulation waves in the FM Pair, so that when CV is cabled into Rotary 1 & 2, the CV triggers a “cycling” through the different waves. This in turn affects the sound coming out of Thor. You then use the Malstrom’s Mod A & Mod B to supply the CV source, which is sent to the Rotary 1 & 2 CV input.

Also in the Modulation Bus of the Combinator, you’re going to set it up so that Rotary 3 and Rotary 4 (sources) are set up to adjust the Malstrom’s Mod A and Mod B (the destination). You can adjust the Min/Max settings to be as wild and crazy (full 0/31) or as tempered as you like (1/3, for example). In this way, you can not only adjust the Carrier / Modulation waves of Thor’s Oscillator with Rotary 1 and 2, but you can also adjust the Modulation Curve settings of the Malstrom’s Mod A and Mod B with Rotary 3 and 4.

Modulating Thor’s “Phase Modulation” Oscillator’s Wave 1 & 2

Now that we have the basic concept down, it’s a snap to transfer this same idea over to the Phase Modulation Wave 1 and Wave 2. Simply switch the Thor oscillator in slot 1 to “Phase Modulation” and then go back into the Combinator Modulation Bus, and change Rotary 1 and Rotary 2 as follows:

Rotary 1 > Osc 1 Phase Modulation Wave 1

Rotary 2 > Osc 1 Phase Modulation Wave 2

Note: the actual Min/Max settings, as shown earlier, can be anything you like, depending how crazy you like things.

Modulating Thor’s “Wavetable” Oscillator’s Tables

Now instead of the Phase Modulation oscillator, switch to the Wavetable Oscillator. Personally, this is my favorite oscillators for this type of technique. The variety and timbre of the sounds make it a really nice glitch mayhem device for the task. In using it though, there’s only 1 parameter we can effect, which is the actual Wavetables themselves. So switch Rotary 1 in the Combinator Modulation Bus as follows:

Rotary 1 > Osc 1 Wavetable Table

Once again, the actual Min/Max settings are up to personal taste.

One Step Further with the Oscillator’s  “Modulation” Parameter

When it comes to any of these oscillators, there is a “Modulation” parameter that you can also control using CV. For example, when using the FM Pair oscillator, you can have CV control the “FM Amount” knob. When using the Phase Modulation oscillator, you can use CV to control the “PM Amount” knob. When using the Wavetable oscillator, you can use CV to control the “Position” knob.

If you want to do this, you can borrow from one of the existing CV cables coming from the Malstrom and split it using a Spider CV Merger/Splitter, then send one split to the original Rotary destination and send another split into Thor’s CV in. Then it’s a matter of going into Thor’s Modulation Bus Routing Section (MBRS) and entering the following:

CV In1 : 100 > Osc1 FM Amt / Osc1 PM Amt / Osc1 Pos

If you set the FM/PM/Pos on Oscillator 1 very low, then using a high Amount (100) in the MBRS makes sense. If, on the other hand, you set the FM/PM/Pos knob very high, using a lower setting (-100) makes more sense. It depends which direction you want the CV to influence the knob (upward or downward).

Now that we’ve done 3 different Oscillators, I’ll leave you to work your magic on Thor’s  “Multi Oscillator” — yes, you can certainly have a lot of fun with that oscillator as well.

Bringing it all Together

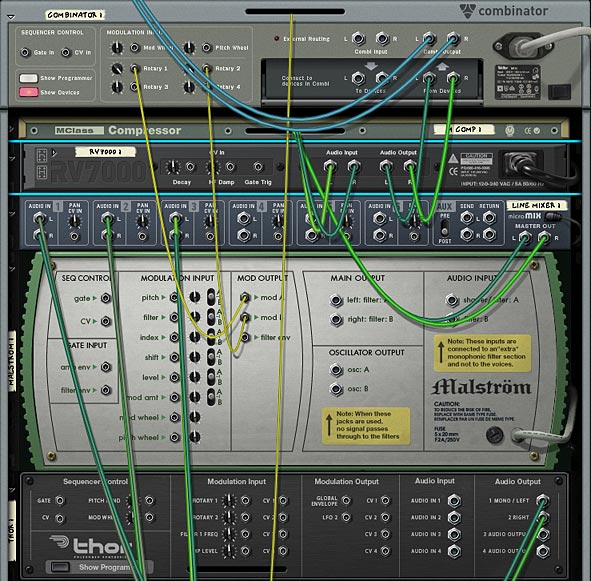
If you look in the project file, you’ll see a few Combinators that take this whole idea a step further by creating a 6:2 Mixer in the Combinator, and then creating three sets of devices (each set contains a different Thor Oscillator, 1 Matrix to use the Mod A/B curves, and an Equalizer at the end of the signal chain, which is then sent to the line mixer and back out to the Combinator’s “From Device” input).

Here’s a video that goes through the steps needed to build one such Combinator:

The idea is a simple one. Have a different oscillator in each of the Thors. Set up the amp envelope any way you see fit. I find a high Decay, Sustain, and Release setting works pretty well, but again, you may have a different preference. The Malstrom Modulation Curves are there for you to use to affect the Thor oscillator waves or even the Modulation knob of the oscillator. This is where experimentation comes in.

The back of the Rack showing the main components of the Combinator and how the devices are routed.

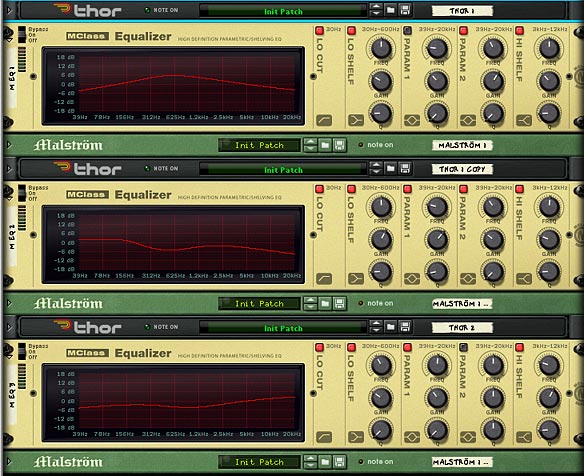
Finally, you have an Equalizer which is applied as a dynamic insert effect used to split each of the Thor sounds into their own specific range along the stereo field. This way, you can set up three oscillators and have each oscillator represent a place along the spectrum: Low, Mid and High. This way, you can balance out the sounds and let them shine in their own frequency range, without interfering with each other. Of course, these are all just suggestions. You might find some other ways to set things up for yourself.

The front of the Combinator, showing all 3 EQ devices to spread out the Oscillator sounds across Low, Mids, and Highs.

I hope this opens up some new creative avenues for you. There’s a lot more that can be done with the Thor oscillators, and this just attempts to scratch the surface or get your feet wet. Don’t be afraid to jump in though, and create your own masterpiece. Oh and if you do, please feel free to share it here. The more we see your ideas, the more we can learn from each other.