20 – CV Switching

Learn how to switch between 2 CV sources that control a single destination. This method can expand the number of patterns you use in a Matrix (from 32 to 64) to control a single destination. It can also allow you to switch between two RPG-8 Arp devices or any two CV sources anywhere in Reason and Record for that matter.

At some point when working with CV, you end up wondering if you can expand beyond the limits. For example, if you have a Matrix loaded with 32 pattern banks, you’re going to wonder if you can push it to 64. If you have an Arp applied to an instrument, you’re going to wonder if you can have two Arps applied to the same instrument. I know that’s what I was wondering a few nights ago. And that’s the subject of this article. How to expand upon CV connections by switching between these CV devices in real-time.

You can download the project files in the following zip file: cv-switching. These project files include 2 Combinators that show you how to switch between two matrixes or two Arps on the fly. Both Combinators are connected to the same mixer, so to hear each one separately, just mute/solo each one and press play on the Transport bar.

Switching between 2 Matrixes

  1. First open up a new document, and first place a 14-2 Mixer at the top (if you are in Record, you won’t need the mixer, because everything gets tied to your BIG mixer).
  2. Now, open up a Combinator and holding Shift down, place a sound source at the top (for example, a Subtractor), a Thor underneath that, and then two Matrixes underneath the Thor.
  3. Next, flip the rack around and let’s route the audio up.  Route the Left Audio output from the Combinator to Channel 1 on the mixer. Then Route the Audio out of the Subtractor to the Left audio In of the Combinator (From Devices).
  4. Now for the CV routings. Route the CV 1 and CV 2 Modulation outputs from the Thor to the Gate and CV Sequencer Control section of the Subtractor, respectively. Take the Note and Gate CV of Matrix “A” and route them to the CV 1 and CV 2 Modulation inputs of the Thor, respectively. Finally, route the Note and Gate CV of Matrix “B” to the CV 3 and CV 4 Modulation inputs of the Thor, respectively.
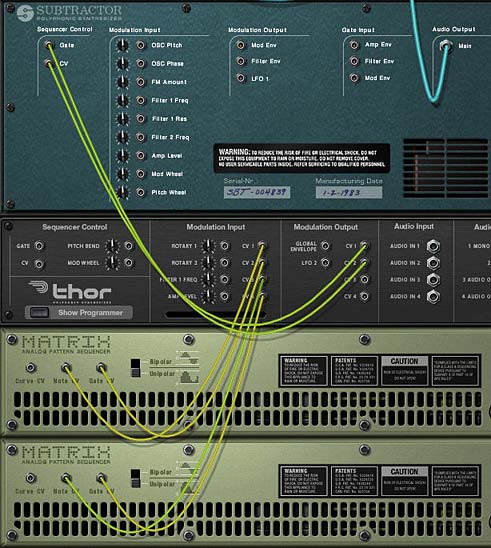
    Proper CV routings for the Thor and Matrix A & B devices
    Proper CV routings for the Thor and Matrix A & B devices
  5. Flip the rack around. On the Subtractor, select a patch you like, or program in some patch parameters that you want to hear. Alternately, leave the default init patch as it is.
  6. On the Thor, completely initialize the patch by turning Oscillator 1 Off, Bypassing Filter 1, turning off the Mod/Filter/Amp/Global envelopes, and reducing the Range, Polyphony, and Release Polyphony down to zero (0) in the Global section. We’re using Thor purely as a CV switcher between the two Matrixes.
  7. In the Modulation Matrix area of Thor, enter the following:

    CV In1 : 0 > CV Out 1

    CV In2 : 0 > CV Out 2

    CV In3 : 0 > CV Out 1

    CV In4 : 0 > CV Out 2
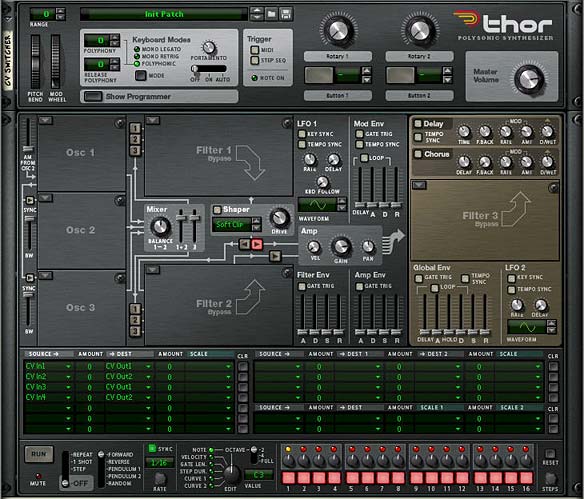
    A completely initialized thor, with the proper routings in the Modulation Bus Routing Section (MBRS)
    A completely initialized thor, with the proper routings in the Modulation Bus Routing Section (MBRS)
  8. In the Matrix A, fill up all 32 of your pattern banks with random patterns or midi patterns that you want to use to play the Subtractor. Random patterns are just quicker for the purposes of this exercise.
  9. In the Matrix B, do the same. However, note that in the example file I have not loaded any patterns into Matrix B. This is so that you can hear the difference when you swtich between Matrix A and Matrix B. But for practical purposes you’ll want to load up all 32 pattern banks with more patterns with which to play the Subtractor sound source.
  10. In the Combinator’s Programmer, select the Thor device (I call it the CV Switcher) and enter the following settings for the Modulation Routing:

    Button 1 > Mod 1 Dest Amount : 100 / 0

    Button 1 > Mod 2 Dest Amount : 100 / 0

    Button 1 > Mod 3 Dest Amount : 0 / 100

    Button 1 > Mod 4 Dest Amount : 0 / 100
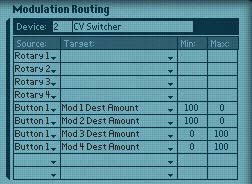
    The Combinator's Modulation Routings for the Thor device (CV Switcher)
    The Combinator's Modulation Routings for the Thor device (CV Switcher)
  11. For the Matrix A and Matrix B devices, enter the following programmer modulation (for both Matrixes):

    Rotary 1 > Pattern Select : 0 / 31

Now, when you press the play button on the Transport, both matrixes will engage, but only one will be used to play the Subtractor, depending on the on/off state of the first button on the Combinator. This first button determines which Matrix is used (if off, Matrix A is used. If on, Matrix B is used). The first Rotary on the Combinator moves through all 32 pattern banks of both Matrixes, thus allowing you access to 64 pattern banks to apply to your Subtractor sound source.

Everything gets switched using the Thor. And the beauty of this type of setup is that you don’t need to worry about Matrix delay problems. Since both Matrixes are always running, and the Thor is used to switch between them, the switching is done completely in real-time with no latency whatsoever.

Ramping it up with an Arp

I won’t go into too much detail about applying this same technique to an Arp. You have the sample file, and you can open this up and see how it’s done. But basically, instead of two Matrixes, you have two Arps that are going through two Thors (one Thor controls the Note / Gate CVs, and the other Thor controls the Pitch/Mod wheel CVs).

One other difference is that you will need a separate Matrix to play the Combinator (ie: the Matrix Note / Gate CV will be sent to the Combinator’s Sequencer Control). This is to ensure something is triggering your sound source, whereas in the previous Matrix example, the matrix units themselves were triggering the sound source.

Alternately, if you don’t want to trigger your sound source via the Matrix, you can set up two sequencer tracks (one for each Arp device) and add your midi note clips there. If you want to switch between both Arps and have them both playing the same part exactly, just duplicate the note clips on both Arp tracks so they are identical. Or have some fun switching up the notes. Experiment with this one.
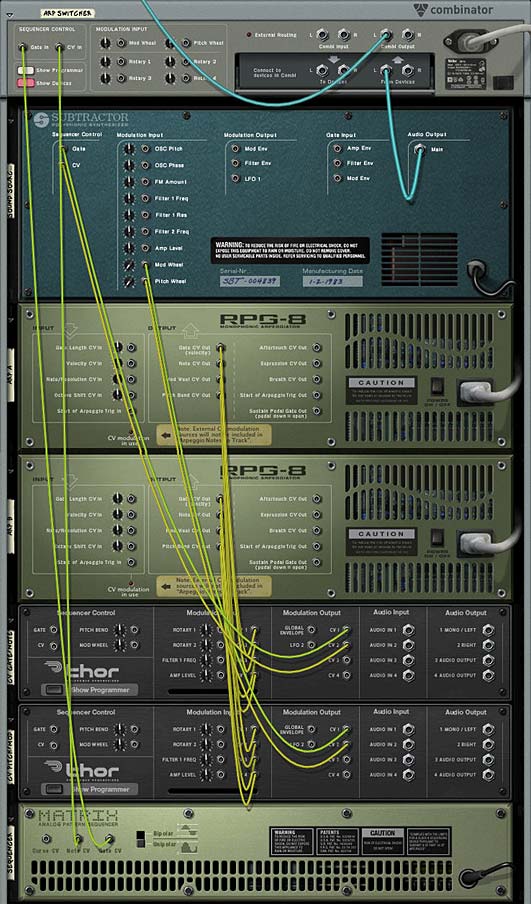
Proper routings on the back of the rack for the Arp Switcher Combinator

Where do I go from here?

Using this method you can switch between any two CV sources going to the same destination CV input. So let your mind wander and try it out using a Scream or RV7000 or any filter envelope. Anywhere you use CV, this method hopefully inspires you to try playing around with CV and using it more creatively when working on your songs.

Did you find this tutorial useful or beneficial? Let me know. And as always, if you have other ideas related to CV switching, please share them with all of us.

18 – A 12-Way Filter FX Combi

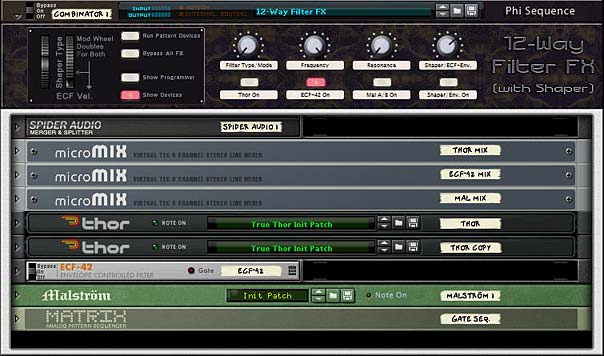
This is a 12-Way Filter FX Combinator patch (with Shaper – and an Envelope for the ECF-42) which is best used as an Insert Effect anywhere you need it to filter audio. It’s a tightly compact little bugger.

This is a 12-Way Filter FX Combinator patch (with Shaper – and an Envelope for the ECF-42) which is best used as an Insert Effect anywhere you need it to filter audio. It’s a  tightly compact little bugger. It took me quite a bit of time to work out the proper programming in the Combinator’s Mod Matrix, because some of the Rotaries and Buttons, as well as the Mod Wheel, have dual functionality, depending which filter you are using. This is why I’m going to provide a little explanation from the vantage point of looking at each device that the combinator is controlling and explaining how those devices are controlled. I think that’s the best approach to show how this Combinator functions.

If you’re itching to get your hands on the Combinator, then go here: 12-way-filter-fx. It’s a zip file that contains the FX Combinator I’m outlining below. For safety sake, please read through so that you understand how this thing operates. Don’t want to open up any black holes in the universe or anything.

A 12-way Filtering FX Combinator system. Deceptively simple looking.

First, A brief background. When I posted a video on YouTube showing how to create a selectable Thor Filter, the focus was on creating a way to route audio through Thor and use Thor’s global Filter 3 slot and be able to switch between all 4 Thor Filters on the fly. This way you could control most of Thor’s parameters from within a single Combinator. That’s great for getting the most out of Thor’s 4 filters. But then Hydlide gave the following comment on his site, The Sound of Reason:

it’s an awesome technique. I sometimes use thor just being an audio processor only because it is the only device that can change filters (all of them) on the fly. In Reason 3 the malstrom was always my default audio input/output source since it didn’t need that much programming and such (just jack the audio signals inside the rear and you are done). However the nice thing with thor is that whole programming part. I can remember I also did a similar setup using filter slot 1. However, that one even becomes more tricky since filter 3 is a global filter (eg: does not need a gate to trigger), with filter 1 you need that same setup with the step sequencer for a gate to retrigger. But it does add that shaper thingy in between. However, in addition, it does add something having the step sequencer running anyways, and use the curve of the step sequencer to retrigger something else (eg: Shaper drive, filter changes etc…).

So two things I got from this comment:

  1. Thor is the only device that can change filters on the fly. [OK, let’s add more filters that we can change on the fly]
  2. That shaper thingy in between. [hmmm. yes indeed. Let’s add that shaper thingy]

So there was my mission. To create a Combinator that could change more than just the Thor filters on the fly, but could also allow you to select a few other filters (namely the ECF-42 and the Malstrom A/B Filters). And also let’s utilize the “Shaper Thingy” in between (since both Thor and the Malstrom have “Shaper Thingies” let’s definitely have the ability to change both and adjust the amount of both).

Oh and hey, while we’re at it, let’s try our hand at squeezing in the ability to utilize the Envelope of one of the filters. And the ability to change filter modes on one of the other filters. Essentially, we’re going for ultimate controllability and in the end you’ll have a 12-way Adjustable filter using a single Combinator. Think you can’t do all of this in a single Combinator. Wrong!

It’s actually deceptively simple to route into a Combinator. And it’s really light-weight on your CPU. The really tricky part in putting this all together is programming the Modulation section of the Combinator. Here’s how it breaks down:

There are three main devices that can be used as filters: Thor (4 filters), ECF-42 (1 Filter with 3 Modes), and the Malstrom (2 Filters: A&B which work globally, and these with 5 variable modes). So 4 Thor Filters + 3 ECF Filter Modes + 5 Malstrom Filter Modes = 12-way adjustable Filter FX. Here are the parameter settings for each of the 3 different devices:

Thor Filter

Rotary 1: Cycles through all of Thor’s 4 filters: Low Pass Ladder, State Variable (on High Pass mode), Comb Filter (+ mode), and Formant Filter.

Rotary 2: Adjusts the full range of the Filter Frequency

Rotary 3: Adjusts the full range of the Filter Resonance

Rotary 4: Adjusts Thor’s Shaper thingy Amount (termed the drive in Thor).

Button 1: When pressed, the Thor filter becomes active. When not lit, Audio routed to Thor is muted.

Button 4: When pressed, Thor’s Shaper Thingy is enabled.

Mod Wheel: Acts as a Shaper selection for the different Thor Shaper waves. When recording using this combinator, I would highly suggest just setting this and forgetting it — in other words, program the automation for the mod wheel in the Reason/Record sequencer, but don’t automate any changes with the Mod wheel. When you adjust the shaper modes using the mod wheel in this way, you’ll hear an audible click which is nasty and you won’t want it saved along with your recording. So set up a shaper wave and then forget about it.

ECF-42 (Envelope Controlled Filter)

Rotary 1: Cycles through the 3 ECF Filter modes: BP-12, LP-12, and LP-24

Rotary 2: Adjusts the full range of the Filter Frequency

Rotary 3: Adjusts the full range of the Filter Resonance

Rotary 4: Adjusts the Filter Envelope Amount

Button 2: When pressed, the ECF-42 filter becomes active. When not lit, Audio routed to the ECF-42 is muted.

Button 4: Activates the Envelope when lit. The Envelope is off by default. Actually, what’s happening is the Matrix inside the Combinator is used as a gate CV to control the Filter frequency of the envelope. Since it is routed through the CV in/out of one of the Thor devices, this button acts as a trim knob control for the free-running Gate CV from the Matrix into the ECF CV Gate in. This makes things instantaneous when switching the Envelope button on / off.

Mod Wheel: Acts as the Velocity setting for the Envelope amount in the ECF Filter. Of course, it won’t do anything unless you have the Envelope enabled (button 4).

Malstrom’s separate A/B Filter processor

Rotary 1: Cycles through the Malstrom’s A/B Filter modes:LP-12, BP-12, Comb+, Comb-, AM

Rotary 2: Adjusts the full range of the Filter Frequency

Rotary 3: Adjusts the full range of the Filter Resonance

Rotary 4: Rotary 4: Adjusts the Malstrom’s Shaper thingy Amount.

Button 3: When pressed, the Malstrom filter becomes active. When not lit, Audio routed to the Malstrom is muted.

Button 4: When pressed, Malstrom’s Shaper Thingy is enabled.

Mod Wheel: Acts as a Shaper selection for the different Malstrom Shaper waves. When recording using this combinator, I would highly suggest just setting this and forgetting it — in other words, program the automation for the mod wheel in the Reason/Record sequencer, but don’t automate any changes with the Mod wheel. When you adjust the shaper modes using the mod wheel in this way, you’ll hear an audible click which is nasty and you won’t want it saved along with your recording. So set up a shaper wave and then forget about it.

A few other notes:

  • There is no “bypass” option for the filters. In other words, if you turn off buttons 1, 2, and 3, then you won’t hear any audio coming out of the combinator (even though audio is going INTO the combinator). So, to get around this, bypass the Combinator. This way, you will still hear audio going through the Combinator.
  • If you press play or record while the Thor filter is enabled (Button 1 is lit), Thor will not sound. You need to actually engage this button after playing or recording is initiated. Not sure if there is a workaround for this, but let me know if there is and I can update the patch.
  • Since each Filter has its own dedicated Line Mixer associated with it, and the first three buttons simply turn the master level on or off (0 at a minimum and 100 at maximum for the respective buttons), then having more than one filter on simultaneously will effectively duplicate the audio and combine the filtered audio together. This wasn’t really intended when I put this Combinator together. Usually, I would think you would want one of the filters on at any given time, and not have them both on in unison. But I’m not stopping you from using it in this way. You might get some interesting effects by enabling both the Thor and the Malstrom Filter, and then using the Shaper for both at the same time.
  • Further to the point above, if you want to stack filters on top of each other in your audio chain, it’s pretty easy to do. Just put as many copies of this combinator on top of each other and you have an instant stack of adjustable filters in series as an insert effect.
  • The Pitch/Bend wheel is open if you want to program it to do something above and beyond what the Combinator already does. Not sure what else you could possibly pack in here, but hey, go for it!

So I hope you enjoy this little venture into packing everything but the kitchen sink into a Combinator. Please let me know if you find this useful and if you have any great solutions or better ways to improve on this patch please let me know. Also, if you have a question or want to see me write about something in Reason or Record, please speak up. I take requests too. Until next time, good luck in all your Musical pursuits!

9 – Creative ReDrums (Part 1)

I decided to try out some Redrum creativity by taking a standard Redrum patch from the Factory Sound Bank and punching it up. At the same time, I tried to get creative with the Filtering and Routings. A new way to use your Redrum device.

I often get asked and see on the Props forum many complaints that the supplied drum kits are lacking in depth and sound flat. Often this takes the form of slams against the props for providing lacklustre drum kits in the Factory Soundbank. Truth is, the drum sounds can be expanded upon, and if you’re willing to take some time, they can be made to sound much deeper and more punchy. It’s all in what you do with them. The power is all there in front of you, and with the Redrum there’s a lot of flexibility.  

With this in mind, I decided to try out some Redrum creativity and put together a flexible drum kit that takes a basic kit from the props and turns it into something unique . There’s two things I want to accomplish with this tutorial: First: Create a Drum Kit that is more expansive sounding, and Second: Find some creative ways in which the Redrum can be used. So let’s see how far we can take it.  

Before jumping in let me first say that this template is fairly massive. It contains a lot of Thor filters, and as such it can be a little expensive on CPU. If you find it taxing your CPU, you can scale it down (see my notes in the “Where do you go from here” section below), or you can bounce it to an audio track to be put into a Dr. Rex device or as a separate audio track entirely. Second, there’s two main ways I find can bolster the sound of your drums: Compression/Mastering, and Filtering the drums, so those methods will be explored below.  

Download the Project files here: creative-redrums. The project files contain two Combinators inside an rns file. The first Combinator is the Original untouched kit put through the same Matrix sequencing. The second Combinator is the Drums we’re going to create below. Mute/unmute the channels in the mixer to listen to how they sound compared to one another.  

  1. As with all great Reason patches, let’s start by creating a Combinator. Inside the Combinator, create in order, an M Class Compressor, M Class Equilizer, M Class Stereo Imager, M Class Maximizer, 14:2 Mixer, Redrum Drum Machine, Thor Synth, DDL-1, and Spider Audio Merger/Splitter. Then hold Shift down and create a Matrix Pattern Sequencer.
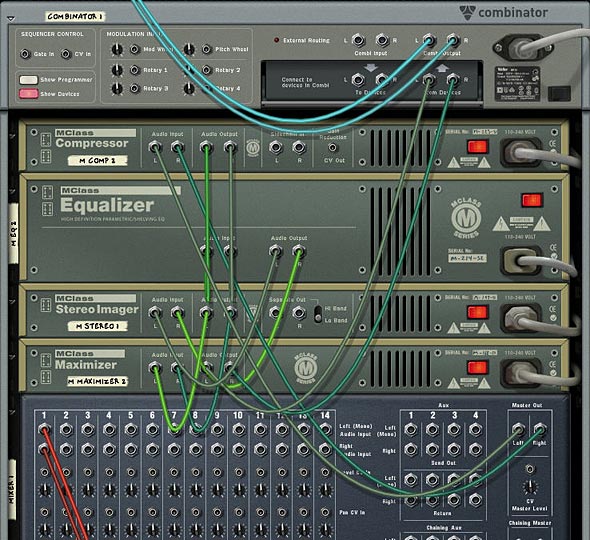
  2. Flip the Rack around and let’s start working on our Routings. First, move the Cables from the Combinator’s “From Devices” ins to the Audio Inputs of the Compressor. Then connect the Audio Outputs from the Maximizer to the “From Devices” inputs on the Combinator. This sets up the main mastering for the Redrum.

    The Mastering setup on the back of the rack
    The Mastering setup on the back of the rack
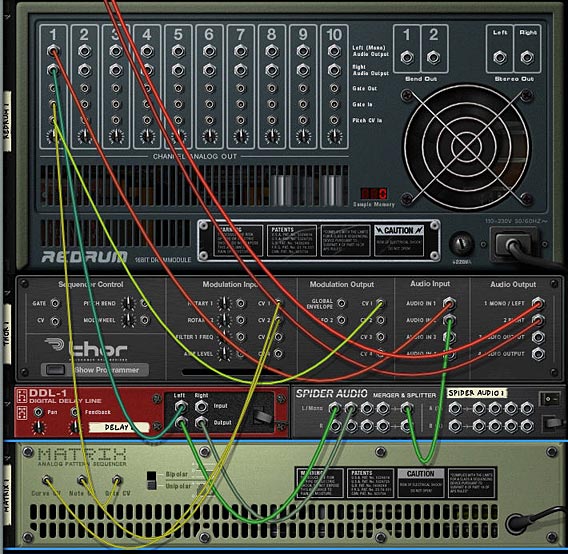
  3. Next, move the DDL 1 Left and Right input cables to the Left and Right Channel 1 on the 14:2 Mixer. At the same time, disconnect the Chaining Aux cables from the 14:2 Mixer. Also, connect the Left output from Channel 1 on the Redrum to the Audio In 1 on the Thor. Then connect the Right output from Channel 1 on the Redrum to the Left input on the DDL-1.
  4. Next, move the Left and Right Audio Inputs from Channel 2 on the Mixer to two Left Audio Inputs on the Merger side of the Spider. Then route a cable from the Left Merged Output to Audio In 2 on Thor. With this setup, you’ll have no delay on the Left audio channel for the drum, while the Right Channel goes through the delay device.
  5. Moving to our CV routing, plumb a CV cable from the Gate CV output of the Matrix to the Gate In on Channel 1 on the Redrum. And plumb a CV cable from the CV 1 Output on the Thor to the Pitch CV In on Channel 1 of the Redrum. Also cable the Note CV output from the Matrix to the CV 1 Input on the Thor, and the Curve CV output from the Matrix to the CV 2 Input on Thor. If this is all starting to get confusing for you, check out the routings in the Combinator file download, or else check out the image below.

    The routings for the Thor Filter, Delay, and Matrix Sequencer
    The routings for the Thor Filter, Delay, and Matrix Sequencer.
  6. Next, let’s flip the rack around and start working on applying settings to the front of the devices. First, click the “Enable Pattern Section” button on the Redrum so that the pattern is disabled. Click the browse button and load a patch (drum kit) into Redrum. I used the Chemical Kit 7 from the Factory Soundbank (under Redrum Drum Kits > Chemical Kits). Now you have a basis from which to work.
  7. In Thor, we’re going to use multiple filters which will be applied to the Bass Drum (Channel 1 on the Redrum). So the first thing to do is to ensure that the Bass Drum Left and Right channels are routed into Filter 1 and Filter 2. In the Mod Matrix, apply the following settings:

    Audio In1: 100 > Filt1 In  

    Audio In2: 100 > Filt2 In  

    This setup means that the Left (dry) Channel goes through Filter 1, while the Right (delay) Channel goes through Filter 2, and then both are sent in Stereo to be output to the Submixer. 

  8. Next, since Thor is not free running, like the Subtractor, we need to use the step sequencer to keep Thor “On.” To do this, set up a one step long pattern in the sequencer. Turn Button 1 on (so it’s Red) on the top panel of Thor. Then add the following setting into the Mod Matrix:

    Button1: 100 > S. Trig  

    To be honest, since everything will be triggered when you hit the play button, you probably don’t need to setup the above (step 8). But it will ensure that Thor remains on and is running, which will ensure you can use the filters in the Voice section of Thor (the first two filter slots), as well as the Global filter section (Third Filter slot).  If I’m wrong, please feel free to correct me.

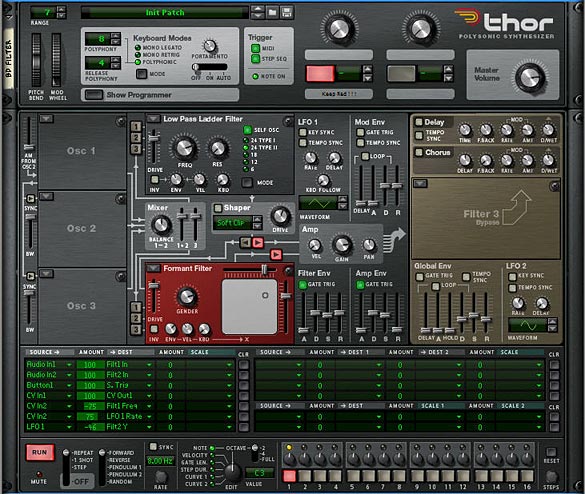
  9. Add a Low Pass Filter into Filter slot 1, and a Formant Filter into Filter slot 2. Route both the filters parallel into the Amp section of Thor. Turn off any Oscillators and Oscillator routings, as well as the Mod Envelope and Global Envelope sections. And Then add the rest of the MBRS settings as follows:

    CV In1: 100 > CV Out1 (sends the Note CV data from the Matrix to the CV Pitch in on the Redrum Channel — yes you can send the CV cable directly from the Matrix to the Pitch In on the Redrum, but If you set it up this way, you can then use the Note CV to affect other parameters in Thor, if you wish).  

    CV In2: -75 > Filt1 Freq (sends the Curve CV data from the Matrix to the Filter 1 Frequency).  

    CV In2: 75 > LFO 1 Rate (sends the Curve CV data from the Matrix to the LFO 1 Rate).  

    LFO1: -46 > Filt2 Y (sends the LFO 1 to the Filter 2 – Formant Filter – Y Parameter).  

    Here’s the image which shows the front of the Thor Device and the Filter settings:  

    Thor settings for the main Bass Drum Filtering
    Thor settings for the main Bass Drum Filtering
  10. Next, on the DDL-1, select 4 Steps, and in the Matrix, create a Random pattern. Alternately, you can build your pattern as you play the sequence. The Matrix will trigger the Drum’s Channel 1 gate, and play the pattern you enter. So it can be much easier to build up a drum pattern as you play. Also, as you play, adjust the filter settings in Thor until you come up with your own unique brand of Drums. At the same time, flip the rack and adjust the Pitch In Trim knob on the Redrum Channel 1 to taste.
  11. Now comes the tedious part. Select the Thor, DDL-1, Spider Audio Merger/Splitter, and Matrix. Then right-click and select “Duplicate Devices and Tracks.” Once duplicated, flip the rack around to the back of the devices, and set up the routings into the second Channel of the Redrum and Submix (along with the CV routings, etc.). Do this for each Channel of the Redrum.
  12. Once everything is routed properly, you can start to work on filtering each individual drum channel. Try out different Thor filters, as well as different Matrix patterns (right-clicking and using “Alternate Pattern” works well here, along with shifting the patterns left or right). Also try alternating some of the delay routings from left and right (by reversing the audio inputs on the back of the Thor. Finally, try out different delay steps for each of the delays. There’s lots you can do to fine tune this type of setup.

Combinator Mod Matrix

Going into all the modulations in the Combinator is pretty intense, so instead I’ll let you download the project files and see what’s going on. But a few words about how the Rotaries/Buttons work:  

The Pitch Bend moves all the drum pitches up or down. This can be fun to play with while performing with the drums. The downside is that when the Pitch Bend is static center, so are all the drum pitches. But you can always automate it so that it stays in a non-static, non-centered position.  

The Mod Wheel is tied to a basic drum Reverb which also affects all the drums equally. If you don’t like this Reverb, you can use your own. This way you can apply a little or a lot of Reverb to the overall mix. And then of course there’s nothing saying you can’t add a Reverb or other FX as Send FX on the Submixer. This was a last-minute thought.  

Rotary 1-3: Applies Compression, EQ, and Maximizer Gain to the overall mix. In this way you can master the drums to your liking.  

Rotary 4: Affects the Delay Levels for all drums at once. You can go from no delay (at the far left) to a pretty heavy delay (on the far right).  

Buttons 1-3: Turns on/off the delays for the Bass Drums (1), Snare Drums (2), and High Hats (3).  

Button 4: Turns on/off the Ride by muting it on Channel 10 of the Submixer.  

Where do you go from here?

  • Add different variations and drum patterns (fills and rolls) in the Matrix pattern sections. Then create sequencer tracks for all the Matrixes. In this way you can play the patterns for each of the drums in their own separate tracks on the sequencer, and they are all pattern-based. This makes creating several variations very easy not only to explore, but also to apply in your song.
  • If things are a little too chaotic having all 10 drums running at once, simply mute some of them in the Drum Submixer, so let’s say you have a Bass Drum, Snare, and Hi Hat instead of an all-on cacophony of drums.
  • At the same time, if the CPU load is a little too much, try minimizing the number of filters used, and instead run each drum channel through only one filter, instead of two. Or delete the drums you aren’t using, along with their associated Thor/Delay/Splitter/Matrix.
  • Once you have this template built (and you already have mine done for you), you can add different drum kits into Redrum, and adjust settings for your filters, mastering, etc. One thing that helps is to work on the drums in a build-them-up-as-you-go way. So first do the Bass Drum, then mute the bass drum and go on to the Snare, then unmute and see if they work together. Once they do, move on to the next drum.

And no more than a few days after I posted this article, Matt Piper posted a great little youtube tutorial on how to process your drums through a BV512 Vocoder. You have to check it out. It sounds awesome. Great inspiration for those that want another way to beef up your drum kits: propellerhead-record-reason-vocoding-with-drums

So let me know what you think of this setup. Do you know of some great methods for getting more out of the drum sounds provided in the Factory Soundbank? Do you have any creative drumming techniques. Please feel free to share them. I’d love to see what can be done to boost the supplied drums and learn some new creative ways to ReDrum the kits. Good luck in your Reason projects!

2 – Reusable Device Toolboxes

let’s discuss the possibility of adding a whole new dimension to your sound arsenal by creating Matrix device templates that speed up your workflow. Sound like something that could benefit you? Read on. . .

There is a wealth of devices, patches and samples available in the Factory, Record, and Orkester Soundbanks. And the amount of refills available on the internet grows each and every day. So why are we going to discuss yet another Device Toolbox? Because this one is going to be a little different. Here, I’m going to explore what isn’t in any of the prefab refills provided with the software. Here I’m going to discuss ways in which you can create your own repository of Matrixes. If you extend this idea, you can create your own Redrum devices as well, or how about a complete storehouse of Bass lines and melody lines. It all revolves around the same idea below. So let’s discuss the possibility of adding a whole new dimension to your sound arsenal by creating device templates that will speed up your workflow 10 times over. Sound like something that could benefit you? Read on. . .

Device Toolbox – a multitude of kits

  1. Let’s start by creating an empty document. This document is going to be used to house a variety of matrixes, but no sounds will be generated. So contrary to the way you usually start off a song, you won’t need a mixer or any kind of insert or send effects. Simply start by opening a blank document and off we go.
  2. You should get into the habit of saving your document right off the bat. So let’s do that now. Give the document a name like “Matrix Toolbox” or something you will remember.
  3. Next, create a matrix. Change the switch from Keys to Curve, and Steps to 32. Add in a curve that you use most often. Perhaps a sawtooth or sine-shaped curve. Now switch to the second pattern. Since the Matrix can house up to 32 curves, you may as well maximize the use of the Matrix and use up all those slots. That way when you insert this matrix into your projects, you have 32 choices right off the hop. So add in the next pattern. You can elect to store the Resolution and number of steps along with the pattern settings, but I prefer to leave these as is when creating some general curves (for CV control, such as panning or level control on a mixer channel, for example). This is because using all 32 steps allows you a greater degree of control over the curve. And the resolution will change depending on your song, so change that later when you insert the Matrix into an actual project.
  4. We’re only creating the repository here, so go nuts. Add in a bunch of Matrixes. In my project file I’ve added a lot of random Matrixes, with random notes and curves because this can do wonders for glitch tunes. Use 10 Matrixes tied to the 10 channels of a Redrum and you have an instant glitch kit. So keep adding. When you’re done, save the entire project as an .rns or .record file. Then when you have a song file open that requires some CV control, you’ve got a whole warehouse of Matrixes at your fingertips. Just open up the toolbox, and copy the Matrix into your song file. Don’t forget this can work in reverse as well, so as you work on your song projects, and create new Matrixes with new curves, open up the toolbox file and add the new curve(s) into a new Matrix for later retrieval.
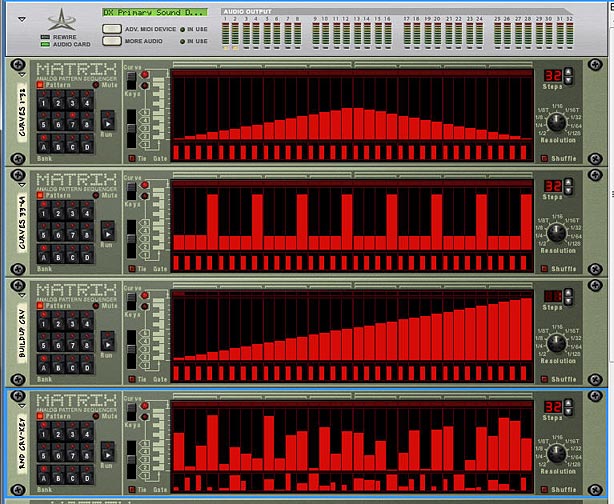
A variety of Matrixes ready to go with nothing more than copy & paste

There are quite a few ways you can use a Matrix. You can have them control a sound device’s LFO, Filter Frequency, Resonance, etc. or you can use the Matrix as a monophonic note player which plays the sound device for you. You can also use it to control many different parameters in a combinator, and you can even control the pattern selection of the Matrix itself via a rotary on a combinator. These are pretty powerful devices. See below for a some suggestions. I’ve also included a ton of pattern variations in a nice little package for you (so all the legwork is done). You can download the file below.


matrix-toolbox 

What’s in this Package? Here’s the highlights:

Curves 1-32: Contains Main Curves that can be used for CV control of other devices, with a focus on LFO curves. Most of the main curves here are familiar ones, with Sine, Sawtooth, Pulse Width, etc. Make sure that you switch to Bipolar on the back of the matrix in order to open up the curves to any control which is bipolar in nature (such as controlling the panning of a channel). Switching between Unipolar and Bipolar is a simple way to extend the use of these curves and essentially doubles the amount of curves contained in a single matrix from 32 to 64.

Curves 33-64: More curve fun. This set is more focused on melody and beat than LFO use, but of course you can use any one of these curves to control any CV parameter (LFO, beats, filter frequency, filter resonance, etc).

Buildup Crv: This Matrix uses a sawtooth curve as its basis. You’ll see the same curve in all 32 banks, but each slot adjusts the steps upward incrementally (A1 has 1 step, A2 has 2 steps, etc.). This is more experimental than anything else, but the thought is that you can use this Matrix to slowly build up a pad or any other sound by placing this matrix in a combinator, having the matrix control a sound device, and programming the pattern to a rotary. Then create an automation track for the combi, and slowly bring up the rotary along the length of the sequencer, the sound should build upward incrementally. Of course, you don’t have to use it in a combi, and instead can program the pattern section of the matrix directly in the sequencer, but this would take you much more time as you would have to fiddle with the pattern changes in the sequencer. Try the combi idea first. It’s easier. Then also If you want to create a fade-out “build-down” instead, simply reverse the programming of the Pattern section in the combi’s mod matrix. Simple.

Rnd Crv-Key: This can be used for random curves or random keys. Every pattern in this matrix lasts for 32 steps and is using 1/16th resolution. So the timing and length of the patterns stay the same, however, the patterns themselves are different.

Rnd Step: Same as the Rnd Crv-Key Matrix, however, this time, the Length of the Patterns is also randomized (sequentially from 1 step in Bank A1 up to 32 steps in Bank D8). Try adding this to a combi and programming the pattern section to a rotary. Then in the sequencer create some crazy random vector automation to switch between all the patterns. Or control the rotary on your controller and have some fun spinning the dial for a bit of craziness.

Rnd Res: The same as the Rnd Step Matrix, except the Steps remain constant at 32 for each pattern. What changes here is the Resolution. Be warned that this can get a little chaotic because the Matrix switches in and out of Triplets, which I’ve always found a little jarring. But it’s there to play with.

Rnd All: The granddaddy of them all. This is the “everything-but-the-kitchen sink” of Matrixes. All banks are loaded with patterns, and everything is randomized: Steps, Resolution, Patterns. It’s the whole enchilada. Just be warned, this may create some complete and utter nonsense and may cause aural nausea. But again, it’s fun to tinker.

Rnd 4/4: This Matrix can be used for random curves or random keys. But it’s a lot less random than the Rnd All matrix. As the name suggests, all the notes and curves are completely random, however, the beats are kept to a basic 4/4 structure, and in 4 steps or beats per bar. Bank A1-A8 all use ¼ time, with 4/8/12/16/20/24/28 and 32 steps respectively. Same goes for Bank B1-B8, with the difference being everything is set in 1/8 time. Bank C1-C8 is 1/16 time, and Bank D1-D8 is 1/32 time. I set it up this way because I rarely utilize the ½, 1/64 or 1/128 time unless it’s something very specific. So this can be used in most general circumstances and create a cohesiveness to whatever parameter you’re controlling. At the same time it is still a random controller, so expect the unexpected. If you want to work only within a specific time, then place this matrix in a combi, and assign the pattern section to a rotary which controls only a specific bank (A: 0-7, B: 8-15, C: 16-23, or D: 24-31). If you instead want to work with only a specific amount of steps in different timings, then create a track for the matrix in the sequencer, and program the same numbers in each bank. For example, working with 8-step patterns only, you would program A2/B2/C2 and D2 in the sequencer. This way, all the timing would be different, but the amount of steps for each pattern remains the same.


The real power in this project lies in the fact that you only need to build the toolbox once, and you can reuse it as many times as you like. The more variety you have in the toolbox, the more variety you can insert into your song projects and the more organized you are, the quicker you can do it. So think about applying this idea not only to Matrixes, but how about Redrum patterns, and other things like basslines or melody lines. You can create a whole series of quick beat loops or chord sequences that you can recall at a moment’s notice. Break out and create your own toolboxes to suit your needs.

Do you think this can help you out in your own work? What kinds of other items do you think you can turn into a toolbox? What other matrixes do you have that you’d like to share? Any suggestions for some Matrix patterns that I may have missed? Let me know and I’ll add it into the package.

Happy Reasoning!