34 – Breaking out of Kong

Exploring the Advanced features of Kong, learn how to use Kong’s FX modules on audio from other devices, process your Kong sounds through other Effects units not included in Kong, expand your Drum processing abilities by parallel drum processing or processing each drum module individually.

In this tutorial I’m going to explore some of the advanced features of Kong. We’ll learn how to use Kong’s FX modules on audio from other devices, process your Kong sounds through other Effects units not included in Kong, expand your drum processing abilities by parallel drum processing, and process each drum module individually.

Break Out / Break In

The first foray into exploring some outside routing came from an email request I got. The person who emailed me wanted to know how the first tip from “Music Radar’s Top 10 Essential Reason 5 Tips” worked. The tip went like this:

“One of Kong’s best features is its powerful level-setting system, but another key point is its connectivity. Instead of mixing internally within Kong, try routing the pads out through a 14:2 Mixer and then back into Kong via the Break-in connections. This enables you to set levels and EQ with the mixer, and still use the powerful master output FX. Save your construction as a Combinator for future use.”

Well, here’s how it works. The basic idea is that the Break-out jacks on the back of Kong act as an additional way to insert Effect devices between the FX2 and Bus FX modules in the signal flow. The flow works something like this:

Drum Module > FX1 > FX2 > [Your Insert FX here / Break-out & Break-in jacks] > Bus FX > Master FX > Main Output

That’s essentially the signal flow. Keep in mind though, that if your Drum output is set to “Master FX” which is the default, or any of the output jacks (3-4, for example), you will need to use the Bus FX Send knob on the drum panel on the front of Kong to adjust the level of the external effects devices. Also note that the external effects devices are global. You can use them as an insert for all the drum modules inside Kong. If you don’t want them used on a specific drum, then just keep the Bus FX Send for that specific drum at it’s zero (0) default.

I know this sounds a little complex, so I put together this video to show you an example:

Parallel Drum Processing, Kong Style

Here’s an interesting way to create Parallel processing on your kick via Kong. And it’s stupid-easy!

Parallel processing is when you use the same drum sound both wet and dry at the same time. You can tune the amount of each, but both together add up to a beefier sound. Again, the idea is to trigger both a processed and unprocessed drum sound at once and then mix both together to create a punchier beefier kick. So here’s the easy way to do it in Kong. Note that we’ll do it inside a Combinator so you can save the patch for later use.

  1. First, Create a Combinator and inside create a 14:2 Line Mixer (we’ll do this to have access to the Mixer’s EQ, otherwise you can create a 6:2 mixer instead, that’s totally up to you). Then create a Kong.
  2. Open up Kong and add a Physical Bass Drum into drum module 1. Set the drum output to the 3/4 stereo pair. Add a Parametric EQ device into the Bus FX slot and a Compressor into the Master FX slot.
  3. Flip the rack around and send a pair of audio cables from the 3 / 4 Audio outputs on the back of Kong into the second channel of the 14:2 Mixer.
  4. Now comes the fun part. Flip back to the front. Turn up the Drum’s Bus FX send to about 100, and start playing the Drum Pad. As you play, adjust the EQ and Compressor to taste. You’ll hear the effect it has on the sound.

The reason this works is because you are sending the same drum sound two different places. The unprocessed sound is going straight through ouput 3/4 (and into channel 2 on the Mixer), while the processed sound is running through the Bus FX and Master FX and back out the main outputs into channel 1 of the 14:2 Mixer. Both are playing at once. Instant parallel sound.

If you want to ease back on the level of processed sound (ie: the sound going through the EQ and Compressor), simply reduce the Bus FX send knob. If you want to adjust the level of dry sound, use the Channel 2 Level fader. You can also turn on the EQ and adjust the EQ parameters directly on the 14:2 Mixer. This setup provides loads of options.

7 Drums to 7 Channels: Hooking up each Drum Module Separately

And now for something completely different. I’ve heard many people ask how they can send their drum pads to individual channels in the mixer. The easy answer is to send each drum module through the different outputs available on the back of Kong; 7 stereo pairs in all.

In actuality, if you count the Master FX, Bus FX, and Direct output, you have 10 in total. But for our purposes here, let’s focus on sending 7 drum pads out to 7 different channels in the Mixer. In this way, all the drums operate exactly the same in terms of signal path and it’s the easiest to work with when you’re first starting out.

To set this up, first create a Combinator as we did earlier (so we can save this as a template for use later). In the Combinator create a 14:2 Mixer and holding the shift key down, create a Kong device.

On Kong, click the Show Drum and FX button. Then load up 7 drums in the first 7 drum module slots. These can be any drum modules you like, and they can have any associated FX inserted into the FX1 and FX2 slots.

At the bottom right of the drum module select the appropriate outputs as follows:

Drum Module 1 > Output 3 – 4

Drum Module 2 > Output 5 – 6

Drum Module 3 > Output 7 – 8

Drum Module 4 > Output 9 – 10

Drum Module 5 > Output 11 – 12

Drum Module 6 > Output 13 – 14

Drum Module 7 > Output 15 – 16

Flip the rack around to the back, and route each of the above audio outputs to their own Left/Right channels in the 14:2 Mixer (7 channels in total).

That’s all there is to it. Now, you can control each of the drums via the Mixer channels. This means that you can control the Level, EQ, Panning, etc. from the Mixer channel strip. This also opens you up to using 4 different sends on the drums via the Mixer sends if you like (if you did everything through Kong, you’d have access to only 2 sends via the Aux 1 and Aux 2 cables on the back of Kong).

One caveat. In this type of setup, you can control the Level of the individual drums via the Drum Level knob on each drum panel, if you so choose. So don’t get confused. Essentially, this means you have three junctures at which to control each of the drum levels: The Drum Module’s Level knob, the Drum panel Level knob, and the Mixer Channel Level fader. It’s important to know the proper signal chain between all these various levels. It goes exactly in that order:

Drum Module Level > Drum Panel Level > Mixer Channel Fader > Mixer Master Fader

Since there is nothing routed from the main output of Kong, Kong’s Master Level isn’t even utilized (put another way, it’s useless and does nothing in this setup).

Processing Audio Through Kong

Finally, here’s how you can process your audio through Kong. It’s drop-dead simple, and you can process Any audio from any device (and from any audio track if you have Record) through any number of Kong FX devices. Watch the video to find out how it’s done.


So that’s it. A few advanced ideas for breaking outside Kong and using the device for more than just drum processing. I’m sure there’s many others. But these are the ones that came to my mind. What’s your favorite idea or feature of Kong? Drop me a line or comment on this post and let’s see just how far we can push Kong.

31 – Kong Drum Pad Hit Types

In this tutorial, I’m going to cover and give a thorough explanation of how the hit types work for the Kong drum pads. Depending on which Drum Module you select in Kong, the hit types will change. So having a clear understanding of how each one works is important. After reading this tutorial and watching the accompanying videos, you’ll have a good grip on how they work.

In this tutorial, I’m going to cover and give a thorough explanation of how the hit types work for the Kong drum pads. Depending on which Drum Module you select in Kong, the hit types will change. So having a clear understanding of how each one works is important. After reading this tutorial and watching the accompanying videos, you’ll have a good grip on how they work.

First, A word about Hit Types.

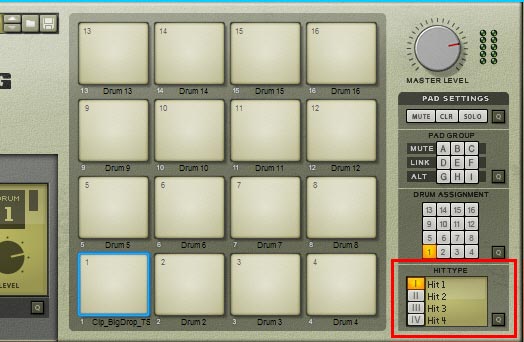
First, the Hit Types can be found on the bottom right side of Kong’s main interface. You’ll see access to all four types, as outlined below. By default all pads are assigned to Hit Type I, no matter what drum module is selected. Each Pad can only be assigned to a single Hit Type (as opposed to Support Generator Modules, which can be assigned to any number of the four Hit Types – more on that below).

Kong Hit Types and their Location

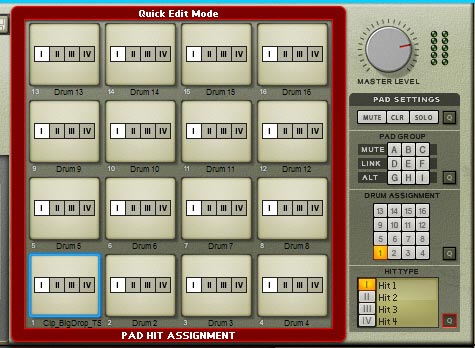
In addition, there is a “quick edit” mode button. When accessed, you can easily set up the Hit Types for all 16 pads at once. That’s what this button is for (see below).

Kong Hit Types "Quick Edit" Mode

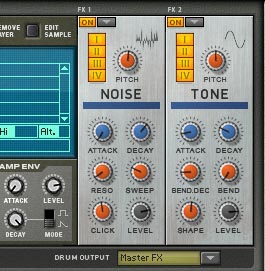
Lastly, there are Hit Type assignments on both of the Support Generator Modules (Noise and Tone) at the top left side of each unit. This means that you can assign which hit type will make use of the Support Module (this can be one single Hit Type, or all four Hit Types). By default, all four Hit Types are affected by the support modules. Click any of the Hit Types to essentially turn off the support module for said Hit Type. For example, you may want to have a Closed Hi-Hat module make use of the Noise Support Module FX, but leave the Open Hi-Hat unaffected. In this case, you would keep Hit Type I (Closed Hi-Hat) selected, and deselect Hit Type IV (Open Hi-Hat).

Kong's Support Generator Modules and their Hit Types

Now that we’ve got the basics down, here are the various Hit Types you will find, in order of the Drum Modules that appear in Kong:

NN-Nano Sampler

The NN-Nano Sampler has four Hit Types, as follows:

  • I: Hit 1 (references sample 1 loaded into the NN-Nano)
  • II: Hit 2 (references sample 2 loaded into the NN-Nano)
  • III: Hit 3 (references sample 3 loaded into the NN-Nano)
  • IV: Hit 4 (references sample 4 loaded into the NN-Nano)
NN-Nano Hit Types
NN-Nano Hit Types

The idea behind the hit types provided by the NN-Nano Sampler is pretty straightforward. Each Nano Sampler can load up to 4 samples that can be adjusted both Globally by the global parameters and locally by the local parameters just below the sample. Note that you can load more than one sample into a single hit using the “Add Layer” button at the top of the Nano Sampler. This will create additional lanes below the selected Hit type, where you can load additional samples. If multiple samples are loaded, you can use the “Alt” function (checkmark below the samples) to alternate between the various layers when the Pad is pressed.

Note: In the video, I jump a little ahead of myself and go over creating Sample Layers in the first Hit Group within the NN-Nano. It’s important to understand that when you layer samples, by default all the samples will play at the same time when the pad is pressed. Not sure I got that across in the video, so I’m explaining it here. This is a common question that comes up: how do you layer pads together. This is one way in which you can layer Samples. To layer actual drums, like the Physical Bass Drum or Synth Snare, you would have to put the two drums inserted into two different drum modules, assign them to two different pads, and then create a “Link Group” between the two pads (assign the link group “D,” for example, to both pads). Then when you hit one pad, the other pad would automatically play at the same time. I hope that clarifies things.

The 4 Drum Pad Hit Types here correlate directly to the 4 Sample slots on the Nano Sampler. Nothing too fancy. In this way, you can select four pads and tie them all to the same Nano Sampler. Then tie the different Hit Types to the different Pads (Hit Type I on Pad 1, Hit Type II on Pad 2, Hit Type III on Pad 3, and Hit Type IV on Pad 4). This way you can trigger different samples from all four pads. The only downside is that the Nano’s global parameters are the same for all four Pads. But this, in essence is how you use the four Hit Types for the Nano Sampler.

Nurse Rex Loop Player

The Nurse Rex has arguably the most interesting selection of Hit Types. While the NN-Nano Sampler looks pretty boring in this regard, the Nurse Rex is completely opposite and has many different possibilities. Here are the Hit Types:

  • I: Loop Trig (Plays the entire loop once from start to finish)
  • II: Chunk Trig (Divides multiple pads into equal Chunks or sections that can be played back. Note that Chunks can be resized over the samples, but cannot be non-contiguous between each other)
  • III: Slice Trig (Allows you to select single or multiple slices to be triggered. Note if multiple slices are selected to be triggered by a single pad, the pad will trigger the various slices as if they were an Alt group; alternating between slices.)
  • IV: Stop (Stops loop, Chunk, or Slice playback)

Before jumping into an explanation of these Hit Types, I put together a short video that explains how they are used:

Nurse Rex Hit Types
Nurse Rex Hit Types

The first Hit Type is the most basic default: Loop Trig. This simply plays the entire loop once over from start to finish. Note that you can resize the loop’s start and end points by dragging the start and end markers just above the rex loop.

The second Hit Type is Chunk Trig, which is only really useful if you have multiple pads assigned to the same rex file. If you have a single pad assigned to use the Chunk Trig Hit Type, then it acts the same as if you were assigning Loop Trig to the Pad. So if multiple pads are assigned to the same Nurse Rex Loop Player, and all those pads are assigned the Chunk Trig Hit Type, the rex loop is subdivided into equal parts or “chunks” of slices. It’s important to note that you can reshape the various chunks to include/exclude slices, but moving one chunk left, will also move the adjoining chunk left. In this case, one chunk gets smaller while the other chunk gets larger. You cannot have non-contiguous chunks (gaps between any of the chunks).  One easy way to get around this is to assign each pad to its own drum, then copy / paste the same rex into all the drum slots. Have all the pads set to Hit Type I (Loop Trig), and then you are free to independantly set up any sections of the various rex loops to any of the pads. They are all independant. The other benefit is that you have the ability to set independant levels and Nurse Rex settings. If all your pads are set to use the same Nurse Rex Drum module, then most settings become global parameters affecting all Pads across the board. This may be what you want, but for more control, copy/pasting the same file into multiple drum pads is a better way to go.

The third Hit Type is the Slice Trig, and this is probably the most confusing Hit Type of the four. Put simply, at default, the Pad will Trigger the first slice of the Rex file. This is because the “Trig” checkbox for the first slice is selected (checked). This checkbox tells the pad which slice to trigger. You can turn it off and select a new slice by clicking on the slice, and then placing a checkmark in the Trig checkbox. The new slice is now triggered by the pad. It’s very important to note that you can select multiple slices to be triggered by the pad. Simply select the next slice, place the checkmark in the Trig box, and so forth, for as many slices as you want to be triggered. If two slices are selected, hitting the pad will alternate back and forth between the two slices. If more than two slices are selected to be triggered by the pad, then the slice selection is random between all the slices. But any way you slice it (pardon the pun), only a single slice will be triggered with the pad.

The fourth and final Hit Type is Stop. This may be confusing, but it works well when you have 2 pads assigned to the same Nurse Rex module, and one pad is assigned to Hit Type I (Loop Trig) and the second pad is assigned to Hit Type IV (Stop). In this scenario, pressing on Pad 1 will start the loop playing, and pressing on pad 2 will stop the loop from playing. A simple Start / Stop scenario. Although, I must say, it would be nice to be able to assign both Start/Stop to the same pad as a toggle. Not sure why it wasn’t implemented in this manner, but I’m sure there’s some complex Thor workaround for this too. 😉

Physical Bass Drum, Physical Tom Tom, Synth Bass Drum, Synth Snare, and Synth Tom Tom

The Drums without Hit Types

For the Physical Bass Drum, Physical Tom Tom, Synth Bass Drum, Synth Snare, and Synth Tom Tom drum modules, there are no variations on the Hit Types. Selecting any of the four Hit Types with these modules will have no effect on the output you hear from the drum module. Or put another way, you only get one sound out of these drums, no matter what Hit Type you select. There are no Hit Type variations here.

Physical Snare Drum

The Physical Snare Drum has four Hit Types, as follows:

  • I: Center (Plays the drum sound as if the drum stick struck the center of the drum)
  • II: Position 2 (Best described as closer to center.)
  • III: Position 3 (Best described as closer to the edge.)
  • IV: Edge (Plays the drum sound as if the drum stick struck the edge of the drum)
Physical Snare Drum Hit Types

These Hit Types are pretty self-evident, and they depend somewhat on the setup of your drum parameters. However, all these Hit Types revolve around where the drum is struck with the drum stick. In this way, you can easily create variations on drum sound by associating four pads to a single Physical Snare Drum module, and then assign each Hit Type to each pad. Then create an “Alt Pad Group” between all four pads. This way, each subsequent hit of one of the pads will result in a slightly different sound emanating from the drum.

Alternately, you can associate two pads to the same Physical Snare Drum module and have Hit Type I (Center) on pad 1 and Hit Type IV (Edge) on pad 2. Then play a pattern whereby the first 3 drum hits use pad 1 and the fourth drum hit uses pad 2. This can have the effect of creating a jazzy kind of feel with a slight change in sound between the center and edge (or center and position 3 if position IV is too harsh). These are just some of the setups you can try out.

Synth Hi-Hat

The Synth Hi-Hat has a few options when it comes to Hit Types. Here they are:

  • I: Closed (Plays a closed Hi-Hat)
  • II: Semi-Closed (Plays a semi-closed Hi-Hat)
  • III: Semi-Open (Plays a semi-open Hi-Hat)
  • IV: Open (Plays an open Hi-Hat)
Synth Hi-Hat Hit Types

As with the Physical Snare Drum, the Synth Hi-Hat is pretty self-evident when it comes to Hit Types. And you can use the variations in smilar ways to what I’ve outlined above. However, you probably would want to create an alt group between Hit Type I and II (the closed positions), as well as a separate alt group between Hit Type III and IV (the open positions).

One other thing you can do which is unique to the Hi-Hats is mimic the old “Exclusive 8 & 9 Channels” on the Redrum. What this button used to do, for those who may need a refresher, is provide the ability to play channel 8 and channel 9 exclusively on the Redrum. These two channels were usually reserved for an open and closed Hi-Hat. The rationale was that you would never hear the open Hi-Hat at the same time that you would hear the closed Hi-Hat (since usually this was one and the same Hi-Hat in the real world). So this “Exclusive” button allowed you to ensure that when either the open or closed hi hat (on separate channels in Redrum) was played, the other channel was muted.

In Kong, you can create the same setup by assigning 2 pads to the same Synth Hi-Hat module, then assigning Hit Type IV to pad 1 (open) and Hit Type I to pad 2 (closed). Label both pads so you don’t get confused which is which. Now by default, the drums are exclusive if both pads are tied to the same Hi-Hat drum module. However, if you use two different Hi-Hat drum modules assigned to two different pads, you’ll have to make both pads part of a “Mute Pad Group”  (either A, B, or C). Now when you play either drum by pressing pad 1 or pad 2, the opposite pad will be muted. Simple as can be. See the video below for an explanation and example (and yes I screwed up a little at first, but the main points are there). As always, thanks for watching!


In the end, by looking at the various Hit Types, it seems pretty evident that the Props went a long way toward trying to make alternate drum sounds and Alt groupings a big part of the new Kong Drum Designer. So use them when you can in new and creative ways, because the possibilities are truly endless. Now go forth and make beats! And drop me a comment if you want to add to this post or let me know what you think about the various Kong drum pad Hit Types. Your comments are always welcome.


30 – Automating Kong FX & More

In this tutorial, I’m going to present two ways in which you can automate the FX parameters in Kong that you probably thought could not be automated. I’ll also show you a method to create an automated Drum Roll and tie it to a Combinator button. So let’s automate what at first seems unautomatable (say that five times fast!).

In this tutorial, I’m going to present two ways in which you can automate the FX parameters in Kong that you probably thought could not be automated. I’ll also show you a method to create an automated Drum Roll and tie it to a Combinator button. So let’s automate what at first seems unautomatable (say that five times fast!).

You can download the project files here: Kong Automation Examples. There are 3 Kong examples in .rns format for you to look at. The first one goes over automating Kong FX parameters by cross-fading two Kongs. The second provides an alternate “Step Sequencer” example to automate an FX parameter from one state to another. And the third .rns file is a way in which you can create a note-repeater (not a true note repeater but a drum roll creation) using an RPG-8 Arpeggiator and Thor tied into a Kong Drum module. The Combinator in this file provides 2 buttons: 1 button acts as the drum roll (note repeater) and button 2 acts as a single-shot note player. Enjoy!

The “Cross-Fading 2 Kongs” Method

The first method is my favorite, and it comes from Kloeckno on the Propellerhead User Forum (PUF). He suggested that you could automate any parameter on the FX or Drum Modules by creating a secondary Kong device and cross-fading between the sound source Kong device and that secondary Kong device. So here’s my take on his suggestion. Let’s try it out and see how it stands up (here’s a spoiler: it works amazingly well!).

The “Kong Parameter Step-Sequencer” Method

Next, let’s take a look at an alternative approach, which uses a single Kong device as a step sequencer for a single drum hit. With each pad, you increase the parameter slightly, so that you can step between multiple instances of the same FX parameter. This can be a good idea for things such as a drum roll (so you get the added benefit of seeing how you can create a drum roll as well). Take a look and tell me what you think of this approach?

So there are two methods which you can use to automate those parameters that you thought you couldn’t directly from Kong. With a little ingenuity you can find workarounds for almost any kind of problem that you face in Reason. I’m firmly convinced of that. Though, admittedly, there are some problems that involve a lot of routing and hard work and thinking through the routings on paper to get it right. Reason always amazes me for its ability to be flexible and provide solutions for some of the toughest audio problems. In fact, it’s this flexibility and a strength of the software that you can find so many workarounds and alternate ways of thinking. Perhaps that’s why the props are at the forefront of audio software.

Automating a Drum Roll

The easiest way to re-create a drum roll and automate it is to use an RPG-8 Arpeggiator to “Hold” the note that is being played. In a Combinator, place a Kong, RPG-8 and THor. With a little routing, you can use the Thor step sequencer to play the note via the Combinator Gate in (the Arp), and then let the RPG-8 hold that note, which in turn is triggering the Kong Drum 1 module. To see an example of this, refer to the Project files. The example is included in there. When I have some time, I’ll try to put together a video for this idea as well, if time permits.

What are your thoughts? Any cool workarounds in Kong or the other new devices that you’d like to share?

27 – Kong Drum Creation A to Z

Like the title says, I’m going to provide you with a 45-minute video / blog tutorial on how to create an entire Kong 16-Pad design, using nothing more than a Rex file and some imagination. This is the A to Z of Kong drum design. And lots of tips along the way. Don’t miss it!

Like the title says, I’m going to provide you with a 45-minute video / blog tutorial on how to create an entire Kong 16-Patch design, using nothing more than a Rex file and some imagination.

Those familiar with the methods for my tutorials know that I usually provide the project files along with the technique. Nope. Not this time. Instead, I’m providing the rex file I used to create most of these drums. That way you can try it out yourself and follow along with the tutorial. Give a man a fish, they say, and he’ll eat for a day. Teach him how to fish, and he’ll never go hungry. So here’s the single Rex in a zip file: trails-rex

This method starts off with a Combinator, then two 6:2 Mixers, a spider audio/merger, and the obvious Kong Drum Designer. Then I go into how to set up the drums one at a time, starting with the Kick Drum. Using the Nurse Rex player, you load the rex file (and this can be any rex file, and start copying/pasting the rex loop one at a time into the first 8 pads. That gives you enough room to work creating all the drums you need, such as the Kick, a few toms, some snares, an open and closed hi hat, and even a reverse drum, and some other more off-the wall sounds.

After you do this, I’ll show you how you can set up the top 4 pads in Kong to trigger other devices (in this case Thor, but you can trigger any other device in Reason that accepts a Gate trigger, which is just about everything).

Finally, I go into programming the Combinator and adding some extra global Effects to play around with the tone and reverb of your drums as a whole. So check out the videos below for a complete tutorial on how to mess around with Kong and create some kick butt drums!

So that’s how you do it, or at least one of a million ways in which you can design a few drums in a Kong patch. What’s your favorite new Kong trick, and do you have any other suggestions or ideas? Please share them and let us all know.

Until next time, happy reasoning!

Reason 5 / Record 1.5 Overview

Reason 5 and Record 1.5: An overall 6 out of 10. Bottom line: The updates improve workflow, but there is nothing here which is earth-shattering, and very little that you can’t already do with Reason 4 and Record 1.0.1. Still, I’ll end up buying the upgrade because I’ve already invested $850 in the software. So what’s another $129 right?

DISCLAIMER: This is an opinion piece. This is an editorial. This is my view of the software while it is in the beta testing stages. The software is not yet finished or finalized. I take full responsibility for my opinion. But please let’s be crystal clear on this: Your rating and thoughts on the subject of the software may be completely different than mine. You may see this software as the second coming of Christ and it may bring you to the heights of orgasm. You may run out into the street totally naked yelling “This is it! Finally. It’s here! It’s here!” If that’s your thing, great. Send me a postcard from jail. I’ll be working on Reason & Record at home, as I usually am.

This is my view on the software as it stands right now with what information I have about it currently. This is based entirely on public knowledge of said software. If you agree with me, then great. If you disagree that’s ok too. Once this software is released, more than likely no one’s going to care about our opinions anyway. The time is now June 17th, 2010. All names have been changed to protect the innocent.

So here’s the talk of the town lately: Reason 5 / Record 1.5. And in case you don’t want to read through my rant, let me give you the lowdown right upfront:

Dr. Rufus Rex, the 8-legged animal: 5 out of 10

Bricks: 4 out of 10

That Roman Sea God (there’s always a deity involved): 6 out of 10

That live audio import thingamajig: 6 out of 10

King…. well you know.: 7.5 out of 10

. . . and more (secondary features): 7.5 out of 10

Overall: 6 out of 10

*(you did read that bit about names being changed in the disclaimer right?)*

To be fair, if you are a musician who cares nothing about Sound design or if you’re brand new to the program or you care more about making your workflow faster, then these ratings may be somewhat higher than mine. But for me, that’s it in a nutshell. Now will I purchase the upgrade. Sure. Why? Because I’ve already invested $850 in Propellerhead products and an extra $129 — even for the lackluster features — is not going to kill me. When you’ve run 14 km in a 15 km race, what’s one more mile?

I’d rather not be so nonchalant. I’d much rather be jumping for joy and bursting at the seams like I was for Thor. I’d rather be itching to get my hands on the new Kong features, but somehow that’s just not happening. We’ve seen Kong before in Live’s new drum setup. We’ve seen blocks in the form of scenes. And what is Octorex really trying to do? It feels like they took out your Grandfather’s car and are busily polishing it up to be sold as a fresh new idea. Sure, I love the vintage look of the thing, and I love how it rides. But can we kick-start it into the year 2010? To be fair, blocks is starting to grow on me. And Kong is definitely better than I expected, and it’s a very welcome addition to the software.

Don’t get me wrong. I love Reason. I even love Record. I love that I don’t even need to open up Reason anymore. Just launch Record and everything is there for me. Great. But where is the “wow”? I sure didn’t see it come to me in 5 days of anticipation when they were unveiling. It just kind of left me scratching my head.

Where is Recycle integration? I had to go out and buy it separately because I want to put some rex files together. And where are all those wonderful ideas turned into reality that we’ve all been adding to the Propellerhead feature suggestion forum? The ideas keep piling up. And this is the best they’ve got? Perhaps I have more faith in their programming skills. After all, they haven’t disappointed in the past. They did give us Thor after all. So maybe they’ve set the bar too high in the past that now they just can’t live up to their reputation? I don’t know for sure. I just know I expected so much more. And if I’m reading all the forums correctly, so did you.

Revisiting the Wishlist

So I went back to my old post (here it is if you need a refresher: My Reason/Record wishlist) and I looked to see how much of my dreams will actually come true in September. Green shows features implemented in Reason 5, Purple shows features partially implemented, and Red indicates those things which have not been implemented.

First, Record:

  1. Automatic Routing of the Reason mixer channels to the Record Main Mixer. Somewhat there with Record 1.0.1, however this could still be improved because routings through spiders/mergers and Redrum / NN-XT individual outs are not handled correctly.
  2. Comping for Midi as well. Nope. No improvements here.
  3. Split Performance Controller Data into Separate Lanes. Nope. No improvements here.
  4. Record Performance Controllers as automation. I think we got this with Record 1.0.1, so kudos!
  5. Tempo automation/changes on a per-track basis. Well, you can timestretch audio clips. So I’ll say this is halfway there.
  6. Display Masked Audio portion in the Audio Clip. Nope. No improvements here. Right now, there’s no visual indicator to show how far and wide the masked area is. It’s worthwhile to note that this is already pretty much implemented in the audio comp tracks. Now if we could bring that into the main arrange view, we’d be golden.
  7. Synch Reason / Record Favorites. Nope. No improvements here.
  8. Cut Note Events in the Clips. Nope. No improvements. Sometimes you DO want to split the notes, and sometimes you don’t. Provide us with the option to split the notes or not when splitting clips apart.
  9. Scale Transposition of Notes. Nope. And this one is not difficult to do. This is imminently more useful than chromatic transposition of the notes.
  10. Multiple Left and Right locators. Nope. No improvements here.
  11. More Training/Tutorials and videos included in the user documentation. Documentation is starting to improve. Microtutorials, James Bernard video series. Glad to see this getting better! Green light on this one.

And now for Reason:

  1. Adding some new Effects, especially a glitch box such as “Glitch“ Nope. Not there.
  2. Having the ability to Randomize the entire Matrix or Redrum device with one click of a button. Nope. And for this one, I’m truly saddened. Especially since almost all their changes for Reason 5 are simply workflow improvements. To miss out on this one is nuts frankly.
  3. Combinator updates: More CV connections and a better subdivided menu system get a big thumbs up from me. I would still like to be able to switch the rotaries from “pot” mode to “step” mode. But that’s a minor nit-pick. Kudos again!
  4. Integrate ReCycle into Reason (or Record). Come on guys. Seriously! Big thumbs down! When is this going to happen already? Give us sampling without the ability to slice stuff up makes you look money-hungry; holding onto Recycle like an old dog clutching a tattered bone.
  5. The ability to reverse midi and audio for backward playback. Yes. Beautiful!
  6. Tap Tempo. Thank you!
  7. When in edit mode in the sequencer, providing the ability to move notes from one clip into another. Yup. This one is added in Record 1.0. Sweet. However, I’m only giving half points here because it’s not currently available in Reason. If this makes it into Reason 5, I’ll give it the green light.

So 4 out of 18 of my original requests made it in, and 3 are halfway there. A little over 1/3 of my features made it in. I don’t think that’s too bad. You be the judge. To be fair, there may be more to remove from my list once Record graduates to 2.0, and I will say that a few things which made it into this update I’m very glad to see and would have had on my list if I had given it more thought. To name a few:

  • Neptune. I really can’t wait to get my hands on this and seeing what can be done with it from a sound design perspective. Routing Thor through it and using it in an experimental way should be really interesting.
  • Kong. Although I’m less than thrilled with the implementation — It feels cluttered with all the mini-fx machines and just doesn’t look very intuitive — I’m eager to explore some routing possibilities on the back of the device. Perhaps that’s just my nature. And I am glad to see some modeling synthesis introduced. But a Guitar modeler is really what I’d like to see more than anything. Perhaps the Props are testing the waters and we’ll see this in Reason 6.0?
  • As said before, the Combinator update with new CV and easier menu system. Yes. Thank you lord. Finally.
  • Sampling. Sure. Great. But I have a field recorder, so is this really adding to my toolbox? Not really. Sure it’s handy. But I’ve already got a workflow for this. Still, it’s a feature that’s been wanted by many, so I’ll add it to the “glad to have it” pile.

In case you didn’t know. . .

And for those that didn’t know, don’t forget to read the fine print. There’s lots of little additions to the program that you may have missed when you were enthralled with the Big 5. Some of these surprised me in that they are not hyped more. The extra CVs in the Combinator are a huge deal and should be up there in lights. However, these are the features that are relegated “second class citizen” status. You should read them nonetheless: Secondary updates to Reason/Record.

Of course, don’t forget to check out the videos from the Props home page below, and  judge for yourself if these new updates are worth your money. Most of the updates are helpful to improve workflow. But bottom line is that there is nothing here which is earth-shattering, and very little that you can’t already do with Reason 4 and Record 1.0.1. My overall take is that there are three camps:

If you are a sound engineer and have invested in purchasing both Reason and Record, then it’s probably worthwhile to upgrade.

If you are a new hobbyist or musician who has only invested in Record and/or Reason, you may not need the update at all and might be better off sticking with what you have (which is already a very powerful system).

For people working on Live recording only and who only own Record, then the only advantage is Neptune. And honestly if you’re in this boat it’s probably not worthwhile.


What’s your take on the Record 1.5 and Reason 5 package?

http://www.youtube.com/watch?v=cBdy0aTW5YI&feature=related