59 – Komplete Kongtrol (Part 2)

There is always more to be discussed where Kong is concerned, and here we’ll build upon the first article about Kong control and figure out a few enhancements and other off-kilter things we can do with the Kong device. So step inside and prepare yourself for the journey.

There is always more to be discussed where Kong is concerned, and here we’ll build upon the first article about Kong control and figure out a few enhancements and other off-kilter things we can do with the Kong device. So step inside and prepare yourself for the journey.

The project files for this article can be downloaded here: Komplete-Kongtrol-Part2. There are a few upgrades to the old files from Part 1, as well as an .rns file / Combinator file for the Note Repeating example, and an .rns / Kong patch to show how to create a pitched sample player across all 16 pads in Kong. Enjoy!

Expanding on the Previous “Thong” Patch

Previously, we created an 8-way control of Thor (and the Malstrom) filters. In this patch, we provided step by step control of each elements of the filters via the Kong pads. This time, we’ll switch things around a little so that we can add the ability to hold the pad down and the parameters “glide” upward or downward instead of stepping through each parameter’s 0-127 MIDI value. This allows you to more smoothly and quickly glide each parameter upward or downward. And the truth is that it’s a very simple implementation. Thanks goes once again to Sterioevo for his simple solution.

The idea is to go inside all the up/down Thor devices, and switch the Run Mode on the Step Sequencer from “Step” to “Repeat.” Once this is done, you can press and hold the pads to move the parameter smoothly upward or downward, as desired. The rate at which the parameter glides is determined by the “Rate” setting of the step sequencer. I found a rate of 1/16 – 1/64 is  a good setting.

Taking this approach a step further, I modified the patch by also allowing you to control the rate of all the step sequencers at once using the two free Kong pads. Pad 10 now decreases the rate and Pad 11 increases the rate. The rates are synced, and the Pitch Bend wheel is used to map the rate to the Thor devices. Finally, I added a new DDL-1 device to show the 21 different rates that can be selected. 18 on the DDL-1 = 1/16 rate on the Thor Step Sequencers.

In order to achieve a proper up / down switch for Pads 10 and 11, I had to change the notes in the Rate Up / Rate Down step sequencers and Rate Merge Spider trim pots as follows:

Rate Up Thor device: Step 1 note value = C4

Rate Down Thor device: Step 1 note value = C2

Rate Merge Spider Trim Pot Values = 88

These settings will ensure that the up / down pads properly switch between all Synced Rate values in the up / down Thor devices.
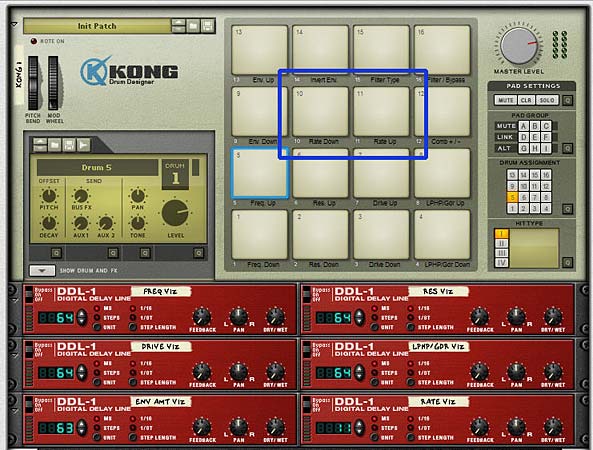
The "Thong 8-type Filter" patch updated with a new global rate control.

Note: I also updated the FM Pair patch from part 1 of this tutorial. However, since there were no pads available to control the rate, I mapped the rate control to Rotary 1. Furthermore, I added a sync control on button 1, so you can control the rate either synced or free-form, depending on whether the button is on or not. When off, the rate is synced. When on, the rate is free-form.

Note Repeating

There’s been a lot of people asking if Kong can provide “Note Repeat” functionality found on their pad controllers. It seems every week I get one or two questions on this issue. One person actually emailed me a Battery tutorial video to ask how this functionality can be replicated in Kong. After watching that video, I put together this patch to show how you could indeed apply the same concepts in Reason. It’s really not hard at all, but it does involve the use of 2 pads for each drum or sample sound (which, coincidentally, works out perfectly to replicate that Battery tutorial, as he only uses 8 drum sounds/pads). Here’s how it’s done:

  1. Ensure you have a main mixer set up in your Reason or Record document. Then create an empty Combinator, and inside the Combinator create a Kong device. The Kong device’s main audio output will be routed to the Combinator’s “From Devices” inputs.
  2. Click the “Show Drum and FX” button on Kong, which opens up the drum modules. on Drum Module 1, add a Synth Snare into the drum module. Copy and paste this snare into the next three drum modules.
  3. Open up the fifth drum module and add a “Synth Hi-Hat” into that drum module. Then copy the hi hat into the next 3 drum modules. You now have pads 1-4 with the same Snare Drum sound, and pads 5-6 with the same Hi-Hat sound.
  4. In order to stay true to the Battery video, change the pitch of each Snare Drum and Hi Hat in the following way:

    Snare (Drum Module 1) & Hi Hat (Drum Module 5): Pitch = 24

    Snare (Drum Module 2) & Hi Hat (Drum Module 6): Pitch = 12

    Snare (Drum Module 3) & Hi Hat (Drum Module 7): Pitch = 0

    Snare (Drum Module 4) & Hi Hat (Drum Module 8): Pitch = -12

    Note: I changed the pitch of each drum Module’s “Pitch” parameter, as opposed to the “Pitch Offset” located on the main Kong panel. I don’t think it really matters one way or the other which pitch parameter you end up adjusting to be honest.

  5. Holding down the shift Key, create a Thor device underneath Kong. Then completely initialize it by turning down all the polyphony settings, removing the Oscillator, Bypassing the filter, etc. In short, ensure it makes no sounds, since we’re only using the Thor Step Sequencer to generate our rolls. Label the Thor device “Snare 1.”
  6. In the Thor Step Sequencer, change the Run Mode to Repeat. Now flip it around to the back and send the Gate Output from Pad 9 to the “Gate In (Trig)” of the Thor device (you’ll need to expand Thor fully to access the Step Sequencer CV inputs and outputs.
  7. Next, send the Gate / Velocity CV output from Thor to the Gate Input on Pad 1 in Kong. With this setup, you can use Pad 1 to trigger a 1-shot for the Snare drum, and Pad 9 to trigger a roll for as long as your finger is pressing the Pad (this is your “Note Repeat” functionality).

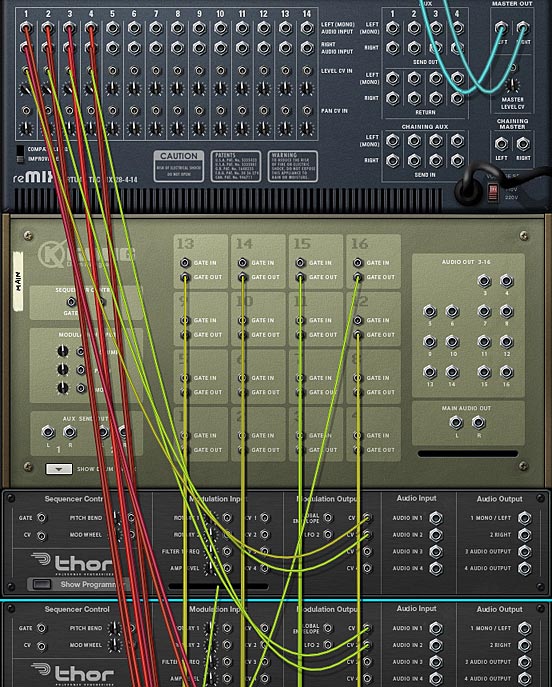
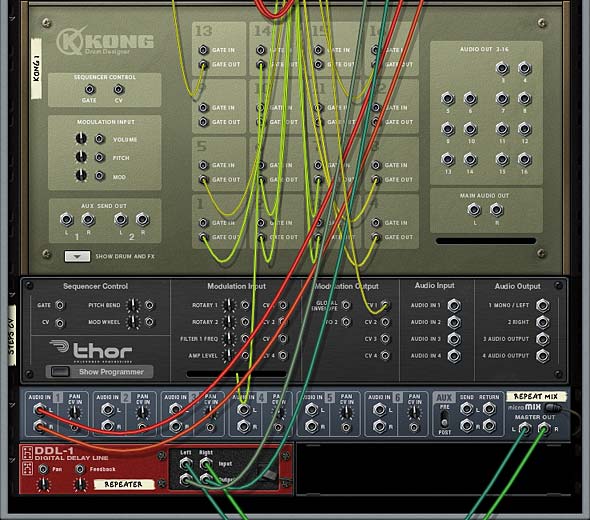
    The Gate in / out CV cables from Kong into the Thor. Pad 9 triggers the step sequencer to start, and the Gate output is sent to Pad 1 to start the roll of the Kong drum.
    The Gate in / out CV cables from Kong into the Thor. Pad 9 triggers the step sequencer to start, and the Gate output is sent to Pad 1 to start the roll of the Kong drum.
  8. Repeat this process by duplicating the Thor device 7 more times, and route it to the other pads in sequence. Pads 9-12 become the Snare Rolls (or Snare Note Repeat), and Pads 13-16 become the Hi-Hat Rolls (or Hi Hat Note Repeat).
  9. Finally, we want to provide a way to speed up or slow down the rolls. This can be achieved quite easily by mapping all the Thor devices’ Step Sequencer rate to a Combinator knob. Open up the Combinator programmer, select the first Snare 1 Thor device, and enter the following line in the Modulation Routing section:

    Rotary 1 > Synced Rate : 0 / 20

  10. Now enter this line for all the Thor devices so that the Rotary will globally change the speed or Rate of your drum rolls when you press pads 9-16. You can now create a pitched roll going from a high pitch to a low pitch by playing from pads 9 > 10 > 11 > 12 for the Snare, or pads 13 > 14 > 15 > 16 for the Hi Hat. If you want the rolls slower, turn Rotary 1 to the left. If you want them faster, turn Rotary 1 to the right.
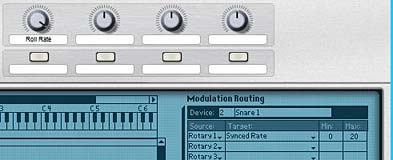
Setting up the Combinator's Rotary 1 to control the rate of the Drum Rolls.

Note: You don’t have to use a “Synced Rate” necessarily. Try letting the rate go freeform for speeds that are outside the normal synced tempo pace of the song. To do this, you’ll need to turn off the “Sync” button in all the Thor Step Sequencers and then change the Combinator Modulation Routing for all the Thors from “Synced Rate” to “Free Rate.” This can produce some chaotic results which might work better, depending on the type of beats you want to lay down on your track.
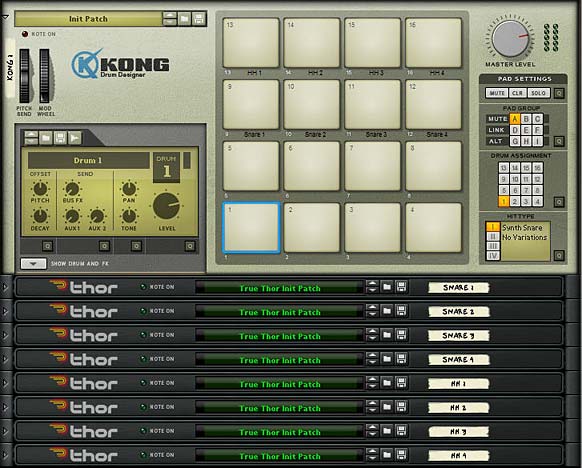
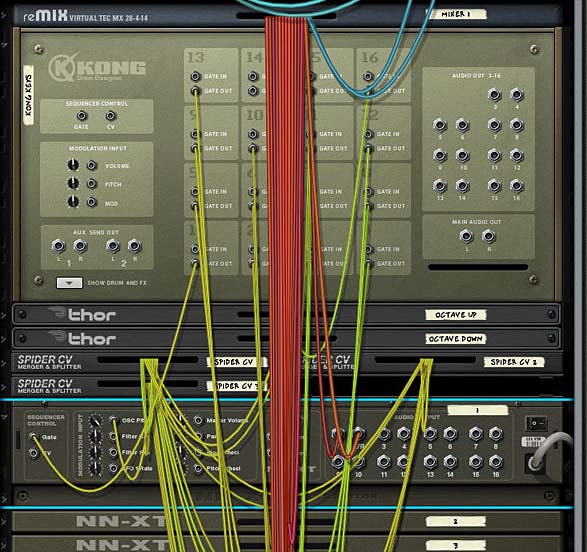
The Kong Drum Roll Setup.

Pitching for any Sample or Sound (the Akai MPC “16 Level” function)

One other little trick that many people have asked about is the ability to take one sample and spread the pitch out across the 16 pads in Kong (Pitching it up or down). This, too, is an easy thing to setup, but it might not be that obvious at first. This is because on most pad controllers (like the Maschine, for example), you select the sample, press a button, and the sample is layered on all pads at different pitches. Kong is different. You can’t select one sample and hit a button and have that sample pitched across all the pads. Instead you have to select a sample, copy it across all the drum modules, and then pitch the sample differently in each drum module. Once done, you have your setup and can save it. If you think of it as a template, you can go back in and switch out the samples, and save a new version of the Kong device. Then you can create a library of pitched sample devices for any and all of your sounds. 1 Kong per sample.

I provided a hint to how these pitch changes can be made up above when I was discussing the “Note Repeat” function. This is what I’m going to call the “Easy way.” This time, however, we’ll use a sample; pitching it up and down across the entire 16 pads. Here’s how you set it up:

Pitching a Sample across 16 Kong Pads — The “Easy” Way

  1. Create a Mixer and then a Kong device (doesn’t have to be inside a Combinator).
  2. Click the “Show Drum and FX” button to open it up to the first drum module. Click the Drum Module drop-down arrow and select “NN-Nano Sampler.” Click the “Browse Sample” button and load up a sample of yours or a sample from the Factory Sound Bank.
  3. Right-click and select “Copy Drum Patch” (Ctrl+C) and then select Drum Module 2 by pressing Pad 2, and then right-click over the drum module area and select “Paste Drum Patch” (Ctrl+V). Do this for all 16 Drum Modules so that you have the same sample across all 16 pads.
  4. Now for each drum module, change the “Pitch Offset” parameter found on the main Kong panel. Since this parameter can go from -120 to +120 (range of 240), you can divide this up into increments of 15 or 16 roughly (240 / 16 = 15). So on Pad 1, change the Pitch Offset to -120, on Pad 2, change the Pitch Offset to -105, on Pad 3, change the Pitch Offset to -90, etc. all the way up to Pad 16.

Now you can play the sample back and have its pitch spread across all the Kong pads.
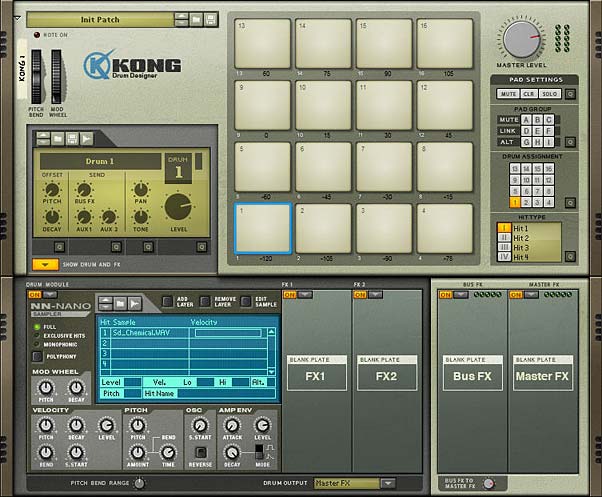
The front of the Kong device with the same sample copied into all drum modules and the pitch varied across all 16 pads.

Pitching a Sample across 16 Kong Pads — The “Alternative” way

The hard way involves creating an up / down set of pads for the Pitch parameter in Kong and then loading the same sample into Pads 1-14. By now you should be familiar with how to set this up if you read the first part to my Komplete Kongtrol article here. So I shouldn’t have to repeat this setup here. But just note that this is another way you could set things up in Reason. The benefit to this type of setup is that you can control multiple samples at once (up to 14) with a global pitch up / pitch down set of pads. It all depends on what you want to accomplish.

Any thoughts on these Kongtrolling methods?

58 – Taking Komplete Kongtrol

This tutorial should prove a little enlightening for those that only think of Kong as a basic drum module. Here we’re going to twist it into the ultimate controller for everything under the sun. For starters, I’ll show how Kong can control 8 filters at once, and then I’ll move on to use Kong to control the FM Pair Oscillator in Thor. Using some of these methods, you’ll be able to control pretty much anything in Reason or Record with Kong; moving traditional device control from a basic keyboard to a Pad controller.

This tutorial should prove a little enlightening for those that only think of Kong as a basic drum module. Here we’re going to twist it into the ultimate controller for everything under the sun. For starters, I’ll show how Kong can control 8 filters at once, and then I’ll move on to use Kong to control the FM Pair Oscillator in Thor. Using some of these methods, you’ll be able to control pretty much anything in Reason or Record with Kong; moving traditional device control from a basic keyboard to a Pad controller.

Sound exciting? I thought so.

You can download the project files here: Taking-Komplete-Kongtrol. This file contains 2 .rns and 2 .cmb files that are outlined below. Both require Reason 5 or Record 1.5 due to the fact that it uses the new Kong device and new CV inputs on the back of the Combinator. There is also a “Volume Control” example .rns file for you to get your feet wet.

Note also that I’ll be unplugged until next Thursday April 15th, so don’t take it personally if I don’t respond to questions until that time. Some times you just have to unplug from things for a bit. But feel free to leave me a little love. I promise to get to all your comments or questions when I jump back online. Have a great week! 🙂

A Little Background

When I was working on my mammoth “Key Flux FX Processor” patch I got a post on the Propellerhead User Forum from someone who jokingly said “what’s next? A Kong controlling Thor? A Thong?” After I stopped laughing and rolling around on the floor, I thought about it for a minute and said “well why not?” And that was the start to this tutorial here. I decided I wanted to try to control Thor with Kong. Whether or not this is practical is for you all to decide. For my part, I can see this being a new fun way to play around with the devices inside Reason.

Understanding the Kong Control Concepts

There are two main concepts that I’d like to outline here. The first is the idea of using the Pads in Kong as an up / down selector switch to transpose MIDI values up or down. The other is the idea of visualizing these changes in Reason, since visualization in Reason (and Kong especially) is somewhat limited.

The first concept was opened up to me by Ed Bauman of EditEd4TV fame. In the midst of his working on recovers for his 80’s band, I asked him to help me figure out how to transpose from one octave to the next using the Kong pads. This helped me set up the Kong Piano Roll Keyboard (again, that was explored in another article). So credit where credit is due. Without his help on that project, I couldn’t have figured out some of these tangential concepts to control other parameters with the Kong pads.

The concept works like this: Using one pad in Kong for the upward movement and one pad for the downward movement, you use the Thor Step Sequencer “Note Transpose” function to manipulate a device parameter that goes from 0 – 127 MIDI value. Each time the up or down pad is pressed, it transposes the value by an increment of “1.” For example, you can go from 64 to 65 to 66 to 67 and so on, using the “Up” pad. Since Reason allows you to interchange CV values (using Note CV for Gate or Gate CV for Note), this isn’t difficult to accomplish.

Here’s the basic setup to control the Volume of a Channel in the Mixer (just as an example):

  1. Open up Reason with a Main Mixer. Then create a Combinator with a 14:2 Mixer.  Underneath that, create a sound generating device (for simplicity’s sake, create a Subtractor and load up your favorite Sub patch). But note that this can be any device you like. Underneath that, create a Matrix and add a pattern in, so that it is playing the Subtractor.
  2. Now holding the Shift key, create a Kong device. Still holding Shift, create a Thor device and call it “Vol Up.” Completely initialize the Thor device by pulling down all the parameters, removing the Oscillator and Filter, and turning everything to 0 (zero). Also while we’re at it, pull down the level of the Channel on the Mixer where the Subtractor is connected to 0 (zero).
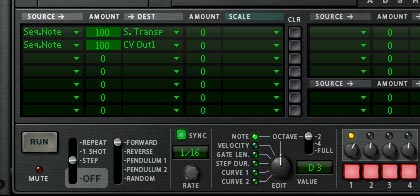
  3. Open up the Thor programmer, and in the Step Sequencer set the Run Mode to “Step,” Step Count to “1,” and set the first step’s note to “D3.” In the Modulation Bus Routing System (MBRS), set up the following 2 lines in the first 2 slots:

    Seq. Note : 100 > S. Transp (Step Sequencer Note : 100 > Step Sequencer Transpose)

    Seq. Note : 100 > CV Out1

  4. Duplicate the “Vol Up” Thor device and rename it “Vol Down.” Then go into this Thor’s Step Sequencer and change the note value of step 1 to “A#2.”

    The MBRS settings for the "Vol Up" Thor device.
    The MBRS / Step Sequencer settings for the "Vol Up" Thor device.
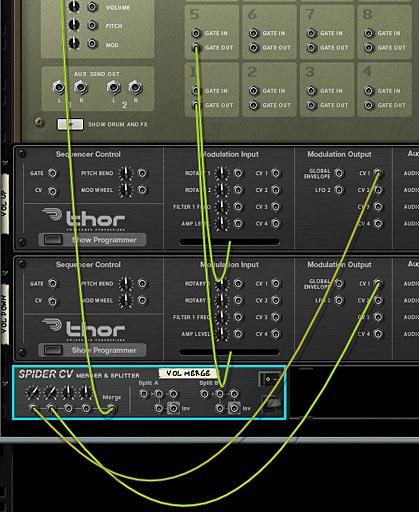
  5. Next, holding the Shift key down, create a Spider CV Merger/Splitter at the bottom of the Combinator rack and name it “Vol Merge.” Now it’s time to route everything up.
  6. Flip the rack around to the back, and on the Combinator’s 14:2 Mixer, turn the Subtractor channel’s level trim knob up to 127. Then connect the Merged output from the “Vol Merge” Spider to the Level CV input on the Mixer channel.
  7. Connect the Kong’s pad 1 “Gate Out” CV to the “Gate In (Trig)” CV input on the “Vol Down” Thor. Also connect Kong’s pad 5 “Gate Out” CV to the “Gate In (Trig)” CV input on the “Vol Up” Thor.
  8. Connect the CV 1 Modulation Output from the “Vol Up” Thor to the “Vol Merge” Spider’s Merge Input 1. Also connect the CV 1 Modulation Output from the “Vol Down” Thor to the “Vol Merge” Spider’s Merge Input 2. Set both trim knobs to a value of “84.” That’s the magic CV number that makes things happen correctly.

    The CV routing for the Up / Down Volume Control using the Kong Pads
    The CV routing for the Up / Down Volume Control using the Kong Pads
  9. Flip the rack to the front again, and label Pad 1 in Kong “Vol Down” and Pad 5 “Vol Up.” Now play your device by pressing “Play” on the Transport and you’ll hear the volume at level 64. Press Pad 5 about 10-15 times and you’ll start hearing the volume rising. Press Pad 1 and the volume drops. You’ve now set up Kong to act as your up / down fader for the volume of your Subtractor device.

Visualizing the Kong Volume Control

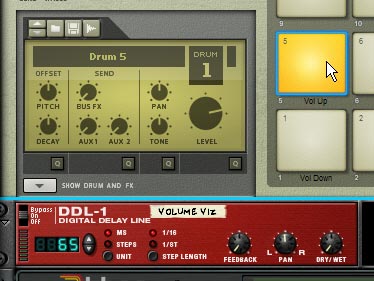
Since there’s no visualization in Kong, it’s hard for us to track where the volume is located for the Subtractor. Here’s one way to do it using the DDL-1 device. Note that this trick is curtosy of Sterioevo, and I can’t thank him enough for showing it to me. See the comments to my previous “Kong FX Chain Builder” tutorial for more information on the ins and outs of this visualizing method.

  1. Building on our previous volume level control, hold Shift down and create a DDL-1 device underneath your Kong device. Label it “Volume Viz” or something like that. Also change the Unit to “MS” for Milliseconds.
  2. Open up the Combinator programmer, select the “Volume Viz” device, and in the Modulation Routing area, set up the following line:

    CV In 1 > Delay Time (MS) : 1 / 127

  3. This sets up the CV 1 input on the combinator to change the display of the DDL-1 to show values between 1 and 127.
  4. Now we just need to send the same CV merged signal to also send a value to the CV 1 input on the Combinator, so flip the rack around to the back, and move the CV merged output to one of the A split outputs. Then connect the Merged output to the Split A input on the same “Vol Merge” Spider.
  5. Finally, send another A split output to the Combinator’s new CV 1 input and turn its trim knob all the way to 127.
The DDL-1 used as a visualizer for the Volume setting

You’re all set. Now when you flip to the front of the rack and start pressing the volume pads, you’ll see the value update in the DDL-1 device. I know, it’s pretty sweet. You now have visualization of your volume setting.

A Look at the “Thong 8-Type Filter FX Processor” Combinator

So to answer the question about controlling Thor with the Kong device, I set up 2 patches. The first one is the “Thong 8-Type Filter FX Processor” which can be used as an insert effect on any sound you like. This patch allows you to switch between 8 different filter types and control them all via the Kong pad interface. Here’s a rundown of the pad assignments. Note: You do not want to use any of the Combinator parameters, since all the CV for the Rotaries, as well as the Mod Wheel was used to create the pad assignments and visualization. So simply create a track for the Kong device in the Combinator, and use that track as your control.

Note: I made all the up / down switches bipolar so that everything starts out with a value of 64. This is because each pad press only moves up one midi value, and if you started out at 0 (zero), you’d have a long way to go to get higher up on the register. Starting out at the middle makes working with the up / down pads a lot easier IMHO.

  • Pads 5 & 1: Controls the Frequency of all filter at once. Pad 5 moves the filter frequency up and Pad 1 moves the filter frequency down. These two pads together act as the frequency rotary control. Visualization for the Frequency setting can be seen on the “Freq Viz” DDL-1 device located just below the Kong device.
  • Pads 6 & 2: Controls the Resonance of all filters at once. Pad 6 moves the resonance up, and Pad 2 moves the resonance down. These two pads together act as the resonance rotary control. Visualization for the Resonance setting can be seen on the “Res Viz” DDL-1 device located just below the Kong device.
  • Pads 7 & 3: Controls the Drive of all filters at once. Pad 7 moves the drive up, and Pad 3 moves the drive down. These two pads together act as the drive slider control. Visualization for the Drive setting can be seen on the “Drive Viz” DDL-1 device located just below the Kong device.
  • Pads 8 & 4: Controls the LPHP parameter of the “Notch” and “Peak” filters, as well as the Gender parameter of the “Formant” filter. Pad 8 moves the LPHP and Gender parameters up, while Pad 4 moves the LPHP and Gender parameters down. These two pads together act as the LPHP and Gender rotary controls. Note that the filter must be set to “Notch,” “Peak,” or “Formant” for you to hear the effects of these two pads. Visualization for the LPHP/Gdr setting can be seen on the “LPHP/Gdr Viz” DDL-1 device located just below the Kong device.
  • Pads 13 & 9: Controls the Envelope Amount of all filters at once. Pad 13 moves the envelope amount up, while Pad 9 moves the envelope amount down. Together, these two pads act as the envelope amount rotary. Note: To turn off the envelope entirely, reduce the envelope amount to 0 (zero) using the “Env Down” Pad (Pad 9). If you wish to insert your own pattern sequence to control the envelopes, change the pattern sequence in the Thor Filter device’s Step Sequencer. Each Thor Filter device Step sequencer controls the corresponding filter envelope, except for the “Peak” Thor Filter, which controls both the “Peak” Thor and “AM” Malstrom filters. Visualization for the Envelope Amount setting can be seen on the “Env Amt Viz” DDL-1 device located just below the Kong device.
  • Pad 14: Controls whether the Filter Envelope is turned on or off for all filters. Visualization for this pad can be seen on the fourth band of the “Filter Type Viz” BV512 Vocoder device.
  • Pad 12: Controls whether the “Comb” filter is set to plus (+) or minus (-). Visualization for this pad can be seen on the third band of the “Filter Type Viz” BV512 Vocoder device. Note that this is a very specific setting, and the filter type must be set to “Comb” in order for you to hear anything.
  • Pad 15: Controls which filter is heard. Visualization for the Filter Type setting can be seen on the first band of the “Filter Type Viz” BV512 Vocoder device.  Selections can be one of the following 8 different filter types:
  1. LP (Thor Low Pass Ladder Filter)
  2. HP (Thor State Variable Filter – High Pass mode)
  3. Comb (Thor Comb Filter)
  4. Formant (Thor Formant Filter)
  5. BP (Thor State Variable Filter – Band Pass mode)
  6. Notch (Thor State Variable Filter – Notch mode)
  7. Peak (Thor State Variable Filter – Peak mode)
  8. AM (Malstrom AM Filters – both Filter A and B are set exactly the same way when controlling this filter).
  • Pad 16: Filter / Bypass. This provides you with a quick way to switch between the Filtered sound and the non-filtered sound. Think of this as a Wet / Dry switch.

A Look at the “Oscillator Kongtrol – FM Pair” Combinator

The second patch is a Kong controlling an Oscillator inside Thor. To start things off easy, I decided to control the FM Pair Oscillator. Again, I made all the up / down switches bipolar so that everything starts out with a value of 64. This is because each pad press only moves up one midi value, and if you started out at 0 (zero), you’d have a long way to go to get higher up on the register. Starting out at the middle makes working with the up / down pads a lot easier IMHO.

The FM Pair Oscillator control has at least one interesting twist. Since controlling the Carrier / Modulator pair is unlike controlling a MIDI value of 0 – 127, we need to figure out the proper settings to control a MIDI value of 1 – 32. This is done by going into the Up / Down Thor devices and changing the note values of the first step to the following:

“Up” Thor device: G#3

“Down” Thor device: E2

Once this is updated, you can control parameters that have 32 options. This does not only mean the FM Pair Carrier and Modulator, but also the Matrix pattern devices, or Thor’s Wavetable Oscillator “Table” selection. Anything with 32 MIDI values can now be controlled and stepped through one at a time in Kong.

Here’s a rundown of the pad assignments. Note: You do not want to use any of the Combinator parameters, since all the CV for the Rotaries, as well as the Mod Wheel was used to create the pad assignments and visualization. So simply create a track for the Kong device in the Combinator, and use that track as your control.

  • Pads 5 & 1: Controls the Pitch of the Oscillator. Pad 5 moves the pitch up and Pad 1 moves the pitch down. Visualization for the Pitch setting can be seen on the “Pitch Viz” DDL-1 device located just below the Kong device.
  • Pads 6 & 2: Controls the FM Parameter of the Oscillator. Pad 6 moves the fm up and Pad 2 moves the fm down. Visualization for the fm setting can be seen on the “FM Viz” DDL-1 device located just below the Kong device.
  • Pads 7 & 3: Controls the Carrier setting of the Oscillator. Pad 6 moves the carrier setting up and Pad 2 moves the carrier setting down. Visualization for the carrier setting can be seen on the “Carrier Viz” DDL-1 device located just below the Kong device.
  • Pads 8 & 4: Controls the Modulation setting of the Oscillator. Pad 6 moves the Modulation setting up and Pad 2 moves the modulation setting down. Visualization for the mod setting can be seen on the “Mod Viz” DDL-1 device located just below the Kong device.
  • Pads 13 & 9: Controls the Amp Envelope’s “Attack.” Pad 13 moves the Attack setting up (slower attack) and Pad 9 moves the attack down (faster attack). Visualization for the envelope’s attack can be seen on the first and second band of the “Amp Vizualize” BV512 Vocoder device, located just below the 4 DDL-1 devices. The first band shows the upward setting, and the second band shows the downward setting (much easier to see when you are actually using the Kong controller – so download the patch and try it out).
  • Pads 14 & 10: Controls the Amp Envelope’s “Decay.” Pad 14 moves the Decay setting up (longer decay) and Pad 10 moves the decay down (shorter decay). Visualization for the envelope’s decay can be seen on the third and fourth bands of the “Amp Vizualize” BV512 Vocoder device, located just below the 4 DDL-1 devices. The third band shows the upward setting, and the fourth band shows the downward setting.
  • Pads 15 & 11: Controls the Amp Envelope’s “Release.” Pad 15 moves the Release setting up (longer release) and Pad 11 moves the release down (shorter release). Visualization for the envelope’s release can be seen on the fifth and sixth bands of the “Amp Vizualize” BV512 Vocoder device, located just below the 4 DDL-1 devices. The fifth band shows the upward setting, and the sixth band shows the downward setting.
  • Pads 16 & 12: Controls the Panning of the sound. Pad 16 moves the panning left, while Pad 12 moves the panning right. Visualization for the panning can be seen on the seventh and eighth bands of the “Amp Vizualize” BV512 Vocoder device, located just below the 4 DDL-1 devices. The seventh band shows the leftward setting, and the eighth band shows the rightward setting.

Where can you go from Here?

Sometimes it’s the smallest concepts that can lead to the biggest revelations; opening doors to new ideas and solutions. This is definitely one of those cases. Using these simple ideas, you can now control virtually every possible parameter in Reason via the Kong Pads. These are just two types of control devices I built here. But there’s nothing stopping you from building a Reverb Kong controller (ReKong 7001?), or a DDL-1 controlled by Kong (DDKong-2?). And there’s nothing stopping you from building a controller that allows you to combine Oscillators or Filters or any number of things together that can be triggered by Kong pads. Just use your imagination and come up with some cool ways to take your pad controlling to new heights. This is just the tip of the iceberg. Where you go from here is all up to your patience and ambition.

Any thoughts?

57 – Kong FX Chain Builder

In this tutorial I’m going to show you how to create a flexible FX chain that has 8 stops along the chain, and at each of these stops, allows you to select from 1 of 6 different FX devices. This means you have a total of 48 different FX devices to select from in the chain, and the possible permutations of all these FX are 8×7 possible FX combinations, which amounts to 40,320 possible FX chain permutations.

In this tutorial I’m going to show you how to create a flexible FX chain that has 8 stops along the chain, and at each of these stops, allows you to select from 1 of 6 different FX devices. This means you have a total of 48 different FX devices to select from in the chain, and the possible permutations of all these FX are 8×7 possible FX combinations, which amounts to 40,320 possible FX chain permutations. Don’t believe me? Go here: http://www.vpgenius.com/tools/combin.aspx. That’s a hell of a lot of possibilities. Now change the order of your FX chains, and you end up with double, triple and even more possibilities. So let’s see how it’s all done.

You can download the project files here: Kong-FX-Chain-Builders. The file contains 3 different FX chain combinators that are outlined below. The effects in each chain are the same. The only difference is that they each present the chain in a different order. You can take this idea and build any number of effects chains in any order you wish to combine both “Serial” and “Parallel” processing of your audio signal through various FX that you create in Reason. It’s all only limited by your own imagination.

Introducing the “Kong FX Chain Builder” Patch

The beauty of this type of system lies also in the fact that you can combine a “Serial” and “Parallel” audio system together. So when I was working on my “Key Flux FX Processor” in project number 56 here on my site, I introduced the notion of a Parallel system, whereby the same audio was sent through many different FX chains and then sent out to the soundcard. In this tutorial, I’m going to introduce the idea of a Serial FX system, and merge it with a Parallel FX system so that you get much more flexible audio routing and audio possibilities.

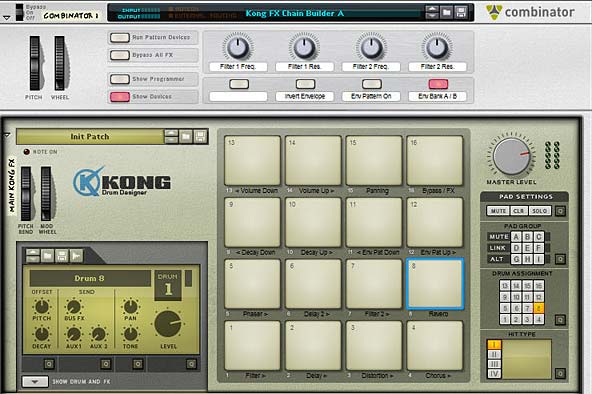
The main controls for the Kong FX Chain Builder (and Combinator Controls)

The idea is pretty simple. First you have a set of FX in a chain, as follows:

Filter > Delay > Distortion > Chorus > Phaser > Delay 2 > Filter 2 > Reverb

Now, each of these “stops” along the chain also has 7 different selectable FX sound possibilities, as follows:

Filter>

(Pad 1)

Delay>

(Pad 2)

Distortion>

(Pad 3)

Chorus>

(Pad 4)

Phaser>

(Pad 5)

Delay2>

(Pad 6)

Filter2>

(Pad 7)

Reverb>

(Pad 8 )

FX 1 FX 1 FX 1 FX 1 FX 1 FX 1 FX 1 FX 1
FX 2 FX 2 FX 2 FX 2 FX 2 FX 2 FX 2 FX 2
FX 3 FX 3 FX 3 FX 3 FX 3 FX 3 FX 3 FX 3
FX 4 FX 4 FX 4 FX 4 FX 4 FX 4 FX 4 FX 4
FX 5 FX 5 FX 5 FX 5 FX 5 FX 5 FX 5 FX 5
FX 6 FX 6 FX 6 FX 6 FX 6 FX 6 FX 6 FX 6
Dry Audio Dry Audio Dry Audio Dry Audio Dry Audio Dry Audio Dry Audio Dry Audio


The Dry audio is there so that you have a selection that sets things back to being the original audio, like a pass-through. Using this table you can come up with an amazingly large array of different sounds by mixing and matching the different FX together. You can, for instance, create the following:

Filter >

(Pad 1)

Delay >

(Pad 2)

Distortion >

(Pad 3)

Chorus >

(Pad 4)

Phaser >

(Pad 5)

Delay 2 >

(Pad 6)

Filter 2 >

(Pad 7)

Reverb >

(Pad 8 )

FX 1 FX 1 FX 1 FX 1 FX 1 FX 1 FX 1 FX 1
FX 2 FX 2 FX 2 FX 2 FX 2 FX 2 FX 2 FX 2
FX 3 FX 3 FX 3 FX 3 FX 3 FX 3 FX 3 FX 3
FX 4 FX 4 FX 4 FX 4 FX 4 FX 4 FX 4 FX 4
FX 5 FX 5 FX 5 FX 5 FX 5 FX 5 FX 5 FX 5
FX 6 FX 6 FX 6 FX 6 FX 6 FX 6 FX 6 FX 6
Dry Audio Dry Audio Dry Audio Dry Audio Dry Audio Dry Audio Dry Audio Dry Audio


And that is just one example.

Switching the Order of Effects in the Chain

The Kong FX Chain builder from the back of the rack

Now I know some of you are going to say, “well why can’t I switch the order of the FX chain?” So instead of having the Filter come before the Delay, how about switching it so that the Filter comes after the delay. And to that I’ll say that Reason is not the easiest software to work with when it comes to making routing decisions such as these and building it into a single setup is very difficult. But thankfully it’s pretty easy to build multiple instances of the Combinator to come up with any FX chain order you like. The trick is to flip to the back of the rack and change the following:

  1. The order of the “Gate Out” CVs from the first 8 Kong Pads
  2. The order of the 14:2 Submixers and their associated splitters. The signal flow goes from the “To Devices” of the Combinator into the first Effect’s splitter. Then the 14:2 Submix main output of the first effect goes into the second effect’s splitter. And so on down the chain, until the final output goes into the Pan splitter device. The Pan also has a bank of different “Global” LFO Panning selections. This can be selected on Pad 15.

So anyway, this just shows you that with a little thought, you can create a variety of FX of your own and route them in a serial way. Then use the “Parallel” processing idea to create multiple effects at each stop in the chain. Simple enough right?

Here are the other 2 effect chains I came up with. Feel free to create your own based on variations that work for you. You can either change the routing scheme as I outlined above, or you can change the actual effects at each stop. As you can see, you don’t even need to have all the FX in play within the chain. You can keep any part of the chain set to “Dry Audio” so that it will not be affecting the chain at all. This means you can make your chain simple with only 1 effect in play, all 8 in play, or any amount in between. Here are the other two effect chains I put together:

Delay > Filter > Phaser > Delay 2 > Chorus > Filter 2 > Reverb > Distortion

Phaser > Chorus > Filter > Reverb > Distortion > Delay > Delay 2 > Filter 2

Working with the “Kong FX Chain Builder”

There are 2 components to working with the Kong FX Chain Builder: 1. The Combinator and 2. The Kong device. Both work together to create your FX chain. You can also use them “Live” and play the different effects out on the pads in real-time, or else build them up in the studio until you find a combination of effects that works for your sound, and then just leave this setting as it is (or save it for future recall).

I’ll start off with the Kong device. Note that if you want to fully utilize the device, you should create a track for it in Reason or Record’s Main Sequencer. This way, you can not only play the Kong device, but also record your Kong pad changes over time. And you can also lock your pad control surface to the Kong device and another controller to the Combinator; essentially controlling them both via 2 different controllers at the same time. So here are all the Kong pad settings:

  • Pads 1 to 8: These are the 8 stops in the FX chain going from Pad 1 > 2 > 3 > 4 > 5 > 6 > 7 > 8. In the original file I created (Kong FX Chain Builder A), this goes from Filter > Delay > Distortion > Chorus > Phaser > Delay 2 > Filter 2 > Reverb. The Pads act as a cycle, starting with a dry signal, then going through 6 different possible FX. The pad cycles through these 7 positions. So each time the pad is pressed, you’ll hear a new effect inserted into the chain.
  • Pads 9 and 10: Decay Down / Decay Up – These pads will shift the decay of all the Reverb effects upward or downward. So you need to have the Reverb effect turned on (in other words, you need to have one of the 6 Reverbs enabled; not the dry signal).
    Note that there is an upper and lower limit, which, when reached, will not go any further. However, the pad can continue to go upward or downward for a few more times. This means that if you push the decay all the way to zero, and still hit the “Decay Down” pad, it will continue to move downward. So it may take a few more Pad pushes on the “Decay Up” pad to get it back to a “zero” postion (until you start hearing the decay again). This is true of all the Up/Down pads.
  • Pads 11 and 12: Envelope Pattern Down / Envelope Pattern Up – These pads will shift the matrix pattern banks upward or downward. These curve patterns are used to “play” the envelope amount on all the filters in the system. Therefore, you need to have at least one filter turned on to hear anything. You also need to have the “Env Pattern On” button (button 2 on the Combinator) enabled. There are 25 patterns on each Matrix (from A1 to D1), for a total of 50 patterns from which to select (you need to use Button 4 on the Combinator to switch between Matrix A and Matrix B).
    Note that there is an upper and lower limit, which, when reached, will not go any further. However, the pad can continue to go upward or downward for a few more times. This means that if you push the patterns all the way down to A1 on the Matrix, and still hit the “Env Pat Down” pad, it will continue to move downward. So it may take a few more Pad pushes on the “Env Pat Up” pad to get it back to the “A1” postion (and get the patterns to start moving forward again). This is true of all the Up/Down pads.
  • Pads 13 and 14: Volume Down / Volume Up – These pads will shift the global volume upward or downward. Note that there is an upper and lower limit, which, when reached, will not go any further. However, the pad can continue to go upward or downward for a few more times. This means that if you push the volume all the way down to zero, and still hit the “Volume Down” pad, it will continue to move downward. So it may take a few more Pad pushes on the “Volume Up” pad to get it back to a “zero” postion (until you start hearing the volume again). This is true of all the Up/Down pads.
  • Pad 15: Panning. You can select from 6 different Auto-panning effects, which are global and affect the signal after it has gone through all 8 effect stops in the chain. There is also a seventh “dry” position, which is on by default. The Pad cycles through all 7 positions (6 “auto-panners” and 1 “dry” position).
  • Pad 16: FX / Bypass – this allows you to switch between hearing the effects chain or hearing the original “dry” signal.

The Combinator controls are outlined below:

  • Pitch Bend: Not assigned.
  • Mod Wheel: Controls the envelope amount on all the filters. This is used in conjunction with the Envelope patterns in both Matrixes that also control the envelope amount. In other words, you can use the Mod Wheel to scale the envelope amount, and therefore, how much the envelope is affected by the patterns or not. If you wish to control the envelope amount without having any patterns control the envelope, disable button 3 on the Combinator, and then use the Mod Wheel, which will now be the only parameter affecting the amount of envelope applied to the filter(s).
    Note also that both the Mod Wheel and the Patterns affect all filter envelopes globally; both “Filter 1” and “Filter 2.” And of course, at least one filter needs to be added into the FX chain for you to hear the effect of the Mod Wheel or Patterns applied to the Filter Envelope amount.
  • Rotary 1: Filter 1 Frequency. Adjusts the Frequency of the first filter in the chain. All the filter selections for “Filter 1” are affected using this rotary, so that as long as you have one of the six filters enabled in the Filter 1 slot, the Frequency can be adjusted.
  • Rotary 2: Filter 1 Resonance. Adjusts the Resonance of the first filter in the chain. All the filter selections for “Filter 1” are affected using this rotary, so that as long as you have one of the six filters enabled in the Filter 1 slot, the Resonance can be adjusted.
  • Rotary 3: Filter 2 Frequency. Adjusts the Frequency of the second filter in the chain. All the filter selections for “Filter 2” are affected using this rotary, so that as long as you have one of the six filters enabled in the Filter 2 slot, the Frequency can be adjusted.
  • Rotary 4: Filter 2 Resonance. Adjusts the Resonance of the second filter in the chain. All the filter selections for “Filter 2” are affected using this rotary, so that as long as you have one of the six filters enabled in the Filter 2 slot, the Resonance can be adjusted.
  • Button 1: Not Assigned.
  • Button 2: Invert Envelope. This is a simple envelope invert button, and affects all filters in both the “Filter 1” and “Filter 2” slots in the FX chain.
  • Button 3: Envelope Pattern On. This turns on the envelope pattern Matrixes so that the curve pattern that is selected in Matrix A or B will affect the envelope amount of all Filters in both “Filter 1” and “Filter 2” slots in the FX chain. There are 2 parameters that both affect the Filter Envelope Amount: The pattern here, and the Mod Wheel. The higher you raise the Mod Wheel, the higher the Envelope amount. You can use a combination of the pattern and Mod Wheel to effectively “play” with the Filter Envelope Amount parameter. The reason I set it up this way is that you have ultimate control over the envelope amount. For example, you can turn off the pattern by keeping this button (button 3) disabled. Then use the Mod Wheel to scale the amount upward or leave it fully off (when the Mod Wheel is fully down). Or you can turn on the pattern and leave the mod wheel fully down to have the amount controlled solely by the pattern. Or use both in combination to play around with the envelope amount.
  • Button 4: Envelope Bank A / B. Selects between the two pattern banks (2 Matrixes) that affect the Envelope Amount parameter on all filters (read above for more information). There are 25 patterns on each Matrix (from A1 to D1), for a total of 50 patterns from which to select. Button four switches between the first 25 patterns on Matrix A (when the button is disabled) to the second set of 25 patterns on Matrix B (when the button is enabled).

Visualizing the active FX Chain

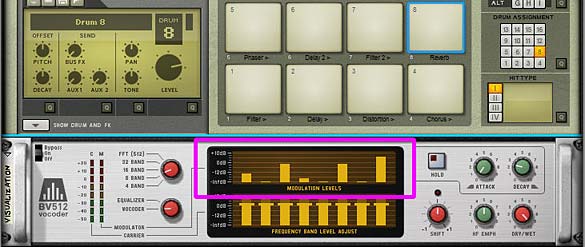
Sterioevo over at  Mute.Hate.Loud.Love was kind enough to provide two methods for visualizing the active effect chain (see the comments below this post for more info about this CV method). He used the Gate Length of the Thor Trigger devices to change the Modulation Level Bands of the BV512 Vocoder and the delay steps in the DDL delay devices to show visually which effect was enabled at each stop in the FX chain. So I updated the patches (just download the Project files again if you haven’t already) using his “Vocoder Visualization” method. You’ll now see a Vocoder under the main Kong device. This uses an 8-band setting to display the position of each effect on Pads 1-8 in the Kong device. This way you can visualize what’s going on as you play the pads. Very cool and handy little tool! Thanks Steve!

Visualizing the active FX chain using the Modulation Levels of the BV512 Vocoder

So what do you think of this combination of “Parallel” and “Serial” effects processing using Kong? Any other ideas come to mind on how these ideas can be used? I can envision setting both this and the “Key Flux FX Processor” ideas on the alternate devices. For example, you could set up the “Key Flux FX Processor” on Kong and you can probably set up the “FX Chain Builder” on a Combinator. The device is somewhat irrelevant. What matters is the concepts and what you want to accomplish. And as you can see, Reason can usually provide an avenue to make your systems come to life.

Until next time, hope you can make this work for you and use it in your own productions. If you do, drop me a line and let me see what you come up with. I’m always interested to see how others’ use my patches. Cheers for now.

47 – Beyond Kong Pad Banks

In this tutorial, I’m going to dispel the myth that Kong can’t contain multiple pad banks — that is, multiple kits. Here I’ll show you two ways to extend Kong by either Layering multiple Kong devices, or switching between multiple kits (from one kit to another). Method 1 uses the Combinator buttons to trigger 4 different kits (which can be layered). And Method 2 uses a Kong pad to trigger 4 different Kong banks, making it self-contained in a single Kong device.

It’s come up on more than one occasion that Kong does not have the ability to provide multiple pad banks; that is, multiple Kits inside the same Kong. This is a feature that most other MPC controllers have: usually providing 4 entire kits from which you can select. In this tutorial, I’m going to dispel the myth that Kong can’t do this, and in turn I’m going to show you two different ways you can trigger multiple “banks” or kits for Kong. Method 1 uses the Combinator buttons to trigger 4 different kits (which you can also Layer on top of each other, and also adjust the master volume for each kit independently using the Combinator Rotaries). On the other hand, Method 2 uses a Kong pad to trigger 4 different Kong banks, and is therefore, a self-contained method where everything can be switched within Kong.

The project files can be downloaded here: beyond-kong-pad-banks. There are two Combinators included in a .rns file which is zipped up. These files outline the two different approaches discussed below.

Method 1: Kong 4-bank Kit (Layered)

This is not my favorite way to create banks, simply because you need to use the Combinator controls to determine which bank is being played, and it takes two clicks to a) turn off one bank and b) turn on the other. However, the advantage is that you can layer these banks on top of each other and adjust the volume for all 4 banks. Something you can’t do with the other method. Also, if you need to switch banks instantaneously, your best bet is to program the switch in the sequencer, otherwise you’ll have a slight lag which even the best two fingers pressing on both buttons at once won’t be able to do at precisely the same moment. Automation to the rescue.

Ok, so here’s the low-down. You create a Combinator with a 6:2 Line mixer. Then create four Kong devices underneath the line mixer so they are automatically routed to the mixer’s first four channels. Then load up your favorite drum kits into all four Kong devices.

Once the kits are in place, you open up the Combinator programmer, and for each Kong device, enter the following:

Kong 1 – Button 1 > Receive Notes : 0 / 1

Kong 2 – Button 2 > Receive Notes : 0 / 1

Kong 3 – Button 3 > Receive Notes : 0 / 1

Kong 4 – Button 4 > Receive Notes : 0 / 1

That takes care of the Buttons. For the Rotaries, we’re going to use the Line Mixer to provide level adjustments for each bank, so select the 6:2 Line Mixer in the Combinator programmer and enter the following:

Rotary 1 > Channel 1 Level : 0 / 100

Rotary 2 > Channel 2 Level : 0 / 100

Rotary 3 > Channel 3 Level : 0 / 100

Rotary 4 > Channel 4 Level : 0 / 100

That’s pretty much all there is to it. Now you use the buttons to switch between banks; turning them on or off. You use the rotaries to adjust the level of each bank. Notice that you can layer the banks on top of each other, depending which buttons on the Combinator are active.

Method 2: Kong 4-bank Kit (Self-Contained)

Now for a somewhat different, and possibly more robust, way to create 4 Kong banks. The upside to this method is that you can control everything from the Kong pads directly. You don’t need to use separate Combinator controls. The downside (if indeed this is a downside) is that you cannot layer the pad banks. Each bank is either on or off. And in my mind at least, this seems to work the way most Pad Controllers and MPC devices work. And another downside is that you have to give up one pad to act as the “Pad Bank Switcher.”

Keep in mind that even though this method does not layer the pad banks, there’s nothing to prevent you from building up layers using the NN-Nano drum type inside the Kong kit itself. It’s for this reason that I call this method much more flexible, because you can both switch between pad banks with one pad press and at the same time use layered drums inside the kits you are building. It’s the best of both worlds.

This method employs multiple Kong devices that are chained to each other via Gate CV connections. So first, create your Combinator, and then a 14:2 Line Mixer. Hold down your Shift key and create a Kong device underneath the Line Mixer. This Kong is going to be used as the Main “Player” but will not require any audio to be sent to the Mixer. Everything this Kong does is CV-based, to trigger the other Kong devices.

The next step is to chain all the Kongs together. So starting with the first Kong, send the Gate Out CV from each pad to the Gate In from the corresponding pad in the second Kong. Do this for Pads 1-15, and when finished route Kong 2 to Kong 3 in the same manner, and finally Kong 3 to Kong 4.

Now create a Thor device underneath the Main Kong (hold the “Shift” key down so nothing is routed). This Thor is merely used for CV purposes, so initialize everything, and turn on the “Step Seq” button in the “Global” area of Thor (top panel). Inside the step sequencer, change the Run Mode to “Step” and turn the Edit knob to “Curve 1.” Enter the following: 4 steps, with the first step CV value of 100, and the other three steps to CV value 0 (zero). Here’s what it looks like:

Curve 1 setup in the first Thor's Step Sequencer

Now change the Edit knob to “Curve 2” and enter the following: 4 steps, with the second step CV value of 100, and the first, third, and fourth steps to CV value 0 (zero). Here’s what it looks like:

Curve 2 setup in the first Thor's Step Sequencer

Enter the following in the Modulation Bus Routing Section (MBRS):

S.Curve 1 : 100 > CV Out1

S.Curve 2 : 100 > CV Out2

Flip the rack around to the back and send CV Out 1 to the Mixer Channel 1 Level CV input, and turn the trim knob all the way up to 127. Then send CV Out 2 to the Mixer Channel 2 Level CV input, and turn its trim knob all the way up to 127.

Flip the rack back to the front, select the Thor and duplicate the device. Inside this new Thor, you will have to make changes to the MBRS for the Curve 1 and Curve 2 values. Curve 1 will be set to 100 on the third step and Curve 2 will be set to 100 on the fourth step (with all other steps set to zero). This setup is shown below:

Curve 1 setup in the second Thor's Step Sequencer
Curve 2 setup in the second Thor's Step Sequencer

Flip the rack around to the back and send CV Out 1 to the Mixer Channel 3 Level CV input, and turn the trim knob all the way up to 127. Then send CV Out 2 to the Mixer Channel 4 Level CV input, and turn its trim knob all the way up to 127.

Under the Thor devices, hold the Shift key down and create a Spider CV Merger/Splitter. Then send the Main Kong’s CV Gate Out on Pad 16 into the Split A input on the Splitter. Send one split CV cable into the first Thor’s “Gate In (Trig)” CV input and another split into the second Thor’s “Gate In (Trig) CV input. Pad 16 on Kong will now switch between all the other Kong devices, and though they all play at the same time, only one will be heard, based on the Curve values you set up in the two Thor devices (which are used to control the level of the main mixer).

The back of the rack showing the CV routing from the Main Kong and two Thor devices

So what do you think of these setups? Personally, I think it’s nice to have everything self-contained inside the Main Kong device so that you can trigger any pad bank you like without ever having to leave your pad controller. Note also that you are not limited to 4 banks. You can setup as many as you like using this technique. You just need to increase the step values in the Thors, and duplicate the Thor device to create more inputs. It’s an easy way to extend the Kong functionality. Good luck!

46 – Kong Keyboard Piano Roll

Once again we have a new use for Kong. This time, we’ll turn Kong into a Piano Roll. On my Maschine, I can turn the entire device into a Keyboard by going into a special “Pad Mode – Keyboard (Button 1).” So I got to thinking if this was a possible setup for Kong in Reason. Sure enough, there’s an interesting way to work this out. Since most of the time, you’ll probably want to work on a Sampler device for this kind of feature, we’ll set it up within an NN-XT (or at least a group of NN-XTs). This way, you can insert the sample kit of choice, or your own samples directly into the device.

Once again we have a new use for Kong. This time, we’ll turn Kong into a Piano Roll. On my Maschine, I can turn the entire device into a Keyboard by going into a special “Pad Mode – Keyboard (Button 1).” So I got to thinking if this was a possible setup for Kong in Reason. Sure enough, there’s an interesting way to work this out. Since most of the time, you’ll probably want to work on a Sampler device for this kind of feature, we’ll set it up within an NN-XT (or at least a group of NN-XTs). This way, you can insert the sample kit of choice, or your own samples directly into the device.

You can download my sample .RNS patch which includes the Combinator setup here: kong-keyboard-mode. This is a zip file which contains both the .RNS and Combinator file we’ll be discussing below.

Note: A huge debt of gratitude goes out to Ed Bauman (EditEd4TV) for his help getting the CV on the Octave Up/Down pads working correctly. Without his help, you’d be cycling through all the octaves and looping around them using a single pad. Not the most intuitive design. Thanks a million for this Ed. I owe you big time! You can visit him at Bauman Productions or his Reason forum.

Setting up the Kong Keyboard

And now let’s get started creating a multi-purpose Kong Keyboard (aka: the Kong Piano Roll).

To start, create a Combinator and inside the Combinator create a 14:2 Mixer and holding shift down, create a Kong device. This is going to be the main device from which everything else is triggered. Underneath that (and still holding shift down) create two empty Thor devices, and three CV Spider/Mergers. Then without holding Shift down, create an NN-XT, which will auto-route to the first channel on the Mixer.

Inside the NN-XT, load your favorite patch or a group of samples that span the full range of the keyboard. For this example, I used a Wurlitzer Piano. You could even load up your favorite sound effects kit, and use the Kong pads to trigger each of the sounds associated to each of the keys. This is a very versatile little patch.

With the sounds loaded, select them all in the “Sample Zone” window. Then be sure that the Pitch Semitone is set to zero (0). Also flip to the back of the NN-XT and  Route the Gate CV output from Kong’s Pad 1 to the Gate input on the NN-XT. Also set the Osc. Pitch CV input trim knob on the NN-XT to 127.

Duplicate the NN-XT 12 more times, for a total of 13 NN-XT devices. Open each of these sampler devices fully so that you can see the sample editors. Select all the samples contained in the device so they are all highlighted, and then move the Pitch Semitone knob incrementally by 1. Do this for each NN-XT device, moving the semitone pitch upward incrementally by a value of 1. Note that the first NN-XT’s semitone should be set to zero (center). Then NN-XT 2 should be set to “Semitone = 1,” NN-XT 3 to “Semitone = 2” and so on down the line until NN-XT 13 is set to “Semitone = 12.” This gives you a full Octave range of 12 notes +1 (C to C).

Next, flip the rack around and route the Audio Outputs 1 & 2 (Left & Right) for each NN-XT to separate channels in the main mixer. Also route the Gate outputs for each subsequent Kong Pad into the Gate inputs of each corresponding NN-XT.

Now it’s time to set up the “Octave Up” and “Octave Down” pads in our Kong device. Octave Up is going to be placed on Pad 15. So we’ll start there. Rename the first Thor in the Combinator “Octave Up.” Send the Gate CV output from Kong’s pad 15 into this Thor’s  “Gate In (Trig)” CV input (located at the back of Thor’s Step Sequencer area). Also send the CV1 output from Thor to the Merge input 1 on the first Spider Merger/Splitter, and set the Trim knob to 84 (this is the “magic” CV number to get the octave switching correctly). Flip around to the front of Thor, and in the Step Sequencer set Run Mode to “Step” and Direction to “Forward.” Also set the number of steps to 1 only and with the Edit knob set to “note” adjust the Step 1 knob to C2 (which is set fully left).  enter the following in the Master Bus Routing Section (MBRS):

Seq.Note : 100 > S. Transp

Seq.Note : 100 > CV Out1

This is used to transpose the value of Thor, and thereby all the NN-XT devices upward by one octave. The only thing left to do is to ensure the CV Out1 gets sent to all the NN-XT devices (into the “Osc Pitch” CV input on each device). This is what the spider mergers/splitters are for. So flip around to the back of the rack, and send the Merged output from Spider 1 into the Split input of spider 1 (A), then daisy chain this input to the B side of the same Spider, and then over to the A side input on the second Spider, and so on and so forth to each A/B splits on all 3 spiders. This gives you 13 free splits to send to the “Osc Pitch” CV inputs on each of the NN-XT devices. Thus ends the setup for the Octave Up pad.

And now for the Octave Down pad. Same idea but in reverse. Here’s what you do: Octave Down is going to be placed on Pad 16. Rename the second Thor in the Combinator “Octave Down.” Send the Gate CV output from Kong’s pad 16 into this Thor’s  “Gate In (Trig)” CV input (located at the back of Thor’s Step Sequencer area). Also send the CV1 output from Thor to the CV Merge input 2 on the first Spider Merger/Splitter, and set the Trim knob to 84 (again, the “magic” CV number to get the octave switching correctly). Flip around to the front of Thor, and in the Step Sequencer set Run Mode to “Step” and Direction to “Forward.” Also set the number of steps to 1 only and with the Edit knob set to “note,” adjust the Step 1 knob to C4 (which is set fully right).  enter the following in the Master Bus Routing Section (MBRS):

Seq.Note : 100 > S. Transp

Seq.Note : 100 > CV Out1

Again, this is used to transpose the value of Thor, and thereby all the NN-XT devices down by one octave. Since you already set up the Spider CV Splitter/Mergers to take the incoming CV values from both Thor devices and merge them to send output to the Osc Pitch parameter of the NN-XT devices, you’re all done connecting your CV cables.

The back of the Rack showing an open NN-XT and the Kong. A little complicated, but honestly, it's not that difficult to set up

One last thing to do. . .

Open up the Combinator Programmer, and select the first NN-XT. Uncheck the “Receive Notes” checkbox at the bottom left corner of the programmer window. Do this for all the NN-XT and Thor devices inside the Combinator. The Kong is the only device that should be receiving notes. If you don’t do this, and end up playing on the Combinator device’s sequencer track, you’ll end up triggering all the NN-XT devices at once. Instead, I would suggest you create a separate track for the Kong device in your sequencer and then add all your midi clips/notes on this Kong track. That way, things are laid out a little more logically.

Note: there’s nothing to prevent you from using the Combinator itself and playing notes on the Combinator’s note lane. Just remember that if you do, you’ll need to play Kong via the proper “Kong note range” with your keyboard (which kind of defeats the purpose here — the whole idea is to use your pad controller to play the Kong device and use it as a keyboard).

Try playing a few notes by using Kong’s pads, and then switch the Octaves up or down accordingly. You’ve now created a fully-functioning keyboard in Kong, which can be used via any 16-pad controller to enter notes or chords for any sound device you can come up with in Reason. The only thing to keep in mind is that the sound coming out of all 13 devices need to be exactly the same (aside from being pitched upward by 1 semitone for each subsequent device).

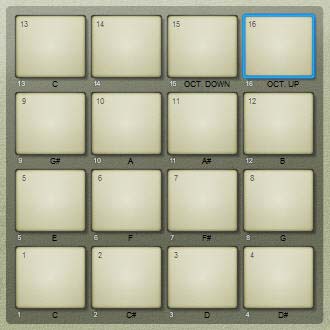
Now add some labels to the front of your Kong device. Here you can see how I labeled things very simply so that you can see the notes you’re playing via each pad. You can also play combinations (ie: chords) by playing multiple pads at once. Very simple idea, but a profound new way to play your instruments via your pad controller.

The labels on the front of Kong. Kong turned into a Piano Roll
The labels on the front of Kong. Kong turned into a Keyboard

Where do You go from Here?

Since all the devices inside Reason (except Kong and the Redrum) have a way to adjust pitch via CV (they all have an “Oscillator Pitch” CV input on the back), you can use this technique for any Reason-created sound. Furthermore, if you are creative enough, you could even apply this technique to a stack of Combinators. Yup. That’s right. You’ll just need to program the pitch changes via a Rotary in the Combinator Programmer, and then send the CV cable into the Rotary CV input. So this is perfectly “doable.”

As always, I’d love to hear what you think of this setup. Does this help you use Reason more creatively? Does it fill a need to perform all your music from your favorite pad controller? Tell me what uses you’ve found for this type of patch. I am always eager to hear what you come up with. Happy music-making!

43 – RPG-8 Arpeggio Fun (Pt.1)

In this tutorial, I’m going to show you a few interesting ways you can use the RPG-8 Arpeggiator in Reason 4 and above. We’ll first cover the basics and then move into more interesting territory in Part 2. For this tutorial, I’ll run through setting up an RPG-8 device, and then explore all the device parameters.

In this tutorial, I’m going to show you a few interesting ways you can use the RPG-8 Arpeggiator in Reason 4 and above. We’ll first cover the basics and then move into more interesting territory in Part 2. For this tutorial, I’ll run through setting up an RPG-8 device, and then explore all the device parameters.

To start, the project files for both Part 1 & Part 2 can be downloaded here: arpeggiator-fun. The files are fairly self-evident. You have one .rns file which shows you the basic RPG-8 setup, and a few combinators to showcase some of the tricks I’ll show you. The file is available in zip file format.

Arpeggios for Dummies

The RPG-8 is a device that allows you to play arpeggios. What’s an arpeggio? In simple terms, it’s a “broken chord” whereby the notes of a chord are played successively rather than simultaneously. To think of this in simple piano terms, if you were to play three notes in a triad (first, third, and fifth, for example), you would place all three fingers on the three different notes and press the keys at the same time. This produces a chord. Instead, an arpeggio plays the chord in succession: your first finger goes down on the first note, second finger then goes down on the third note, and third finger then goes down on the fifth note. The notes are played one after the other.

Setting up the RPG-8

Before jumping into an explanation of setting everything up and exploring all the parameters, I thought I would put together this video and show you visually and audibly how it all works. Then you can read the full explanation below.

Setting up the RPG-8 is fairly easy. Create your sound device (Subtractor, Malstrom, Thor, NN-XT, for example), then create the RPG-8. Everything is automatically routed up for you. From then on, all you need to do is enter some notes on the RPG-8 track (NOT THE SOUND DEVICE), and you’ll hear the Arpeggios playing from those notes. Of course, if you set up the RPG-8 inside a Combinator, you might want to create a special track for the RPG-8 in the sequencer — though placing notes on the Combinator track will trigger the RPG-8 to play (because the RPG-8 is set to Receive notes in the Combinator). Just make sure that any notes you want to play arpeggiated should reside on the RPG-8 track or in the Combinator that houses the RPG-8 and you’ll be safe.

Default routing for the RPG-8 Monophonic Arpeggiator

It should also be noted that the RPG-8 is a monophonic device. In other words, it’s one note at a time. You can create polyphonic setups by duplicating the device (both the sound source and the RPG-8) and then sending the audio output from both devices to different channels on a mixer or merging them together using a Spider Audio Merger/Splitter. This is a common setup or workaround to making your arpeggios polyphonic. Yeah, it’s a bit of a pain. But it’s not a major hassle either IMHO.

RPG-8 Parameters

So now that you understand how an arpeggio operates, we can easily make a few connections on the RPG-8 device. Open one up and you’ll see the following controls:

The RPG-8 Front Panel, with all the Parameters shown

Note: The RPG-8 is divided into 3 main areas. On the left, you have the “Midi-CV Converter” area. Translated into english, these are your “Keyboard” controls. This includes the Velocity knob, Hold button and Octave Shift settings. Generally, these controls relate to how notes are input from the keyboard controller (or other midi controller device).  In the middle, you have the “Arpeggiator” controls, which affect the way the arpeggios operate. Finally, on the right side, you have the “Pattern” section, which can add a separate internal rhythm to the arpeggios.

Velocity: As with any other device, the Velocity value is determined by how hard you play your keys on the keyboard. The harder you play, the louder the notes will sound (depending, of course, on the velocity levels you set up in the device being controlled). When this knob is set fully right, you are in manual  mode, which means the velocity is determined by how hard or soft you play the keyboard (this is the default). If, however, you set the knob anywhere else on the dial (left of the manual position), the velocity level is fixed, based on the dial. For example, if you set the knob to 64, then no matter how hard or soft you play the keyboard, your velocity level will remain on 64 (ie: 50% or half-level velocity).

Hold: This is one of the best features of the Arpeggiator device in my humble opinion. Using this simple button can free you up to do other things on your keyboard while the arpeggio continues. The way it works is you turn it on, then play a chord. Then lift your hand off the keyboard (Release). Notice that the Arpeggio continues to play? Now play a new chord. The new chord will overwrite the old chord and continue to play. Turn the “Hold” button off, and the arpeggio stops playing. In this way, you can continue to maintain an arpeggio playing while jumping off to play other devices. Or you can create a series of Arpeggiators and play different rhythms on each device to have them all running their own rhythms and chords simultaneously, without ever entering more than one chord on each device. One of the most useful features of the RPG-8 to be sure!

Note: If you have the Arpeggiator On/Off button (see below) turned off, adding a new note will not overwrite previous notes. Instead, the Hold will leave the gate open, meaning the notes will be “additional” to the previously held notes. This may be what you want or intend. But usually, you want the notes replaced when they are held. Still, it’s nice to have options.

Octave Shift: This allows you to transpose the notes up or down 3 octaves each way. You can use this to shift notes up or down an octave in a “live” setting, or if you find you’ve input notes on the sequencer that are too high or too low, you can adjust them here. Nothing too exciting, and I think the idea behind this feature is pretty self-evident.

The Arpeggiator’s “On” button: 99% of the time you’ll want to leave this button on. It simply turns on/off the Arpeggiator section of the device. See the above note for a situation where you may want this button turned “Off.”

Mode knob: This can be thought of as the “direction” of your arpeggio. If you think in terms of the previous triad I was explaining, up would play the root, third and fifth in succession, while down would play the fifth, third, and root. Up/Down would play the root, third, fifth, third, root. Random would play the notes in a random order. Finally, manual creates arepeggios that move in the same direction that the notes are played when they are input. Input a C1 and then a C2 and then a C0, the notes will arpeggiate up from C1 to C2 and then down from C2 to C0. It basically follows the direction you play manually.

Octave: This determines the range of your arpeggio. Using our example, If you set this to 1 octave,  the arpeggio will not stray from the octave that is played. The triad will be played in succession and within the octave that is initially input. If you enter 2 Octaves as your parameter, the triad will play within the range of the current octave plus an additional octave above. It’s important to note that the octave range increases. It does not decrease. If you wish to extend the range one octave below the current octave, an easy solution is to set the Octave Shift parameter to “-1” and then select the “2 Oct” button. This essentially places the arpeggio within the two octave range; one octave below the current octave AND the current octave being played. Sounds confusing, but becomes obvious once you start applying the parameters to an arpeggio which is currently playing.

Insert: Probably the most complicated aspect of the Arpeggiator section, the best way to think of the insert function is to understand that it injects a rhythm to the Arpeggio by altering the sequence of notes being played. This is another one of those “great to have” features because it can add a lot of interest to the sound, without having the arpeggio sound static or dull.  “Hi Insert” will start by inserting the highest note, then play the next note in the arpeggio sequence; inserting the highest note after each subsequent arpeggio note (after every second note). “Low Insert” will start by inserting the lowest note, then play the next note in the arpeggio sequence; inserting the lowest note after each subsequent arpeggio note (after every second note). 3-1 and 4-2 are more rhythmic in nature and don’t actually add any new notes into the sequence. “3-1 Insert” plays 3 notes forward, and then goes back 1 note, then starts playing 3 more notes from there. “4-2 Insert” plays four notes forward, and then steps 2 notes backward, and plays the following 4 notes. Hi and Low Insert can be thought of as introducing new notes, while 3-1 and 4-1 Insert simply reshuffles and restarts the arpeggio sequence at a different point in time (either 1 note back after 3 notes are played, or 2 notes back after 4 notes are played).

Here are some examples using real-world arpeggios for a C Major chord (C, E, and G) with the Inserted notes listed in rounded brackets and restarted notes listed with square brackets (with the Arpeggio Mode set to “Up” and the Octave setting set to “1 Oct”):

No Insert: C – E – G – repeat

Low Insert: (C) – E – (C) – G – repeat

Hi Insert: (G) – C – (G) – E – repeat

3-1 Insert: C – E – G – [E] – G – C – E – [C] – E – G – C – [G] – repeat

4-2 Insert: C – E – G – C – [E] – G – C – E – G – [C] – E – G – C – E – [G] – repeat

Notice that the 4-2 insert is identical in sequence to the “No Insert” setting. This is because the way the algorithm works on a triad is indiscernible to not having any insert set. If you were to create a 4-note chord, however, the 4-2 Insert will have a noticeable difference. The moral of this story: Insert values sometimes don’t have any effect on the arpeggios you are playing.

Rate knob: This determines how fast the notes are played. Very simple. You can have it free-form, meaning that the rate is not tied to the song’s tempo, or you can have it synced, meaning the speed is tied to the song’s tempo.

Note: if you want to tie the rate parameter to a Rotary within a Combinator, you can expand the capability by assigning both the Free Rate and Sync Rate to the same Rotary and then tie the sync parameter to a button. With this setup, you can use one Rotary to change both the free and sync rate, and switch between the two via the sync button on the Combinator. Easy as pie!

Gate Length knob: This determines when the gate is triggered. If it is fully left, the gate is “tied,” meaning that the gate is always on. In other words, the notes are meshed together and seamlessly play from one to the next, with no “breather” or “break” between the notes. If the gate length is further to the right, the gate breaks up the notes more and give a sort of “staccato” feel. Fully right and the gate makes the note extremely short, if not inaudible.

Single Note Repeat button: This is one of those parameters I think should be under the “Keyboard” section, but anyway. It basically determines how the Arpeggiator works when single notes are played. If left on (default), playing a single note triggers the gate over and over. So the note repeats based on the “Gate Length” setting. If turned off, any single notes that are played will not repeat, but playing multiple notes at once (polyphony) results in the Arpeggiator being triggered. This can work very well if you want to play a monophonic synth line, and break into an arpeggio when more than one note is played simultaneously. Very dynamic when used correctly.

Pattern button: This turns on the “Pattern” section of the device. The pattern section can best be described as a mini-matrix or mini sequencer inside the RPG-8. You can use the +/- “Steps” buttons to reduce or add steps into the pattern. By default, when you turn on the pattern, all steps in the pattern are enabled. This means the arpeggio plays through from the beginning of the pattern until the end. If you click on the pattern step buttons above the pattern window, you end up removing notes inside the pattern. This means the pattern will “skip over” those steps and move on to the next step which is enabled. It’s very similar to the way the Thor step sequencer works. Use the shuffle button to add a sense of shuffle or swing to the pattern (similar to the shuffle button on other devices like the matrix and Redrum).

Note: One really neat thing is that you can program the pattern to be changed on the fly by controlling it via one of the rotaries on the Combinator. This gives you access to 127 different patterns. However, if you automate it directly in the sequencer, you have access from -32768 to +32767 pattern variations. That’s a total of 65535 pattern variations. Yup. You got that right. So automate this sucker in the sequencer if you’re in the studio, and map it to a combinator if you need to play it live.

Note: The pattern window helps to show you which notes are playing within the arpeggio. It can play the full range of notes from C-2 to G8, but the pattern window will only display notes from A-2 to D#7. That’s why the notes appear so flat. It has to show 8.5 Octaves worth of notes (103 notes in total). But it does! Perhaps that’s where the “8” comes from in the name of the device?

So that’s the RPG-8 in a nutshell. Stick with me and I’ll show you some further tips on how to use this device in my next tutorial. Drop me a line and let me know what you think so far, or if you’re looking to do something specific with the device. I’d be happy to try and help you out. All my best!

39 – Kong Beat Repeater

This time, I’m going to work off my previous OctoKong device with a series of loopers and show you how to add Beat Repeat and LFO Panning ability inside Kong. The pads are used to trigger both of these effects on and off as a toggle. Hopefully this shows a little more of the capability you can achieve with Kong.

Welcome once again to another little trek down Reason lane. This time, I’m going to work off my previous OctoKong device with a series of loopers and show you how to add Beat Repeat and LFO Panning ability inside Kong. The pads are used to trigger both of these effects on and off as a toggle. Hopefully this shows a little more of the capability you can achieve with Kong.

Here’s the Beat Repeater project files. There are two Beat Repeater Combinators inside an RNS file (zip file). You can download it here: Kong-Beat-Repeaters. The first Beat Repeater under the mixer uses one pad to trigger the Beat Repeater (turning it off and on), and another pad to cycle through all 16 synced steps inside the DDL-1 Digital Delay Line. There’s also an LFO Pan Pad, which turns panning ability on or off. The second Combinator is a different way you can apply Beat Repeating inside the Kong device. It sets up 3 pads with 3 different Beat Repeat settings.

A big thank you to Peff at Peff.com and Hydlide at The Sound of Reason website. They got me thinking about Beat Repeating in general. Have a look at Hydlide’s Beat Repeater tutorial video and be sure to look up Peff’s great Beat Repeater Combinator which is included in the Record Factory Soundbank (in the Effects > Delay folder).

So here’s how you can create a Beat Repeater triggered from a Kong Pad. The Kong Pad is a velocity-sensitive toggle to turn the Beat Repeater on and Off. A second Pad acts as a correlated synced Step Time switch that cycles through all 16 Step units in the Digital Delay Line:

Next, this video shows you how to set up an LFO Pan trigger on another pad in Kong. In the same way, this is a velocity-sensitive toggle to turn the Panning on and off. The harder you press the pad (or key on your keyboard), the heavier the Panning becomes (the amount of Panning is increased the harder you hit the pad). What’s even nicer is that the panning affects both the dry signal and the Beat Repeat signal. Check it out here:

As you can see, the process can be very useful, especially when you set up a lot of loop devices or other synth devices and hook them up into the Mixer inside the Combinator.

The front of the Reason rack showing all the devices in the Kong Beat Repeater (minus the mixer)

The back of the Reason rack showing the Kong Beat Repeater-related connections.

A few notes about the Combinators

  • Both Beat Repeaters work by processing any audio that is connected to the Mixer inside the Combinator, so you can Beat Repeat any audio that is connected to the Kong or not. So don’t let this setup stop you from adding any audio, even that which is not triggered by Kong. Great flexibility here.
  • The Beat Repeater pads and LFO Panning Pad are all velocity sensitive. This means the amount of these effects can range from very low to very high, depending how hard you hit your keyboard or Pad controller.
  • Beat Repeater 2 provides 3 pads with 3 different Beat Repeaters (all with different settings). The cool thing about this Combinator is that you can use them in tandem by pressing 2 or all 3 of the pads together to apply a lot of variation to any of the sounds coming out of Kong.
  • In Beat Repeater 2, feel free to change any of the settings on the 3 different DDL-1 devices, to create custom effects that suit your own purposes. For example, change the step, unit, or resolution settings of any of these devices to come up with your own custom beat repeaters.
  • After all is said and done, you can still add any parameters to the Combinator knobs and buttons. Since all this CV trickery only uses the 4 new Combinator CV inputs, it leaves all the Combinator Rotaries and buttons free for you to program as you wish.

Feel free to post a comment if you find these useful or to make any suggestions on ways you can improve these Combinators or alternative ideas. I’d love to hear from you. Until next time, happy Reasoning!

38 – Kong as Scene & FX Selector

Calling Kong a “Drum Designer” is like calling a Computer a “Typewriter” — sure that may have been the original intent, but it’s so much more. Here I’ll show you a whole new side to Kong. This tutorial will use Kong as a mini Scene Selector, to imitate Ableton Live’s Session view and then also use it as an Effects selector for any audio you like. In this way, you can switch between clips (Rex Loops) and Scenes (groups of Rex files). We’ll also use one of Kong’s pads to cycle through as many FX as your processor can hold. Hours of fun.

It’s very easy to think of Kong as a “Drum” designer because of course that’s what it is called. And indeed that is its primary purpose. However, it would be a mistake to think of Kong as only a “drum” programmer. That’s like calling a Computer a “Word Processor” — sure that may have been the original intent, but it’s just so much more. Here I’ll show you a whole new side to Kong. This tutorial will use Kong as a mini Scene Selector, to imitate Ableton Live’s Session view and then also use it as an Effects selector for any audio you like. In this way, you can switch between clips (Rex Loops) and Scenes (groups of Rex files). We’ll also use one of Kong’s pads to cycle through as many FX as your processor can hold. Hours of fun.

To start, I’m going to use a Combinator I came up with which you can download here: OctoKong-Scene-Selector-3. It’s a single Combinator inside an rns file. The Kong inside the Combinator has been given its own track because I find it easier to play the Kong outside the Combinator and place all the midi data there, as opposed to sequencing midi data on the Combinator track.

A little Off Tangent: Recreating Ableton “Live” in Reason?

As an aside, I have to give a huge thanks to Dioxide for inspiring the idea behind this Combinator. He wanted to try to mimic Ableton Live’s Scene / Clip system. This comes pretty close and allows you to select between different clips in a mini 9-pad way. The pads along the right side trigger all the loops within their respective rows, while the pads on top cycle through that specific row’s Rex loops (8 loops in total). When you open it up, you’ll have to press the “Run Pattern Devices” button on the Combinator. This sets all the loops running freely. I’ve also set up the first 3 buttons on the Combinator to act as your “Mutes” — so you can mute any of the columns at any point in time. You can also play each loop individually by playing the other pads alone or in combination. In this way, it’s a mini scene/clip selector for Reason.

If you’re interested, here is a 2-part series on how to create that patch:

But moving on, the real focus of this article is that lonely little pad 16 up there in the top right corner. What to do with that little pad all empty and lonely. Let’s add a ton of effects and use the pad to cycle through each of those effects one after the other. Let’s load in as many as your CPU can handle!

Well, actually, let’s focus on the PROCESS to add in as many as your CPU can handle. I’ll give you the tools and know-how to add in a few effects, maybe 4 or 5, and then you can use the same technique to load up as many effects as you like. This way, you can take the FX Pad in any direction you like. Sound good? Ok. Let’s get started.

Adding 5 FX at once, and tying them to the Pad

The basic idea is to send all the FX into a separate Mixer and then back out to the main output. All the levels of all the channels are turned off and CV is used to determine which channel gets heard. The first Channel is the original (untouched) audio without any FX applied. Then you have five different FX applied to the audio chain which goes through the different channels on the mixer. The CV is then sent out from the two Thors and turns up each respective channel to level 100  on the 14:2 Mixer. The Thor Step Sequencer is used to move step by step through the different FX, and the Pad (Pad 16 here) is the main catalyst moving the step sequencer forward.

The main FX setup. Yeah I know it looks crazy. But follow the video and you can't go wrong. Try to understand the concepts, and you can add any number of effects.
The main FX setup. Yeah I know it looks crazy. But follow the videos and you can't go wrong. Try to understand the concepts, and you can add any number of effects.

In conclusion, pad 16 cycles through all 5 Effects devices. And the cool thing is you can create any number of devices inserted into the chain. So if you want to create custom FX devices, you can insert them into the chain in any way you like. You can also create more than just 5 tied to a single Pad in Kong. But I think this shows you a pretty good example of the possibilities. And that’s what I hope you take away from this.

So what do you think? Any other interesting ideas or uses for the new Reason 5 devices. Is it time for me to move on to Neptune? As always, comments here are welcome. And stay tuned for more to come. Good luck in all your Reason projects!

37 – Dr. OctoKong Looper

In this tutorial, I’m going to show you how to use Kong and the Dr. OctoRex together to create some continuous looping fun. You’ll learn how to continually loop and play a series of OctoRex files with Kong. This way each pad turns the loop on and off as a toggle, with Velocity sensitivity too.

In this tutorial, I’m going to show you how to use Kong and the Dr. OctoRex together to create some continuous looping fun. You’ll learn how to continually loop and play a series of OctoRex files with Kong. This way each pad turns the loop on and off as a toggle. And it’s super easy to do. In addition, when played on your keyboard (C1 – D#2), you get velocity sensitivity.

You can download the project file here: DrOctoKong1-v4. There are 2 RNS files containing 2 Combinators in this zip file. Both Combinators contain the Kong device and 10 Dr.OctoRex devices. The first rns file shows you ways you can play the loops and switch from slot to slot to cycle through all 80 loops. The second one is an update I did which shows how you can use a separate pad to Re-Trigger the loops at any point while they are playing. Keep in mind that what you need to play is the Kong device, and not the Combinator (though you could play the Combinator if you want to. But it might be easier to lay down the midi note clips on the Kong track so you can see what’s going on inside Kong itself). Also, make sure you press the “Run Pattern Devices” button on the Combinator. Alternately, press the “Play” or “Record” button on the Transport. This ensures everything runs as it should.

To see how this setup works, take a look at the video below.

So here’s the basics of how it all works

You create your Kong device without any audio routings. Then you create a series of up to 16 OctoRex devices, all with their audio routings sent to different channels on a 14:2 Mixer. Load them up with your favorite Rex files, flip the rack around and send the “Gate Out CV” from each pad in Kong to the “Master Volume CV In” on each Dr. OctoRex device. Then press “Run Pattern Devices” on the Combinator to initiate the “Run” button for all the OctoRex devices at once (or alternately, press the “Play” or “Record” button on the Transport), and your pads become a play/stop loop toggle for each of the attached OctoRex devices.

The Routing necessary on the Back to link up the Kong with the Rex files
The front panel of the Combinator and Dr.OctoRex devices - Turning on "Run Pattern Devices" will enable all the Rex files to continuously run

A few notes here:

  • The way it works is by having the Rex files continuously looping and running. All the Pad is doing is turning up the volume. For this reason, the rex files are free-running and do not re-trigger when the pad is pressed again. But as I said in the video, don’t let this discourage you. It’s still a very simple and great way to play the Rex loops from Kong.
  • The best way I’ve found to play the loops is by using the Keys from C1 – D#2 on your keyboard. I haven’t tried using a Korg or Akai pad controller to play the loops in this way, but I have a feeling if you do, the pads will end up running the loops continuously without a way to shut them off (you’ll have to press the pad with your mouse directly on the Kong device to stop it again). It’s a little quirky, but I’ve tested the keyboard, and it works great. Press a key and the Rex file sounds. Lift up the key and the Rex file sound stops.
  • One of the benefits of this setup is that the Pads (or keys rather), are velocity sensitive. The result is that the Rex loop volume can be controlled via the Velocity of your pads. This adds a nice dimension to your loops and dynamics to your sound.
  • You can setup the Rotaries and Buttons as I did here. For each Dr. OctoRex, you’ll need to set up the following Modulation parameters in the Combinator’s Modulation Bus Routing:
The Combinator's Modulation Bus Routing - Just a suggestion. ;-)
The Combinator's Modulation Bus Routing - Just a suggestion. 😉

Taking things a step further

One thing you can do is load up the other slots of the OctoRex devices, and then tie the Loop Slot to a free Rotary (you’ll have to give up one of the parameters above). This way, you not only have the ability to play multiple loops using the Kong device, but you can also switch slots for new Rex Loops by turning one of the Combinator Rotaries. Add to that the various parameters you can tweak at the slice level of each Rex loop, and you have some very powerful fun at your fingertips.

I decided to go ahead and implement this. However, I realized that there’s a nice little way to keep all our parameter automation in place in the Combinator, and still provide the ability to switch from loop slot to loop slot in all the OctoRex devices. It’s really not too complicated. Here’s a video to show you how it’s done.

The nice thing about this method is that it uses the new CV inputs on the back of the Combinator in conjunction with Thor’s step sequencer and triggering provided by Pads 15 and 16. So you can see how some of the Reason devices can be interconnected and operate together to provide some useful functionality.

The idea that you can trigger 80 Loops (and if you used all 14 pads you could trigger 112 loops!) using a single Kong can be pretty overwhelming, but can provide some interesting chaotic possibilities. And even structurally, you can create some amazing songs using little more than Rex loops. For example, think of having each OctoRex device contain 8 loops related to a single instrument. So the first OctoRex contains your drums, the second contains the basslines, the third contains guitar loops, and so on. You have a complete band that you can switch from verse to chorus with one press of a key or a pad.

Extra Bonus: Let’s add some Effects

Here’s a quick video to show you how to simply add an FX or two. I’ve also updated the main project file so be sure to download that at the top of this post. For now, here’s the method I used to show how to add the effects to some of the free pads. There’s also some Delays and Reverbs on two other pads that you can cycle through (5 delays and 5 reverbs). The cycling is somewhat similar to how the Loop Slot Changers work on Pad 15 and 16, except the audio gets split between a bunch of different FX devices with different settings. I didn’t go over how to set that up, but you can look at the file and figure out the routing. Hope you have lots of fun with this one. I had a really great time making it. And now… the video:

Re-Triggering the OctoRex Loops

This video is an update to the main tutorial above. A big thanks has to go out to EditEd4TV at Bauman Productions for helping me figure out how you can re-trigger all the loops as they are playing. Essentially, it uses the note function of the Thor step sequencer to start the loops from the beginning again. Very cool indeed. I also placed the finalized file in the project file download at the top of this article. So go check it out there. And if you want to know how it was put together, check out the video below:

As always, any comments or suggestions or ways we can improve upon this are welcome. So please let me know what you think and what other ideas you might have. And have fun Reasoning!

36 – Let’s Talk Compression

Let’s start talking about Compression. In one of my previous tutorials, I showed a way you could use Kong to parallel compress a Kick Drum. So that was one method. But here are a few others that everyone should know about, especially if you’re working on most dance music genres.

Let’s start talking about Compression. In one of my previous tutorials, I showed a way you could use Kong to parallel compress a Kick Drum. So that was one method. But here are a few others that everyone should know about, especially if you’re working on most dance music genres.

Sidechain Compression (aka: “Ducking” or “Gating”)

This is a basic concept that everyone should know. But the twist is that we’ll use Kong, instead of Redrum, to compress a Thor bassline. This way, when the kick drum sounds, the bass is compressed and “ducks out” of the mix. This ensures the Kick drum cuts through the bass in your track.

Compression can also be used for other things as well. It does not have to be confined to a Kick drum and Bassline. You can use any sound source to duck out any other sound source and create a pumping rhythm like this. For instance, you can use a Kick drum to compress your main synth line. This can create some interesting gating effects if used properly.

Parallel Compression

Parallel Compression occurs when you mix a dry sound source together with that same sound source which has been compressed. In this way you get a wider, fatter sound, and you also get the flexibility of controlling the mix between the dry and wet signals. I put together a video to show you how Kong can be used in a Parallel Compression scenario on YouTube. However, why don’t I show you another way you can use a Redrum to parallel process a Kick Drum (a very common usage of this technique), or an entire set of drums (this is a little more unorthodox because you would usually parallel compress one drum at a time, but just to show you that you have options. . . ). Here’s the video:

Frequency-Based Compression

This approach is a little different, but the concept is similar. A lot of times, you might have a specific frequency that you want to “duck” out of the mix. One method you can use is Frequency-based compression, where you compress only a specific frequency in your mix. This is usually used to remove an unwanted sound, and probably the most popular usage for this kind of compression is “de-essing” where those nasty sibilant “S” sounds are removed from vocals. This is really childs play with Reason and the M Class EQ and Compressor devices. Let’s take a look at how it’s done:

As an alternative to using the M Class Eq device, you can use the BV512 Vocoder. In this way, the sound is colored slightly (and moreso if you use the 512 FFT setting), but it’s still a legitimate way that has its own technique. You can see the video of it below. Try it out. You might come to like this method.

Multi-Band Compression

Of course, there’s also something called “Multi-band Compression” which takes the EQ frequency idea to an extreme. This is usually applied to the whole mix at the end of the signal path, before going to the audio outputs. In this way, you set up multiple compressors each affecting a specific range of frequencies. The concept is not entirely difficult, depending on how many compressors you want to set up. For a really great introduction to multi-band compression, I would advise you to check out James Bernard’s week 7 video tutorial on Multi-Band Compression. In addition, James also has a complete multi-band toolkit available as a free download. So go check it out now if you haven’t already!


So that’s it. I’m sure there are other creative ways you can use Compression, but I hope that begins to inspire you to look at compression as a useful dynamic processing tool or even special effect. If you have any comments on this or any other tutorials, please let me know.