56 – Key FluX FX Processor

One week, 300 + devices, enough cables to circle the earth at least once, and a massive caffeine-induced headache, here is my “Key Flux FX Processor.” If some of the other tutorials I’ve written have yet to melt your brain, then this might actually fit the bill. Here I created a massive chaotic Reason 5 FX processor. Each effect is triggered via Midi Key on the Combinator track.

If some of the other tutorials I’ve written have not yet melted your brain, then this might actually do it. It melted mine as I was creating it and I’m only just now recovering (and not in an EditEd4TV kind of way). Here, I’m going to delve into creation of a massive chaotic Reason 5 FX processor using a Combinator. And each Effect is going to be triggered via Midi Key on the Combinator track. It’s kind of like Ned Rush’s own Extreme FX Combinator (included in the NedFX refill), and Hydlide’s FX Triggering Combinator, but ummm…. yeah…. different.

So one week, 300 + devices, 84 FX chains, enough cables to circle the earth at least once, and a massive caffeine-induced headache, here is my “Key Flux FX Processor.” Ta-da!

You can download the whole thing here: Key-Flux-FX-Processors. This contains the Reason 5.0 .rns and Combinator file enclosed in a zip package. Note that this is for Reason 5 users only. There’s several Kongs and the CV inputs on the Combinator are used. If I have some time, I might put together a version for R4, but right now, this is what I’ve got. Note also that your CPU will take a hit. If you have an older computer, you may not even be able to open it or use it. So I’ve included 2 “Lite” Combinators which have 21 FX chains in each. Of course there should be nothing stopping you from building your own, and you should give that a try.

The “Key Flux FX Processor” Combinator

First off, a bit about the way the Combinator operates. It is just a massive chaotic Effects processor that can be added after any sound source in Reason. So open the .rns file and take a look inside. I have a Thor patch that is being played by a matrix. And then the sound is processed through the Combinator. That’s straightforward enough. But if you press “play” on the Transport, you’ll notice you don’t hear any sound. If you want to hear the original sound, just bypass the FX Combinator.

Assuming you want to play the sound through the FX, make sure the Combinator is NOT bypassed, and instead play any key from C-2 to B4. There are 84 different effects tied to the first 84 midi keys. So playing each key will process your sound differently. Fun right?

  • Key C-2 to F1: These keys play 42 different FX chains, depending on which key you press.
  • Key F#1 to B4: These keys play 42 additional FX chains, which are combinations of the first 42.
The Combinator Key Mapping and Modulation Routing section showing each key mapped to a Thor device.
The Combinator Key Mapping and Modulation Routing section showing each key mapped to a Thor device. The Mod 1 Scale Amount scales the velocity so that Button 1 can act as a Global Velocity Sensitivity on/off switch.

Taking this a step further, you can do many different things based on the parameters that are set up on the Combinator controls, and this is where things differ greatly with the way this patch operates and others, like Ned Rush’s very awesome patch. Here are the Combinator controls:

  • Pitch Bend: Not intentionally mapped to any device, but may still provide some variations. I haven’t really gone through the whole thing to see where it’s mapped. Just kind of left this one hanging.
  • Mod Wheel: Changes the randomization pattern. 32 patterns are mapped to the Mod Wheel, and the patterns will only be heard if you have button 2 (Run Randomly) enabled.
  • Rotary 1: Parameter 1 – This knob is mapped to one or two parameters inside each of the effects chains. So utilizing it will definitely affect your sound in some weird and quirky way, no matter which effect is being played. I would caution, however, not to turn the knob before first listening to each of the effects. All the effects were built to have their parameters exactly where they are. But if you want to mangle things even more, you can do so with this knob. If you ever want to reset it back to the original values, just reload the Combinator again (of course, make sure you don’t overwrite the original file by saving over it after you’ve changed this Rotary to a different position. If you do so, all bets are off and your parameter will be permanently changed. Make sense?)
  • Rotary 2: Parameter 2 – Same as Rotary 1, except this knob is mapped to one or two “different” parameters than Rotary 1. It is mapped to at least one or two parameters inside each of the effects chains. So utilizing it will definitely affect your sound in some weird and quirky way, no matter which effect is being played. I would caution, however, not to turn the knob before first listening to each of the effects. All the effects were built to have their parameters exactly where they are. But if you want to mangle things even more, you can do so with this knob. If you ever want to reset it back to the original values, just reload the Combinator again (of course, make sure you don’t overwrite the original file by saving over it after you’ve changed this Rotary to a different position. If you do so, all bets are off and your parameter will be permanently changed. Make sense?)
  • Rotary 3: Master Volume – This is the master volume for all the effects. Sometimes things can get a little loud due to all the effects running, and while I tried to make sure all the effects are somewhat leveled out so they are all somewhere around the same volume, you can control the overall global volume using this knob. Careful not to set it too high, unless you are going for something specific, because it can go all the way up to 127 midi volume.
  • Rotary 4: Beat Delay Time – Changes the Beat Repeater time from very short (turned more left) to very long (turned more right). Used in conjunction with Button 4. In other words, you need to first turn on the Beat repeater for this to do anything.
  • Button 1: Velocity On – Turns on / off the Velocity sensitivity on a global level. So if you enable this button, you will essentially make the volume of each effect you play via your midi keys sensitive to the velocity at which you strike the keys.
  • Button 2: Run Randomly – This will turn on the Random pattern generator which randomly plays the Combinator keys. If you wish to change the rate, you’ll have to go into the “Random” matrix inside the Combinator and switch the resolution on any or all of the Matrix patterns. But this provides a nice way to randomly play the various effects in the combinator (kind of a last minute thought to add that into the mix).
  • Button 3: Beat Steps / MS – Switches the beat repeater delays from Steps (off) to milliseconds (on). Used in conjunction with Button 4. In other words, you need to first turn on the Beat repeater for this to do anything.
  • Button 4: Beat Repeat – Turns on the global beat repeater, so that you can add a beat repeat effect after any of the FX chains you are playing.

How was it all Built?

The biggest issue with building this thing was mostly time. Time to figure out the effects, and time to piece everything together. But the main concepts behind it are actually very easy to understand, so I’ll try to guide you on the building blocks and let you take things from there.

First thing’s first. You need to build all your effects chains. The easiest way to do that involves starting with one Spider Audio/Merger and sending the “To Devices” cable of the Combinator into the splitter side of the Spider. Then you can create as many more Spiders as you need, and endlessly split the signal to create as many FX chains as you like. When you have finished building your first Effects chain, send the outgoing audio signal back into a channel on a 14:2 mixer.

Second, you need to create one Thor per key (this is mostly so that you can make everything velocity sensitive by toying with the Midi Velocity setting via the “Mod Bus > Destination Scale Amount” on the front panel of the Thor in the Modulation Bus Routing Section (MBRS). In the above Modulation Routing image of the Combinator, you’ll see that each Thor has the following line:

Button 1 > Mod 1 Scale Amount: 0 / 100

In the Thor, you need to enter the following in the MBRS:

Midi Gate : 100 > CV Out1 : 0 >  Midi Vel

So in the first image below, you’ll see what needs to be placed in the front Thor panel:

The front panel of Thor, showing the MBRS line. Each key triggering Thor needs to have this same line.

And in the image below,  you’ll see how the CV1 output from each Thor is sent to the level CV input of each FX chain channel on the 14:2 mixer. Note that the trim knob for each “level cv input” on the mixer is set to full (127).
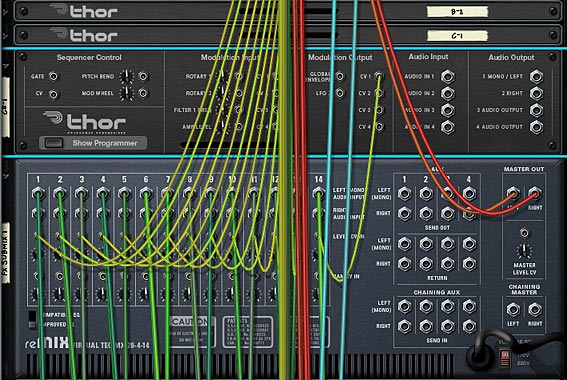
One of the FX 14:2 Submixers showing the CV from each Thor is used to trigger the level of each FX chain.

Once you’ve got one chain built and run through your Mixer, you can have fun duplicating this setup and repeating the process 42 times to fill up 3 mixers of chains on each channel. Then you can have some fun reworking the chains by combining the chains. For example, what I did in the above was create a bank of 28 Audio Spider Splitters / Mergers. I then wired the 14 Audio inputs from the first FX Submixer through the first 14 Spiders (on the split side). I then sent one split from each back to the channels on the first FX Submixer, and another split over to the Merger side of the spiders. Then on the other 14 splitters, do the same for the second FX Submixer, only be sure to send one split back to the merger side of the first 14 Spiders. Finally, send the merged output of the first 14 Spiders back to a new FX submixer. Bingo! You now have a new (fourth FX Submixer) with 14 new effects that basically combine the FX output from FX Submixer 1 and 2. I repeated this process to create a fifth FX Submixer (combining FX submixer 2 & 3), and a sixth FX submixer (combining FX submixer 1 & 3). You could actually create crossover mixes as well, for example, combine channel 1 from submix 1 to channel 5 of submix 2, etc. etc. But I didn’t want to seem like a complete lunatic! I mean 84 keys should be enough to keep you happy for a long time. Or at least until next week and a new tutorial right?

Wait. . . does anyone actually read this? hmmmm.

Ok, well then here’s the videos showcasing the sounds and what you can do with this little puppy:

And here’s a video that shows you how to build your own FX processor with velocity-sensitivity (not the whole thing, that would be CRAZY man! And it would take me hours upon hours to show you. No, this just shows you how to start things off and get the ball rolling. It’s really not a difficult concept to grasp, and it’s mostly repetition and legwork:

So now you have a system which utilizes the first 84 keys. But there’s a few more ideas I built into this whole thing. For instance, you have the global beat repeater which affects all the sounds and can be manipulated by turning it on/off on button 4. You have a simple random player which you can turn on/off via button 2. And don’t forget that when the random player is on, you can use the mod wheel to switch between 32 different patterns. If you don’t like the patterns, you can go in and change them using the first Matrix at the top of the set of Combinator devices (labelled “Random”). You also have two knobs to mangle the FX parameters, and a simple volume control on rotary 3. I honestly can’t think of too much more to pack into this little science experiment.

If the Combinator breaks your CPU. . .

It seems that there’s a lot of people that can’t open the main Combinator or run it because the FX chains inside are too much for their CPU to handle. To deal with this, I broke up the file into 2 discreet Combinators that each have 21 FX chains inside them. This way you can load up half the original FX chains and run just the ones you want. Hopefully this means that more people can use the FX. All the files are available in the project files at the top of the page. The FX can be run via keys C1 to G#2. This way, you can create some random playing via the Matrix (which is actually already built in – but it just makes it easier to tack on a Matrix after the whole thing and start adding some patterns in there to play the FX chains). There are now 2 Combinators and 2 .rns files included in the project files: “Key Flux FX Processor (Lite – A)” and “Key Flux FX Processor (Lite – B).”

Note: I have since updated these patches so that they contain a “Bypass” ability. In other words, if you don’t play the keys, the original unprocessed sound can still be heard. Then when you press the keys to hear the effects, the original sound is cut and the affected sound is passed through. For more information on how this is done, as well as the updated version of these effect Combinators, visit my Effects Bypass Methods article.


Your thoughts?

55 – Key Trig Patterns (Part 3)

In this tutorial, I’m going to go all out and create a one-finger band Combinator which makes use of MIDI Key Triggering to launch an array of patterns for all my instruments. In other words, I’m going to construct a song using a single Combinator and some Reason devices. You can use this as a template for your own ideas, and simply switch out the sound generating devices and patterns to create your own track.

In this tutorial, I’m going to go all out and create a one-finger band Combinator which makes use of MIDI Key Triggering to launch an array of patterns for all my instruments. In other words, I’m going to construct a song using a single Combinator and some Reason devices. You can use this as a template for your own ideas, and simply switch out the sound generating devices and patterns to create your own track.

You can download the project files here: one-finger-band. There are two .rns files for those using Reason 5, and 2 Combinator files (one for Reason 5 and the other for those still running Reason 4). You can also open up the Combinator inside Record and use it there if you like. Note: please respect that these project files, like everything else on this site, is under the Creative Commons 3.0 licensing, meaning you can mix, remix, share, and play around with the song to your heart’s content, but you will need to provide the source info and a link back to my site here in any productions you do with this file. Share and share alike ok? And you can’t make any money off the file. It’s not going to win any awards anyway. But if you remix or play with the file, send them back to me privately and I’d be happy to showcase them here in a new posting (send to my email in the top menu), I’d love to see what you come up with. Don’t be shy!

Before jumping in, I just wanted to give a shout out to Hydlide, who did a great tutorial over at TSOR (The Sound of Reason) site which shows you how you can split several Thor patterns along all the octaves of the Combinator Key Range. Have a look at his creative Thor Step Sequencer tutorial for some fresh ideas. So thanks for ripping off my idea Hyd. Thief! 🙂 All joking aside, if it wasn’t for him wanting to see a third part to this series, I wouldn’t have written this “next part.” And now you’ll all have to suffer through more MIDI Key Triggering madness.

Here’s a video showing you what I’m explaining below. It’s a bit of a showcase for the song I created. Read on to see how the Combinator is setup.

Explaining the “One Finger Band (Latched – R5)” Combinator

The idea behind the Combinator builds upon the previous two tutorials I wrote about Key Triggering your Patterns. However, there’s a few new ideas in this one which I’m going to highlight below. I also have a few tips for those of you trying this out on your own.

The main thing I learned while doing this is that it’s much easier to program a song using the “Momentary” method of Key Triggering. The reason is that it’s easier to write notes into the sequencer. You place the note along the clip lane for as long as you want your pattern running. Simple enough. If, on the other hand, you are programming your notes in using the “Latch” method, you need to provide a start and stop note on the same key to trigger your pattern to turn on, and then turn off. Which can get a bit fiddly. Even so, I tried it using the “Latched” method, just to see how it would work. So to summarize, if you are programming your song in the studio, you’re probably better off using the “Momentary” method. If, on the other hand, you are playing “Live,” you’ll probably benefit more from the “Latched” method, because you don’t have to have your fingers on the keys to keep things running. BUT (and this is a big BUT), you DO need to remember which patterns are running at any given time, so you know which key to press to turn them off when you want them to stop.

It would be really nice if you had a keyboard that had lighted keys to note which ones are on and which are off. But I don’t know of any manufacturers that supply such a keyboard. Pad Controllers are a different story. And controllers with lighted buttons are even better (like the Livid Ohm64, Novation Launchpad, and Akai APC40), because you can assign a key note to each button and they will be lit when on and unlit when off, making this whole setup a piece of cake.

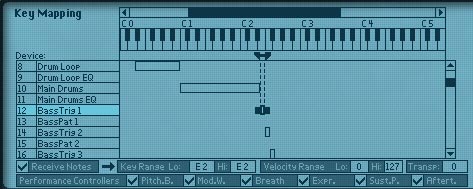
So back to the template. Here’s how the key range works for the Combinator:

The Key Mapping area of the Combinator, where we use the Key Range to map our Kong drum pads, Dr.OctoRex Loop Slots, and sound device pattern triggers to individual keys.

The root of this method is in how you program the Combinator Key Range assignments for the various devices. And we went over most of this in the second part of the tutorial. However, I’ve added in a few Dr.Rex loops and some variations, as well as a Kong device to play our drums. Since both those devices already have default key assignments, you don’t need to do too much to get them working for you. The other sounds are placed on other free key areas on the keyboard. Here’s how it breaks down:

  • MIDI Keys D#0 – B0: Dr. OctoRex Loop Player (Drum Loop with 8 variations in the 8 different slots). D#0 Stops the Loop. E0 – B0: Plays Loop slots 1-8. You can switch between the slots in mid-stream. And depending on how you have your “Trig Next Loop” set up, switching from one slot to the next will follow one of those three methods: Bar, Beat, or 1/16th note.
  • MIDI Keys C1 – D#2: Kong Drum Designer (Main Drums with a Basic drum setup on all 16 Pads). Plays Pads 1-16.
  • MIDI Keys E2 – G#2: Subtractor Bass. E2 – G2 plays Bass patterns 1 – 4 in a “Latched” mode. Therefore, you need to press the key once to trigger the pattern, and press once more to stop playing the pattern. G#2 applies a delay / reverb effect to the bass patterns. You can play each of the bass patterns or all of them combined if you like. Then press G#2 to apply the effect to the bass sound.
  • MIDI Keys A2 – C3: Thor Pad Sounds 1 & 2. These keys play 4 different pad patterns. Both pad sounds are joined together, so the patterns here will play both simultaneously. That’s why I separated them by panning them left and right. The Pad patterns are also “Latched” to the keys. You can also shuttle both pad sounds left and right by using Rotary 4 on the Combinator. This applies an LFO waveform to pan the sounds back and forth inversely. Increase the amount of movement by moving the Rotary further to the right. Reduce the auto-pan completely by moving the rotary all the way left.
  • MIDI Keys C#3 – E3: Thor Synth. These keys play 4 different synth patterns also in a “Latched” mode.
  • MIDI Keys F3 – A3: Thor Rhythm section. Keys F3 – G#3 plays 4 different Rhythm patterns also in a “Latched” mode. A3 applies a distortion effect to the Rhythm patterns. In the same way as the bass works, you can play any patterns using the first 4 keys, and then press A3 to apply the distortion to the sound.

In just under 4 octaves, we’ve managed to provide all the instruments necessary to produce a track. That still leaves plenty more keys to assign to anything from sounds, patterns, and FX switches. Just because I stopped here doesn’t mean you have to. You can use the file as a template, but you’ll gain more out of understanding how the routings work, and what they are doing. This way, you can truly make the Combinator your own. So I encourage you to try your hand at creating your own template file along these lines. You might find it not only a creative exercise, but also a challenging and engaging way to work with the software. And finally, you might get a really nice reusable template that makes creating tracks quicker or “Live” play with Reason better.

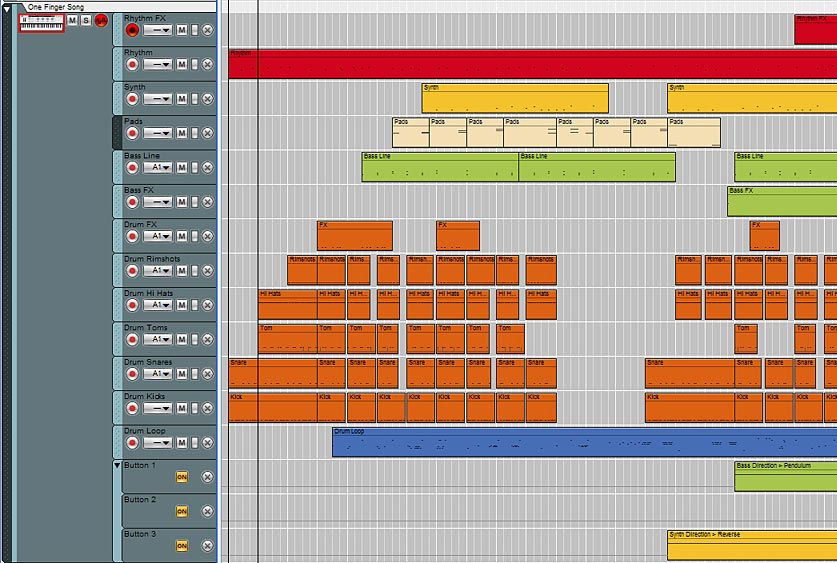
This image shows the various Note Lanes for the Combinator. Each note lane represents a different sound source, Kong drum pad, or Rex Loop Slot selection.

If you are programming a song, you need to create a new note lane for each new track you introduce, because the Combinator IS the song. This is how I set it up in the project’s .rns file. So you can go through one track at a time on each note lane and place all your note triggers there. Alternately, if you are playing live, you can have the entire song on a single note lane.

In addition, when you load the Combinator into your project, you should be aware that the mastering is already built into the Combinator. Rotary 1 controls the Compression Input and Rotary 2 controls the Maximizer input. This mastering setup was largely borrowed from the “Hip Hop” mastering patch in the Factory Soundbank and then the devices were moved and rerouted into the Combinator. You can also create a “bypass” for the entire set of mastering devices and put that on button 4 of the Combinator if you like.

This brings up another point. All the sounds inside the file come from the Factory Soundbank or else were built by me (most of the Kong drums, Synth, and Effects were my creation, while the rest were default patches, drum samples, and Rex files that ship with R5). So you shouldn’t have any problems opening the Combinator or .rns files on your computer.

Differences with the “One Finger Band (Latched – R4)” Combinator

Since Reason 4 users don’t have the new Kong device, I replaced this with a Redrum. The clips and notes in the main sequencer are still the same, but the drum sounds will be different. Each Redrum channel is triggered by a Thor device, and the Thor devices are mapped to the Combinator Keys in the Combinator Programmer. So the key assignments for the drums are different than the R5 file. Those with R5 can, of course, open both .rns files. Those with R4 can only open the R4 Combinator.

One other difference is that I had to remove the Dr. OctoRex device, so there is no “Drum Loop” note lane for the R4 .rns file. You can, of course add in any number of legacy Dr.Rex devices and Rex loops in your own template. Since I do all my work in Reason 5 and Record 1.5 now, I have to stop working with the legacy Dr. Rex loop player. So farewell Dr. Rex. I loved you while you were with us. R.I.P.

Careful with that Pitchfork, Eugene (any Pink Floyd fans out there?)

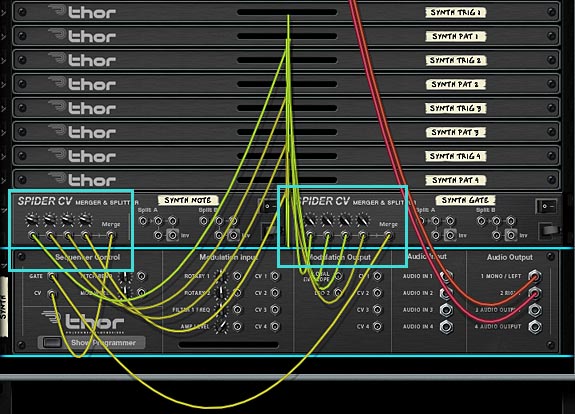
When I was trying to streamline things a bit, I got into a bit of a pickle. Rather than duplicate all the sound sources over and over just to recreate new patterns, I decided to Merge the Note/Gate CV from the “Pattern” Thors into the sound source devices. In order to do this, you need to use 2 Spider CV Mergers; one for the Note and the other for the Gate. However, when you do this, you’ll notice that the pitch of your sounds will go upward, depending how many sound sources you have connected to the Spider. You’ll need to pitch downward using the trim knobs next to the CV inputs on the Merger side of the Spider. This is fiddly because you need to adjust all four downward until you get the pitch you want (assuming you have four pattern devices merged into one CV output). Even merging 2 note CV sources into one will force you to lower the trim knobs a bit toward the left. As for the Gate CV inputs, you can turn all the trim knobs way up to 127. I don’t think this has any noticeable affect on the Gate.

This image shows the attenuation of the pitch on the "Note" CV Merger on the left and the attenuation of the "Gate" CV Merger on the right, using the CV trim knobs.
This image shows the attenuation of the pitch on the “Note” CV Merger on the left and the attenuation of the “Gate” CV Merger on the right, using the CV trim knobs.

This also complicates matters a little bit because you now have 3 parameters affecting the pitch of your sound: The Oscillators in the sound source, the Note values of the Step Sequencers on the “Pattern” Thors, and the combined CV output from the Spider CV Merger (which is attenuated using the trim knobs). Just be aware that the combination of all three parameters will affect the pitch of your sound. You can, of course, play around with all three to affect your pitch, but I found it’s usually easier to first set up your trim knobs to be in the right vicinity of the Octave you want the sound source playing, then leaving them alone and using the Pattern knobs to adjust the pitch.

Suggestions for Using this Combinator setup

  • Live Play. Ultimately, this has the potential to create some really monster setups where you have a wide array of devices and patterns playing those devices all along a single keyboard controller. And with the new Ableton Controllers out there, you can make great use of them for Reason also. All you need is a lot of lighted buttons that are set up to trigger MIDI Key notes, and you’re golden. You can even set things up logically. If you have an 8×8 64-button controller, you can use the first two rows to control Kong, the third row to control a Dr. OctoRex with loop slots (use 1 slot to stop the loop from playing, and 7 other ones for loop variations or entirely new loops in the other slots. And so on and so forth.
  • Remixing potential. Change around the patterns inside the various “Pattern” Thors and/or change the sound sources to your own patches to instantly create a variation on the Midi data that’s in your main sequencer. This takes very little time to do and can generate an entirely new sound or track for you. The beauty is in the fact that you’ve already built the template and laid down midi data. All the hard lifting is done.
  • If you’re feeling ambitious you can set things up to trigger the instrument direction switches (currently set up on Combinator buttons 1-3) from MIDI keys instead.

So there you have it: Part 3 in our MIDI Key Triggering explorations. Should I delve into a “Part 4” or move on to something new? And let me know if you have any other ideas that come to mind where Key Triggering is concerned. In parting, I’ll leave you with the sweetly dark ambient glitch sounds of my little experiment: