44 – RPG-8 Arpeggio Fun (Pt.2)

In Part 2 of my exploration of the RPG-8 Monophonic Arpeggiator, I’m going to dig a little deeper under the hood and see what kind of fun we can have with it. The arpeggiator is usually used to enhance the synth devices. But with a little tweaking, we can apply it to other areas as well, like Kong and Redrum, as well as using it to create multiple arp lines from the same synth. So let’s get busy.

In Part 2 of my exploration of the RPG-8 Monophonic Arpeggiator, I’m going to dig a little deeper under the hood and see what kind of fun we can have with it. The arpeggiator is usually used to enhance the synth devices. But with a little tweaking, we can apply it to other areas as well, like Kong and Redrum, as well as using it to create multiple arp lines from the same synth. So let’s get busy.

To start, the project files for both Part 1 & Part 2 can be downloaded here: arpeggiator-fun. The files are fairly self-evident. You have one .rns file which shows you the basic RPG-8 setup, and a few combinators to showcase some of the tricks I’ll show you. The file is available in zip file format.

Creating a Left/Right Double Arp Setup

Creating an RPG-8 to control a device is all well and good. But how about kicking it up a notch. Let’s create two Arps that are controlling the left and right audio signals and affecting them with different Arpeggios (actually, in this tutorial the Arpeggios are similar, but travel in two different directions and have different “Insert” parameters to play slightly different arpeggios left and right). In this case, create a Subtractor, adjust the parameters to get a synth line that you like (melodies work well). Then create an RPG-8 underneath and the Arp device auto-routes to the Subtractor. Once this is done, select both the Subtractor and RPG-8, right-click and Duplicate the Devices and Tracks. The following shows the routing setup at the back of the rack. Note that I also split the device signals and sent one audio pair through a Unison device to fatten it up a bit.
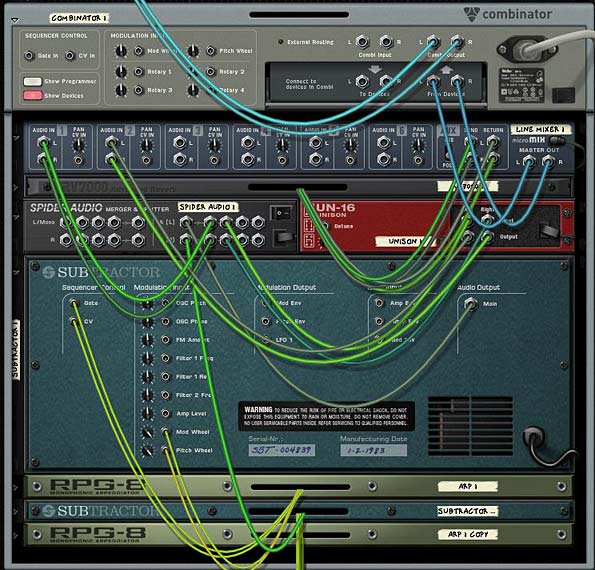
The Subtractor and RPG-8 routing at the back of the rack to set up your melodic synth lines.

The Subtractor becomes the perfect experimental sound source, because this synth is monophonic to begin with. The video below shows in more detail how this setup is put together.

Using the RPG-8 to Control Kong

This is just a quick little look at a different way you can play Kong. Everyone is always looking at new ways to use the Kong device, so here’s a new one. This procedure explains how you can pair the Kong device with the RPG-8 Arpeggiator. This opens the possibilities to use the RPG-8 to act as a sequencer for your drums, and if you turn up the rate you can get some wonderful glitch sounds out of Thor.

In this setup, you create the Combinator with a 6:2 Mixer (the mixer is optional though), and then the Kong device. Create the RPG-8 under the Kong device and it automatically routes up with Kong via the 4 outgoing CV cables.

Note: In the following three setups (with Kong, Redrum, and the Dr.OctoRex), the methods only use the Gate trigger, meaning that the Arpeggiator is only controlling the Gate of the drums. Kong doesn’t have internal CV pitch controls, so you can’t directly control the pitch of Kong. However, it should be noted that if you use the Arpeggiator to control Redrums, you could send the Note / Gate CV cables of an RPG-8 into the Gate / Pitch CV input on an individual drum. This type of setup allows you to create 1 RPG-8 device to control 1 drum in Redrum. So you can imagine a setup that uses 10 RPG-8 devices to control all the drums in a Redrum Kit. Try that out if you want pitch control (and who said Redrum was obsolete?).
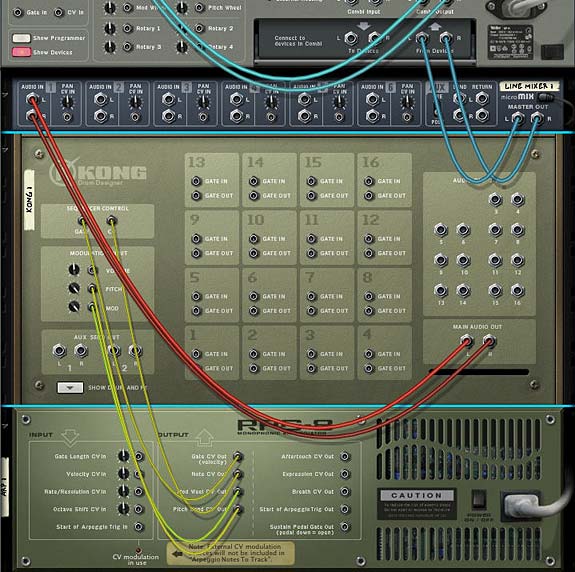
The routing on the back of the Combinator: The Kong and RPG-8 Arpeggiator

From here it’s a walk in the park to use the Arpeggiator to trigger Kong. You just need to create some notes on the sequencer in the usable range of Kong (either C1 to D#2 or C3 to B6). To do this, add the notes in the Combinator track in the sequencer, and with the note clip selected, open the Tools Window (F8). Then use the “Transpose Notes” function, select “Random” and enter the minimum/maximum note value and press the “Apply” button. Done.

Here’s the video to show you the setup details:

Using the RPG-8 to Control a Redrum

Now let’s see if it’s possible to have an Arpeggiator trigger the Redrum, so that Reason 4 drummers aren’t left out in the cold. The downside to using an Arp to trigger the Redrum is that there are no single set of CV connections to trigger the device as a whole. You could trigger the gates of each drum separately. However, you can’t trigger all drums at once. What’s needed is a workaround. And this workaround comes in the form of putting the entire setup inside a Combinator and having the Arpeggiator trigger the Combinator via its CV connections.

Create the Combinator as you did previously with the Kong setup. Then add your Redrum with your favorite kit. Now, instead of creating the RPG-8 under the Redrum, go outside the Combinator and create it underneath the Combinator itself. This will automatically connect the CV cables to control the Combinator. Once this is done, move the RPG-8 inside the Combinator (so you can save the entire Combinator patch later).
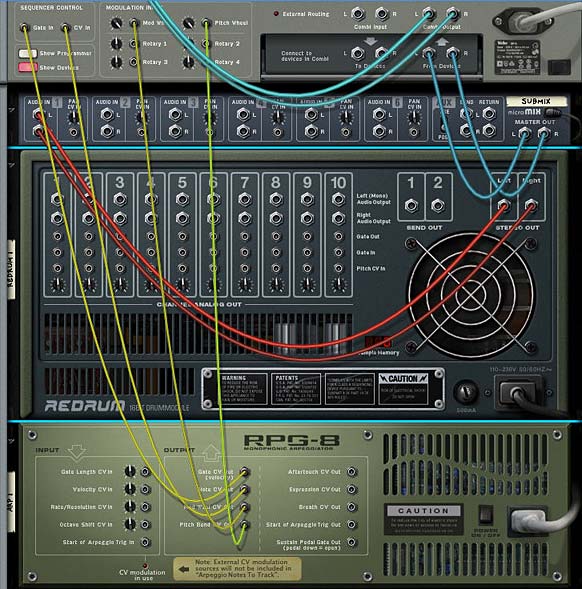
The alternate Redrum routing where the Arpeggiator triggers the Combinator and any devices inside.

Now, as we’ve done before, we can create some notes on the Combinator lane and adjust them from C1 to A1, which is the usable range of the Redrum device.

See below for the video which details this setup.

Using the RPG-8 to Control a Loop — That’s right, a Loop!

Ok so this one is a little out there. You’re going to get some very glitchy results, but in the same way we can Arpeggiate the Redrum, we can also arpeggiate the Dr. OctoRex loop player. Keep in mind this is really going to get glitchy. So be prepared. Because you’ll need to really really experiment with this one to get something you like out of it. And it’s ultimately completely unpredictable. But here’s the idea in the following video:

Now let’s look at the issue of Pitch. Since the above videos show you how you can use the Gate of the Arpeggiator to trigger the gate of the drum devices, we need to do a little adjustment to set up the Pitch correctly. With the Redrum, for example, you can set up the Arpeggiator to trigger the Gate / Pitch CV inputs on each individual drum. On the Dr. OctoRex, you can leave the Gate CV out from the Arpeggiator where it is in the Combinator, but move the Note CV out cable to the Osc. Pitch input on the back of the Dr.OctoRex. Here’s a video which outlines how these methods are achieved:

So those are just a few ways you can play with the RPG-8 to create interesting melodies and experimentation. Do you have any other ideas you would like to share when it comes to creative Arpeggios? Anything you would like further explained? Drop me a comment and let me know.

34 – Breaking out of Kong

Exploring the Advanced features of Kong, learn how to use Kong’s FX modules on audio from other devices, process your Kong sounds through other Effects units not included in Kong, expand your Drum processing abilities by parallel drum processing or processing each drum module individually.

In this tutorial I’m going to explore some of the advanced features of Kong. We’ll learn how to use Kong’s FX modules on audio from other devices, process your Kong sounds through other Effects units not included in Kong, expand your drum processing abilities by parallel drum processing, and process each drum module individually.

Break Out / Break In

The first foray into exploring some outside routing came from an email request I got. The person who emailed me wanted to know how the first tip from “Music Radar’s Top 10 Essential Reason 5 Tips” worked. The tip went like this:

“One of Kong’s best features is its powerful level-setting system, but another key point is its connectivity. Instead of mixing internally within Kong, try routing the pads out through a 14:2 Mixer and then back into Kong via the Break-in connections. This enables you to set levels and EQ with the mixer, and still use the powerful master output FX. Save your construction as a Combinator for future use.”

Well, here’s how it works. The basic idea is that the Break-out jacks on the back of Kong act as an additional way to insert Effect devices between the FX2 and Bus FX modules in the signal flow. The flow works something like this:

Drum Module > FX1 > FX2 > [Your Insert FX here / Break-out & Break-in jacks] > Bus FX > Master FX > Main Output

That’s essentially the signal flow. Keep in mind though, that if your Drum output is set to “Master FX” which is the default, or any of the output jacks (3-4, for example), you will need to use the Bus FX Send knob on the drum panel on the front of Kong to adjust the level of the external effects devices. Also note that the external effects devices are global. You can use them as an insert for all the drum modules inside Kong. If you don’t want them used on a specific drum, then just keep the Bus FX Send for that specific drum at it’s zero (0) default.

I know this sounds a little complex, so I put together this video to show you an example:

Parallel Drum Processing, Kong Style

Here’s an interesting way to create Parallel processing on your kick via Kong. And it’s stupid-easy!

Parallel processing is when you use the same drum sound both wet and dry at the same time. You can tune the amount of each, but both together add up to a beefier sound. Again, the idea is to trigger both a processed and unprocessed drum sound at once and then mix both together to create a punchier beefier kick. So here’s the easy way to do it in Kong. Note that we’ll do it inside a Combinator so you can save the patch for later use.

  1. First, Create a Combinator and inside create a 14:2 Line Mixer (we’ll do this to have access to the Mixer’s EQ, otherwise you can create a 6:2 mixer instead, that’s totally up to you). Then create a Kong.
  2. Open up Kong and add a Physical Bass Drum into drum module 1. Set the drum output to the 3/4 stereo pair. Add a Parametric EQ device into the Bus FX slot and a Compressor into the Master FX slot.
  3. Flip the rack around and send a pair of audio cables from the 3 / 4 Audio outputs on the back of Kong into the second channel of the 14:2 Mixer.
  4. Now comes the fun part. Flip back to the front. Turn up the Drum’s Bus FX send to about 100, and start playing the Drum Pad. As you play, adjust the EQ and Compressor to taste. You’ll hear the effect it has on the sound.

The reason this works is because you are sending the same drum sound two different places. The unprocessed sound is going straight through ouput 3/4 (and into channel 2 on the Mixer), while the processed sound is running through the Bus FX and Master FX and back out the main outputs into channel 1 of the 14:2 Mixer. Both are playing at once. Instant parallel sound.

If you want to ease back on the level of processed sound (ie: the sound going through the EQ and Compressor), simply reduce the Bus FX send knob. If you want to adjust the level of dry sound, use the Channel 2 Level fader. You can also turn on the EQ and adjust the EQ parameters directly on the 14:2 Mixer. This setup provides loads of options.

7 Drums to 7 Channels: Hooking up each Drum Module Separately

And now for something completely different. I’ve heard many people ask how they can send their drum pads to individual channels in the mixer. The easy answer is to send each drum module through the different outputs available on the back of Kong; 7 stereo pairs in all.

In actuality, if you count the Master FX, Bus FX, and Direct output, you have 10 in total. But for our purposes here, let’s focus on sending 7 drum pads out to 7 different channels in the Mixer. In this way, all the drums operate exactly the same in terms of signal path and it’s the easiest to work with when you’re first starting out.

To set this up, first create a Combinator as we did earlier (so we can save this as a template for use later). In the Combinator create a 14:2 Mixer and holding the shift key down, create a Kong device.

On Kong, click the Show Drum and FX button. Then load up 7 drums in the first 7 drum module slots. These can be any drum modules you like, and they can have any associated FX inserted into the FX1 and FX2 slots.

At the bottom right of the drum module select the appropriate outputs as follows:

Drum Module 1 > Output 3 – 4

Drum Module 2 > Output 5 – 6

Drum Module 3 > Output 7 – 8

Drum Module 4 > Output 9 – 10

Drum Module 5 > Output 11 – 12

Drum Module 6 > Output 13 – 14

Drum Module 7 > Output 15 – 16

Flip the rack around to the back, and route each of the above audio outputs to their own Left/Right channels in the 14:2 Mixer (7 channels in total).

That’s all there is to it. Now, you can control each of the drums via the Mixer channels. This means that you can control the Level, EQ, Panning, etc. from the Mixer channel strip. This also opens you up to using 4 different sends on the drums via the Mixer sends if you like (if you did everything through Kong, you’d have access to only 2 sends via the Aux 1 and Aux 2 cables on the back of Kong).

One caveat. In this type of setup, you can control the Level of the individual drums via the Drum Level knob on each drum panel, if you so choose. So don’t get confused. Essentially, this means you have three junctures at which to control each of the drum levels: The Drum Module’s Level knob, the Drum panel Level knob, and the Mixer Channel Level fader. It’s important to know the proper signal chain between all these various levels. It goes exactly in that order:

Drum Module Level > Drum Panel Level > Mixer Channel Fader > Mixer Master Fader

Since there is nothing routed from the main output of Kong, Kong’s Master Level isn’t even utilized (put another way, it’s useless and does nothing in this setup).

Processing Audio Through Kong

Finally, here’s how you can process your audio through Kong. It’s drop-dead simple, and you can process Any audio from any device (and from any audio track if you have Record) through any number of Kong FX devices. Watch the video to find out how it’s done.


So that’s it. A few advanced ideas for breaking outside Kong and using the device for more than just drum processing. I’m sure there’s many others. But these are the ones that came to my mind. What’s your favorite idea or feature of Kong? Drop me a line or comment on this post and let’s see just how far we can push Kong.

27 – Kong Drum Creation A to Z

Like the title says, I’m going to provide you with a 45-minute video / blog tutorial on how to create an entire Kong 16-Pad design, using nothing more than a Rex file and some imagination. This is the A to Z of Kong drum design. And lots of tips along the way. Don’t miss it!

Like the title says, I’m going to provide you with a 45-minute video / blog tutorial on how to create an entire Kong 16-Patch design, using nothing more than a Rex file and some imagination.

Those familiar with the methods for my tutorials know that I usually provide the project files along with the technique. Nope. Not this time. Instead, I’m providing the rex file I used to create most of these drums. That way you can try it out yourself and follow along with the tutorial. Give a man a fish, they say, and he’ll eat for a day. Teach him how to fish, and he’ll never go hungry. So here’s the single Rex in a zip file: trails-rex

This method starts off with a Combinator, then two 6:2 Mixers, a spider audio/merger, and the obvious Kong Drum Designer. Then I go into how to set up the drums one at a time, starting with the Kick Drum. Using the Nurse Rex player, you load the rex file (and this can be any rex file, and start copying/pasting the rex loop one at a time into the first 8 pads. That gives you enough room to work creating all the drums you need, such as the Kick, a few toms, some snares, an open and closed hi hat, and even a reverse drum, and some other more off-the wall sounds.

After you do this, I’ll show you how you can set up the top 4 pads in Kong to trigger other devices (in this case Thor, but you can trigger any other device in Reason that accepts a Gate trigger, which is just about everything).

Finally, I go into programming the Combinator and adding some extra global Effects to play around with the tone and reverb of your drums as a whole. So check out the videos below for a complete tutorial on how to mess around with Kong and create some kick butt drums!

So that’s how you do it, or at least one of a million ways in which you can design a few drums in a Kong patch. What’s your favorite new Kong trick, and do you have any other suggestions or ideas? Please share them and let us all know.

Until next time, happy reasoning!