Etch Red Patch Pack

In my fervent attempt to learn every single Rack Extension in the known universe, I stumbled upon Etch Red. And then I started creating, and just kept going and going and going. You see, this is part of the fun of the Rack Extensions. I’m starting to learn it’s not always about pitting the default Reason software against a particular Rack Extension. It’s just as important that a Rack Extension motivates you to create more. To that end, Etch Red was a seriously fun creative tool that allowed me to experiment on a large scale. So I thought I would share some of these experimentations with you.

Reason101 Etch Red Patch Pack.In my fervent attempt to learn every single Rack Extension in the known universe, I stumbled upon Etch Red. And then I started creating, and just kept going and going and going. You see, this is part of the fun of the Rack Extensions. I’m starting to learn it’s not always about pitting the default Reason software against a particular Rack Extension. It’s just as important that a Rack Extension motivates you to create more. To that end, Etch Red was a seriously fun creative tool that allowed me to experiment on a large scale. So I thought I would share some of these experimentations with you.

You can download the patches here: Etch Red Patch Pack. There are 20 patches included: 8 Combinators (4 Instruments and 4 Effect devices), along with 12 Etch Red device patches. In order to use them, you will need Reason 6.5+ and the Etch Red Rack Extension.

I hope you enjoy the patches. And if you do, please consider donating here: [paypal-donation]

Now a little bit about the patch pack. There are two sections:

  1. Combinators — There are 4 instrument patches and 4 effect devices, all of which make use of Etch Red.
  2. Etch Red Device Patches — Since Etch Red can save it’s own patches, I’ve included 12 .repatch files as well.

Here is a brief description of each patch you’ll find inside this pack:

FX Combinators

  • Drive LP FX.cmb

This patch Combines the various drive modes of Etch Red and pairs them with a Low Pass Filter. Use Rotary 1 for the Drive amount, and Rotary 2 to switch between the seven drive modes.  Rotary 3 and 4 allow you to shape the LP filter (Frequency and Resonance). You can turn the drive or filter on or off using the first two buttons. And even apply some Drive modulation using button 3. Lastly, you can Pan the Filter using button 4.

  • Dual Auto-Panner FX.cmb

As it says in the name, this Combinator offers up some dual panning. It uses the two Etch Red LFOs in order to Pan the audio signal. In this way, you can create complex panning effects. The Rotaries control the depth (gain) and Rate of both Pans. You can also change between two different wave types (square and sine) for both Pans using Button 1 and 2. And if you like, you can turn off the second pan altogether using Button 3. Lastly, you can sync or un-sync Pan 1.

  • Hi – Lo Filter Splits (BP).cmb

This Combinator splits out the audio signal into the High and Low Frequencies. The fun comes in the fact that you can apply a different Bandpass filter to these two different Frequency splits independently. Use Rotary 1 to determine the crossover frequency, and then use Rotary 2 and 3 to set the Frequency for the High and Low Bandpass filters. There’s also a few other modulations and a HP filter that you can apply to both the High and Low Frequency streams, as well as some FM application if you like (on Rotary 4).

  • Tremolo & Vibrato FX.cmb

Tremolo affects the level of the audio signal (volume wobble), and Vibrato affects the Filter variance (Filter wobble). Using the Combinator Rotaries and buttons, you can control both in a variety of ways. You can adjust their Level, Rate, and what wave shape is used for the wobbling.

Instrument Combinators

  • Dubstep Bass C.cmb

As the name suggests, this is a Dubstep Bass experiment. You can adjust Filter Frequency, Drive, FM, and Wobble Glide using the rotaries, as well as some other adjustments using the buttons. Hint: If you don’t like the wobble pattern, open up the Combinator, and change the Thor step sequencer Velocity and Step Count. The velocity controls the Rate of the LFO in Etch Red, and therefore the type of Wobble you hear.

  • Easy Etch Synth Pad Hybrid.cmb

This is a nice hybrid between a polyphonic synth and pad instrument. Use Rotary 3 to smoothly transition between a Synth (fully left) and a Pad (fully right). Frequency and Resonance are on Rotaries 1 & 2. And you can control the level of the Sub Oscillator on Rotary 3. Button 1 and Button 2 control various Modulations applied to the Filter Frequency and FM, respectively. And try out the Pad Wrapper on button 3, which adds a nice shaper modulation to the sound.

  • Hooveretch.cmb

Where Etch Red meets a Hoover style sound. There’s even a Thor Step Sequencer thrown in for an Arpeggiated rhythm. Probably one of my favorite sounds of the bunch. You can control the Filter Frequencies using the first two Rotaries, and the level of the Sub Oscillator on Rotary 3. You can also use Rotary 4 to detune the main two Oscillators. Add in some Delay, FM, and Shaper, and you have yourself a really nice rich Bass.

  • Memory Pad

Another Pad, I think this one has a nice upbeat sound, yet still floats in the background. It’s more Rhythmic in nature, but you can dampen that if you like by turning down the “Flicker” rotary (Rotary 3) and turning switching to the alternate Wave type (Turn button 1 On).

Etch Red Device Patches

  • Basic Auto-Panner.repatch

The name is pretty self-explanatory. This is a patch that allows you to pan any audio signal.

  • Comb Phreak.repatch

Difficult to explain. Baiscally uses a Comb along with some drive to create a pretty wild little sound. Great for a sci-fi effect.

  • Deep Basso.repatch

Try this one out on your Bass sounds. It tends to raise the level and spreads out the Bass sound a little for you.

  • Dueling Filter Sweeps.repatch

This one is a double-sweep using two slow LFOs. Try to use this on a sound with a long ADSR time, like a Pad. That way you really get a chance to hear the sweep.

  • Ghost Pad.repatch

This is one of my favorites, and is great for smooth Pads and textures. It creates almost a feedback echo on your sound, but it’s a slow sweeping echo. So give it some musical room to breathe. Long held notes for this one.

  • Grunge Guitar.repatch

How could I do an Etch Red Patch Pack without a great distorted effect for Guitar. Nuff said.

  • Kick Variable Enhancer.repatch

Use this on your Kicks. It adds both punch and enough variation in the Filtering / Resonance so that it doesn’t become static. Instead your Kick drum will display a little variation each time it’s played.

  • LFO Grind Drive Distort.repatch

Another wacky and heavily distorted sound. There’s a lot of vibration and drive in this one. Try it with a bass or synth sound. Or even a texture or drone sound.

  • Simple Tremolo.repatch

This is a simplified version of Tremolo, and shows you how you can wobble the level of any audio source.

  • Panned Combs.repatch

A very simple patch that takes the audio coming into Etch Red and sends it through two Comb filters in parallel. Then the signal is panned left and right.

  • Snare Variable Dual Filter.repatch

Like the Kick Variable patch, except this one was built for snares.

  • Whacky Comb.repatch

Something a little more “out there” using a Comb filter. Try it out for some weird glitchiness.


So that’s what you’ll find included in the free Etch Red Patch Pack. Let me know what you think. Now I have to go wrap my head around Peff’s excellent Directre Rack Extension. Deep! Until next time, I hope some of what I do inspires you. All my best.

36 – Let’s Talk Compression

Let’s start talking about Compression. In one of my previous tutorials, I showed a way you could use Kong to parallel compress a Kick Drum. So that was one method. But here are a few others that everyone should know about, especially if you’re working on most dance music genres.

Let’s start talking about Compression. In one of my previous tutorials, I showed a way you could use Kong to parallel compress a Kick Drum. So that was one method. But here are a few others that everyone should know about, especially if you’re working on most dance music genres.

Sidechain Compression (aka: “Ducking” or “Gating”)

This is a basic concept that everyone should know. But the twist is that we’ll use Kong, instead of Redrum, to compress a Thor bassline. This way, when the kick drum sounds, the bass is compressed and “ducks out” of the mix. This ensures the Kick drum cuts through the bass in your track.

Compression can also be used for other things as well. It does not have to be confined to a Kick drum and Bassline. You can use any sound source to duck out any other sound source and create a pumping rhythm like this. For instance, you can use a Kick drum to compress your main synth line. This can create some interesting gating effects if used properly.

Parallel Compression

Parallel Compression occurs when you mix a dry sound source together with that same sound source which has been compressed. In this way you get a wider, fatter sound, and you also get the flexibility of controlling the mix between the dry and wet signals. I put together a video to show you how Kong can be used in a Parallel Compression scenario on YouTube. However, why don’t I show you another way you can use a Redrum to parallel process a Kick Drum (a very common usage of this technique), or an entire set of drums (this is a little more unorthodox because you would usually parallel compress one drum at a time, but just to show you that you have options. . . ). Here’s the video:

Frequency-Based Compression

This approach is a little different, but the concept is similar. A lot of times, you might have a specific frequency that you want to “duck” out of the mix. One method you can use is Frequency-based compression, where you compress only a specific frequency in your mix. This is usually used to remove an unwanted sound, and probably the most popular usage for this kind of compression is “de-essing” where those nasty sibilant “S” sounds are removed from vocals. This is really childs play with Reason and the M Class EQ and Compressor devices. Let’s take a look at how it’s done:

As an alternative to using the M Class Eq device, you can use the BV512 Vocoder. In this way, the sound is colored slightly (and moreso if you use the 512 FFT setting), but it’s still a legitimate way that has its own technique. You can see the video of it below. Try it out. You might come to like this method.

Multi-Band Compression

Of course, there’s also something called “Multi-band Compression” which takes the EQ frequency idea to an extreme. This is usually applied to the whole mix at the end of the signal path, before going to the audio outputs. In this way, you set up multiple compressors each affecting a specific range of frequencies. The concept is not entirely difficult, depending on how many compressors you want to set up. For a really great introduction to multi-band compression, I would advise you to check out James Bernard’s week 7 video tutorial on Multi-Band Compression. In addition, James also has a complete multi-band toolkit available as a free download. So go check it out now if you haven’t already!


So that’s it. I’m sure there are other creative ways you can use Compression, but I hope that begins to inspire you to look at compression as a useful dynamic processing tool or even special effect. If you have any comments on this or any other tutorials, please let me know.

Reese Bass & Trance Lead

This time, I was trying out various Reese Bass ideas and other trance lead ideas after watching Hydlide do a few interesting tutorial videos on putting together a trance lead. So I thought I would try out creating some trancey sounds in a Combinator which everyone can use if they wish.

Download the RNS file and two Combinators (in a single zip file) here: trance-leads.

Description: This time, I was trying out various Reese Bass ideas and other trance lead ideas after watching Hydlide do a few interesting tutorial videos on putting together a trance lead. So I thought I would try out creating some trancey sounds in a Combinator which everyone can use if they wish.

Features: The Combinators are pretty simple. Mostly, they use saw waveforms which are detuned. Add in a few special effects and you have some highly customizable sounds. The Reese’s Pieces Combinator was created with a Reese Bass sound in mind, so it’s better if you use this in the lower registers of your keyboard. The Trance Lead Combinator is pretty much what it says on the tin: a Trance Lead. Here are a rundown of each Combinator’s controls:

Reese’s Pieces

Reese's Pieces - Just one of my takes on a Reese Bass

Here’s how the patch was put together:

Pitch Bend: The pitch bend adjusts the Pitch up or down by 7 semitones.

Mod Wheel: The mod wheel is assigned to the Malstrom only. Index is increased, Shift is reduced, and the Filter is increased.

Rotary 1: Filter Frequency – This affects the Thor’s Filter 1 Frequency and allows you to play with the full frequency range. This knob is also tied to the ECF filter frequency which affects the sound coming out of the Malstrom in the same way. Essentially you can create a filter sweep with this Rotary.

Rotary 2: Resonance – This gives you a limited, but useful range affecting the Thor and Malstrom Resonance kn0bs.

Rotary 3: Unison – This Rotary affects the impact of the Unison affecting the Thor Oscillators. Fully left, and there is no Unison (fully dry), while turning the knob fully right provides you with a full Unison detuned sound (fully wet).

Rotary 4: + Shift – This changes the Shift of the two Malstrom Oscillators (A and B) from 0 to +63. You just have to try this out to hear for yourself. It’s a very interesting and quirky application to the sound. But I personally like playing around with this rotary.

Button 1: Twist 1 – This turns on the Thor Shaper. It provides a slightly overloaded or overdriven sound on top of all three sawtooth waves in Thor. It’s not overly heavy though, so it’s pretty safe to use. However, depending on how your Frequency and Resonance are set, this will affect how much you will hear the Shaper affect the sound.

Button 2: Twist 2 – This turns on the Malstrom Shaper. It provides an overdriven sound effect. This is much higher pitched or brighter than the Thor Shaper, so it provides a more distinctive sound. However, depending on how your Frequency and Resonance are set, this will affect how much you will hear the Shaper affect the sound.

Button 3: Reverb – Adds in a strong reverb sound, which I find is pretty common in these types of patches.

Button 4: Unassigned

Usage: You can use this any way you like. But mainly it can provide a very bass-heavy sound (my take on a Reese Synth Bass sound).

Trance Lead

A simple Trance Lead Combinator
My take on a simple Trance Lead with lots of parameters to tweak.

Pitch Bend: The pitch bend adjusts the Pitch up or down by 7 semitones.

Mod Wheel: Unassigned

Rotary 1: Bass Increase – As the name suggests, the bass is increased by increasing the Filter Frequency of Thor’s Filter 2.

Rotary 2: Motion – This affects the Motion of the Malstrom Oscillators A and B from -64 to +30.

Rotary 3: Reverb – Adds Reverb to the overall sound coming out of the Combinator. This is a Dry/Wet Reverb knob going from 0 to 70.

Rotary 4: Filter Sweep: This affects the frequency of all the Oscillators. Use this rotary to create a simple filter sweep for build-ups in your songs.

Button 1: FX 1 – Each of the buttons adds a specific effect which you may or may not like. I added these in as an afterthought just to provide more flexibility with the Combinator. Play around and experiment with them to see if they enhance the sound for you. Button 1 here Changes the Modulator A to Index from 0 to -64.

Button 2: FX 2 – Changes Thor’s Oscillator 1 Octave from 3 to 4. Also changes the Malstrom’s Oscillator B Octave from 4 to 5.

Button 3: FX 3 – Changes the Malstrom’s Modulator A to Shift from 0 to 22 and Modulator B to Motion from 0 to -10

Button 4: FX 4 – Changes the Malstrom’s Modulator B to Filter from 0 to -64

Usage: You can use this any way you like, but mainly it provides a basic trance lead sound.

Other Notes: For both Combinators, you can really change this sound around quite a bit just by playing with all the parameters. So you’ll have to experiment to find something that suits your taste. In addition, you can use the Frequency rotary to create a frequency sweep or build-up in your tunes.

As always, please let me know what you think or let me know if and how you use this in your own projects. Happy Reasoning!

22 – Parallel Effects Processing

Split an audio signal into multiple parallel audio signals, send them to various effects, and then merge them back together. You control the mix level of all 3 effects and the original signal. As an example, we’ll create a Dynamic Effects processor (Compressors / Equalizers) to apply to your bass sounds.

In this tutorial, I’m going to show you how to split an audio signal into multiple parallel audio signals, send them to various effects, and then merge them back together. You control the mix level of all 3 effects and the original signal. As an example, we’ll create a Dynamic Effects processor (Compressors / Equalizers) to apply to your bass sounds. The Combinator knobs will be used as the basis to sculpt your sounds. Add some additional effects to the buttons and you have yourself some very powerful sound development indeed.

The inspiration for this tutorial came from a procedure I had read about in which the Kick drum is compressed and then the original Kick is mixed back in with this compressed Kick drum to give a beefier sound. So I thought, if you could do this with a Kick drum, how about doing it with other sounds such as a Bass, and then allowing you to mix in not only the original sound, but also different compression schemes. With the Combinator allowing you to utilize 4 knobs, you can actually create 3 different compression/EQ schemes (each tied to their own Rotary on the Combinator), and then tie the original mix to the fourth Rotary. This way, you can have some fun adjusting the balance of all 3 compressions as well as the original to create your final sound. This opens up a huge array of sound possibilities.

Once I show you the method to do this, you’ll be able to parallel process any kind of effect you can create in Reason or Record. For example, we can take 3 variations on a Chorus, and tie each variation to their own Rotary, then have some fun mixing them together. This turns your Combinator into a very flexible Chorus machine.

The project files can be downloaded here: parallel-effects-processing The zip file contains 1 Combinator inside an .rns file and a Combinator template. The .rns file contains the Parallel Processor which we’ll create here. You can use it to process your bass sounds. Different Bass tones and cabinet models are packed inside the Combinator. The template file can be used to start you off creating your own effects. You won’t have to enter any settings in the Combinator’s Modulation Routing, unless you tie some effects to the buttons. Otherwise, have at it building your own Parallel processing effects.

Here’s the basic Combinator setup:

  1. First, Create a new Reason document and then create a 14:2 Mixer. Next, create a sound module, such as a Bass sound. You can find great bass sounds under the Factory Sound Bank (FSB) or you can create one of your own using a Thor, Mal, or Sub. You can even create a sampled Bass sound using the NN-19 or NN-XT. It’s up to you, but since we’re going to create a Combinator effect unit, you’ll need some kind of sound which is to be affected.
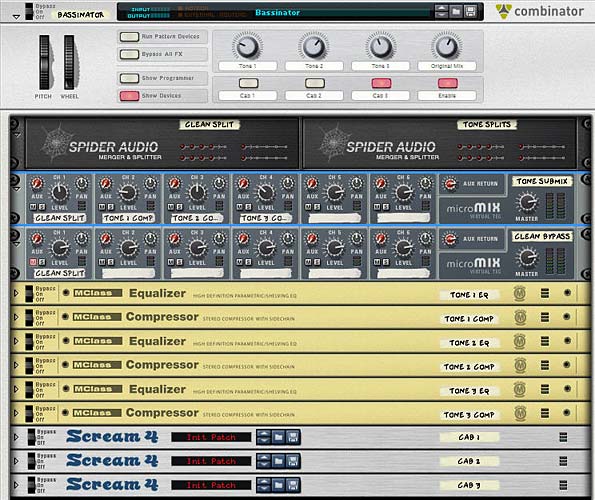
  2. Next, create a Combinator under the sound source and in the Combinator hold down shift and create in the following order two Audio Spiders/Mergers, two 6:2 Line Mixers, 3 sets of M-Class Equalizer/M-Class Compressor devices, and 3 Scream devices.
  3. Label the first Audio Spider/ Merger “Clean Split” and label the second Spider/Merger “Tone Splits.” Label the first 6:2 Mixer “Tone Submix” and the second 6:2 mixer “Clean Bypass.” Label each set of EQ/Compressor as follows: Tone EQ 1/Tone Comp 1, Tone EQ 2/Tone Comp 2, and Tone EQ 3/Tone Comp 3. Finally, label the 3 Scream devices “Cab 1,” “Cab 2,” and “Cab 3.” These will be our cabinet emulations. This is how we will refer to each device for the remainder of the tutorial.
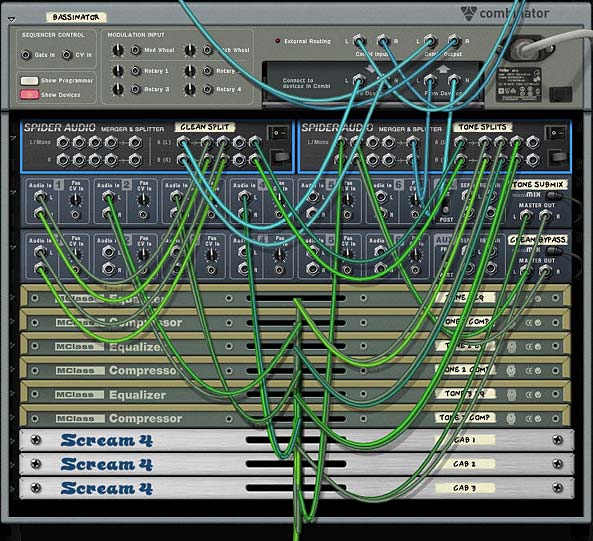
  4. Flip the rack around to the back as it’s time to do some serious routing. Note that all the routings below are Left/Right stereo pairs. Move the Audio outputs from the sound device to the Combinator inputs, and then move the Combinator audio outputs to the Main 14:2 Mixer’s Channel 1 inputs. Route the “To Devices” cables from the Combinator to the main inputs on the splitter side of the “Clean Split” Spider device.
  5. Send one of the splits from the “Clean Split” device to Channel 1 input of the “Tone Submix” mixer, another split to Channel 1 of the “Clean Bypass” mixer, and a third split to Main inputs on the splitter side of the “Tone  Splits” Spider device.

    The back of the rack for the Template file.
    The back of the rack for the Template file. I'm jumping ahead a little. But this shows the basic routing before setting up any of the Effect devices.
  6. Send one split from the “Tone Splits” Spider to the “Tone EQ 1” inputs. Send a second split to the “Tone EQ 2” inputs. Send a third split to the “Tone EQ 3” inputs. Then send the audio outputs from each of the EQ devices to the audio inputs of their respective Compressor devices. Then send the outputs of each of the Compressor devices into Channels 2, 3, and 4 of the “Tone Submix” mixer device.
  7. Next, send the Master output of the “Tone Submix” mixer to the input of the “Cab 1” scream device. The “Cab 1” output goes to the “Cab 2” input, the “Cab 2” output goes to the “Cab 3 input,” and finally the “Cab 3” output goes back into the Merge side input of the “Tone Splits” Spider device. Also send the Master output of the “Clean Bypass” mixer device to another merge input on the “Tone Splits” Spider device.
  8. Last but not least, send the Merged output from the “Tone Splits” Spider device to the “From Devices” input on the main Combinator panel. I know this all looks really messy, but sometimes you just have to get in there and get dirty to get what you want out of Reason.
    The back of the rack when finished routing
    The back of the rack when finished routing

    The front of the rack
    The front of the rack
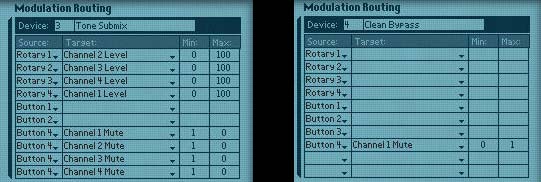
  9. Now let’s flip the rack around to the front and work on the Combinator Modulation Routing section. Click the “Show Programmer” button on the Combinator. Enter the following settings:

    For the “Tone Submix” mixer device:

    Rotary 1 > Channel 2 Level: 0 / 100

    Rotary 2 > Channel 3 Level: 0 / 100

    Rotary 3 > Channel 4 Level: 0 / 100

    Rotary 4 > Channel 1 Level: 0 / 100

    Button 4 > Channel 1 Mute: 1 / 0

    Button 4 > Channel 2 Mute: 1 / 0

    Button 4 > Channel 3 Mute: 1 / 0

    Button 4 > Channel 4 Mute: 1 / 0

    For the “Clean Bypass” mixer device:

    Button 4 > Channel 1 Mute: 0 / 1

    For each the “Cab 1” Scream device (note, each Cab device has the same settings, except Cab 2 is tied to Button 2 and Cab 3 is tied to Button 3):

    Button 1 > Damage On/Off: 0 / 1

    Button 1 > Cut On/Off: 0 / 1

    Button 1 > Body On/Off: 0 / 1

    Combinator Modulation routing for the two Mixers
    Combinator Modulation routing for the two Mixers

Here’s what is happening:

Button 4 is used as a bypass switch. When this button is turned off, the original sound will travel through the Combinator untouched. When Button 4 is turned on, you can use the 4 Rotaries to create a custom mix between all the sets of effects. Rotary 4 is a “special” rotary, in that it allows you to mix the original audio back into the mix. It’s important to note that this original audio is separate from the audio that goes through the Combinator when button 4 is off. Hence the need for two different mixers inside the Combinator. This way you can have the original mix work as though it were just another tone alongside the others, and when you switch back to a “clean” signal, a separate “original audio” is piped through the Combinator.

Buttons 1, 2, and 3 are your different Cabinet emulations. Those with Record are even luckier in that they can add in a few Line 6 Cabinet modeling devices and use those instead of the Scream. But with Reason, you can still get some amazing cabinet models by using the “Body” setting of the Scream unit (in conjunction with a little distortion and EQ cutting if you wish).

Another thing to keep in mind is that the Tones attached to the Rotaries are independent of the Cabinet models. You can dial in Tones without ever having to use the Cabinet models. However, button 4 must be turned on or enabled for you to hear any of the Tones or Cabinet models. In addition, you can have two Cabinet models used in series (note however, that this was not really the intended purpose — my thinking was that you can use each Cab model individually, and not together, but if you want to use them together, go for it).

Now as a final step, you will need to enter individual settings in the Equalizer / Compressor and Scream units. I won’t go into all the settings you can enter, but rather, you should build your own settings within these devices to your taste. However, take a look at my own settings to see what I used for Bass processing. The idea is to create each set of Equalizer/Compressor settings separately. So, for instance, turn rotary 1 all the way right and turn down all other rotaries to zero (fully left). Now listen to your sound source going through the device, and adjust the “Tone EQ 1” and “Tone Comp 1” devices until you hit on a nice bass processing setting.

Next, turn Rotary 1 all the way down and turn Rotary 2 all the way up. Now work on the second set of EQ/Comp devices to get an entirely new bass processing outcome from the devices. Once that’s done, repeat this for the final set of EQ/Comp devices.

Note: If you want to cheat a little bit, select your sound source, and then right-click and select “Create Effect.” Open up the Factory Sound Bank and look under the ALL Effects Patches > Dynamics > Basses folder and open up one of the bass Combinator patches that you like. Now be sure to adjust the settings on the front of this Combinator patch until you find the sound you’re looking for. Then click the “Show Devices” button on the Combinator, and copy/paste the devices from this Bass patch into your parallel processing Combinator. Delete the (now empty) bass Combinator. In the parallel processing Combinator, you will need to do a little routing to set things up as I have (routing into the main inputs of the first device, and routing the outputs from the last device). But once you do, you can then repeat this process two more times choosing different Combinator patches to copy from in the FSB.

Here’s a 2-part video series that expands upon this idea. It doesn’t always come out exactly the way you expect. But that’s the fun of trying out the technique. You may find something worth keeping, and then you can save the Combinator as a patch and use it in your own compositions.

Part 1:

Part 2:

Now for your cabinet models (Scream devices) you would go through the same process.

Note: When working with the Scream devices, in order to balance the volume level between the Original sound / Tones (using Button 4), you will need to raise all the Scream device Master volume settings up to 100. In this way, if you use Button 4 to switch between the Original volume on Rotary 4 and the volume of the clean bypass (being sent to the “Clean Bypass” mixer), the volume levels will match. So first raise all the master levels for all Scream units to 100.

Listen to the bass sound going only through Rotary 1 and with Button 1 enabled. Then enter a proper Cab setting in the “Cab 1” Scream device. When you have something that sounds nice, test it out with the other Tones on the other Rotaries individually. Note that you may need to put a limiter (M Class Compressor) after the Scream device to tame the sound if it gets too crazy.

Why I feel this setup is so powerful

This type of setup can be very flexible and powerful. Instead of using a single effects processor (one EQ and one Compressor) you can create any kind of mix between three different EQ/Compressor setups. Add to that the Cab models and you end up with some very powerful audio processing.

Another reason I feel this setup is powerful is because you end up with a processor that is greater than the sum of its individual parts. It’s also a handy way to store three setups (plus the original mix) in a single Combinator.


So what are your thoughts? Does this open up some new possibilities for you? Have you used this technique before in other areas or with other devices? I’d love to hear your thoughts on this. Thanks for reading. Now go out there and make some amazing music!

Reason Patch A Day Refill

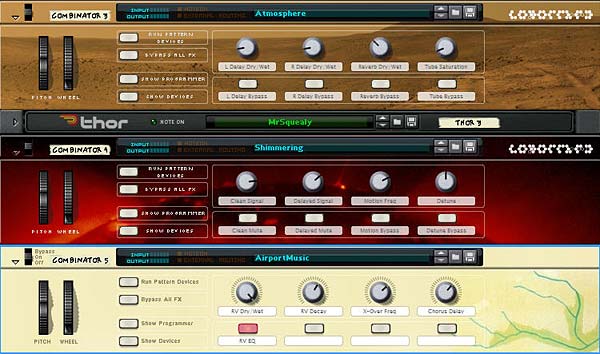
A review of Robb Neumann’s “Reason Patch A Day” Refill, with approximately 500 Patches for Propellerhead Reason. This is one refill you don’t want to miss. Basses, Pads, Effects, Combinators, Synths. It’s all in there. Take a listen for yourself.

If you frequent the various Propellerhead forums and sites, you’ve probably come across Robb Neumann’s “Reason Patch A Day” website. The concept is simple. Robb provides a new patch each day which is produced by him or contributed by others, and he provides a short write-up explaining each one on his blog at http://www.reasonpatchaday.blogspot.com/

Recently, he decided to release the entire 1.5-year collection in a single Refill that anyone can download for a donation. Being a person who runs my own Reason website, I know what goes into maintaining this growing monstrosity. And I know that a few modest donations go a long way. And for 500 patches in a rock-solid refill, that’s well worth it. And that’s what you get.

Some of the great Combinator patches from the refill
Some of the great Combinator patches from the refill. Notice the dedication to Brian Eno in the bottom Combi backdrop. Love it!

There’s Basses, Synths, Rhythm patches, and tons of Effects. If you’re looking for some great new sounds or looking to be inspired and see how one sound designer works his magic, then this is a great refill which you’ll want to have in your collection. Play the video review I put together below to hear some of the sounds and what you can accomplish.

Now keep in mind this only scratches the surface. I could go on and demonstrate many more of his patches, but I think this modest little intro showcases some of the magic you’ll find here.

I think in general the refill focuses on Basses, Synths, Pads and Effects. However, there are also some really nice percussion kits, and a lot of great Yamaha RX one-off samples that you can easily put inside an NN-XT kit.

The only nit-pick I would have is that some of the Combi patches that I opened up were templates where you had to add in your own Redrum kits. I would have liked to have been able to open up those Combis and start rocking out right away. But that’s such a minor nit-pick, it should in no way stop you from downloading this refill right away. You will not be disappointed.

To download the Refill, go to http://www.reasonpatchaday.blogspot.com/ and click the Donate button on the right side navigation bar. Once you enter a paypal donation, Robb will send you an email with a link to download the refill. Simple as that.

I think the cherry on the cake are the Combinator backdrops. There’s some really nice designs in there. I know that’s just a minor thing, but it adds that special touch that is usually lacking in a lot of refills. So this refill gets an extra gold star for that.

So thanks to Robb and thanks to all of you Reason/Record sound designers out there. You guys all give of yourselves so much and so freely that it makes me proud to be considered part of this small little niche community. Keep up the great work!

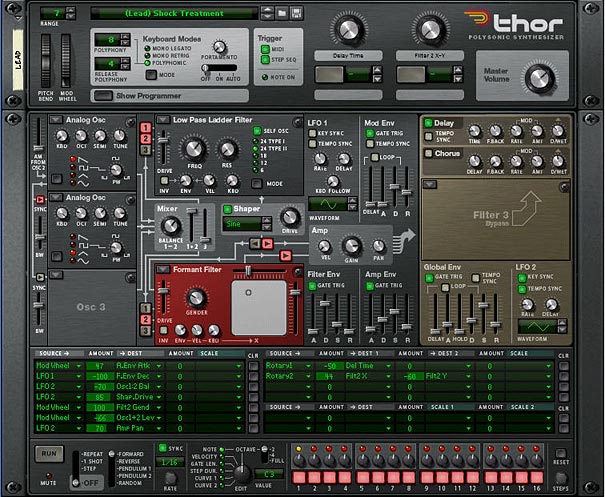
Shock Treatment

This is one of my signature Lead/Bass sounds. I used it for my song “A View from the Edge” found on my Phi Sequence Mount Royal & Fairmount page.

Play Example or Download the File
[ti_audio media=”104″ repeat=”1″]

Description: This is one of my signature sounds. I used it for my song “A View from the Edge” found on my Phi Sequence Mount Royal & Fairmount page.

Shock Treatment Lead

Features: Pitch Bend set to +/- 7 semitones. Mod Wheel controls the Formant Filter (Filter 2) gender (positive 100), as well as the level of Oscillator 1+2. Rotary 1 controls the global Delay Time from 142 ms backward by 50% to 72 ms for a very interesting spacey effect which makes the sound get more closed in, as if you’re using a “small space” reverb. Rotary 2 plays around with the X-Y of the Formant Filter (Filter 2).

Usage: Used as either a Lead or a Bass.

Other Notes: Try playing with the BW slider between Oscillator 1 and 2. I find that can generate some nice new sounds.