This was inspired from all the discussion about FM synthesis lately. Lots of this discussion surrounded the Yamaha DX7, which has the capability of 6-operator polyphonic FM synthesis. So what exactly does that mean, and how does this apply to Reason. This will be the discussion of the day.
A Brief Intro to FM Synthesis
FM Synthesis is not a difficult concept. It works similar to a Vocoder in that there is a carrier and a modulator. The modulator affects the carrier and the carrier is then sent to the output. But what is modulated and what is carried? In FM Synthesis, there is an “Operator” which is another word for “Oscillator.” The Carrier and Modulator are nothing more than Oscillators. In a simple setup, you would have Oscillator A (Modulator) affecting Oscillator B (Carrier). The crucial idea however, is in what is being modulated: Frequency. The audio output of Oscillator A modulates the frequency of Oscillator B. That’s all it is. It’s not hard to understand at all. And it’s super easy to implement in Reason. However, there are a few caveats which I’ll go over.
Download the project files here: FM-4-Op-Synth-System. There is one Combinator patch which outline the basic technique for creating an algorithm within a single Combinator. There is also an .rns file included with an 8-algorithm, 4-Operator Modular Monophonic FM Synthesis system in which you can explore the various sounds and shape them to your hearts’ content. The jpg image of the 8 Algorithms is also included. Note that in order for the FM Synthesis to work, you must have the same notes triggered on all four operators (Combinators 1-4) at the same time in the sequencer. There is a sample C3 note triggered a few times inside a clip to give you an idea of how this works. If you want to go further with this idea, there’s a 6-op FM synth included in my Generations ReFill.
The other thing that makes FM a bit more mysterious and makes things look harder than they seem is the use of several operators tied together in various ways. Each set of Operators (modulators/Carriers) is termed an “Algorithm” and anyone used to programming will immediately understand the concept. You can have several modulators and several carriers working together to create a single unique sound. This is what makes FM Synthesis so interesting and varied. By plugging different Oscillators together and having them modulate each other, you can create a huge variety of possibilities. For example, the Yamaha DX7 had 32 different polyphonic algorithms and each of those algorithms used 6 Operators. That’s a lot of possibilities.
Finally, the icing on the cake when it comes to most of the Yamaha algorithms is the usage of Self-Oscillation. Usually, in most Algorithms, one of the operators was oscillating itself. This means a feedback is created whereby Oscillator A is fed back into itself and Modulates its own frequency. This too, can be recreated in Reason.
Now that we have a basic understanding of how FM Synthesis works, let’s take a look at some simple 4-Operator Algorithms and see how close we can come to recreating them in Reason:
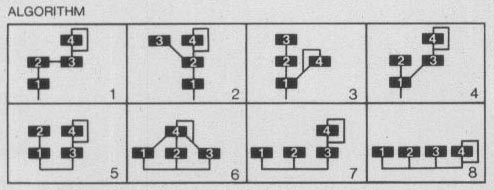
To read each algorithm it’s important to understand the visuals. Each number is an Operator, which we learned was the same as an Oscillator. The Operators are linked to each other from top to bottom. The Bottom-most Operators on the bottom line are the Carriers. The Operators above them are all Modulators. The line that circles around Operator 4 in all the above algorithms denotes the feedback loop (Self-Oscillation). Once we understand this visualization, we can work it out inside Reason. Here’s how we do this:
Translating the Algorithms into Reason
- We’ll start out by creating a Combinator with a 6:2 line mixer and four Thor devices, one for each operator. Ensure no cables are routed yet. We’ll get to that shortly.
- The reason we have separate Thors for each Oscillator is because we need to have each Oscillator running through its own Amp Envelope and then feed this signal into a second Thor and have the signal Frequency Modulate the second Oscillator, and so on. You can’t do the same thing by having a single Thor with three Oscillators, because they do not have their individual Amp Envelopes, and part of the fun is adjusting the Amp Envelope for all of the operators individually.
- So now that we have our 4 Thor devices, rename them from top to bottom as shown in the algorithm image: 4 at the top, then 3 underneath, then 2 under that, and finally 1 at the bottom. We’re going to recreate algorithm #2 shown in the image above, because this provides a few interesting concepts, such as 2 modulators (3 & 4) Frequency Modulating the same Operator (2) and then Operator 2 modulating the Carrier (Operator 1).
- Flip the rack around to the back and start routing the cables. Here, we’ll try out Algorithm #2 (which was included in the project files above). Also, all the cable routings between the Thors are going to be Mono, so only plug in the left cables here. Start at the top by routing Audio out from Thor Operator 4 and have that cable go into the Audio In of Thor Operator 2. Then take the Audio Out of Thor Operator 3 and plug that into the Thor Operator 2 Audio In2. Next, take Audio Out of Thor Operator 2 and plug that into the Audio In of Thor Operator 1. Lastly, route the Audio Out from Thor Operator 1 and send that to the line mixer. Then send the main output of the line mixer to the “From Devices” on the Combinator. The back of the rack should look like the following:
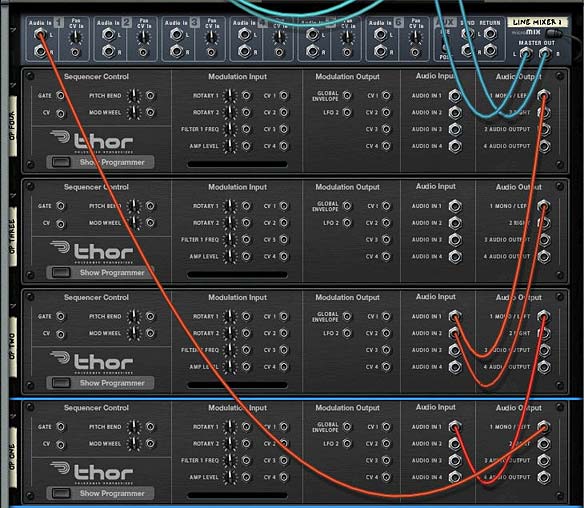
The back of the rack showing the routing between Thor Operators - Once this is done, flip the rack around and start work on setting up the Operators. For all the Thors, it’s best to start out with a clean slate. I have a file set up which turns everything in Thor off completely so that I’m starting from scratch. Anytime I want to start clean, I load this file into Thor and start from the ground up. So assuming you’ve done that, in the Top global section, you want to have the pitch range zero, polyphony and release polyphony set to “1” and the Trigger set to “Midi”. In the voice section, you will want to have an analog oscillator in slot 1, routed through the amp envelope which is turned on. Turn the Oct knob on the analog oscillator all the way down (we’re going to tie the pitch to a Combinator Rotary in a minute). Here is what the front of Operator four looks like:
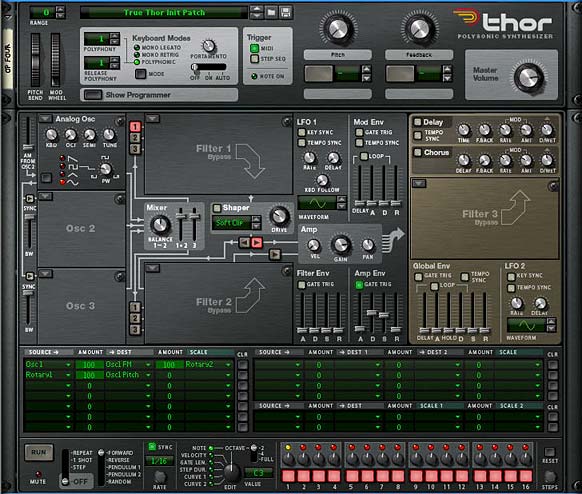
The front of the Thor Operator #4. Note the setup in the modulation routing section as well. Note: the reason we set up the Polyphony and Release Polyphony to “1” is because this is a monophonic algorithm (all FM algorithms built inside Reason this way are monophonic). Since Thor can only produce a single voice, it is important to limit the amount of keys that can be used to a single one. While this type of system can’t be used to produce chords, it’s use as a lead instrument can still open it up to a world of possibilities. Also, see one of the notes below about creating polyphonic FM synthesis in Reason. It can be done. However, it can get very bulky. But if you have the stomach for it, give it a shot.
- Set up all the Thors in exactly the same way. Once you have this done, it’s time to set up the modulation sections (MBRS). We already got a glimpse of this in Operator 4 above. Here it is again:
Osc1: 100 > Osc1 FM: 100 > Rotary 2
Rotary1: 100 > Osc1 Pitch
The first line sets up the feedback loop and makes it adjustable with Thor’s Rotary 2. The second line allows you to adjust the Pitch of the Oscillator with Rotary 1. Again, we’re going to tie both of these to Combinator Rotaries in a second.
The following images show how to set up the other Operators:

The Thor Operator 3 setup in the MBRS 
The Thor Operator 2 MBRS setup. 
The Thor Operator 1 MBRS setup. Operator 3 has no audio input, so we only need to have the ability to change the pitch of the oscillator. For Operator 2, there are 2 other modulator operators that are frequency modulating its oscillator, and so we need to have individual lines for Audio In 1 and Audio In 2. The Mod Wheel is used to adjust the amount of FM modulation on the operator. If the mod wheel is left at its default position, the FM Amount is fully modulating the Oscillator. If the mod wheel is turned up however, the FM amount applied to the oscillator is decreased. It’s a nice clever way to apply some control to the FM parameter. Operator 1 should be fairly self-explanatory at this point, so let’s move on to our Combinator assignments.
- Open up the Combinator’s programmer. Enter the following settings shown below. Operator 4 is exactly the same as the others, except for the fact that Thor Rotary 2 is assigned to the Combinator Rotary 4. In this way, you can control the feedback of Operator four.
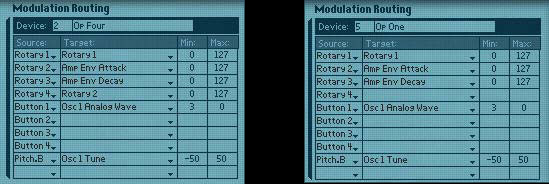
Thor Operator 4 (Left) and all other Operators (Right) Modulation Routing for all Thor Operators:
Rotary 1 > Rotary 1: 0 / 127
Rotary 2 > Amp Env Attack: 0 / 127
Rotary 3 > Amp Env Decay: 0 / 127
Button 1 > Osc 1 Analog Wave: 3 / 0
Pitch Bend > Osc 1 Tune: -50 / 50
Additional Modulation Routing for Thor Operator #4:
Rotary 4 > Rotary 2: 0 / 127
In this way, Rotary 1 becomes the “Global Pitch” change for all the Operators. Rotary 2 and 3 are set to control the Amp envelope. If you wish, you could use the knobs to control Sustain and Release or any combination. The point being that after the Pitch of the Oscillators (which controls the Frequency), the Amp is the next most important element to control, as it affects the application and duration of the sound over time. So these Rotaries help to control that time element.
Button 1 provides an added bonus by switching between a sine and saw wave form. You can, of course, select any two waveforms you like.
The 8-Algorithm, 4-Operator Monophonic FM Synthesis System
Included in the project files is an 8-Algorithm, 4-Operator Monophonic FM Synthesis system that I developed which allows you to switch between all the algorithms on the fly. A little explanation might be in order. But first, a look at it from the front:
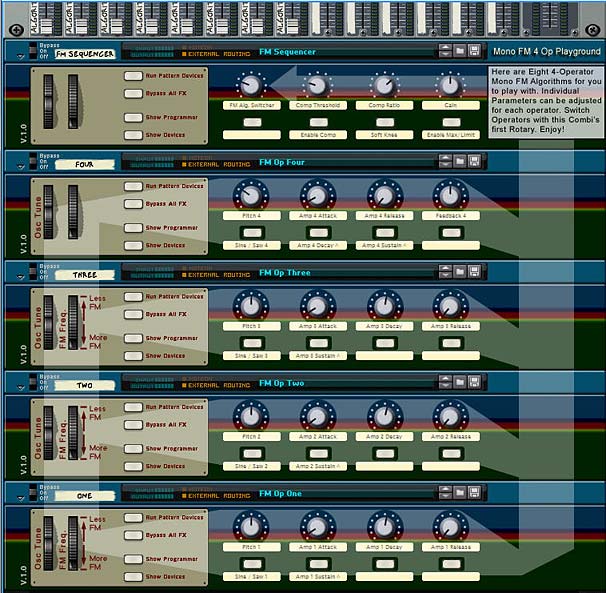
To get started with this system, you’ll have to press play and visually tune your eyes to the Mixer at the top while you switch around the “FM Sequencer’s” first Rotary. This will switch between the 8 different algorithms dynamically. I’ve added a simple C3 note played out a few times in a loop to give you an idea of how the process works.
In the “FM Sequencer” Combinator there is also a Compressor and Maximizer/Limiter which is adjustable from the various knobs and buttons. I found when experimenting with different FM settings using this system, often times levels got quite hot and far too loud. This should help to tame the levels. If needed, you can enable the Compressor and/or the Limiter via buttons 2 and 4, respectively. The other parameters should be self-evident.
Each of the four Combinators below the FM Sequencer is tied to an individual Operator, and each Combinator has 8 Thors within, all doing the same thing at the same time. All four Combinator/Operators work essentially the same way. The parameters affect 2 main areas: Pitch and Amp Envelope. The first Rotary affects the overall Pitch of the Operator, and the Pitch Wheel affects the fine tuning of the Oscillator. Button 1 affects the wave form used (sine or saw). The rest of the Rotaries (and button 2) affect the Amp Envelope. Finally, the Mod Wheel affects the amount of FM applied to the current Operator by the previous Operator. This functions the same as I’ve explained before, whereby moving the mod wheel upward reduces the FM amount.
A notable exception is Operator four. Where this operator differs is in the fact that it can be fed back into itself (self-oscillation or feedback). I have tied Rotary 4 from this Combinator to adjust the feedback amount, so even self-oscillation is fully controllable. This also means that the Amp Envelope Decay parameter had to take a back seat and I therefore applied the Decay to a button so you at least have the option of two different decay states.
Note that while you don’t HAVE TO have the same note/clip data on all the Combinator tracks in the sequencer, this is the proper way to use the system and this is the only way to fire off all the Operators at the same time (short of programming a matrix to control all the operators at once). But again, nothing is stopping you from experimenting with only firing one or two Operators. If you do this, however, you may not get very good results. Just warning you about this.
With this system, you have complete control over all Operators’ pitch and amp envelope parameters. You can set up each operator individually or even automate any parameter, all from the front of the rack. So enter at your own risk. It can turn into many hours of fun.
Where do you go from here:
- This tutorial explains use of Analog Oscillators in Thor. However, you don’t have to use the analog oscillator at all. You can use any of Thor’s Oscillator types (though admittedly, the Noise Oscillator will probably not take you very far). If you use the FM Oscillator, you already have a built-in pair of Mod/Carrier, so you’re already working with 2 operators. The only difference is that they are internally tied together and can’t be separated the way you can separate things between different Thors. But that’s not to say they are not useful.
- Have a good look at the 4-Operator Mono FM Synthesis System I designed which allows you to switch between all 8 algorithms. This can open up a whole new world of FM synthesis for you which you may not have previously known about. I certainly hope it gets your mind flowing with some new ideas.
- Keep in mind the more operators added to the mix, the more complex things become, and the more the output will move towards a sound very similar to a noise oscillator. Also, the more erratic and unpredictable the outcome will be. You can still find lots of interesting uses for these sounds, but you’ll have to give some serious experimentation time to come upon some useful sounds. And you’ll have to be willing to accept the erratic nature of FM synthesis in general.
- Always remember that Thor is monophonic. It can only produce a single voice. Therefore, any FM synthesis system you build inside Reason is going to be monophonic. There is a way to circumvent this issue and add polyphony, but it’s not an easy process. It’s quite cumbersome and involves you duplicating the Combinator setup multiple times. Each instance that you duplicate becomes an additional voice you can program. However, if you have a large setup like the 8-algorithm 4-Op FM system setup I have, duplicating this whole system multiple times becomes slightly more than a hassle. Until we have true polyphonic FM synthesis in Reason however, it will have to do as a workaround.
- Some further reading: Thor demystified 9: An introduction to FM Synthesis – part 1: A great introduction to the world of FM synthesis in Reason by Gordon Reid. Also check out the great tutorial series put on by Hydlide here: Fm Synthesis in Reason 4 part 1. He’s also got some great video tutorials on how to put FM synthesis into action in Reason. Highly recommended material!
I hope this sparks some creative sound mangling for you. And if you have any comments or questions, please post them here. Also, if you have any further ideas related to FM synthesis in Reason, I’d welcome them. All my best for now.
