The Musician’s Manifesto

The Musician’s manifesto. Or, subtitled: “The Reason Guide to getting Zen and Musical” — these are just some of the things I’ve learned throughout my life and more specifically being a musical-minded person working with Reason for the past 5 years

Or, subtitled: “The Reason Guide to getting Zen and Musical” — these are just some of the things I’ve learned throughout my life and more specifically being a musical-minded person working with Reason for the past 6 years.

I caution that you might find these points a bit preachy or moral or spiritual or whatever, or you might find it total bunk, but these are some of the rules by which I try to live, and they have served me pretty well over the past years. I keep coming back to them again and again because I realize nobody is perfect, and on a day where I find I’m slipping or feel like giving up, they are there to help me get out of that funk.

  1. Admit you know nothing and start from that vantage point. Everyone has something to teach us. Open yourself up to realizing that, humble yourself, and learn wherever and whenever you can from whomever you can.
  2. Ultimately be creative and make music! We all have the ability to be artistic and creative. We just have to find it inside ourselves and turn on the tap to let it out. Easier said than done, I know. But the journey is so worth it.
  3. Experiment, experiment, and then experiment some more. Devote as much time as you can each and every day to music. If you truly love it, then this will simply come naturally.
  4. Challenge Everything. Don’t be complacent. Question things. Come to your own conclusions. Think outside the box. Never sit still. Be your own person. Set artificial limits for yourself. Cherish the mistakes and the accidents. Be better than good. Music does not have to be formulaic, so don’t be satisfied with a formula. Challenge yourself to make things different.
  5. It’s all about the journey, not the destination. Be mindful of your past while looking forward to your future. As Winston Churchill wrote: “The farther backward you can look, the farther forward you will see.”
  6. If you are truly enjoying working in music, then count yourself lucky. You’ve found something that really does help fulfill you! And buddy, that means you’re ahead of about 90% of the population. Don’t believe me? Next time you’re on public transportation during morning rush hour, look around and see how many happy faces are in your vicinity.
  7. Never stop learning, because knowledge is truly power. Suck it up like a sponge. Be as curious as you can. Seek out the answers to all your questions. If you don’t know how a chord is created, go online and read about chords. Don’t know what an ADSR is? Look it up! Don’t be afraid to admit you don’t know something. And don’t be afraid to make mistakes. They are just as important as your successes.
  8. Stop lamenting what you don’t have or don’t own, and focus on what you do have and what you can do with it. Specifically learn Reason and Record inside out. Believe me, you can spend a lifetime solely exploring the base Reason Package with Factory Sound Bank and still never know it all. In addition, Google is your friend. YouTube is your friend. Wikipedia is your friend. Bloggers are your friends. The 800+ page Reason/Record manual is also your friend. Get to know them all intimately.
  9. Stop blaming the tools. It’s not the guitar’s fault you don’t know how to play it. Just as it’s not Reason nor Record’s  fault you don’t know how to use them. The blame and responsibility are squarely on your shoulders. Put on your big girl panties and suck it up Rockstar!
  10. Check your ego at the door. Don’t step on those around you to get a leg up, or fall into the trap of trying to “be better than the next guy.” It’s stupid, petty, unnecessary, and worthless. There’s nothing competitive about music and art. It’s not a competition to get to the top. It’s a fundamental ability that all humans have to let their voice be heard. It’s the most free-spirited part of being human. Focus on honing your voice and market yourself with respect as you would expect others to market themselves to you. Don’t belittle others in the process. That’s just counterproductive.
  11. Stand up for your art!
  12. It’s not wrong to be a perfectionist, but it may as well be. 90% of tracks are completed in 10% of the time. Stop spending 90% of your time trying to perfect the last 10% of a track. Learn to let go at some point or stop if you find yourself struggling or getting nowhere. Nothing is more frustrating than going nowhere for a long period of time. Avoid getting stuck by stopping and/or focusing your attention on something else: another song, another device, a new genre or just stop completely and take a break. Also learn how to brainstorm and finish things at a quick pace. Try completing a song in an hour just for the hell of it. Creating these artificial deadlines can help your creativity, just as brainstorming can.
  13. Seek out help, discussions, collaborations, and healthy relationships in general. They might be able to help you  finish up that last 10% of a track in less time than you could. You just have to realize that no man or woman is an island. We all need the help of others from time to time. And you’ll find great friendships in the most unusual places, or partnerships that you never thought would come about. They can often inspire you by steering you in different directions. It’s a natural form of networking. And it’s important. Probably more important even than your music, your art, or anything else really. It’s our connections with each other that make us who we are and define us.
  14. Give back to your community in some way, shape, or form, and to the best of your own abilities. You’ll feel more positive, and you may provide the spark in someone else’s life which ignites their passion or sends their life on a careening course which fundamentally changes who they are for the better! Charity is important and fundamental. And you’ll feel good too.
  15. Ignore negative chatter. Pay close attention to positive criticism. It’s the same 90/10 rule all over again and in various respects. 90% of the internet is mere chatter. 10% of the internet is solid and where you should focus. Also, spend 90% of your time on this 10% which is important. Also, knowing the difference between negativity and positive criticism is crucial. We all need — no, we must have criticism in order to grow as artists. Be mindful and humble of that. Believe me, I’m humbled every day at some of the songs I hear, videos I watch, images I see, places I visit. I could go on and on.
  16. Never under any circumstances send out an email, post, Soundcloud message, YouTube comment, etc. which starts and ends with “yo check out my track” or any variation thereof. Guess what? No one will check out your track. And people will purposely ignore your track. Your time can be better spent by getting to know people and checking out THEIR tracks and their work, and talking to them about their work, not yours. This requires a fundamental shift away from what you are doing. This is just common sense.
  17. In opposition to the point above, if you are providing free resources, such as tutorials and refills, then do the opposite. Shout it from the rooftops. In this case you should let everyone know and open everyone up to discussion about it and make it available. Here there be free things!
  18. Understand the difference between “I really hate this” and “God this is difficult but worthwhile and enjoyable.” In the former, if you really hate what you’re doing, try to figure out what you really do enjoy and go out and do that instead. Give it your all, no matter what anyone says. If you find that working in music or with Reason is incredibly difficult, but you just spent 10 hours without realizing it in front of Thor, then hey, you’re on the right track. Keep at it. And don’t stop. You do enjoy it.
  19. Use your ears 90% of the time and your mouth 10% of the time. I know this goes right back to the 90/10 rule, but it’s vital. If you think I talk too much here on my blog, what you don’t see is the other 90% of the time when I’m reading posts, watching videos, seeking out the latest tips and tricks from everyone out there, digging through refills and song files for more ways I can abuse Reason. And now we’ve come full circle back to points #1-3.
  20. Finally, remember that there’s a life outside of Music and Reason and Record. And that all of this alone cannot fully sustain you. Make time for all the other people in your life, vacation, hobbies, work, breaks, taking your sweetheart out for a night on the town or a quiet evening in. We are all made up of many facets. Try to gain a deep understanding of all those facets in your own life.

So there you have it. My views on what it takes to succeed and more importantly, what it takes to live up to your full potential as a creative and artistic human being.

And for some further reading, I would recommend the following:

Any other thoughts?
28 – Weird Sci-Fi Synth Sounds

Here are a few ways you can create some trippy and out-there sounds using the synths in Reason. I’ve had a lot of requests for these kinds of sound creations, so I thought I would throw a few ideas out there. These sounds provide you with three different patch ideas for three different Sci-Fi type sounds. Enjoy!

Here are a few ways you can create some trippy and out-there sounds using the synths in Reason. I’ve had a lot of requests for these kinds of sound creations, so I thought I would throw a few ideas out there.

Sure. This time around I’ll provide the patches found in this project here: weird-sci-fi-patches The file contains 2 Thor patches with 2 variations on the Sci-Fi sound, a Malstrom with an Alien voice, and a Subtractor ominous spacey patch. Enjoy!

First off, here’s an idea which uses the Noise Oscillator and a Multi-Oscillator to create some really weird sounds in Thor. The key features here are the use of the Bipulse Shaper and the Self-Oscillating filters. In this example, they are probably even a little more important than the actual Oscillators that you’re using. So here’s the video:


The second kind of other-worldly sound is brought to you by the Malstrom. In this case, I tried to create an Alien from outer space voice using the Electronik voice and the Jews Harp grains inside the Malstrom. As you’ll see, the Malstrom is exceptional for these kinds of crazy effects. You can have a field day tweaking knobs on here. The main focus should be on utilizing the Pitch knob, as well as all the other knobs to affect the Oscillators. In this way, you can mangle your audio beyond any human recognition. Makes for exactly what we need to build our Alien Voice. Here’s the video:

Now of course we shouldn’t forget the Subtractor in our quest to create some freaky sound effects. So let’s try giving it a whirl. This time I’m going to go for a more Ominous space sound, almost a Pad-like sound. This seems like it would be great as an intro for a huge and ominous scene and reminds me of when the Borg attacked the Enterprise in the feature-length movie: “Star Trek: First Contact.” Yes, I know. Major geek right? Well, anyway, this uses some FM for the deep bassy sound, and a low Octave Oscillator. From there, you just need to adjust the filter. One other interesting thing you could do is sweep the filter frequency from Closed to open and back again. The key of course is to experiment, experiment, and experiment some more!

So there you have it. A few different Sci-Fi sounds for you to jump into. There’s billions more sounds just waiting to be created. If these help as a starting off point for you, then great. Glad I could help. And if you have any comments, suggestions, tips or tricks, please let me know. It’s from your requests that I end up making these tutorials in the first place. So keep the requests coming. And Happy Reasoning!

27 – Kong Drum Creation A to Z

Like the title says, I’m going to provide you with a 45-minute video / blog tutorial on how to create an entire Kong 16-Pad design, using nothing more than a Rex file and some imagination. This is the A to Z of Kong drum design. And lots of tips along the way. Don’t miss it!

Like the title says, I’m going to provide you with a 45-minute video / blog tutorial on how to create an entire Kong 16-Patch design, using nothing more than a Rex file and some imagination.

Those familiar with the methods for my tutorials know that I usually provide the project files along with the technique. Nope. Not this time. Instead, I’m providing the rex file I used to create most of these drums. That way you can try it out yourself and follow along with the tutorial. Give a man a fish, they say, and he’ll eat for a day. Teach him how to fish, and he’ll never go hungry. So here’s the single Rex in a zip file: trails-rex

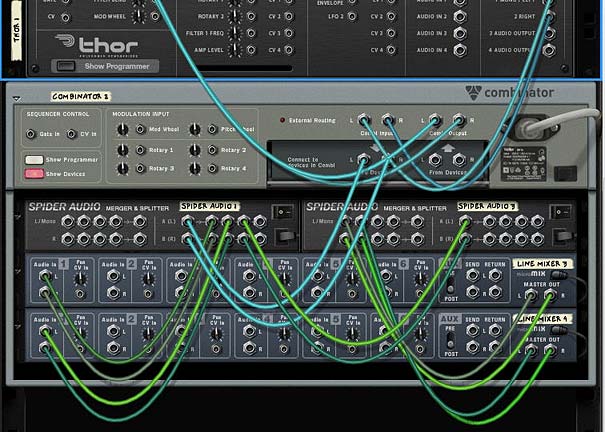
This method starts off with a Combinator, then two 6:2 Mixers, a spider audio/merger, and the obvious Kong Drum Designer. Then I go into how to set up the drums one at a time, starting with the Kick Drum. Using the Nurse Rex player, you load the rex file (and this can be any rex file, and start copying/pasting the rex loop one at a time into the first 8 pads. That gives you enough room to work creating all the drums you need, such as the Kick, a few toms, some snares, an open and closed hi hat, and even a reverse drum, and some other more off-the wall sounds.

After you do this, I’ll show you how you can set up the top 4 pads in Kong to trigger other devices (in this case Thor, but you can trigger any other device in Reason that accepts a Gate trigger, which is just about everything).

Finally, I go into programming the Combinator and adding some extra global Effects to play around with the tone and reverb of your drums as a whole. So check out the videos below for a complete tutorial on how to mess around with Kong and create some kick butt drums!

So that’s how you do it, or at least one of a million ways in which you can design a few drums in a Kong patch. What’s your favorite new Kong trick, and do you have any other suggestions or ideas? Please share them and let us all know.

Until next time, happy reasoning!

Organizing your Files

I would diverge a bit and talk about a subject that everyone needs to understand: organizing your files. Hopefully this will shed a little light on how Reason files operate, and at the same time provide some ideas with a safe method of organization.

There’s been a lot of talk lately about how to best organize Reason and Record refills and files and such, so I thought I would diverge a bit and talk about this, since it’s important for everyone. It’s also tied closely with another subject: how does Reason handle files. In my opinion, everyone needs to have a basic understanding of this subject, as understanding this will help you put together a foolproof file structure on your hard drive or external drive. In the process, I’ll provide my own method for file organization, which I think has some pretty good benefits.

First and Foremost: How the heck do these files work?

First, what must be understood is the idea that samples in Reason and Record are not automatically part of the song files. Note that wav files loaded into a track in Record is a different story. Any wav files loaded on their own channels are saved along with the song. When it comes to samples, the only thing saved with the song file is a link to the sample location. This means that each time a sample is loaded into a song, the location and name of the sample is noted and stored. When the song is saved, the sample’s file name and location are saved along with the song. When the song is reopened, the program performs a check to see that all the saved sample links are still valid. If not, you get a warning telling you that the sample is missing. UH OH. Now you’re in trouble.

But what causes a sample to go missing. If you’ve understood the above paragraph, it’s not a great leap to figure out that if you change the sample’s location or file name (or both), Reason’s sample check will fail. So why am I telling you this? Because once you understand how samples are treated in Reason, you’ll understand how best to organize them. Knowledge is power after all.

Second, we must also understand the difference between a sample and a patch. A sample is a .wav or .aiff file which can be loaded into any of Reason’s sample players (the NN19, NN-XT, Redrum, Kong, or Dr. Rex). A patch is completely different. Patches do not rely on any outside files, and instead are built wholly inside Reason. This means that you can rename and relocate patches anywhere you like. They will still load fine within Reason or Record. Patches can be loaded into any of Reason’s Synthesizers (Subtractor, Malstrom, and Thor), as well as the advanced FX devices (Scream and the RV7000).

A special case exists with the Combinator, NN19, NN-XT, Redrum, and possibly Kong, which can make things a little confusing. All three of these devices can load both samples and patches. While the Combinator does not have the ability to load a sample per se, it can contain instruments which do load samples, therefore it has the possibility of containing samples. The NN19, NN-XT, and Redrum can all load both samples and patches (Kits = Patches in the case of Redrum). Lastly, if you use the NurseRex or Nano-XT in Kong, you’ll realize that Kong can also hold samples. Point is this: if you have a sample contained inside a Reason device, be it Kong, Combinator or NN-XT, etc. then you’ll have to be extra careful to ensure that those samples are not changed. No renaming, and no moving around from folder to folder. If you change sample file names or move them to another folder, the link is broken and you get the dreaded “Sample not found” dialog.

Truth be told, moving them from folder to folder is really not a huge issue if you follow my advice for file organization below (in other words, if you keep all the Samples in a single parent folder — create as many subfolders under this as you like, and move the samples around freely under this main parent folder). The more dangerous culprit is renaming the sample file, as this will make it almost impossible to find later, especially if you have thousands of samples on your hard drive or if you do some massive renaming of a bunch of sample files. Just don’t do it. Force yourself to think of a naming convention that makes sense to you (and it doesn’t hurt to make it somewhat logical in the event you’ll be collaborating with others).

Note also that if you trade files between others that don’t have your samples or the same refills you do, you’ll also get the dreaded “File not found” message. In this case there are two easy solutions: 1. If the samples are your own creations, self-contain the song (from the file menu) and send the song to your colleague. When the song is opened on the other end, all the samples are contained and will open up properly. 2. If you are using samples from a refill which your colleague does not have, tell your colleague to download the refill if it’s free or pay for it if it’s commercial. Problem solved.

In conclusion, you have to simply be cognizant of the fact that if samples are used anywhere in your Reason devices, Reason is only storing a link to those samples. Now let’s look at things from the other side of the coin. Let’s see how we can best optimize the samples and other Reason files so that we never lose any samples, songs or other files ever again.

The Simple File Organization Method for Reason or Record

One of the simplest solutions to file organization is to create a directory outside the “C:\Program Files\Reason” directory entirely (I put mine under the C:\ drive directly and I call it “Reason” for lack of a better term — call this folder anything that makes sense to you like “Audio” or “AudioWork” but I would stay away from “Music” because Windows creates a “My Music” folder automatically — looking back I probably would have chosen a name other than “Reason” so as not to confuse it with the Reason directory under the Program Files on my hard drive, but I’ve never been tripped up by this).

Then under this folder I created the following sub-folders:

  • Main Refills (where I place all 3rd party refills)
  • Working Refill (where I place my own patches for my own refill development)
  • Samples (Where I place all my sample wav or aiff files)
  • Songs (all .rns, .rps, and .record files go here)
  • Output (all .wav or .mp3 output goes here)
  • Miscellaneous (files others provide me, documentation, charts, etc)
  • Scratchpad (any stupid experiments or playful fun stuff goes here – usually in .rns or .record file format).

You can create any number of sub-folders under the above folders as you wish. The idea though, is to keep the samples in their own folder and keep some basic top level organization.

I personally have the whole above “Reason” folder backed up on 2 different hard drives and I do a DVD backup twice a year. This takes care of ensuring I sleep like a baby each and every night, and even if my computer explodes or gets accidentally hurled off the balcony after receiving that final blue screen of death straw during the best jam session I’ve had in a decade, it’s unlikely all 3 hard drives will crash at the same time. And even if they do, I have everything stored on hard media (DVD). At the absolute very least, and if you only do one of the above, back up your stuff onto a DVD! Hard Drives fail. DVDs seldom do. But even with that recommendation, I still would highly suggest in backing it up in at least 2 other places above and beyond your main computer (a secondary hard drive and DVD).

Some of the benefits of the above organizational approach:

  1. Easy to find what you want quickly
  2. You can always uninstall/install reason without ever worrying you’ll overwrite something or having to move something outside the main reason folder every time you uninstall/install
  3. Saving all my scratchpad stuff in .rns or .record format means that I can go directly into windows explorer and double-click on the file to open the Reason or Record program with my song loaded in one shot, which saves time.
  4. Separating the output (.wav) from the songs (.rns or .record) means that I can organize my output in whatever way I want without touching the main song files — which is nice when trying out different track listings. Note that all the output files are further organized into sub-folders for different full CDs or genre, etc. Whatever works for you.
  5. Keeping all the samples in one folder means that you’ll never lose the samples or the link to the sample from a song. You could also subgroup samples underneath in sub-folders based on sample type: drums, nature sounds, urban sounds, etc. As long as they stay in this folder, you can subgroup them any way you like and you can even change the samples from one location to another under this folder — if the song ends up losing the connection with the sample, just point to the “Samples” folder, and let Reason/Record find the samples for you. Since they will always be in this folder. Only thing you can’t do is rename a sample. That’s always unwise.
  6. Finally, this type of system means I have one folder to backup. Not a bunch of folders and files all over the place on my hard drive.

I know some people advocate the opposite approach of saving everything related to a song in a single folder and creating separate folders for each song. But this approach means you end up with several copies of the same samples and patches all over the place, and I think it can become a mess very quickly. Also, with the “self-contained” settings in Reason and Record, the program can do this for you on the fly.

Here’s another idea if you really want to keep all the patch and sample files with your songs. Try using the “favorites” feature in the Reason song browser to create a “favorite list” for each song you create. This way you have all the files and patches for each song stored in a favorites list. And you can duplicate patch listings in multiple favorite lists without duplicating the patches themselves.

The other added benefit is that it can help you when you’re looking for a specific patch from a specific song. You don’t need to open up the song file. Instead, open the song browser, click on the “favorite list” for the song that contains the patch, and there it is.

Building a Refill: How do I organize that?

Well you’re on your own for that one jack. Mainly because I’m way too tired from writing this long post. But here is an example on how I would probably try setting things up. Usually I create several folders for each instrument or device at the top level, then the sub-folder would contain the various instruments. If I don’t have any patches for a specific instrument, I omit that folder entirely (no need to have an empty folder). Here’s an example:

  • Instrument Device (for instance, Thor)
    • Bass
      • Acoustic
      • Synth
    • Bells & Mallets
    • Drums
      • Kits
      • Hits
        • Bass Drum
        • Snare
        • Toms
        • Rimshots
        • Assorted
    • Horns & Woodwinds
      • Sax
      • Oboe
      • Flute
    • Pads
      • Upbeat
      • Downbeat
      • Neutral
    • Piano
    • Strings
      • Guitar
      • Violin
    • Synths
      • Mono
      • Polyphonic

For the FX devices, I usually just list the device at the top level, and put all the patches directly under that folder. If it gets out of hand though, I might try separating even that into sub-folders based on sound types. For example, you could set up the RV7000 as according to it’s algorithms (Room, Arena, Spring, Echo, etc.). Or you could set up the Scream according to its damage types (Tape, Tube, Fuzz, etc.)

For Rex loops, I would probably list them based on purpose and then Tempo. For example:

  • Dr.OctoRex Loops
    • Drum Loops
      • 90 BPM
      • 100 BPM
      • 110 BPM
      • 120 BPM
    • Music Loops
      • 90 BPM
      • 100 BPM
    • Experimental Loops
      • 90 BPM
      • 100 BPM
    • Assorted Loops
      • 100 BPM
      • 110 BPM

In conclusion, when you’re dealing with file structures on your hard drive the idea is to make it as easy as possible for you to find what you’re looking for. When creating file structures for refills, the idea is to make it as easy as possible for the end user.

As an update, Vitor posted the following on EditEd4TV’s forum in this post. I wanted to reprint this, because it’s also good advice:

I already do what you say, I just don’t agree with the use of optical media to store backups. It’s slow and it’s destined to fail in less than 10 years, even if you store it carefully. And a 1TB HDD costs 50-60 bucks, how much would it cost to get that on DVDs? That’s almost 250 DVDs.

I prefer to keep buying new and bigger HDDs and keep rotating the old drives to become OS drives (my OS HDDs and work HDDs are distinct). Right now I have 320GB and 500GB for OS duties and 2x1TB for work and backups. Next year, I’ll just reassign the oldest 1TB to OS duties and buy a new HDD to become a new backup drive.
I also use an external USB 2.5 250GB to store the most important stuff and keep it in a different location.

Just don’t forget that you should not trust a new HDD, at least not until a week has passed and you’ve been able to test it all. Sometimes they fail on the first week. Remember this to prevent disaster.


I hope some of this helps to demystify how files work in Reason and Record, and provides a helpful and simple approach to file organization on your computer. If you have any other advice in this area, please don’t hesitate to share it with us.

26 – Automating your Groove

As most of us know, you can’t automate the Re-Groove in any way within Reason and Record. . . or can you? As with all things Reason-esque, there’s usually a workaround or two available for you. And Automating your Re-Groove, though time consuming, can indeed be accomplished. Here’s how.

As most of us know, you can’t automate the Re-Groove in any way within Reason and Record. . . or can you? As with all things Reason-esque, there’s usually a workaround or two available for you. And Automating your Re-Groove, though time consuming, can indeed be accomplished. Here’s how:

ReGroove Mixer Automation Workaround

Let’s assume you have a drum track tied to a Redrum (or as most of you will be going nuts for Kong, let’s say you have a Kong track). The easy way to set this up is the following:

  1. First, decide on a groove. Open up the ReGroove Mixer and then place that groove inside channels 1-8, or however many channels will require your groove movement. For now let’s set up 8 slots with the same groove.
  2. Next, you will need to create the same amount of note lanes for the device which you will be “Grooving.” So create 8 note lanes.
  3. In the case of Redrum, create the drum pattern using the pattern sequencer, and place this pattern on the first note lane for the Redrum (right-click on the Redrum step sequencer and select “Copy Pattern to Track” which places it on the current note lane).
  4. Go to the sequencer and copy the Redrum pattern 8 times. Move each copy to a separate lane in sequence. So, for example, note lane 1 will have the pattern from bar 0-2; note lane 2 will have the pattern from bar 3-4; and so on, right up to the 8th note lane.
  5. Associate a different groove with each note lane from A1 on the first note lane, right up to A8 for the eighth note lane.
  6. Now comes the fun part. On the ReGroove mixer, set up each channel as though it were steps in the step sequencer of the Matrix, except this time you are creating different “grooves” for each step between Channel 1 to Channel 8. If you want to get a better feel for setting this up, loop through each note lane’s note clip and adjust the parameters for the groove as you listen. Let your ear be your guide in this instance.

I hope you see where I’m going with this now. When you play your track forward, the drum beats play in sequence as if they are on a single lane, however, since you set up each lane with a different groove, you are essentially applying different grooves to each note clip and therefore changing the groove as the song progresses and as the note lanes switch from one to the other. Since you can create 32 different groove patterns, you have a 32-step groove sequencer using this method. The only downside is that your sequencer can get pretty cluttered quickly; especially if you split your different drums on different lanes (for example, if you have all your kicks on one lane, and your hi hats on another, and want to provide different grooves for each, you’ll have to create different sets of note lanes for each drum — up to 32 of course).

Still, if you are willing to invest a little time into your track, this ReGroove automation trick might come in very handy to create some further dynamics in your tracks. And you are not limited to applying this to drums only. You can apply this to any set of note lanes for any note-generating devices.


Just a Quick Tip. . . don’t forget your Solos and Mutes!

I just wanted to post this quick video to point out the idea of automating your solos and mutes on your mixer. Often times it’s easy to forget to use your mixer as a creative tool when producing the track. Having some play with the solos, mutes, and other aspects of the mixer can open you up to a lot of creative potential. It’s a great way to add more dynamism to your tracks.


Here’s a file based on Emile’s comment below this post. Emile’s tip is about tying the Noise Oscillator in slot 1 to an Analog Oscillator in slot 2. I kind of ran with it to provide a bit of a strange patch here. But it might spark some ideas. It has to do with modulating the kbd and pitch of the Noise Oscillator to affect the sound of the Analog Oscillator. The file is a zip format file which contains an .rns with the setup. Have a look here: kbd-pitch-idea


Well, that’s it for now. Let me know how these tricks work for you? And if you have any others, please start up a discussion and let us all benefit. Until next time, happy reasoning!

A Word of Thanks. . .

With the latest release of my “Generations” refill, there’s been a flurry of activity on other boards to help me promote it and showcase it to the world. I just wanted to take a moment to say thanks to everyone for putting all of this together. Thumbnail and picture credit: Cristóbal Vila (http://vimeo.com/eterea)

Thanks for all the Flowers!
Image credit: Cristóbal Vila

With the latest release of my “Generations” refill, there’s been a flurry of activity on other boards to help me promote it and showcase it to the world. I just wanted to take a moment to say thanks to everyone for putting all of this together. I am always humbled when people come together to help out. And you guys have certainly helped me out.

First, a word of thanks to Hydlide. Not only did you do an amazing job on the demo songs for the refill, but you put together a great series of videos to help show off some of the sounds inside the refill. If you missed it, you can find the full article here:

http://evanderheide.demon.nl/reason/reason101+generations.html

Another word of thanks goes out to Lewis for his great interview of yours truly. You did a wonderful job pulling all the elements together for this posting, and even shocked me to see some pictures up there that I thought had long been forgotten. So thanks for that. Those that missed out on the interview can find it here:

http://resonantfilter.blogspot.com/2010/08/10-questions-with-robert-anselmi-of.html

Another great thank you goes out to Robbneu from his Patch-a-day blog. He put together a wonderful testimonial. And his help along the way with some of my constructions was also a huge part of the whole refill process. Here’s what he had to say:

http://reasonpatchaday.blogspot.com/2010/08/reason-101-generations-refill.html

Without all of you guys, this project would never have been completed on time and I want you to know that your help was invaluable. And thanks to everyone else out there who helped me out in one way or another. It does not go unnoticed.

And a word of thanks to everyone out there on all the forum boards that ask so many interesting questions. Without those questions, I wouldn’t have such a great source of inspiration for these tutorials and patches. So thanks to all of you as well. Keep all the questions coming!


What’s in a Name?

Now another thing I’d like to bring up since we’re chatting. Some people have asked me where the moniker “Phi Sequence” comes from. In case you didn’t know, that’s the name under which I do most of my recording and CD/mp3 distribution at http://www.phisequence.com. The name actually comes from the golden rule of proportion, otherwise known as the Fibonacci sequence of numbers: 0, 1, 1, 2, 3, 5, 8, 13, and so on. More info about it can be found at the Wikipedia article for the Golden Ratio. The Golden ratio is expressed mathematically as 1.6180339887 (approximately).

There’s also another resource online which shows just how important this concept is, not only for mathematics, but also for music, science, the stock market, life, and nature. This number is a fundamental idea that permeates almost all aspects of physics and life as we know it. Read more about it here when you get a minute: http://www.goldennumber.net/

Also, my thanks to Guidosh at the Sound of Reason community for pointing out this amazing video. It’s a very short introduction to ways in which the Fibonacci sequence of numbers works in our world:

Nature by Numbers from Cristóbal Vila on Vimeo.

25 – No-Nonsense Tips (Part 2)

In this second part, I’m going to provide even more quick tips that can be used as food for thought while you develop your tracks. These aren’t earth-shattering or advanced. They are just some easy tips to help out with some problems you might have or tips that show you a few capabilities you may have missed.

In this second part, I’m going to provide even more quick tips that can be used as food for thought while you develop your tracks. These aren’t earth-shattering or advanced. They are just some easy tips to help out with some problems you might have or tips that show you a few capabilities you may have missed. So let’s jump in.

Tip #1: Did you know this could be Automated? I didn’t.

This is probably the simplest of tips. While I learned about a year ago that you can assign the Destination and Scale Amount parameters from Thor’s Modulation Bus Routing System (MBRS) to a rotary on a Combinator, I completely neglected to realize that you can indeed automate any of the “Amount” parameters directly in Thor. So for example, if you setup a Vibrato in Thor, it would look something like this:

LFO2: 25 > Osc1 Pitch: 100 > ModWheel (Read Thor’s back panel — this is your basic Vibrato).

Great, but now, let’s automate that LFO2 amount so that the vibrato increases or decreases the pitch over time. Easy as easy can be. Simply right-click over the amount parameter on the front of Thor in the MBRS and select “Edit Automation.” Now you can automate the amount directly in the Sequencer. Pretty cool right?

The Amount settings in Thor's MBRS can also be automated

Tip #2: Stealing unused CV from devices that are already there.

This is a great tip, and it’s one I use all the time. Let’s say you have most of the sound sources set up in your track. Now you want to modulate and automate parameters. Instead of creating new devices like the Subtractor, Malstrom, Matrix, etc. to modulate those destinations, why not steal modulation sources from the devices that are already in your track. This saves on CPU, and it means you ultimately have a less cluttered rack with less devices. The only thing you need to be careful about is making things overly complex, as it can get confusing quickly. But this is another trick I use all the time.

For example, if you have a Thor as one of your devices in your rack, you have access to a multitude of CV sources you can use to modulate other parameters and devices. Here’s just a few:

  • Curve 1 in the Step Sequencer
  • Curve 2 in the Step Sequencer
  • LFO 1
  • LFO 2
  • Mod Envelope
  • Amp Envelope

So if any of these are not currently being tapped for use by the Thor sound itself (and even if they are, you can still use them for other purposes), you can enlist them for CV duty anywhere else in your rack. Simply create the CV connection from the back of Thor to the destination CV input in the other device location. If you are using LFO2 or the Global Envelope outputs, then all you need to do is set up the LFO 2 or Global Envelope parameters on the front of Thor and you’re done. If you are using LFO 1 or the Amp envelope, you’ll have to set these up using the CV outputs on the back of Thor, and then setting them up in the MBRS. If using the Curves in the Step Sequencer, you can route the CV from the Curve CV outputs on the back of Thor.

You literally have an amazing supply of CV modulation sources all from one Thor device. So much so, that this may be all you need. You might not need to use the LFO from another Subtractor or the Mod A and B from a Malstrom, and you may not need to add a bunch of Matrix units. With Thor, you can keep everything contained in one location. And chances are that you probably already have a Thor unit in your track already. So save yourself some CPU. That reminds me to put together a tutorial on all the CV possibilities of Thor. hmmm. Perhaps in a tutorial down the road. More to come on this. . .

Tip #3: Add a Scream to shape your sound.

I have to say that this came out of watching Hydlide run through some videos about my latest refill. He had a really solid idea to turn pretty much any drum sound into a punchier kick sound. But this is also a nice trick to try out variations on your own sound and is kind of like the tip I showed you where we added a unison to give things a wider thicker sound. This time however, let’s add a Scream device after any sound source and just play with the settings until it shapes into a sound you like. Something a little beefier or meatier. And it only takes a minute or so.

The other added benefit to doing this is that you have access to a 3-band EQ using the “Cut” section. While this isn’t as powerful as the M-Class EQ, it does a great job for quickly sculpting the sound. So when you’re in a rut, try out a Unison on those thinner synth sounds, but try out a Scream as well, to sclupt your drum and bass sounds.

The Scream can be inserted anywhere as a great sound sculpting tool

Tip #4: Turn your Combinator buttons into Radio buttons.

This tip came out of a request on the PUF (Propellerhead User Forum) where the original poster wanted to convert the Combinator buttons into Radio buttons. If you don’t know what a Radio button is, it’s ok. You’ve used them everyday in all kinds of software. Here’s a quick rundown: Radio Buttons.

You can download the template for this trick here: radio-buttons. The zip file contains the RNS file (and Combinator) which turns your Combinator buttons into radio buttons. Don’t pay too much attention to the synths at work here. They are just put there at random to highlight the difference in sound when selecting each of the buttons. I didn’t choose them for their stunning sound quality when played together (reset).

Now as all of you know, you can’t change the way the buttons work. They are toggle buttons by design, turning something on or off. So to turn them into a radio button is like taking a two-dimensional object and turning it into a one-dimensional object. It’s going backwards slightly. But there’s a good reason behind it.

To start, you probably want to have the buttons trigger something. In this case, I’ll take something very basic like 4 synths tied to each of the 4 buttons. Pressing one button will trigger its corresponding synth. Pressing another button will trigger the next synth, and so on. So first create a Combinator, and inside create four 6:2 line mixers and four synth devices. And then tie each of the synths to its own line mixer by sending the audio output to channel 1 on each of the four line mixers. Then open up the Combinator programmer, and program the following:

Line Mixer 1:

Rotary 1: Master Level: 100 / 100

Button 1: Master Level: 100 / 100

Button 2: Master Level: 0 / 0

Button 3: Master Level: 0 / 0

Button 4: Master Level: 0 / 0

Line Mixer 2:

Rotary 1: Master Level: 100 / 100

Button 1: Master Level: 0 / 0

Button 2: Master Level: 100 / 100

Button 3: Master Level: 0 / 0

Button 4: Master Level: 0 / 0

Line Mixer 3:

Rotary 1: Master Level: 100 / 100

Button 1: Master Level: 0 / 0

Button 2: Master Level: 0 / 0

Button 3: Master Level: 100 / 100

Button 4: Master Level: 0 / 0

Line Mixer 4:

Rotary 1: Master Level: 100 / 100

Button 1: Master Level: 0 / 0

Button 2: Master Level: 0 / 0

Button 3: Master Level: 0 / 0

Button 4: Master Level: 100 / 100

You’re pretty much done. Now, the buttons act as rotaries. However, you’ll have to disregard the fact that they light up at all. The fact that they are enabled or disabled means nothing. The only thing that means anything is if you switch from one button to the next. Remember our analogy: we’re taking a 2-dimensional object and turning it into a one-dimensional object. There’s no toggling. It’s a straightforward button to button switch.

The front of the Combinator showing the Programmer and the Line Mixers. The Synths are stacked underneath.

Also, Rotary 1 acts as a “Reset” button. Turning this rotary to any location will turn all four attached synths on at the same time. The reason I did this is due to the fact that when you start pressing buttons you will only be able to hear one synth at any given time and there was no way to “go back” to having all of the synths on at once. So I programmed the rotary to do this. As any good programmer knows, you should always provide a way to get back to the default. So this was my “Default” — however, if you don’t need it, you can remove the programming behind Rotary 1 if you really want to.


As always, I hope you enjoyed some of these quick tips. They are definitely fun to figure out and dream up. So keep the questions coming, and share some of your favorite tips with the rest of us. Happy Reasoning!

24 – A few No-Nonsense Tips

In this tutorial I’m going to outline some of my favorite quick tips that you can use when you find yourself in a bit of a bind with Reason. Hopefully these little tips open you up to a new way of thinking with the software, or else at least point you in the right direction if you get stumped.

In this tutorial I’m not going to outline any grandiose Combinator or showcase some majorly complex CV routing scheme (though I have a few interesting ones that I may show down the road). Instead, I’m going to outline just some of my favorite quick tips that you can use when you find yourself in a bit of a bind with Reason. Hopefully these little tips open you up to a new way of thinking with the software, or else at least point you into a direction in case you get stumped.

All of the tips below came out of a need I had to get out of jail with the software. In other words, I’d find myself at a standstill unable to go further because I’d locked myself in a hole. Here’s a few ways I found to get out and escape. I hope you find these tidbits useful.

Tip #1: Unison = Stereo (It’s not just big fat sound).

The first tip came out of a post I’d seen on the PUF (Propellerhead User Forum) entitled “Confessions.” In this post, a few people had stated that they never used the Unison device, and didn’t really understand what it was for. “I think it has something to do with fattening up the sound, but I don’t really use it and don’t really know what it’s for.” Fair enough. Here’s what I think:

Yes, it fattens up the sound. But it does more than that. For instance, take any monophonic sound device; The Subtractor and Thor come to mind. If you start playing either device, you can tell it sounds monophonic. In the case of Thor, you can do some clever things like add some Chorus and Delay. Perhaps in the Subtractor, you’ll add some ring modulation or FM synthesis, detune two oscillators together. But here’s the dilemma: you add a Stereo Imager after the device and nothing happens? Why?

This is because the Stereo Imager only works on Stereo audio, and since you have a device which is monophonic, nothing is going to happen. The simple fix: add a Unison device between the sound source and the Stereo Imager. Instantly, you’ve turned your sound into a Stereo audio pair going into the Stereo Imager, which can now effect the sound as you want (point of fact, it’s more of a faux stereo, but it works).

The unison device is there to “Stereo-ize” your monophonic sound. At the same time, it fattens the sound by creating multiple detuned voices out of the audio you send into it. Good enough!

The front of the rack showing the Unison device creating Stereo out of Mono
The back of the rack showing the Unison setup

Tip #2: Mixer Pan/Level CV automation is holding me back!

Ever automate the level and/or Pan info on your main mixer in Reason or Record and then realize you can’t alter it at all. For instance, if you send a Subtractor LFO to fully automate the level of your track, you end up unable to alter or change the level to fade it in or out right? Whatever is playing in a clip in your sequencer will be affected by the LFO as is. No fade ins, no fade outs, no changes along the way. Same goes for panning.

Here’s a simple tip to allow you to have both. And again it involves inserting a device between the sound source and the mixer. In this case, it’s another line mixer. Insert a 6:2 mixer between your main mixer and the sound source. Then flip the rack around and move the audio cables from the sound source into Channel 1 on the 6:2 line mixer. Then send some audio cables from the main output on the line mixer into the previous channel on the main mixer. Now you can flip back to the front again and right-click on the Channel 1 level knob, select “Edit Automation” and enter your fade-ins and fade-outs. You can also adjust your panning on this line mixer as well. This will affect the panning of the sound source before it gets sent into the main mixer where the CV is affecting the panning. In this case, the panning is combined together.

The front of the rack showing the Line Mixer inserted between the audio signal and main mixer.
The back of the rack showing the connections for the audio signal.

There you go. Total control over your mix, even when your mix is being controlled by CV.

Tip #3: While we’re on CV, don’t forget you can automate any CV trim knob on the back of any device

I discussed this tip in full here: #7 – Adjustable CV, but it bears repeating. If you want to control the trim pots for any CV connection (you know, the tiny knobs on the back of your devices into which you send the CV cables), simply insert a Thor device between the CV source and the CV destination. Route the CV into the CV in 1 within Thor, and send it out from CV out 1. Then in the modualtion Bus Routing Section of Thor (MBRS), use CVin1 as a source and CVout1 as a destination. Enter 100 as an Amount, and then use Thor’s Rotary 1 as a Scale (also with an amount of 100). Put everything (source/destination devices as well as the Thor “CV Pass-Through” device) into a Combinator, and program the Combinator’s Rotary 1 to adjust Thor’s Rotary 1.

This means that you’re adjusting the Scale amount value using the Combinator Rotary 1. Essentially, this will have the same effect of adjusting your CV trim pot. Sounds complicated, but it’s really quite simple.

Tip #4: Damn it, there’s no CV connection. But I want to automate it with an LFO!

Enter the Combinator to the rescue. For this trick to work, you have a device which has a parameter you want to affect with an LFO (or any other mod envelope or anything you like) and the device with the LFO which is going to affect it. This couldn’t be easier, but it’s not at first obvious. Here’s what you do:

Put both devices in a Combinator. Flip the rack around. Send the CV from the LFO device into the Rotary 1 CV in of the Combinator. Then flip back around to the front, and open up the Combinator programmer. Select the sound device. In the Modulation Matrix, use Rotary 1 as the Source andthe parameter you want affected in the destination device as the “Destination.”

Now, when the LFO is enabled and running, it gets sent along the CV cable and affects Rotary 1 on the Combinator. Rotary 1 on the Combinator in turn is affecting the parameter on your destination device. In other words, the Combinator Rotary 1 is used as a CV pass-through to affect any parameter you like, not just the ones that have CV slots on the back of the devices.

Tip #5: That nasty bypass click.

Not all glitch sounds are good sounds. Such is life when you are dealing with bypass switches in Reason. Sometimes you’ll get this nasty clicking sound when switching from on to bypass or vice versa. Sometimes you’re lucky and you don’t get it. It’s like Russian Roulette audio-style. This is why I never ever use the bypass switch. And also why I never ever automate it. Instead, here’s a few simple ways to get the same benefit without the horrible clicks.

First off, if you’re using a device that has a dry/wet knob, put it in a combinator and tie the dry wet knob to a button or a rotary. There’s your bypass button.

If, on the other hand, you need to get around bypassing an entire Combinator, try this trick. Inside the combinator create a spider and a second line mixer (assuming you already have a line mixer for the main audio). Then split the audio coming into the combinator, and have one split going to the main line mixer and the other going to the second line mixer. Merge the master outputs of both line mixers in the merge section of the spider, and then back out to the Combinator “From Devices” output. Ensure all your FX and Instrument devices go into channels on the main mixer. Leave the second mixer for the dry signal only, and nothing else.

In the Combinator programmer, program a button to switch between the two mixers. So when the button is off, the master level on the main mixer is at 0, while the master level on the secondary mixer is at 100. When the button is on (lit), the master level on the main mixer is at 100, while the master level on the secondary mixer is at 0. The button now acts as a bypass. When off, the signal is bypassed and the audio goes right through the Combinator unaffected. When the button is on, the Contents of the Combinator are enabled and the sound affected can be heard. Instant bypass without any clicking issues.

The back of the rack with the Bypass setup
The front of the rack with the Bypass setup shown on Button 4

Keep in mind there are some things that just can’t be stopped on a dime. For instance, changing the delay time or automating changes to the delay time will result in a very distinct sound, almost like a pitch shifting. You just can’t get around this. That’s the nature of audio. So while bypassing most things works without any side effects, other things can still be noticeable. The idea, however, is to minimize the unwanted audio problems as much as you can.


I hope you found these tips useful. I’ll keep posting more as time permits. In the meantime, feel free to share your thoughts or your own tips here by posting a comment. Happy Reasoning!

23 – 4-Op Mono FM System

Inspired from FM synthesis discussions lately, here’s a method to build a complete Mono 4-Operator FM Modular Synth within reason using a few Combinators which are tied together. Also learn how FM Synthesis works inside Reason. This is the discussion of the day.

This was inspired from all the discussion about FM synthesis lately. Lots of this discussion surrounded the Yamaha DX7, which has the capability of 6-operator polyphonic FM synthesis. So what exactly does that mean, and how does this apply to Reason. This will be the discussion of the day.

A Brief Intro to FM Synthesis

FM Synthesis is not a difficult concept. It works similar to a Vocoder in that there is a carrier and a modulator. The modulator affects the carrier and the carrier is then sent to the output. But what is modulated and what is carried? In FM Synthesis, there is an “Operator” which is another word for “Oscillator.” The Carrier and Modulator are nothing more than Oscillators. In a simple setup, you would have Oscillator A (Modulator) affecting Oscillator B (Carrier). The crucial idea however, is in what is being modulated: Frequency. The audio output of Oscillator A modulates the frequency of Oscillator B. That’s all it is.  It’s not hard to understand at all. And it’s super easy to implement in Reason. However, there are a few caveats which I’ll go over.

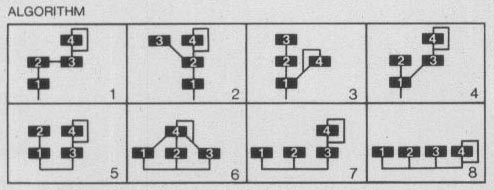
Download the project files here: FM-4-Op-Synth-System. There is one Combinator patch which outline the basic technique for creating an algorithm within a single Combinator. There is also an .rns file included with an 8-algorithm, 4-Operator Modular Monophonic FM Synthesis system in which you can explore the various sounds and shape them to your hearts’ content. The jpg image of the 8 Algorithms is also included. Note that in order for the FM Synthesis to work, you must have the same notes triggered on all four operators (Combinators 1-4) at the same time in the sequencer. There is a sample C3 note triggered a few times inside a clip to give you an idea of how this works. If you want to go further with this idea, there’s a 6-op FM synth included in my Generations ReFill.

The other thing that makes FM a bit more mysterious and makes things look harder than they seem is the use of several operators tied together in various ways. Each set of Operators (modulators/Carriers) is termed an “Algorithm” and anyone used to programming will immediately understand the concept. You can have several modulators and several carriers working together to create a single unique sound. This is what makes FM Synthesis so interesting and varied. By plugging different Oscillators together and having them modulate each other, you can create a huge variety of possibilities. For example, the Yamaha DX7 had 32 different polyphonic algorithms and each of those algorithms used 6 Operators. That’s a lot of possibilities.

Finally, the icing on the cake when it comes to most of the Yamaha algorithms is the usage of Self-Oscillation. Usually, in most Algorithms, one of the operators was oscillating itself. This means a feedback is created whereby Oscillator A is fed back into itself and Modulates its own frequency. This too, can be recreated in Reason.

Now that we have a basic understanding of how FM Synthesis works, let’s take a look at some simple 4-Operator Algorithms and see how close we can come to recreating them in Reason:

Eight Algorithms forming the base for a 4-Operator FM Synthesis system

To read each algorithm it’s important to understand the visuals. Each number is an Operator, which we learned was the same as an Oscillator. The Operators are linked to each other from top to bottom. The Bottom-most Operators on the bottom line are the Carriers. The Operators above them are all Modulators. The line that circles around Operator 4 in all the above algorithms denotes the feedback loop (Self-Oscillation). Once we understand this visualization, we can work it out inside Reason. Here’s how we do this:

Translating the Algorithms into Reason

  1. We’ll start out by creating a Combinator with a 6:2 line mixer and four Thor devices, one for each operator. Ensure no cables are routed yet. We’ll get to that shortly.
  2. The reason we have separate Thors for each Oscillator is because we need to have each Oscillator running through its own Amp Envelope and then feed this signal into a second Thor and have the signal Frequency Modulate the second Oscillator, and so on. You can’t do the same thing by having a single Thor with three Oscillators, because they do not have their individual Amp Envelopes, and part of the fun is adjusting the Amp Envelope for all of the operators individually.
  3. So now that we have our 4 Thor devices, rename them from top to bottom as shown in the algorithm image: 4 at the top, then 3 underneath, then 2 under that, and finally 1 at the bottom. We’re going to recreate algorithm #2 shown in the image above, because this provides a few interesting concepts, such as 2 modulators (3 & 4) Frequency Modulating the same Operator (2) and then Operator 2 modulating the Carrier (Operator 1).
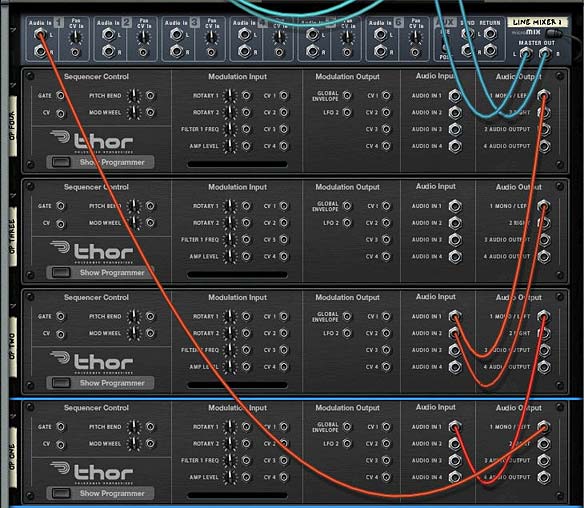
  4. Flip the rack around to the back and start routing the cables. Here, we’ll try out Algorithm #2 (which was included in the project files above). Also, all the cable routings between the Thors are going to be Mono, so only plug in the left cables here. Start at the top by routing Audio out from Thor Operator 4 and have that cable go into the Audio In of Thor Operator 2. Then take the Audio Out of Thor Operator 3 and plug that into the Thor Operator 2 Audio In2. Next, take Audio Out of Thor Operator 2 and plug that into the Audio In of Thor Operator 1. Lastly, route the Audio Out from Thor Operator 1 and send that to the line mixer. Then send the main output of the line mixer to the “From Devices” on the Combinator. The back of the rack should look like the following:

    The back of the rack showing the routing between Thor Operators
    The back of the rack showing the routing between Thor Operators
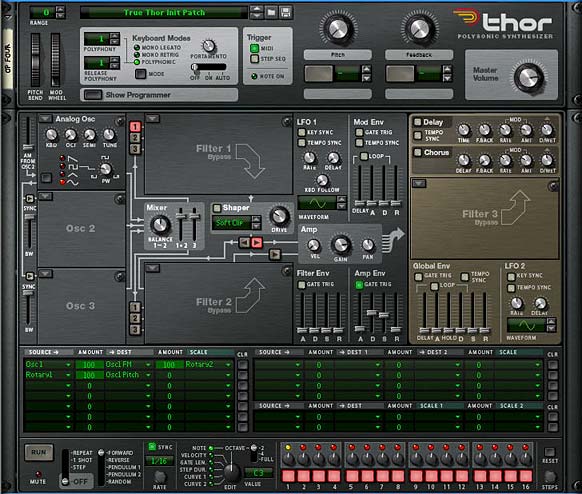
  5. Once this is done, flip the rack around and start work on setting up the Operators. For all the Thors, it’s best to start out with a clean slate. I have a file set up which turns everything in Thor off completely so that I’m starting from scratch. Anytime I want to start clean, I load this file into Thor and start from the ground up. So assuming you’ve done that, in the Top global section, you want to have the pitch range zero, polyphony and release polyphony set to “1” and the Trigger set to “Midi”. In the voice section, you will want to have an analog oscillator in slot 1, routed through the amp envelope which is turned on. Turn the Oct knob on the analog oscillator all the way down (we’re going to tie the pitch to a Combinator Rotary in a minute). Here is what the front of Operator four looks like:
    The front of the Thor Operator #4. Note the setup in the modulation routing section as well.
    The front of the Thor Operator #4. Note the setup in the modulation routing section as well.

    Note: the reason we set up the Polyphony and Release Polyphony to “1” is because this is a monophonic algorithm (all FM algorithms built inside Reason this way are monophonic). Since Thor can only produce a single voice, it is important to limit the amount of keys that can be used to a single one. While this type of system can’t be used to produce chords, it’s use as a lead instrument can still open it up to a world of possibilities. Also, see one of the notes below about creating polyphonic FM synthesis in Reason. It can be done. However, it can get very bulky. But if you have the stomach for it, give it a shot.

  6. Set up all the Thors in exactly the same way. Once you have this done, it’s time to set up the modulation sections (MBRS). We already got a glimpse of this in Operator 4 above. Here it is again:

    Osc1: 100 > Osc1 FM: 100 > Rotary 2

    Rotary1: 100 > Osc1 Pitch

    The first line sets up the feedback loop and makes it adjustable with Thor’s Rotary 2. The second line allows you to adjust the Pitch of the Oscillator with Rotary 1. Again, we’re going to tie both of these to Combinator Rotaries in a second.

    The following images show how to set up the other Operators:

    The Thor Operator 3 setup in the MBRS
    The Thor Operator 3 setup in the MBRS
    The Thor Operator 2 MBRS setup.
    The Thor Operator 2 MBRS setup.
    The Thor Operator 1 MBRS setup.
    The Thor Operator 1 MBRS setup.

    Operator 3 has no audio input, so we only need to have the ability to change the pitch of the oscillator. For Operator 2, there are 2 other modulator operators that are frequency modulating its oscillator, and so we need to have individual lines for Audio In 1 and Audio In 2. The Mod Wheel is used to adjust the amount of FM modulation on the operator. If the mod wheel is left at its default position, the FM Amount is fully modulating the Oscillator. If the mod wheel is turned up however, the FM amount applied to the oscillator is decreased. It’s a nice clever way to apply some control to the FM parameter. Operator 1 should be fairly self-explanatory at this point, so let’s move on to our Combinator assignments.

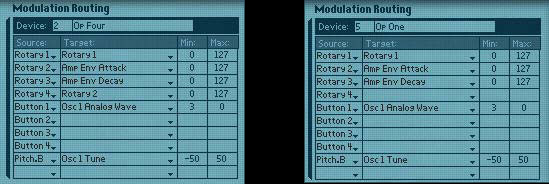
  7. Open up the Combinator’s programmer. Enter the following settings shown below. Operator 4 is exactly the same as the others, except for the fact that Thor Rotary 2 is assigned to the Combinator Rotary 4. In this way, you can control the feedback of Operator four.
    Thor Operator 4 (Left) and all other Operators (Right)
    Thor Operator 4 (Left) and all other Operators (Right)

    Modulation Routing for all Thor Operators:

    Rotary 1 > Rotary 1: 0 / 127

    Rotary 2 > Amp Env Attack: 0 / 127

    Rotary 3 > Amp Env Decay: 0 / 127

    Button 1 > Osc 1 Analog Wave: 3 / 0

    Pitch Bend > Osc 1 Tune: -50 / 50

    Additional Modulation Routing for Thor Operator #4:

    Rotary 4 > Rotary 2: 0 / 127

    In this way, Rotary 1 becomes the “Global Pitch” change for all the Operators. Rotary 2 and 3 are set to control the Amp envelope. If you wish, you could use the knobs to control Sustain and Release or any combination. The point being that after the Pitch of the Oscillators (which controls the Frequency), the Amp is the next most important element to control, as it affects the application and duration of the sound over time. So these Rotaries help to control that time element.

    Button 1 provides an added bonus by switching between a sine and saw wave form. You can, of course, select any two waveforms you like.

The 8-Algorithm, 4-Operator Monophonic FM Synthesis System

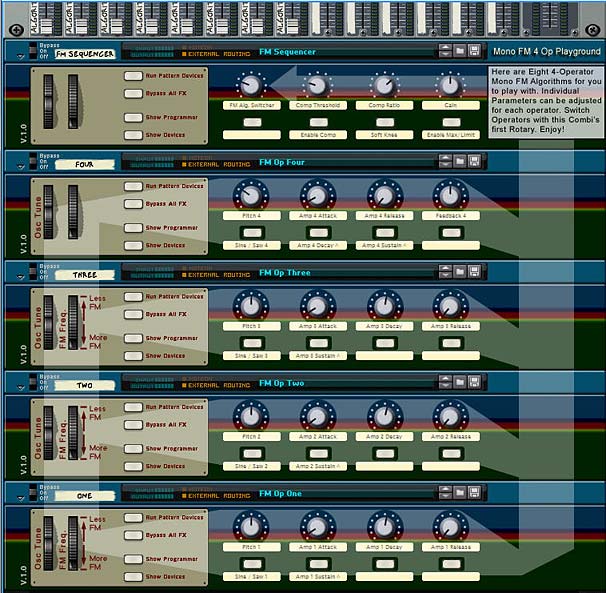
Included in the project files is an 8-Algorithm, 4-Operator Monophonic FM Synthesis system that I developed which allows you to switch between all the algorithms on the fly. A little explanation might be in order. But first, a look at it from the front:

My 8-Algorithm, 4-Operator Monophonic FM Synthesis Modular System (ain't that a mouthful?!)
My 8-Algorithm, 4-Operator Monophonic FM Synthesis Modular System (ain’t that a mouthful?!)

To get started with this system, you’ll have to press play and visually tune your eyes to the Mixer at the top while you switch around the “FM Sequencer’s” first Rotary. This will switch between the 8 different algorithms dynamically. I’ve added a simple C3 note played out a few times in a loop to give you an idea of how the process works.

In the “FM Sequencer” Combinator there is also a Compressor and Maximizer/Limiter which is adjustable from the various knobs and buttons. I found when experimenting with different FM settings using this system, often times levels got quite hot and far too loud. This should help to tame the levels. If needed, you can enable the Compressor and/or the Limiter via buttons 2 and 4, respectively. The other parameters should be self-evident.

Each of the four Combinators below the FM Sequencer is tied to an individual Operator, and each Combinator has 8 Thors within, all doing the same thing at the same time. All four Combinator/Operators work essentially the same way. The parameters affect 2 main areas: Pitch and Amp Envelope. The first Rotary affects the overall Pitch of the Operator, and the Pitch Wheel affects the fine tuning of the Oscillator. Button 1 affects the wave form used (sine or saw). The rest of the Rotaries (and button 2) affect the Amp Envelope. Finally, the Mod Wheel affects the amount of FM applied to the current Operator by the previous Operator. This functions the same as I’ve explained before, whereby moving the mod wheel upward reduces the FM amount.

A notable exception is Operator four. Where this operator differs is in the fact that it can be fed back into itself (self-oscillation or feedback). I have tied Rotary 4 from this Combinator to adjust the feedback amount, so even self-oscillation is fully controllable. This also means that the Amp Envelope Decay parameter had to take a back seat and I therefore applied the Decay to a button so you at least have the option of two different decay states.

Note that while you don’t HAVE TO have the same note/clip data on all the Combinator tracks in the sequencer, this is the proper way to use the system and this is the only way to fire off all the Operators at the same time (short of programming a matrix to control all the operators at once). But again, nothing is stopping you from experimenting with only firing one or two Operators. If you do this, however, you may not get very good results. Just warning you about this.

With this system, you have complete control over all Operators’ pitch and amp envelope parameters. You can set up each operator individually or even automate any parameter, all from the front of the rack. So enter at your own risk. It can turn into many hours of fun.

Where do you go from here:

  • This tutorial explains use of Analog Oscillators in Thor. However, you don’t have to use the analog oscillator at all. You can use any of Thor’s Oscillator types (though admittedly, the Noise Oscillator will probably not take you very far). If you use the FM Oscillator, you already have a built-in pair of Mod/Carrier, so you’re already working with 2 operators. The only difference is that they are internally tied together and can’t be separated the way you can separate things between different Thors. But that’s not to say they are not useful.
  • Have a good look at the 4-Operator Mono FM Synthesis System I designed which allows you to switch between all 8 algorithms. This can open up a whole new world of FM synthesis for you which you may not have previously known about. I certainly hope it gets your mind flowing with some new ideas.
  • Keep in mind the more operators added to the mix, the more complex things become, and the more the output will move towards a sound very similar to a noise oscillator. Also, the more erratic and unpredictable the outcome will be. You can still find lots of interesting uses for these sounds, but you’ll have to give some serious experimentation time to come upon some useful sounds. And you’ll have to be willing to accept the erratic nature of FM synthesis in general.
  • Always remember that Thor is monophonic. It can only produce a single voice. Therefore, any FM synthesis system you build inside Reason is going to be monophonic. There is a way to circumvent this issue and add polyphony, but it’s not an easy process. It’s quite cumbersome and involves you duplicating the Combinator setup multiple times. Each instance that you duplicate becomes an additional voice you can program. However, if you have a large setup like the 8-algorithm 4-Op FM system setup I have, duplicating this whole system multiple times becomes slightly more than a hassle. Until we have true polyphonic FM synthesis in Reason however, it will have to do as a workaround.
  • Some further reading: Thor demystified 9: An introduction to FM Synthesis – part 1: A great introduction to the world of FM synthesis in Reason by Gordon Reid. Also check out the great tutorial series put on by Hydlide here: Fm Synthesis in Reason 4 part 1. He’s also got some great video tutorials on how to put FM synthesis into action in Reason. Highly recommended material!

I hope this sparks some creative sound mangling for you. And if you have any comments or questions, please post them here. Also, if you have any further ideas related to FM synthesis in Reason, I’d welcome them. All my best for now.

22 – Parallel Effects Processing

Split an audio signal into multiple parallel audio signals, send them to various effects, and then merge them back together. You control the mix level of all 3 effects and the original signal. As an example, we’ll create a Dynamic Effects processor (Compressors / Equalizers) to apply to your bass sounds.

In this tutorial, I’m going to show you how to split an audio signal into multiple parallel audio signals, send them to various effects, and then merge them back together. You control the mix level of all 3 effects and the original signal. As an example, we’ll create a Dynamic Effects processor (Compressors / Equalizers) to apply to your bass sounds. The Combinator knobs will be used as the basis to sculpt your sounds. Add some additional effects to the buttons and you have yourself some very powerful sound development indeed.

The inspiration for this tutorial came from a procedure I had read about in which the Kick drum is compressed and then the original Kick is mixed back in with this compressed Kick drum to give a beefier sound. So I thought, if you could do this with a Kick drum, how about doing it with other sounds such as a Bass, and then allowing you to mix in not only the original sound, but also different compression schemes. With the Combinator allowing you to utilize 4 knobs, you can actually create 3 different compression/EQ schemes (each tied to their own Rotary on the Combinator), and then tie the original mix to the fourth Rotary. This way, you can have some fun adjusting the balance of all 3 compressions as well as the original to create your final sound. This opens up a huge array of sound possibilities.

Once I show you the method to do this, you’ll be able to parallel process any kind of effect you can create in Reason or Record. For example, we can take 3 variations on a Chorus, and tie each variation to their own Rotary, then have some fun mixing them together. This turns your Combinator into a very flexible Chorus machine.

The project files can be downloaded here: parallel-effects-processing The zip file contains 1 Combinator inside an .rns file and a Combinator template. The .rns file contains the Parallel Processor which we’ll create here. You can use it to process your bass sounds. Different Bass tones and cabinet models are packed inside the Combinator. The template file can be used to start you off creating your own effects. You won’t have to enter any settings in the Combinator’s Modulation Routing, unless you tie some effects to the buttons. Otherwise, have at it building your own Parallel processing effects.

Here’s the basic Combinator setup:

  1. First, Create a new Reason document and then create a 14:2 Mixer. Next, create a sound module, such as a Bass sound. You can find great bass sounds under the Factory Sound Bank (FSB) or you can create one of your own using a Thor, Mal, or Sub. You can even create a sampled Bass sound using the NN-19 or NN-XT. It’s up to you, but since we’re going to create a Combinator effect unit, you’ll need some kind of sound which is to be affected.
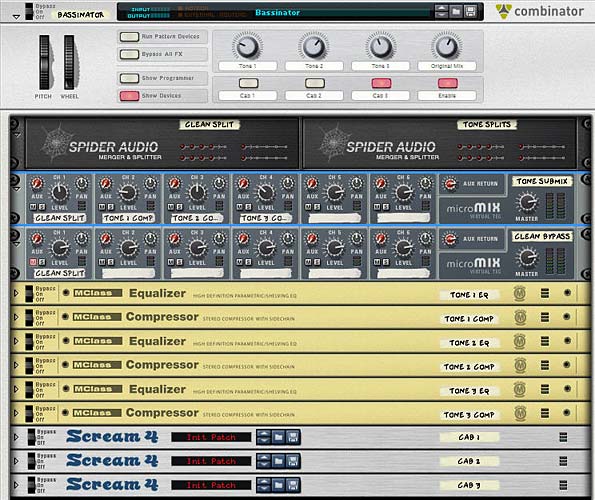
  2. Next, create a Combinator under the sound source and in the Combinator hold down shift and create in the following order two Audio Spiders/Mergers, two 6:2 Line Mixers, 3 sets of M-Class Equalizer/M-Class Compressor devices, and 3 Scream devices.
  3. Label the first Audio Spider/ Merger “Clean Split” and label the second Spider/Merger “Tone Splits.” Label the first 6:2 Mixer “Tone Submix” and the second 6:2 mixer “Clean Bypass.” Label each set of EQ/Compressor as follows: Tone EQ 1/Tone Comp 1, Tone EQ 2/Tone Comp 2, and Tone EQ 3/Tone Comp 3. Finally, label the 3 Scream devices “Cab 1,” “Cab 2,” and “Cab 3.” These will be our cabinet emulations. This is how we will refer to each device for the remainder of the tutorial.
  4. Flip the rack around to the back as it’s time to do some serious routing. Note that all the routings below are Left/Right stereo pairs. Move the Audio outputs from the sound device to the Combinator inputs, and then move the Combinator audio outputs to the Main 14:2 Mixer’s Channel 1 inputs. Route the “To Devices” cables from the Combinator to the main inputs on the splitter side of the “Clean Split” Spider device.
  5. Send one of the splits from the “Clean Split” device to Channel 1 input of the “Tone Submix” mixer, another split to Channel 1 of the “Clean Bypass” mixer, and a third split to Main inputs on the splitter side of the “Tone  Splits” Spider device.

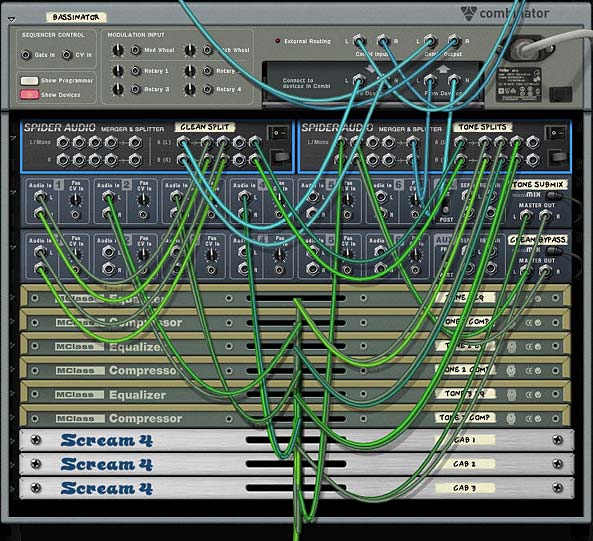
    The back of the rack for the Template file.
    The back of the rack for the Template file. I'm jumping ahead a little. But this shows the basic routing before setting up any of the Effect devices.
  6. Send one split from the “Tone Splits” Spider to the “Tone EQ 1” inputs. Send a second split to the “Tone EQ 2” inputs. Send a third split to the “Tone EQ 3” inputs. Then send the audio outputs from each of the EQ devices to the audio inputs of their respective Compressor devices. Then send the outputs of each of the Compressor devices into Channels 2, 3, and 4 of the “Tone Submix” mixer device.
  7. Next, send the Master output of the “Tone Submix” mixer to the input of the “Cab 1” scream device. The “Cab 1” output goes to the “Cab 2” input, the “Cab 2” output goes to the “Cab 3 input,” and finally the “Cab 3” output goes back into the Merge side input of the “Tone Splits” Spider device. Also send the Master output of the “Clean Bypass” mixer device to another merge input on the “Tone Splits” Spider device.
  8. Last but not least, send the Merged output from the “Tone Splits” Spider device to the “From Devices” input on the main Combinator panel. I know this all looks really messy, but sometimes you just have to get in there and get dirty to get what you want out of Reason.
    The back of the rack when finished routing
    The back of the rack when finished routing

    The front of the rack
    The front of the rack
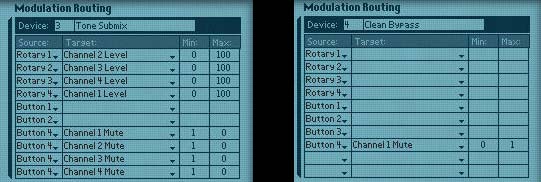
  9. Now let’s flip the rack around to the front and work on the Combinator Modulation Routing section. Click the “Show Programmer” button on the Combinator. Enter the following settings:

    For the “Tone Submix” mixer device:

    Rotary 1 > Channel 2 Level: 0 / 100

    Rotary 2 > Channel 3 Level: 0 / 100

    Rotary 3 > Channel 4 Level: 0 / 100

    Rotary 4 > Channel 1 Level: 0 / 100

    Button 4 > Channel 1 Mute: 1 / 0

    Button 4 > Channel 2 Mute: 1 / 0

    Button 4 > Channel 3 Mute: 1 / 0

    Button 4 > Channel 4 Mute: 1 / 0

    For the “Clean Bypass” mixer device:

    Button 4 > Channel 1 Mute: 0 / 1

    For each the “Cab 1” Scream device (note, each Cab device has the same settings, except Cab 2 is tied to Button 2 and Cab 3 is tied to Button 3):

    Button 1 > Damage On/Off: 0 / 1

    Button 1 > Cut On/Off: 0 / 1

    Button 1 > Body On/Off: 0 / 1

    Combinator Modulation routing for the two Mixers
    Combinator Modulation routing for the two Mixers

Here’s what is happening:

Button 4 is used as a bypass switch. When this button is turned off, the original sound will travel through the Combinator untouched. When Button 4 is turned on, you can use the 4 Rotaries to create a custom mix between all the sets of effects. Rotary 4 is a “special” rotary, in that it allows you to mix the original audio back into the mix. It’s important to note that this original audio is separate from the audio that goes through the Combinator when button 4 is off. Hence the need for two different mixers inside the Combinator. This way you can have the original mix work as though it were just another tone alongside the others, and when you switch back to a “clean” signal, a separate “original audio” is piped through the Combinator.

Buttons 1, 2, and 3 are your different Cabinet emulations. Those with Record are even luckier in that they can add in a few Line 6 Cabinet modeling devices and use those instead of the Scream. But with Reason, you can still get some amazing cabinet models by using the “Body” setting of the Scream unit (in conjunction with a little distortion and EQ cutting if you wish).

Another thing to keep in mind is that the Tones attached to the Rotaries are independent of the Cabinet models. You can dial in Tones without ever having to use the Cabinet models. However, button 4 must be turned on or enabled for you to hear any of the Tones or Cabinet models. In addition, you can have two Cabinet models used in series (note however, that this was not really the intended purpose — my thinking was that you can use each Cab model individually, and not together, but if you want to use them together, go for it).

Now as a final step, you will need to enter individual settings in the Equalizer / Compressor and Scream units. I won’t go into all the settings you can enter, but rather, you should build your own settings within these devices to your taste. However, take a look at my own settings to see what I used for Bass processing. The idea is to create each set of Equalizer/Compressor settings separately. So, for instance, turn rotary 1 all the way right and turn down all other rotaries to zero (fully left). Now listen to your sound source going through the device, and adjust the “Tone EQ 1” and “Tone Comp 1” devices until you hit on a nice bass processing setting.

Next, turn Rotary 1 all the way down and turn Rotary 2 all the way up. Now work on the second set of EQ/Comp devices to get an entirely new bass processing outcome from the devices. Once that’s done, repeat this for the final set of EQ/Comp devices.

Note: If you want to cheat a little bit, select your sound source, and then right-click and select “Create Effect.” Open up the Factory Sound Bank and look under the ALL Effects Patches > Dynamics > Basses folder and open up one of the bass Combinator patches that you like. Now be sure to adjust the settings on the front of this Combinator patch until you find the sound you’re looking for. Then click the “Show Devices” button on the Combinator, and copy/paste the devices from this Bass patch into your parallel processing Combinator. Delete the (now empty) bass Combinator. In the parallel processing Combinator, you will need to do a little routing to set things up as I have (routing into the main inputs of the first device, and routing the outputs from the last device). But once you do, you can then repeat this process two more times choosing different Combinator patches to copy from in the FSB.

Here’s a 2-part video series that expands upon this idea. It doesn’t always come out exactly the way you expect. But that’s the fun of trying out the technique. You may find something worth keeping, and then you can save the Combinator as a patch and use it in your own compositions.

Part 1:

Part 2:

Now for your cabinet models (Scream devices) you would go through the same process.

Note: When working with the Scream devices, in order to balance the volume level between the Original sound / Tones (using Button 4), you will need to raise all the Scream device Master volume settings up to 100. In this way, if you use Button 4 to switch between the Original volume on Rotary 4 and the volume of the clean bypass (being sent to the “Clean Bypass” mixer), the volume levels will match. So first raise all the master levels for all Scream units to 100.

Listen to the bass sound going only through Rotary 1 and with Button 1 enabled. Then enter a proper Cab setting in the “Cab 1” Scream device. When you have something that sounds nice, test it out with the other Tones on the other Rotaries individually. Note that you may need to put a limiter (M Class Compressor) after the Scream device to tame the sound if it gets too crazy.

Why I feel this setup is so powerful

This type of setup can be very flexible and powerful. Instead of using a single effects processor (one EQ and one Compressor) you can create any kind of mix between three different EQ/Compressor setups. Add to that the Cab models and you end up with some very powerful audio processing.

Another reason I feel this setup is powerful is because you end up with a processor that is greater than the sum of its individual parts. It’s also a handy way to store three setups (plus the original mix) in a single Combinator.


So what are your thoughts? Does this open up some new possibilities for you? Have you used this technique before in other areas or with other devices? I’d love to hear your thoughts on this. Thanks for reading. Now go out there and make some amazing music!