8 – Auto CV (Chasing Audio)

Learn how to use the Scream’s Auto CV output to convert an audio signal into a CV signal. Also learn how Thor can be used to achieve a similar effect, and how you can use Thor to switch between different CV sources.

We don’t live in a vacuum (well maybe sometimes we do, however, for the most part we learn by experimenting with many different elements from different sources) and so this tutorial will build upon a previous tutorial on using Thor’s CV capabilities to switch between 2 different CV sources. In addition, there will be a new element which shows how the Auto CV on the back of the Scream can be used to follow the audio from a Dr. Rex. And this is really the heart of the tutorial.

The “Auto CV” feature on the back of the Scream device is an envelope follower with a twist. While most envelope followers work on Audio and in essence shape the parameters of the audio, the Scream’s envelope follower follows the audio, and then converts that to a CV signal. Before Reason 4, this was the only way you could essentially create a CV signal from an audio source. With the advent of Reason 4, you can use Thor to perform the same functions. Even so, it’s worthwhile to note how the Auto CV works in the scream, as it can still be used effectively, with the added bonus that it leaves a lighter CPU footprint, and allows you access to the Scream as an FX insert as well. Finally, I’ll touch upon how you can achieve a similar effect using Thor.

The project files can be downloaded here:  auto-cv-chasing-audio It contains three Combinators which are used as examples to show the Auto CV setups described below. A matrix is used to play a random pattern so you can hear the results. All Combinators play simultaneously through the main mixer, so don’t forget to mute or unmute the channels to hear the proper example.

Using the Scream Auto CV to convert Audio into CV

  1. Create a Combinator and a 6:2 Line Mixer. Then holding shift down, create in order a Thor, NN-XT, Scream and Dr.Rex device.
  2. Click the Show Programmer button in Thor, and turn off Oscillator 1, Bypass Filter 1, and click the “1” button next to the Filter 1 slot. Add a Low Pass Ladder Filter in the Filter 3 slot. Finally, click the Delay button to turn on the Global Delay.
  3. In the NN-XT open up the patch browser and navigate to the Factory Soundbank. Go to the NN-XT Sampler Patches > Synth Poly and open the Odd Poly patch.
  4. In the Scream device, turn off the “Damage” parameter.
  5. In the Dr.Rex device, open the Patch browser and in the Factory Soundbank, nagivate to Dr Rex Drum Loops and load the Hse40_RideBeat_130)eLAB.rx2 patch.
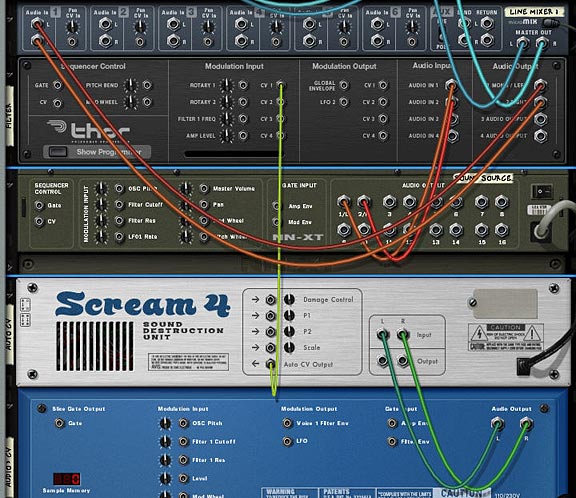
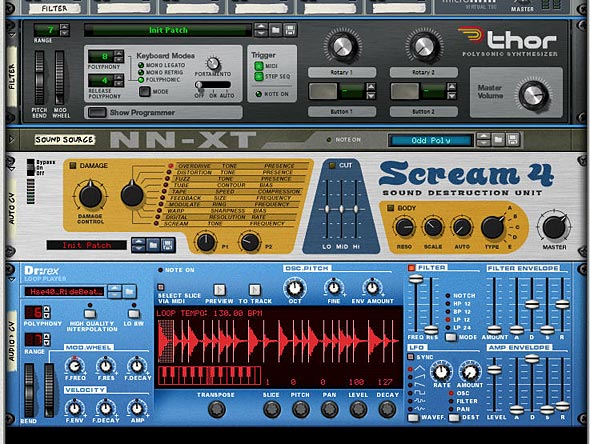
  6. The Front of the Rack with all Devices necessary to chase your audio
    The Front of the Rack with all Devices necessary to chase your audio
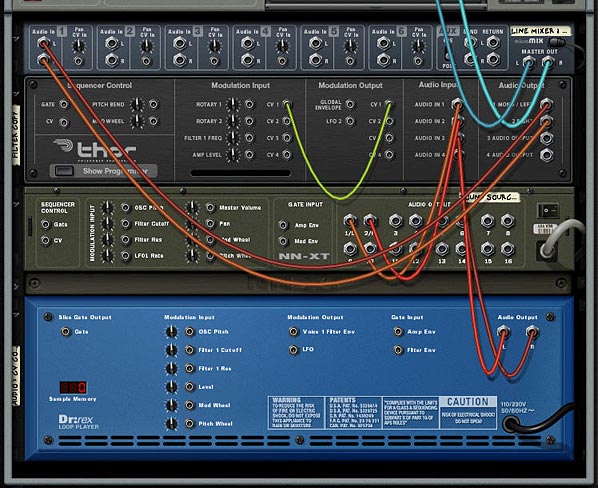
  7. We’re done with the front panel. Flip to the back of the rack, and let’s move on to routings. First, route the NN-XT’s 1/L and 2/R to the Audio In 1 and Audio In 2 on the Thor Audio Inputs, respectively. Then route the 1 Mono/Left and 2 Right from the Thor’s audio outputs to Channel 1 on the Line Mixer (left and Right, respectively). This sets up the audio to be heard. Now comes the Auto CV magic.
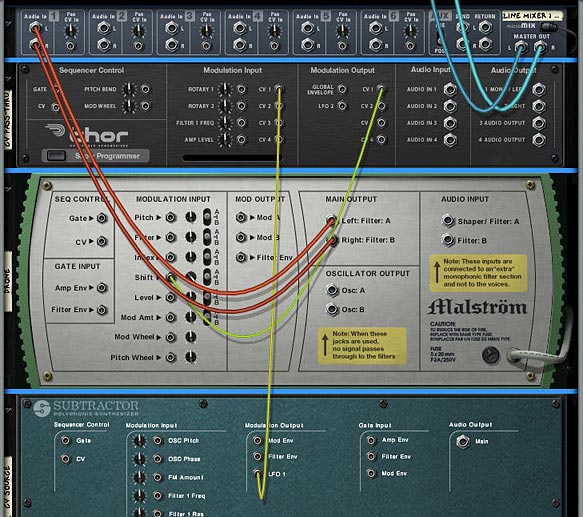
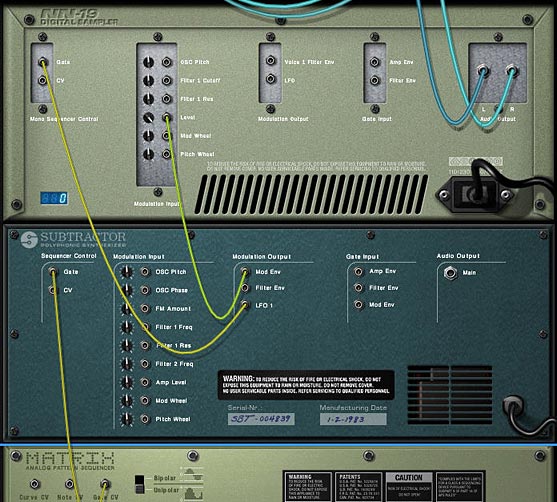
  8. In order for Auto CV to work, the Scream needs to have a sound source fed into it. So connect the Dr.Rex L & R audio outputs into the Scream Audio Inputs (L and R, respectively). Then connect the Auto CV output from the Scream unit into the CV 1 Modulation input on Thor.
  9. Auto CV routing to follow the Rex Audio file via CV
    Auto CV routing to follow the Rex Audio file via CV
  10. Flip the rack around and let’s set up the Thor Modulation Bus Routing Section (MBRS). Enter the following parameters on the left side of the bus:

    CV In 1: 66 > DelFBack

    CV In 1: 66 > Del ModAmt

    Enter the following parameters on the right side of the bus (just to keep things simple for now):

    Audio In1: 100 > Filt3 L.In

    Audio In2: 100 > Filt3 R.In

  11. The MBRS settings in Thor
    The MBRS settings in Thor
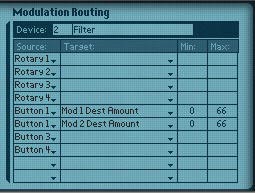
  12. With this setup, the Auto CV is affecting the Thor Delay Feedback and Delay Modulation Amount. To hear what the Scream is actually doing, we can set up a Combinator switch on button 1. So click the Show Programmer button on the Combinator, and click the Thor in the Device section of the programmer. Enter the following two lines in the Modulation Routing section:

    Button 1 > Mod 1 Dest Amount: 0 / 66

    Button 1 > Mod 2 Dest Amount: 0 / 66

    Programmer Modulation Routing in the Combinator
    Programmer Modulation Routing in the Combinator
  13. Now set up a Matrix to play a simple pattern using the Combinator. Turn Button 1 on to hear the Auto CV affecting the Delay. Turn it off to hear the unaffected Delay. Note that you need to have the Dr. Rex receive notes in order to have it send audio into the Scream device. By setting up the Matrix to sequence the combinator, the matrix ends up playing the Dr. Rex. So you’re all set. Alternately, if you don’t want the matrix sequencing the Combinator, you can always copy the Rex notes to its sequencer track so that the Dr. Rex is played via the main sequencer. The point is, the Dr. Rex needs to be active.
What’s happening is the Dr.Rex loop is converted to CV, and this CV is used to affect the Thor Delay. It’s a simple but powerful setup. And you don’t have to limit yourself to affect Thor parameters. I only used this as an example. You run any audio source through the Scream and then use the Auto CV to affect any other CV parameter. Also, since the Scream is not generating any audio output, it doesn’t affect the mix in any other way than a simple CV conversion (or more technically, a CV envelope follower).

Switching CV sources

Not to be one to leave well enough alone, here’s a way to extend the Auto CV idea above and have the ability to switch between two different Rex Files (2 CV sources) using the Thor. The parameters affected are the same (Delay Feedback and Delay Modulation Amount), but the Rex file used to affect the delay can be switched. Here’s how you do it:

  1. Building upon the above example, at the bottom of the Combinator stack, holding Shift down, let’s add another Scream and Dr. Rex.
  2. Next, turn off the Damage parameter in the second Scream. Also, add a different loop into the second Dr.Rex device.
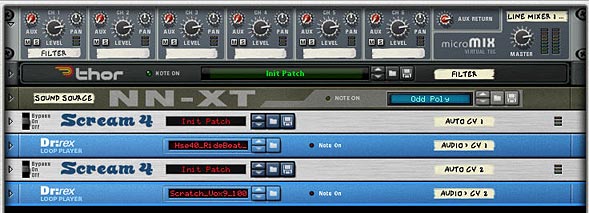
  3. The front panel with two scream and 2 Dr. Rex devices
    The front panel with two scream and 2 Dr. Rex devices
  4. Flip the rack to the back, and send the Audio from the Second Dr.Rex to the Second Scream, and send the Auto CV output from the second Scream to the CV 2 Modulation input on the Thor.
  5. Now we’ll have to set up Thor to also accept the second Dr.Rex CV source. In the MBRS section, enter the following:

    CV In 2: 66 > DelFBack

    CV In 2: 66 > Del ModAmt

  6. The MBRS settings in Thor
    The MBRS settings in Thor
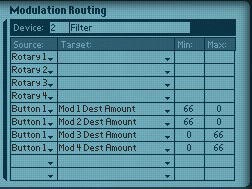
  7. Finally we need to use the Combinator button 1 as a switcher between the two CV sources. So in the Combinator’s Modulation Routing section, enter the following:

    Button 1 > Mod 1 Dest Amount: 66 / 0

    Button 1 > Mod 2 Dest Amount: 66 / 0

    Button 1 > Mod 3 Dest Amount: 0 / 66

    Button 1 > Mod 4 Dest Amount: 0 / 66
    Programming the Modulation Routings in the Combinator
    Programming the Modulation Routings in the Combinator

With this setup, Button 1 on the Combinator is used to switch between the 2 Scream CV sources (which in turn comes from the two Dr.Rex devices). Leaving button 1 off uses the first Scream device. Turning the button on turns off the first Scream CV source, and turns on the second Scream CV source. Note: it’s not actually the Scream that is turning off. We’re just bringing the amounts down to zero on the Thor programmer panel, which has the same effect.

It should also be noted that you can program a Rotary on the Combinator to cross-fade between the two CV sources, if you wish to have a fading effect between the two. Where you take this idea is really up to you.

Using Thor as an Audio/CV converter

Let’s say you don’t want to use the Scream, and instead want to use Thor as a “Auto CV output” or CV envelope follower. Here’s how you set that up.

  1. Starting from scratch, Create a Combinator and a 6:2 Line Mixer. Then holding shift down, create in order a Thor, NN-XT, and Dr.Rex device.
  2. Click the Show Programmer button in Thor, and turn off Oscillator 1, Bypass Filter 1, and click the “1” button next to the Filter 1 slot. Add a Low Pass Ladder Filter in the Filter 3 slot. Finally, click the Delay button to turn on the Global Delay.
  3. In the NN-XT open up the patch browser and navigate to the Factory Soundbank. Go to the NN-XT Sampler Patches > Synth Poly and open the Odd Poly patch.
  4. In the Dr.Rex device, open the Patch browser and in the Factory Soundbank, nagivate to Dr Rex Drum Loops and load the Hse40_RideBeat_130)eLAB.rx2 patch.
  5. We’re done with the front panel. Flip to the back of the rack, and let’s move on to routings. First, route the NN-XT’s 1/L and 2/R to the Audio In 1 and Audio In 2 on the Thor Audio Inputs, respectively. Then route the 1 Mono/Left and 2 Right from the Thor’s audio outputs to Channel 1 on the Line Mixer (left and Right, respectively).
  6. This time, connect the Dr.Rex L & R audio outputs into Thor’s Audio Inputs (3 and 4, respectively). Then connect the CV 1 output to the CV 1 Modulation input, both input and output are on Thor, so yes you can route a CV out on Thor to a CV in on the same Thor.
  7. The back of the rack - routing Thor to work as an Auto CV envelope follower
    The back of the rack - routing Thor to work as an Auto CV envelope follower
  8. Flip the rack around and let’s set up the Thor Modulation Bus Routing Section (MBRS). Enter the following parameters on the left side of the bus:

    CV In 1: 66 > DelFBack

    CV In 1: 66 > Del ModAmt

    Enter the following parameters on the right side of the bus:

    Audio In1: 100 > Filt3 L.In

    Audio In2: 100 > Filt3 R.In

    Audio In3: 100 > CV Out1

    Audio In4: 100 > CV Out1
    The MBRS settings in Thor
    The MBRS settings in Thor

With this setup, the Auto CV is contained within Thor. The Thor is using the Audio from the Dr.Rex directly, and then converting the Audio source into a CV signal which is then sent back into Thor to affect the Delay Feedback and Delay Modulation Amount.

One note here: if you test out the sounds from the Thor CV setup versus the Scream CV setup, you’ll notice that the Thor CV is much smoother. I’m not sure why that is. It may be a difference in the way I’ve routed things, or a difference in how the Scream handles the Auto CV output feature. But there is definitely a difference in sound. Of course this could be pilot error and I may not have the connections set up correctly. I admit my mistakes all the time. But at least it gets you pretty close.

So any other ideas you have for using the Auto CV output on the Scream device or setting up Thor to convert an Audio signal into a CV signal? This is a very basic example, but it opens up a lot of potential with other sound sources / CV destinations. For example, if you have a CV destination that you want to track to the lead vocals in a song, you can do it easily. So what other possibilities are out there?

Wonderland

This is a cross between a beat or rhythm generator and a synth. I wanted to come up with a template to use as a hybrid that could be used to effect a great range of sounds and possibilities all from within a single combinator. Very light weight and easy to use. Great as a Combinator Template for your own sounds.

Download the Combinator: wonderland

Description: This is a cross between a beat or rhythm generator and a synth. I wanted to come up with a template to use as a hybrid that could be used to effect a great range of sounds and possibilities all from within a single combinator.

Features: Wonderland uses a Rex file for the driving rhythm behind a soft sounding synth. The NN-XT provides the synth layer, and the Rex provides the rhythmic layer. You can also adjust the filter frequency and a separate Pumping element in the mix. Here’s how the controls operate:

Pitch Bend: The pitch bend affects only the NN-XT synth layer, and pushes up or down by 4 semitones.

Mod Wheel: The mod wheel affects a few different parameters. Adjusting the wheel upward yields a more dreamy high-pitched sound.

Rotary 1: This controls the “Crudge” feature, which is a Sine wave sound shaper in Thor. Turned all the way left and you get no sound shaping applied. Turned fully right, and you get a grungy distortion to the synth layer. Note that higher filter frequencies will yield more distortion. Having the filter frequency Rotary all the way left will provide very little changes to the grunge effect.

Rotary 2: Controls the level of the Rhythm section (Rex file). All the way left and the Rex audio is essentially turned off. All the way right and the Rex can be heard fully (100).

Rotary 3: Controls the filter frequency of the synth layer. This Rotary is controlling Filter 3 in Thor. Turned all the way left and the Filter Frequency is fully cut off. Turned all the way right and the Filter Frequency is fully open.

Rotary 4: Adjusts the pumping of the Rhythm layer, however, the pumping is affecting the synth layer, so even if the Rex audio from Rotary 2 is all the way off, you can still get a Thumping from the Synth using this Rotary.

Button 1: When off, the Synth Delay (the Thor Global Delay) is not synced. When turned on, the Delay is synced to the beat of the main sequencer.

Button 2: This controls the distortion from the Scream device. Turned off you get no distortion. Turned on you get a Low Frequency Resonator distortion FX applied to the Rex Rhythm layer. This does not affect the Synth layer.

Button 3: This is an octave shift for the Rex Rhythm layer. When off, the Octave is set to the default (4). When on, the Rex loop plays 1 octave higher (5). This does not affect the Synth layer.

Button 4: This provides an “Underwater” feel to the Synth layer. Essentially it controls the Global Chorus in Thor. Left off, the Synth is untreated. Turned on, you get a very warbly chorus applied to the Synth which can only be described as a very quick oscillation as though you were under water.

Usage: You can use this any way you like. But mainly it provides a Synth/Rex Loop Rhythm for your tracks.

Other Notes: To edit the patch and use it as a template, switch out the NN-XT patch for some other synth sound you like (or any other sound patch or sound device, for that matter). You can also vary the rhythm layer by changing the Dr.Rex patch to something different as well. A final note: take a look at the CV setup happening with the Dr.Rex, Scream, and Thor, then look at the routings in Thor’s Modulation Bus. This provides a way you can use the Scream’s Auto CV to convert the Dr.Rex Audio into a CV source that is applied to several parameters within Thor to affect the NN-XT’s sound. Might provide some further inspiration for you.

As always, please let me know what you think or let me know if and how you use this in your own projects. Happy Reasoning!

Arp Box

This is an Arp Box Combinator I developed for Lewis from “Resonant Filter,” which uses 2 Arps working together to provide some interesting sound design potential. The Combinator is fully programmed and you can switch out the sound sources if you like.

Download the Combinator: arp-box


Description: Lewis from “Resonant Filter” told me he really liked Arps, so I thought I would put another one together which focusses solely on utilizing the Arp within a Combinator, and providing for most of the control of the Arps from the Combinator. So this is an Arp Box Combinator I developed, which uses 2 Arps working together to provide some interesting sound design potential. The Combinator has full automation applied to the Rotaries and Buttons. Furthermore, it uses the Malstrom Curves to adjust some settings on the Arps (documented below).

Features: The “Arp Box” has several features associated with it. I was attempting to get a cross between a playful glitch-inspired machine and a traditional Arp. The following are the main features according to Combinator assignments:

Pitch Bend: This affects the Modulation Rate of both the Rate and Gate for the 2 Arps. Moving it down slows down the arp, while moving it up can speed up the Arp, and create a fast-pitch stuttering effect. Best used when performing for quick little quirky Arp changes.

Mod Wheel: This affects the mode of the Arps at the same time. Moving the Mod wheel changes the Arps’ progressions (either Up / Up+Down/ Down, etc.)

Rotary 1: Controls the Rate/Gate Malstrom’s A curve, which in turn affects the Rate of both Arps. Adjusting this Rotary cycles through the Malstrom’s 31 curves.

Rotary 2: Controls the Rate/Gate Malstrom’s B curve, which in turn affects the Gate Length of both Arps. Adjusting this Rotary cycles through the Malstrom’s 31 curves.

Rotary 3: Controls the Velocity Malstrom’s A curve, which in turn affects the Velocity of both Arps. Adjusting this Rotary cycles through the Malstrom’s 31 curves.

Rotary 4: Adjust’s the Thor’s Filter 3 Frequency.

Button 1: This turns the Arps’ Hold buttons on (when lit) and keeps Hold off (when not lit).

Button 2: Affects the Insert of the Arps. When the button is not lit, the Insert is 3-1. When the button is lit, the Insert is 4-2.

Button 3: When this button is off, the Arps do not respond to velocity shifting from the Velocity Malstrom. Velocity is constant. When turned on, the Velocity is shifted according to the curve in the Velocity Malstrom. Note that with the Velocity turned off, adjusting Rotary 3 has no effect.

Button 4: When this button is off, there is very little resonance applied to the Thor Filter (and as a result, the sound). When this button is turned on, a high resonance is applied to the Filter. There’s also a little more balancing going on in order to more closely match the volume between low and high resonance, but essentially this is a quick way to get a whole new sound out of the Arp Box.

Note: In addition to the above programming, you can use the Thor Filter underneath the 6:2 Line Mixer to set up the Delay and Chorus for some quick FX. Button 1 turns on the Delay, and Rotary 1 adjusts the Delay Time. Button 2 turns on the Chorus, and Rotary 2 adjusts the Chorus Delay. So you have a few additional parameters with which to work.

Usage: It can be used as is to insert an adjustable Arp in your tracks, played in a live performance setting, or used as a template with your own sounds. Just keep the Arps as they are and switch out the sound source to your own device or patch.

Other Notes: Feel free to change the Patches for the two NN-XTs or change the device to another sound source (either a Sampler or Synth). Also, you don’t have to have both devices playing the same sound at all. So experiment here first. Also, by default (and for the default sound of the Arp Box), the first arp is set to -1 Octave Shift, and the second Arp is set to -2 Octave Shift. This is so that the first Arp provides the main melody line, while the second Arp provides a bottom end. Depending on your sound, you may want to adjust this Octave Shift setting to whatever you wish. Also, if you don’t like the Low Pass Ladder filter in Thor, you can switch it to any other filter. Depending on your sound source, one of the other filters may suit your own patch better. Finally, if the Rate of the Arp is not to your liking, you’ll have to change this setting on one or both Arps manually. Though the Pitch Bend wheel affects the Rate, it may not be the best rate when the Pitch Bend is in its default position. Playing with the Rates on both Arps can produce some interesting sound designs.

Let me know what you think?

7 – Adjustable CV

Explore how to use Thor as a CV merger / splitter and Pass-Through, allowing you to set up the Combinator Rotaries so you can adjust CV levels and automate those CV changes. All of this without even breaking a sweat.

Let’s have the capability to freely adjust and automate some CV Trim Pots.

I knew that would get your attention. What? I can’t freely adjust and automate the CV trim pots on the back of the rack. What the hell is he talking about? Has he lost his mind.

Yes. I’ve lost my mind long ago. But I’ve recently found it and I’m here to try and provide a few workarounds to do things such as creating adjustable CV levels, as well as provide the ability to adjust merged and split CV sources. All without having to resort to the CV Merger/Splitter. Sound interesting? Well then let’s dig in. . .

When it comes to Thor, you’ve got a very powerful and, in my opinion, wonderfully versatile and variable sounding synth. But Thor can do a lot more than generate great synth sounds. It can perform a set of functions that no other device in the Reason arsenal can. In a previous tutorial I walked through various ways you could use Thor as an audio filter and explored a few practical uses of routing your audio through Thor. Here I’m going to explore how to use Thor as a CV merger / splitter, and furthermore, how using Thor can allow you to automate your CV trim pots, without even breaking a sweat.

The project files used for this tutorial can be downloaded here: adjustable-cv-examples. There are 6 Combinator Examples, outlining the types of tricks we’ll be doing with CV, Thor, and the Combinator Programming below. There is also the original sound source so you can compare that to all the other sounds in the 6 Combinator Examples. The Matrix tied to all the Combinators plays a single note “Drone” sound at 1/4 resolution. In order to test the examples, mute out the other channels in the main mixer except the one you are testing.

Using Thor as a CV Merger

  1. Create a Combinator, and inside the Combinator, create a 6:2 Line Mixer. Then holding shift down, create a Thor. Without holding shift down, create a Malstrom. Then once again, hold shift down and create a Subtractor.
  2. On the Subtractor, set Polyphony to 0, and press the Sync button on the LFO 1. Then duplicate the Subtractor 3 more times. On each new subtractor, select a different LFO waveform. You’ll now have 4 Subtractors with 4 different Waveforms.
  3. On the Malstrom, open the “Electric Yawn” patch under the Factory Soundbank (in the Malstrom Patches > FX folder). This is going to be our sound source.
  4. On the Thor, Initialize the Patch, and click the Show Programmer button. Turn off the Oscillator 1, and bypass Filter 1. Also click the “1” button next to Filter 1. Finally, add a Low Pass Ladder Filter into the Filter 3 slot. We’ll use 4 LFOs to affect the Filter 3 Frequency from the Thor, which in turn affects the Filtering of the Malstrom sound.
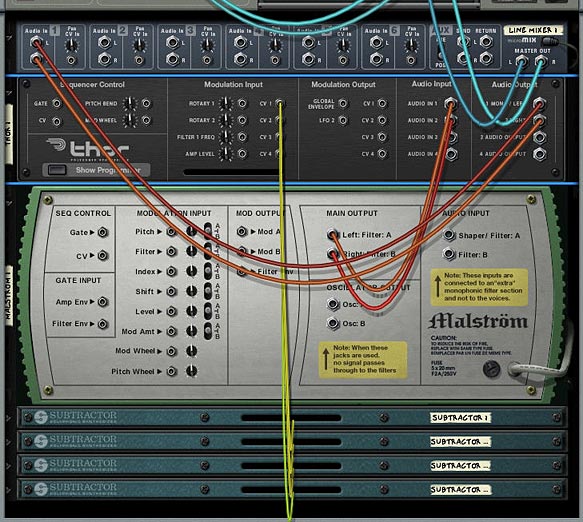
  5. Time to flip the rack around and do a little routing. Move the two audio plugs going into the Line Mixer, and plumb them into the Audio in 1 and 2 on the Thor inputs. Then plug the 1 Mono / Left and 2 Right outputs from the Thor into the Audio in on the Line Mixer’s first channel. Audio routing through Thor is setup.
  6. Next, on the back of the Subtractors, route the LFO 1 Output to the CV inputs on the back of the Thor; 1 for each of the 4 CV inputs on the back of the Thor.

    Merged CV Routing through Thor
    Merged CV Routing through Thor
  7. Flip the rack back to the front, and let’s move to the Thor’s Modulation Bus Routing Section (MBRS). On the right side of the mod bus, enter the following settings: Audio In1 > 100% > Filt3 L.In and on a second line on the right enter Audio In2 > 100% > Filt3 R.In. This sets up the Audio to be filtered through Thor.
  8. Next, on the left side of the MBRS, enter the following settings:
  9. CV In1 > 0 > Filt3 Freq.

    CV In2 > 0 > Filt3 Freq.

    CV In3 > 0 > Filt3 Freq.

    CV In4 > 0 > Filt3 Freq.

    Thor MBRS for the CV routings (left) and audio pass-through (right).
    Thor MBRS for the CV routings (left) and audio pass-through (right).
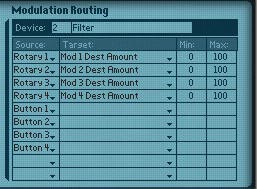
  10. Now let’s turn to the Combinator Programming. Let’s set up each Rotary to control the amount of CV applied to the Filter 3 Frequency. In this way, the Rotaries will work as the CV trim pots. So here’s where the magic happens. Set up the following modulation for the Thor:

    Rotary 1 > Mod 1 Dest Amount: 0 / 100

    Rotary 2 > Mod 2 Dest Amount: 0 / 100

    Rotary 3 > Mod 3 Dest Amount: 0 / 100

    Rotary 4 > Mod 4 Dest Amount: 0 / 100

    Combinator Programming
    Combinator Programming

This modulation setup means that you can control the Amount in the Thor Modulation Bus via the Rotary controls. It’s usually overlooked by many people. But at the bottom of the Thor’s Modulation Bus, after you scroll down through all of Thor’s parameters near the bottom lies the Modulation Destination Amount and Scaling Amount. In this way, you can control any one of the 13 modulation routings (amount and scaling).

To sum up, this Combinator we’ve created will use all 4 LFOs from the four Subtractors in unison to affect the Filter 3 Frequency of the Thor, which in turn affects the filtering of the sound source from the Malstrom. The true beauty of it all is that you can control the CV level using the Rotaries on the combinator. This works like a CV trim knob you’d find on the back of the rack.

Using Thor as a CV Pass-Through

Merging the CV signals and then controlling their level with multiple Rotaries on the Combinator are all well and good. But let’s say you don’t want to control any Thor parameters. What if you want to control an external CV source. For example, you want to control the “Shift” parameter on the Malstrom with a Subtractor LFO. This is pretty easy. Just route a CV connection from the Sub’s LFO to the Mal’s shift parameter on the back of the rack and you’re done. But you can’t control the Trim pot with this setup. So using the same kind of setup as above, here’s how you can use Thor as a Pass-Through for your CV source/destination, and at the same time tie the CV amount to a Combinator Rotary.

  1. Create a Combinator, and inside the Combinator, create a 6:2 Line Mixer. Then holding shift down, create a Thor. Without holding shift down, create a Malstrom. Then once again, hold shift down and create a Subtractor.
  2. On the Subtractor, set Polyphony to 0, and press the Sync button on the LFO 1. Select the Pulse Width waveform for the Subtractor.
  3. On the Malstrom, open the “Electric Yawn” patch under the Factory Soundbank (in the Malstrom Patches > FX folder). This is going to be our sound source.
  4. On the Thor, Initialize the Patch, and click the Show Programmer button. Turn off the Oscillator 1, and bypass Filter 1. Also click the “1” button next to Filter 1.
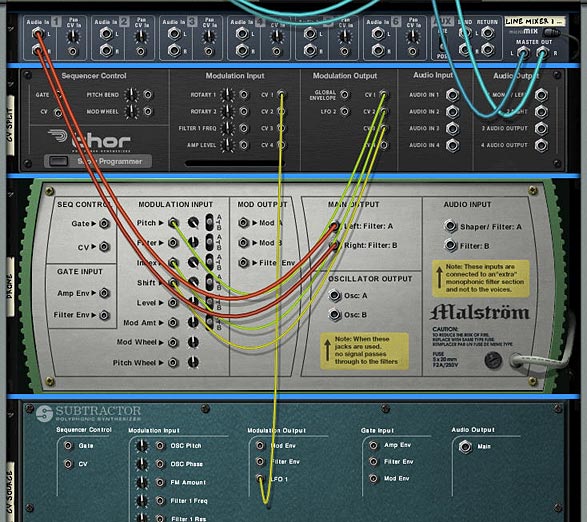
  5. Time to flip the rack around for our routing. On the back of the Subtractor, route the LFO 1 Output to the CV 1 Modulation Input on the back of the Thor; Then connect the CV 1 Modulation Output from Thor to the Shift Modulation Input on the Malstrom. Also turn the Shift Trim knob all the way right, so that it is completely controlled by the CV.
  6. Using Thor as a CV Pass-Through: Routing on the back of the rack
    Using Thor as a CV Pass-Through: Routing on the back of the rack
  7. Flip the rack back to the front, and let’s move to the Thor’s Modulation Bus Routing Section (MBRS). We only need one setting entered on the left side of the MBRS:
  8. CV In1 > 0 > CV Out1.

  9. Now we need to add one final programming setting on our Combinator. Open the Combinator’s Programmer, and set up Rotary 1 to control the amount of CV applied to the Shift parameter on the Malstrom. In this way, as before, the Rotary operates as the CV trim pot, moving from left (no CV applied) to fully right (100% CV applied). Set up the following modulation for the Thor:

    Rotary 1 > Mod 1 Dest Amount: 0 / 100

If you move the Rotary, you’ll hear the LFO  operating on the Shift parameter of the Malstrom. So now using this technique you can apply CV from any source to any device that has a CV input destination on the back of the rack, and also adjust the level of that CV source.

Note: if you are trying to control the Level parameter, it’s best to control your level from the Main mixer to which the sound source is connected. This way, when the Rotary is set all the way left (zero), the mixer’s channel fader will be used for the level. When all the way right (at 127), the Level is controlled 100% by CV. If, on the other hand, you try to control the level via the Malstrom’s Level CV, when the Rotary is at zero, no sound will be heard. When the Rotary is all the way right, you will hear 100% CV. So depending on what outcome you want, you may want to set this up one way or the other. The downside to routing CV from the Combinator to the Mixer’s Level CV destination is that you are setting up external routing from the Combinator. Not a problem if you save the file as an .rns instead of saving the Combi on its own. You can see this Level Pass-Through set up in one of the Combinators in the Project Files.

Using Thor as a CV Splitter

Next, we’re going to look at how you can split CV signals with Thor. This time, we’re going to send 3 CV signals to adjust 3 different CV destinations. Then we’re going to use the Combinator Rotaries to adjust the CV source level (thereby adjusting the CV amount applied to all 3 destinations at once).

  1. By now you should be getting used to the type of setup we’re using. This time we’ll create the Combinator, then inside create the Line Mixer, Thor, Malstrom (with Electric Yawn patch), and Subtractor (to use the LFO 1). Alternately, you can select and copy the Combinator from the previous example, since it already has this kind of setup created.
  2. Now we’ll flip to the back of the rack and connect the LFO1 Modulation output from the Subtractor to the CV 1 input on the Thor. Now, connect the Thor CV 1 output to the Malstrom Pitch CV input. Connect the Thor CV 2 output to the Malstrom Index CV input. Connect the Thor CV 3 output to the Malstrom Shift CV input. Finally, turn these three CV trim pots on the Malstrom all the way right.
  3. Using Thor as a CV Splitter: CV routing on the back of the rack
    Using Thor as a CV Splitter: CV routing on the back of the rack
  4. Flip the rack around again, and in the Thor MBRS, enter the following settings:
  5. CV1 > 0 > CV Out1.

    CV1 > 0 > CV Out2.

    CV1 > 0 > CV Out3.

  6. In the Combinator Programming, you can set it up 2 ways, depending. If you want to control all 3 parameters’ CV levels at once with a single Rotary, Select Rotary 1 as the source on 3 different programmer lines. Then create 3 different Destinations: Mod 1, Mod 2, and Mod 3 Dest Amount. Enter 0 and 100 for the Min / Max settings respectively. If, on the other hand, you want to have separate control over the 3 different parameters, You can change the Source so that Rotary 1 controls Mod 1 (Pitch), Rotary 2 controls Mod 2 (Index), and Rotary 3 controls Mod 3 (Shift). It all depends how you want things set up.

Note: I haven’t yet tried this, but I think you can invert the signal (just like the spider CV splitter has an “inverted” CV out). To do this in our setup above, you can set the min / max values from -100 to +100 respectively. This way, your Rotary knob will be at 0 when dead center. Moving the knob left will invert the CV signal, and moving the knob right will give a positive signal. Like I said, I haven’t tried it out, but I think I’m on solid ground here.

So there you have it. Thor can merge CV signals together, split CV signals to send the same signal to multiple destinations, and can be used as a pass-through for CV signals to affect other devices via CV. While you can do all of this with the Spider Merger/Splitter, the advantage Thor offers is that you can adjust the level of CV incoming from the source and applied to the destination, and automate this in the sequencer via the Rotaries on the Combinator. This is something that cannot be done using the Merger/Splitter alone. I hope this leads you into other avenues of exploration with Thor and CV modulation. If you have any other ideas that come to mind, please let me know. And if you have anything to add to this, please comment. I’d love to hear your thoughts.

What Makes Ambient?

According to Wikipedia, Ambient Music is a musical genre that focuses largely on the timbral characteristics of sounds, often organized or performed to evoke an “atmospheric”, “visual” or “unobtrusive” quality. But what makes Ambient?

Ambient Music is defined by Wikepedia as:

Ambient music is a musical genre that focuses largely on the timbral characteristics of sounds, often organized or performed to evoke an “atmospheric”, “visual” or “unobtrusive” quality.

From Deepintense:

Atmospheric – Environmental – Mood Inducing – Music. This style of music is characteristically undefinable because it incorporates so many different styles, sounds, and moods. However it can be recognized as being atmospheric in nature. The sounds work together to create a space where sound becomes the encompassing theme, mood and character of the immediate environment. According to many sources: the term ambient music was first used by the ambient music legend Brian Eno.

I would also highly recommend reading the Wikepedia article and perusing the Deepintense site, as they go through the History of Ambient music from the early 20th Century to the present, and provide several examples along the way, as well as further reading.

Aside from that, there are a few characteristics with Ambient music that I have found:

  1. Heavy usage of Pad sounds and progressive modulation.
  2. Ambient attempts to create a mood, rather than create something purely pumping or hard or even rhythmic.
  3. Ambient encourages experimenting with sound, and in that, it is experimental.
  4. Ambient focusses the listener away from the music, instead of inward toward the music. The ideas behind ambient are to create a background, or create something that can be passively perceived. The focus is not squarely centered, but rather, it is diffuse and best listened to at the edges or periphery. Taking this thought into the visual. An image of a car crash will focus the viewer straight at the crash scene, while an image of a vast impressionist landscape will focus the viewer toward the edges on the visual periphery, without any focused location.
  5. Ambient music provides a texture, and is more concerned with melody than beat. Whereas Pop music is the opposite. It is more concerned with the beat of the music than the melody. Though both still do play a part in each genre.
  6. Ambient music is also not the same as muzak or elevator music. While elevator music attempts to rehash traditional songs into a mindless subtle background, I think Ambient tends to contain more exploration and depth. Elevator music tranquilizes you. Ambient music surrounds you and takes you in for a soft and subtle journey that can be admired and thought about. It’s intelligent and takes some thought. While muzak takes no thought at all.

And one other note about genres. If you’re interested in looking closer at various Electronic genres, there’s a great site with lots of sound examples which attempts to categorize all that is considered “Electronic.” Visit Ishkur’s Guide to Electronic Music if you’re interested.

What are your thoughts on Ambient Music?

6 – Vocoder Arp Machine

A very flexible Combinator mashup that plays an Arped up Thor run through a Vocoder. A second Thor is used to modulate the sound. Use this Combinator as a template to drop in your own Thor patches and then take it out for a spin at your next live gig. All the Combinator parameters are assigned to toy with the Arp / Vocoder settings. After all, the more flexible the Combinator is, the more use you will get out of it.

I was looking through eXode’s fabulous collection of free patches and combinators in his massive synthesis refill (available from the Propshop’s Free Refill Download Page – A must have for anyone who is looking for a great collection of new sounds!) when I came across a few patches that were hidden away with (arp) in parentheses after the patch names. Being one who loves a good arp sound I started to delve a little deeper into how it was put together. So this became the inspiration for this project. It fuses an arp with two thors — one for the modulation and another as the carrier, and both Thors feed through a Vocoder to the final output.

Now taking things a few steps further, I decided to deviate from what eXode did and add on a few modifications. Firstly, the sounds I used were completely my own (I didn’t want to copy eXode’s brilliant work). And I then took things another step further by assigning parameters to the Combinator rotaries and buttons. This way, you can use the Combi as a performance tool as well. And you can experiment with your own Thor sounds for the carrier and change the way the vocoder operates by toying with the Thor synth parameters, creating your own endless variety of Arp Vocoder machines.

So this is a bit of a mashup, being a Combinator that plays just fine as it is, or used as a template where you can drop in your own Thor patches. Finally, it can be used in live performance, since all the Combinator parameters are assigned for this purpose. After all, the more flexible the Combinator is, the more use you will get out of it.

The project files can be downloaded here: vocoder-arp. It contains an .rns file with a single Combinator which is pre-programmed to most of the major parameters you’ll need to adjust the Filter Frequency, Arp and Vocoder parameters.

Setting up the Vocoder Arp Template.

  1. First, create a Combinator, then inside the combinator create a 6:2 Line Mixer, Thor, RPG-8 Arpeggiator, BV512 Vocoder, and then holding Shift down (to disable auto routing), create another Thor. Flip the rack around and route the bottom-most Thor’s 1 Mono / Left Output to the Modulation input on the Vocoder. This is the basic setup for the arped-up vocoder. The first Thor in the Combi is the carrier, and an Arp is tied to this Thor. In other words, this is the main sound going into the Vocoder. The second Thor in the Combi is used to Modulate that Carrier sound through the Vocoder.
  2. Next, holding Shift down, create two Spider CV Merger/Spliters below the Combinator’s Line Mixer. Then hold Shift down and create a Matrix at the bottom of the stack. Set the steps to 4 and the resolution to 1/4th. Switch the Matrix mode to Curve, flip the rack around to the back and switch the curve mode to Bipolar. Then flip the rack around again and set up a curve pattern so that step 1 and 3 are +64 and step 2 and 4 are -64.
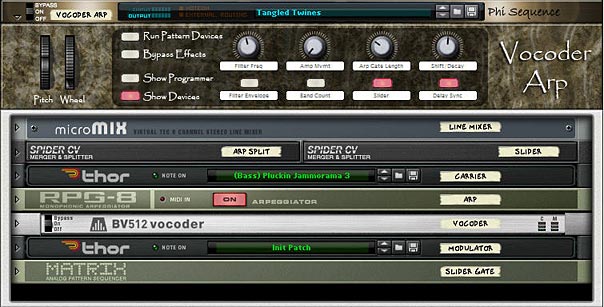
  3. The front of the Vocoder Arp with all devices
    The front of the Vocoder Arp with all devices
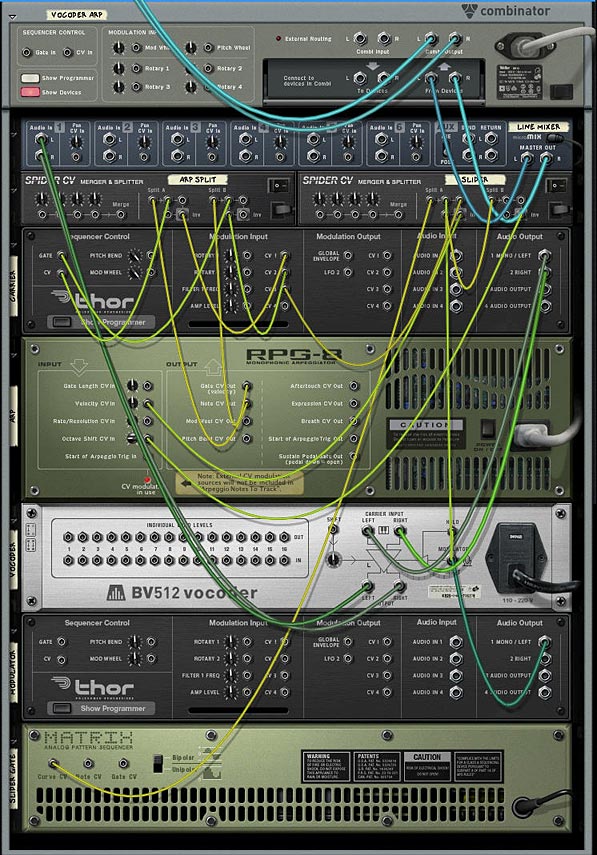
  4. Flip the rack around and on the first Spider connect the Arp Note CV out to Split A in and the Arp Gate CV out to Split B in. Connect one of the splits from Split A to the Carrier Thor’s CV in. Then connect the inverted split from Split A to the  Carrier Thor’s CV1 Modulation input. Connect one of the splits from Split B to the Carrier Thor’s Gate input, and another split from Split B to the Carrier Thor’s CV2 Modulation input.
  5. On the second Spider connect the Curve CV output from the Matrix to Split A’s input. Then connect one of the splits from Split A to the Split B input on the same Spider. Connect another split from Split A to the Vocoder Hold input. Connect the third split from Split A to the Carrier Thor’s CV3 Modulation input. Then connect the inverted split from Split A to the Arp’s Velocity CV in. on the Spider’s Split B, connect the inverted split to the Arp’s Octave Shift CV in. That just about does it for the CV routings. Luckily you can see the Combinator for yourself when you download the project files, because that was a mouthful. But it sounds more complex than it actually is.
  6. Moving to the Arp, and while you’re on the back of the rack, remove the CV cables from the Mod Wheel and Pitch Bend CV out. This way when you use the Pitch Bend, it will only affect the Thor Carrier’s Pitch Bend setting. Now flip the rack around again. Set up the Arp with an Octave Range of 2, and Insert set to Low. On the Vocoder, set the Attack to 8.
  7. The back of the rack with all the routings in place
    The back of the rack with all the routings in place
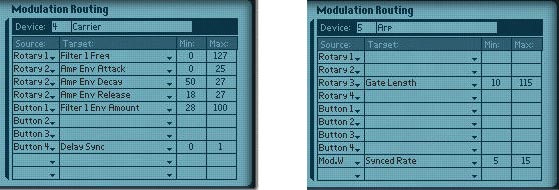
  8. Now we move to the Combinator programming. Click the Show Programmer button and enter the following settings:

    For the Thor Carrier:

    Performance Controllers > uncheck the Mod Wheel

    Rotary 1 > Filter 1 Freq: 0 / 127

    Rotary 2 > Amp Env Attack: 0 / 25

    Rotary 2 > Amp Env Decay: 50 / 27

    Rotary 2 > Amp Env Release: 18 / 27

    Button 1 > Filter 1 Env Amount: 28 / 100

    Button 4 > Delay Sync: 0 / 1

    For the Arp:

    Rotary 3 > Gate Length: 10 / 115

    Mod.W > Synced Rate: 5 / 15

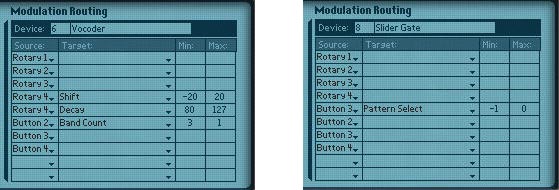
    For the Vocoder:

    Rotary 4 > Shift: -20 / 20

    Rotary 4 > Decay: 80 / 127

    Button 2 > Band Count: 3 / 1

    For the Thor Modulator:

    Performance Controllers > uncheck the Pitch Bend and Mod Wheel

    For the Matrix:

    Button 3 > Pattern Select: -1 / 0

  9. The Combi's mod programming for the Thor Carrier (left) and Arp (Right)
    The Combi's mod programming for the Thor Carrier (left) and Arp (Right)
    The Combi's mod programming for the Vocoder (left) and Matrix (right)
    The Combi's mod programming for the Vocoder (left) and Matrix (right)
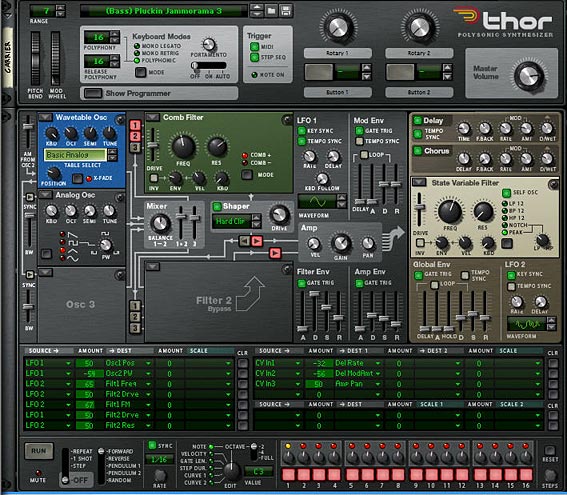
  10. Now flip the rack to the front now, and load up your favorite patch in the Thor carrier. Usually a bright lead will work best, but experiment with any sound you like. You can take a look at how I programmed the Thor in the image below. I won’t go into all the settings that were used. You can pretty much see them here. However, there are some core settings that are needed in the Modulation Bus Routing Section (MBRS) in order to have the Combinator function properly. On the right side of the Bus, create the following routings*:

    CV In1: -32 > Del Rate

    CV In2: -56 > Del ModAmt

    CV In3: 50 > Amp Pan

  11. The front of the Thor Carrier
    The front of the Thor Carrier
  12. Add a matrix below the Combinator so that it is playing the Combi. Then enter a pattern and hit play. This tests out the sounds of the Combi as you experiment with your Carrier and Modulator. For the modulator, you usually want something atonal or heavy on the noise. Unmusical is best. Droning is perfect to affect your carrier signal. This is the fun part where you toy with the Thor until you get something you like. The nice thing is that you have a wide variety of sounds to choose from using the Thor synth.

An explanation of the Combinator Programming

Pitch Bend: This affects only the Thor Carrier as you would expect a pitch bend to operate.

Mod Wheel: The Mod Wheel controls the Arp’s Synched Rate from 1/4 to 1/128th. You can use this as a performance controller to create some interesting arp variations. Let your ears be your guide on this one.

Rotary 1: This controls the full range of the Filter 1 Frequency from the Thor Carrier. Fully left and the filter is closed, fully right and the filter is fully open.

Rotary 2: This controls the Amp’s Attack, Decay, and Release from the Thor Carrier. Fully left and you’ll have very short ADR setting. Fully right and you’ll have much longer ADR settings

Rotary 3: This controls the Gate Length on the Arp. This is one of my favorite settings to play with because it can drastically alter the sounds coming from the Arp. Fully left and you have very short note lengths where the notes are staccato. Turn the knob fully right and you’ll have very long notes – to the point where the notes blend into each other much more smoothly (legato).

Rotary 4: This controls the Shift and Decay of the Vocoder at the same time, affecting the phase of the sounds you hear. This actually shifts the filters of the Vocoder’s Carrier signal down (turning the knob left) or up (turning the knob right). This can be a fun parameter to play with, and you’ll have to experiment to hear what sounds pleasant to you.

Button 1: This controls the filter envelope for the Thor Carrier’s Filter 1. Use it as a sound mode switch, and as with the Rotary 4, you’ll have to hear what sounds pleasant to your ears.

Button 2: This adjusts the band count of the Vocoder. When off, Vocoder has 32 bands. When turned on, the Vocoder has  8 bands. One note about this button: it takes a little time to catch up with itself when you alter the bands. So this may not be great for performance, and you might want to keep this button either on or off. But it’s great fun to test out your sounds through different band counts. If you don’t like these settings, you can change them in the Combinator’s Programmer to switch between any 2 bands you like.

Button 3: For lack of a better word, I named this button “Slider” — as it sounds like the notes from the Arp are being slid on the last beat of the bar. In addition, the Slider button will Pan the sound from left to right in the stereo field based on the Panning settings that were set up in the Carrier Thor’s MBRS. Remember that CV3 in we set up in the Carrier Thor? That’s affecting the Pan of the signal. In addition, the Matrix we placed at the bottom of the Combinator Device Stack is waving the sound up and down like a pulse wave. With a resolution of 1/4, the signal is synched to the 4 beats of a 4/4 tempo. But the Slider does a bit more than that. It also controls the Hold parameter of the Vocoder via CV. This means that on the fourth beat of the bar, the Vocoder is held for the duration of that last beat (one full 1/4 note). Finally, it also controls the Velocity and Octave Shift of the Arp. Yep. One of those spiders and the matrix were set up to perform a simple switch. But I thought it was a pretty cool way to affect the signal. When you turn the button on, it starts up the Matrix pattern to control everything via CV. When you turn it off, the Matrix doesn’t play any pattern at all, essentially shutting down the CV triggers.

Button 4: Finally, we have a simple switch which either keeps the Global delay of the Thor Carrier free running (when left off), or synched (turned on).


* One note about switching the Carrier Thor’s patch. If you switch the patch, you’ll have to remap the settings in the Modulation Bus section for the CV1, CV2, and CV3 sources (all the settings on the right side of the Modulation Bus section). Otherwise, the Delay and Slider functions won’t work properly. Alternatively, you don’t have to switch the patch at all. You can play with the settings in the note / global sections of the Thor until you come up with a sound you like. Point is that since this Combinator is so heavily programmed, switching patches requires a little more tweaking than normal.

Switching patches in the Modulator Thor won’t require any remapping because none of its parameters are used externally.

Any thoughts on this setup? Any ways you can see to improve it? Let me know what you think. . .

What Makes Glitch?

According to Wikipedia, Glitch is a term used to describe a genre of experimental electronic music that emerged in the mid to late 1990s. The origins of the glitch aesthetic can be traced back to Luigi Russolo’s Futurist manifesto The Art of Noises. But what makes good Glitch?

As defined by Wikipedia:

Glitch is a term used to describe a genre of experimental electronic music that emerged in the mid to late 1990s. The origins of the glitch aesthetic can be traced back to Luigi Russolo’s Futurist manifesto The Art of Noises, the basis of noise music. In a Computer Music Journal article published in 2000, composer and writer Kim Cascone used the term post-digital to describe various experimentations associated with the glitch aesthetic. Glitch is characterized by a preoccupation with the sonic artifacts that can result from malfunctioning digital technology, such as those produced by bugs, crashes, system errors, hardware noise, CD skipping, and digital distortion. Cascone considers glitch to be a sub-genre of electronica.

Production Techniques: Glitch is often produced on computers using modern digital production software to splice together small “cuts” (samples) of music from previously recorded works. These cuts are then integrated with the signature of glitch music: beats made up of glitches, clicks, scratches, and otherwise “erroneously” produced or sounding noise. These glitches are often very short, and are typically used in place of traditional percussion or instrumentation. Skipping CDs, scratched vinyl records, circuit bending, and other noise-like distortions figure prominently into the creation of rhythm and feeling in glitch; it is from the use of these digital artifacts that the genre derives its name. However, not all artists of the genre are working with erroneously produced sounds or are even using digital sounds.

Popular software for creating glitch includes trackers, Reaktor, Ableton Live, Reason, AudioMulch, Bidule, Super Collider, Usine, FLStudio, MAX/MSP, Pure Data, and ChucK. Circuit bending — the intentional short-circuiting of low power electronic devices to create new musical devices—also plays a significant role on the hardware end of glitch music and its creation.

Great. But what makes good Glitch? I’ve often pondered this question and think I’ve come up with a few characteristics of the genre.

  1. First, Glitch music has to have some balance of “randomness” or “chaos” and structure. It’s the tension between these two that give the song its listenable and deep quality. Something to be thought about, something difficult, and something that is not easily taken in by a single pass.
  2. Second, I think good Glitch music explores sonic possibilities, or rather, sonic IMpossibilities. If you listen to the works of Autechre and Aphex Twin, some of their glitchiest of tunes are interesting sonically because they use sounds that are not created by traditional musical instruments, and they explore speeds at which no human can play, even if they were created from a human instrument. Or, they create layers of sounds that are so out there and other-worldly that people would question the notion of the sounds being musical at all.
  3. Third, Glitch is not imitative. It does not try to mimic anything found in nature, but rather tries to break new ground by creating something completely new that you wouldn’t necessarily find in nature. I think this is why a lot of glitch artists turn to mechanic or machine sounds to create their music. It takes them further away from nature and more in the realm of the “man-made.” It’s not organic sound. It’s synthetic.
  4. Fourth, good glitch makes you think. Period. Perhaps that’s why us Americans refer to it as “Intelligent” Dance Music (or IDM). And while I know my brethren in the U.K. cringe at this very notion of terming any kind of music “Intelligent” (the argument as I see it stems from the fact that by labelling any one music “Intelligent” you automatically relegate all other music into the “non-intelligent” dogpile — something which I doubt was ever intended), I still think that you have to use what’s between your ears to fully appreciate glitch. I’m not saying any other music is any less intelligent or intellectual. But Glitch is not pop either. It’s not for the masses, and it’s not for those that want to immediately glean everything from one listen. It’s not background music.
  5. Finally, I think good Glitch uses the unexpected and surprising to capture or hold one’s attention. Whereas most music uses traditional hooks, such as filter openings, drum fills, or other crafty ways to keep a listener’s attention, I think Glitch tends to use more chance happenings and unexpected “free-for-alls” to keep you moving forward through the track. For example, a sudden switch from a wide-open reverb to a small space reverb, or a sudden jump in EQ. Or perhaps a major shift in tempo (as Autechre is fond of doing). All of these things seem to pay homage to the origins of the word Glitch: “erroneously” produced or sounding noise. The art of mistakes.

I would say if anyone has a further interest in the subject, they should definitely read up on the Art of Noises, a Futurist manifesto written by Luigi Russolo in 1913. A nice little summary can be found on Wikipedia. If Russolo were alive today, I think he’d be a fan of works by Autechre and Aphex Twin. I think he’d be supremely impressed at how we use computers as tools to create an infinite array of “noise-sounds” which we couldn’t create before. What I find very interesting is how so many sound designers work so hard to re-create sounds of traditional instruments. I think if Russolo were around he’d probably encourage them to forget about traditional instruments and instead focus on creating new experimental sounds that are unlike anything we’ve heard before. But perhaps that’s a thought for a future(ist) post.

What are your thoughts on the subject?

5 – Create a Grain Sampler

Learn how to create your own homemade grain sampler. This allows you to take a single sample, and affect the playback, sample start position, Repeat length, Grain Length, and Filter Frequency, among other things.

If you’ve ever used the Malstrom in your projects, you’ll undoubtedly see the benefit of grain synthesis. It’s like sound design under a microscope, as you can take a very short piece of sound and chop it up into little bits and start/stop the playback where you like. The fact that you can’t add your own grains into the Malstrom is somewhat disconcerting, but there’s a simple way you can create your own grain sampler, where you can add any sound and use that sound as a grain. This can be very effective in adding some new creative spark to your musical projects. And it opens you up to adding any sound you like and deconstructing it as you see fit. So let’s see how we can do this.

The files used for this project can be downloaded here: grain-samplers. It includes 4 Combinators that are set to play a clip of random notes on the sequencer. To try each one out, you’ll have to mute all the other Combinators via the Main mixer channel. I’m sure this is self-evident, but it never hurts to explain it here. As always, this is open source so feel free to use it in your own projects. Just please provide a link back here or a credit or kudos of some kind. After all, I do this for free. 🙂

Creating the Basic Grain Sampler

  1. Start by creating a Combinator, and in the Combinator create an NN19, Subtractor, and Matrix in that order. 
  2. The NN19 is what we will use to contain the sample or “Grain Table.” This is our sound generating device. So starting there, initialize the device so we have a base from which to start. Bring the Polyphony down to “1,” and set the Spread Mode to “jump.” Finally, change the Pitch Bend  Range to “0.” Don’t worry, I’ll explain why we made all these settings after we’ve set everything up.
  3. Load up your favorite sample into the NN19. You only need one. Alternately, you can wait until the end of the setup to load your favorite sample. If you load the sample at the end of this procedure you can then test out the various samples and play around with them at will using the Combinator rotaries that are going to be setup in just a minute. But for now, just have something loaded so you hear some sounds.
  4. Moving to the Subtractor, bring the polyphony down to “1,” and change the Pitch Bend Range to “0.” More importantly, change the Mod Envelope settings to the following: A=0, D=0, S=127, R=0.
  5. On the Matrix, change the number of steps to “1,” and raise the gate to 127 on the first step.
  6. Turning to the back of the rack, there’s really very little to cable. First, cable a CV connection between the “Mod Env”  in the Modulation Ouptut section of the Subtractor to the Level input on the NN19. Also, raise the pot next to this input to 127. Second, cable a CV connection from the LFO1 on the Subtractor to the Gate input on the NN19. Third, cable a CV connection from the Gate CV on the Matrix to the Subtractor’s Sequencer Control Gate input.
  7. The basic cabling for our Grain Sampler
    The basic cabling for our Grain Sampler
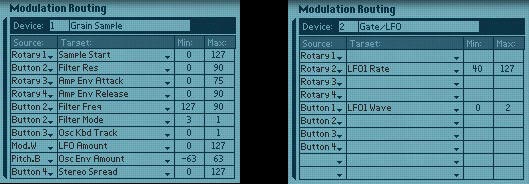
  8. Now comes the fun part: Programming the Combinator. Flip the rack around to the front and show the Combi’s programmer. Here are the settings that we have to make:

For the NN19 (Grain Sampler):

Rotary 1 > Sample Start: 0 / 127

Rotary 3 > Amp Env Attack: 0 / 75

Rotary 4 > Amp Env Release: 0 / 90

Button 2 > Filter Res: 0 / 90

Button 2 > Filter Freq: 127 / 90

Button 2 > Filter Mode: 3 / 1

Button 3 > Osc Kbd Track: 0 / 1

Button 4 > Stereo Spread: 0 / 127

Pitch.B > Osc Env Amount: -63 / 63

Mod.W > LFO Amount: 0 / 127

For the Subtractor (LFO):

Rotary 2 > LFO1 Rate: 40 / 127

Button 1 > LFO1 Wave: 0 / 2

The modulation for the NN19 Sampler (Left) and the Subtractor (Right)

Here is an example of the various things you can do with a basic grain sample:
[ti_audio media=”277″ repeat=”1″]

Explanation of the Functionality

Now for some explanation. The NN19 acts as the grain sampler and the heart of everything. This is why it’s so heavily programmed. The amplitude is controlled by the Subtractor because we set up the Mod Envelope’s Sustain to 127, and cabled the cv from the mod envelope to the level input. And the mod envelope of the subtractor remains “on” because we are sending a gate signal from the matrix. This is simple and effective, and makes our grain sampler very “light weight” by only containing 3 devices.

But don’t let this simple setup fool you. The way we programmed everything gives you a very wide degree of control over the sound — and that sound can be any sample you choose to load into the NN19. Let’s take a peek at what’s going on at the front of the Combinator.

Pitch Wheel: This is set to control the oscillator envelope amount from the NN19.  This is probably one of the coolest and freakiest uses of the Pitch Wheel you could have, and is great for mangling sounds into weird and wonderful effects. 

Mod Wheel: This is set to control the LFO amount on the NN19, for more strangeness, giving the sound a warped and warbled effect.

Rotary 1: Controls the Grain Index, much like the Malstrom’s “Index” function operates. What this is doing is controlling the start position of the sample on the NN19

Rotary 2: This controls the rate of the LFO from the Subtractor, or the speed of the grain playback. All the way left and you get a very slow speed, but turn up the knob and it can get extremely fast.

Rotary 3: Controls the Amp Envelope Attack of the NN19. All the way left gives you fast attack, and all the way right gives you a slow attack.

Rotary 4: Controls the Amp Envelope Release of the NN19. All the way left gives you a short release, and all the way right gives you a long release.

As for the buttons, they are all set up to provide some further sound morphing capabilities.

Button 1:  Switches the LFO Type on the Subtractor. You can program this button to switch between any 2 of the 6 LFOs available on the Subtractor, depending which ones you like best.

Button 2: Controls the Filter mode of the NN19. When off, it uses the default LP12 settings, with a fully open frequency and no resonance. Turn it on, and it turns into a HP filter with the frequency somewhat open, and the resonance dialed up high.

Button 3: This is a very important button in my estimation. It controls the Keyboard Tracking of the Grain Sampler’s Oscillator. This is going to largely depend on how you want the notes in your sequencer to be played by the Grain Sampler. If you look at the project files included here, you’ll see I placed a bunch of random 1/32 notes in a clip on the sequencer. The notes are all different pitches between C2 and C4. If you leave the Key Track button off, the pitch of the notes do not affect the sound. The sound remains constant. If you turn the Key Track button on, then the pitch of the sequencer notes affect the Grain Sampler’s oscillator, and have an affect on the pitch heard. To me, this gives you a great deal of control over how you play your sequencer clips. All with a simple switch.

Button 4: This controls the Stereo Spread of the Sample playback. With this button turned off, there is no spread. With it turned on, full spread is applied across the entire stereo field. Also, since “jump” was selected on the NN19’s Spread mode, it will jump back in a random fashion between the left and right fields.

Exploring Alternate Grain Sampler Ideas

Now that we have the basic grain sampler idea laid out, there’s a few variation Combinators that are included in the project file which you can explore in greater detail. I’ll lay out some of the highlights here.

Mal Grain Sampler: This Combinator inserts a Malstrom and uses it’s “A Curve” in place of the Subtractor’s LFO. It’s then tied to the Rotary 3 on the Combi, so you can use any one of the 31 Curves to affect the gate of the Grain Sampler. The “B Curve” is also plotted to the Oscillator Pitch on the Grain Sampler, and is also plotted to the Rotary 3 on the Combinator. Button 1 on the Combinator turns the B Curve on or off. This means that when you press button 1, it creates all kinds of weird sound morphing (or pitch morphing) to the sample, based on the position of the Rotary 3 knob.

Thor Grain Sampler: This Combinator uses the Thor’s LFO in place of the Subtractor. This isn’t that big of a deal or much of a change. But what’s nice about the Thor is that you can map the Thor’s Sequencer Curve 1 to affect the Oscillator Pitch of the Grain Sampler. Turning on Button 1 on the Combinator starts Thor’s sequencer to Run and provides some Pitch shifting to the sample. The added benefit of using the Thor is that you’re not limited to using the Global parameters. Since the Thor Gate is always on, you should be able to utilize any of the Thor parameters to affect your sample sound. You just need to program them in the Modulation Bus Routing System (MBRS).

Triple Thor Grain Sampler: This Combinator layers 3 Grain Samplers together, all playing different samples. The curves on the 3 Thor’s are all different, and the Mode of the step sequencers in them are set to play randomly. This creates a lot of pitch variation when you press button 1 on the Combinator. Instead of Rotary 3 and 4 affecting the Attack and Decay of the Grain Samplers, I set them to control the level of Sample B and C respectively through a line mixer at the top of the Combi stack. This way, the sample you add into the “Sample A” NN19 is always playing at full level, while Sample B and C’s levels can be adjusted (I didn’t want to give up the functionality on either of the first two rotaries, so that’s why Sample A is always at full level. However, you can create a sequencer track for the Line mixer and adjust the level via automation in the sequencer if you like). Try adjusting the programmer settings on the first two rotaries if you want to have the various samplers playing at differing speeds and at different index points. This can create some pretty elaborate sound designs.

As a final tip, you can try automating the Rotaries for any of the Combinators to randomize things. I would also suggest you read a great article by Lewis72 on the art of Granular Synthesis on his blog. He also created a very nice grain sampler which you can download for free. If you find any other ideas out there on the web on the art of Grain Sampling within Reason and Record, please feel free to post them here in a comment. And if you find these useful or create something interesting with them, please let me know. I’d love to hear how you can use these in your own work. All my best!

Panning to Punch out your Mix

Kevin Parks is a former architectural designer, artist, and boatbuilder with a life-long love of music. Learn how he uses Panning in Record to punch up his mixes, giving them enough sonic space to have a fighting chance.

Your mastering will go a lot better when your mix is fine tuned.

These are some procedures that have evolved for me through time, advice, and experience. Everyone’s work flow is different, but we are all trying to solve the same sorts of problems, so I hope what follows will add something to your bag of tricks.

Before adding a lot of FX to try to punch out a mix, there are some things I like to do to give my mixes enough sonic space to have a fighting chance.

Working with Audio

First of all, since Record gives us audio capability now, let’s start with audio.

For all audio recording, I want to get the cleanest signal possible going into my computer.  Electronic noise takes up space better used for actual audio content.

I spent weeks routing and re-routing cables, getting rid of bad connections, separating all my power cords from my audio cables, and gain-staging to get the cleanest signal I could going into my computer.

While my input signal is *much* improved, it isn’t perfect, and electronic noise is cumulative. So if you mix a lot of tracks, each with a little noise, it adds up. If you don’t have noise reduction software, what can you do?

One thing you can do about that in Record is to use the razor tool and cut out the silent stretches in each audio track.  That will eliminate your hardware’s noise profile, at least from those stretches.  Nothing worse than teaching people’s ears how to tune into the static, just as they are ready for the music to start. This can make a really surprising difference. Noise can hide rather nicely within the audio content when the listener isn’t being trained how to hear it.

So now that we have gotten off to a good start by getting rid of obvious  problems with the audio tracks. Now what?

Next step , before adding a lot of FX to the mix, is to make sure to give all your tracks a place to be in the mix,  their own sonic space. No sense to start cutting freqs with EQ to solve problems that will go away with proper panning.  So start out with panning before using EQ.

To pan your tracks well, the first thing to consider is what goes center stage?

Be careful not to stack too many things in the center. 

Keep in mind that bass  frequencies are non directional to a great extent, so try to avoid panning low freqs very far if at all. The farther you pan a low frequency track the muddier your mix will get. (I have sometimes panned a bass and a kick a little bit, say 10-15%, and then gone back later to help separate them with some judicious EQ work.)

Separate freq ranges work OK together in the center, but if the freqs are too close to each other it will get “crowded” very quickly.  Think in terms of low, medium and high frequencies, and choose what  tracks you will stack in the center. Then  preview just  those tracks in your center channel.  You can try out different instruments until your center shines.

Next idea to remember:  The higher the frequency, the easier it is for it to sit farther from center. Since I use a lot of guitar tracks, I often balance the rhythm and lead guitars by placing them approximately the same distance from center, say 30-50%.

I like to continue to keep balance in my mix by pairing up higher freq tracks and placing them likewise the same distance apart. Higher freq tracks I place farther out than the guitar tracks. More often than not, it is better not to go all the way to 100% .  

Placing higher freqs farther apart is a good rule of thumb to start off with. I  get a sense of how many pairs I have and then divide up the space between pairs accordingly. Then preview different ideas; it’s fun, it’s free, and it’s going to improve your mix.

On the psycho-acoustic side, keep in mind that people tend to rely more on their right ear for things that they pay more attention to, so I like to place the lead somewhat, but not extremely, to the right. It helps hold peoples attention.

So remember,  you will need to do less fiddling with EQ when the tracks each have their own place in the sound field. Panning is powerful stuff.

Now, just to touch on EQ and Reverb:

OK, at this point,  panning has just given you the ability to place your tracks/instruments in different locations from left to right across the sound field. Then if there is a conflict, if  there is an instrument or track that is masking another one, then use EQ to tweak that  problem specifically.  Using a bass track and a kick drum as an example, solo those two tracks and tweak the EQ gently on each  until you can hear them both clearly. (Research this aspect if necessary.) 

Apply reverb last: Now I evaluate where I need/want reverb. Reverb will push a track farther back in the mix.  Sometimes you might need some reverb on a guitar track to help it cut through the mix. I often like to give my guitar tracks an ethereal feel with reverb. Avoid using reverb on low freqs; it makes muddy, harmonics. Reverb is much more pleasant and clean when used on higher freqs.

Once in a while I find that a *little* reverb applied globally to the finished song, can help integrate the tracks. Be careful though. If you are having to do very much of that, chances are that there is a track that needs more attention.

That’s all for now.  Knock ’em out, baby!


Kevin Parks is a former architectural designer, artist, and boatbuilder with a life-long love of music.  Translating uncharted realms of emotion using rhythm, space, and harmony..weaving real world instruments and software synths into experiential ambient synthesis. You can visit his website at http://www.soundclick.com/ambientsynthesis where he showcases several of his musical works.

My Reason/Record Wishlist

Reason and Record together constitute one of the best all-in-one music creation and sequencing packages. I’ve tried out most all of the major DAWs out there, and I keep coming back to Reason and Record time and again. So here is my wishlist of items I’d like to see in future versions of the software; in no particular order.

Let’s just say Reason and Record together constitute one of the best all-in-one music creation and sequencing packages. I’ve tried out most all of the major DAWs out there, and I keep coming back to Reason and Record because of a few things: a) it’s easy and intuitive. This is the biggest draw for me. b) it allows me a wide latitude in sound creation. Sure some of the FX are a little lacking, but nowhere else can I create my own setups in such a simplistic way without having to know any programming or high level math. c) It’s instant and quick. Yes, I’m a little ADD, and I just love the fact that Reason and Record caters to me. I can jump in and add midi and audio tracks in a snap. I can go with an idea and get sidetracked into all kinds of wonderful tangents. It’s great. d) Finally, it’s stable and light-weight. My computer isn’t struggling unless I have an insane amount of Thors packed into a project. Sure I’d love access to VSTs but not at the expense of stability. Besides, I could spend a lifetime alone exploring the factory soundbank alone (not to mention all the great refill packages out there). So why go further.

All that being said, here is my wishlist of items I’d like to see in future versions of the software, in no particular order. I’m sure there are lots more that could be added, and this list is not meant to be exhaustive. It’s just a few of the major things I’d like to see in future versions.

For Record:

  1. Automatic Routing of the Reason mixer channels to the Record Main Mixer. Right now you can bring Reason songs into Record, but there is no mixer routings set up. You have two options: delete the mixer in Reason and then open the song in Record so that all devices get their own channels, or you can manually reroute in Record once your song is brought in. A user preference or dialog which opens and allows you to select the mixer you want to automatically route to separate channels should be available so that bringing a completed Reason song into Record maps all the Reason channels to new channels on the Record main mixer. Maybe in the next version PLEEEEEEZE!
  2. Comping for Midi as well. The new Comping Feature is great. Love it. However, it is reserved for Audio Lanes. If you want to do something similar in Note Lanes you have to use the New Dub / New Alt features. Overall, these two concepts are very similar. I’m wondering if there is a way to be more consistent with implementation. Why can’t we implement comps, for example, in note, and even in parameter automation lanes, and then do away with the new dub/new alt features altogether. This would make recording in loop mode in a Note Lane so much easier and workable. When you’ve laid down 4 or 5 takes in a note lane, you go into comp mode where you can have all the note lanes right there automatically waiting for you. The only real difference would be that in note lanes, you can have overlapping takes (audio and parameter automation can’t do this). But everything else would be pretty much identical for all types of track lanes. Seems a little clunky to have different methods which essentially do the same thing.
  3. Split Performance Controller Data into Separate Lanes. Would be nice to have the ability to split performance controller/note data from each other into two different clips on two different lanes. Right now it’s a tedious process of copying clips, deleting notes out of one clip and then deleting performance automation out of the other.
  4. Record Performance Controllers as automation. Would be nice if you can elect to record the “Performance Controllers” (Pitch Bend/Mod/etc) as automation instead of performance. Currently you have to record once for the notes, and once for the performance to get them on separate lanes OR you have to draw in the performance controller data. There is no way to click a button to record performance controllers as automation lanes (opposite to the “Automation as perf ctrl” button).
  5. Tempo automation/changes on a per-track basis. In the documentation on Page 161, it says “Automating tempo is done much in the same way as with other parameter automation. You record the tempo changes by changing the Tempo value on the Transport Panel. When you later play back, audio clips will automatically be stretched to follow the tempo changes (unless you have disabled stretch for the clips – see “About disabling Stretch for audio clips”). Note clips and automation clips will always follow tempo changes.” It woud be nice if you could opt to leave note lanes at the current tempo, thereby being able to change some note lanes or clips to a different tempo, and leaving other note clips / lanes as they are. This would be a nice advance in both Reason and Record.
  6. Display Masked Audio portion in the Audio Clip. In the documentation on page 169: Nice touch showing whether or not a clip has masked notes/areas! Nice improvement (Having this same feature added to audio clips would be nice as well). What would be even nicer is if masked areas were displayed the same way muted clips are displayed in the Arrange view, as there is really very little difference between the two. In fact, if you take this idea a step further, when you resize a clip (making it smaller) so that a masked area is created, it should automatically create the masked area as a new muted clip separate from the “active/visible” clip. When you resize back, it should automatically join the clips again. I think that would make sense, but I’m not sure if this would have undesired consequences in other places? But off the top of my head, it’s a suggestion. The benefit is that you would then be able to visualize how far the masked area goes in a given direction. Right now, there’s no visual indicator to show how far and wide the masked area is. It’s worthwhile to note that this is already pretty much implemented in the audio comp tracks. Now if we could bring that into the main arrange view, we’d be golden.
  7. Synch Reason / Record Favorites. I wish there was a way to automatically import your reason favorites into the Record Favorites and synch them together. I don’t like having to recreate all my favorites over again. It’s one of those time-wasters.
  8. Cut Note Events in the Clips. It might be nice to have the option when cutting clips, to cut the note events in the clip as well (if the note goes between split clips). This should be a toggle button on every track. Sometimes you DO want to split the notes, and it’s easier than going into edit mode for each clip and cutting them manually one by one (especially over several tracks). By doing this, you could select which tracks split notes and which don’t. Would be ideal if you are cutting several clips along multiple lanes, or inserting bars between locators.
  9. Scale Transposition of Notes. This is imminently more useful than chromatic transposition of the notes. Having both in the software would be a wonderful addition.
  10. Multiple Left and Right locators. When using Record to master a series of tracks, it would be nice if you could set things up with L/R locators and bounce all the tracks at once instead of bouncing them one at a time.
  11. More Training/Tutorials and videos included in the user documentation. At 850+ pages, the manual is getting absurd. Time to start moving with the times. More creative and advanced documentation please!

For Reason:

  1. Adding some new Effects, especially a glitch box such as “Glitch
  2. Having the ability to Randomize the entire Matrix or Redrum device with one click of a button. Currently you have to create random patterns in each and every slot in all the banks, and then (if you want), you need to randomize the Steps AND Resolution. Having a button, which when clicked, allows you to select what you want to randomize on the matrix or redrum (steps / resolution / how many patterns, notes, curves, both notes and curves) AND also providing the ability to randomize percentage-wise (for example, randomize 10% gives you less randomization than 90%). This would turn a very tedious process into a simple one. Same thing in the automation lanes. How about random automation? This would be a godsend for glitch music.
  3. Combinator updates: In the Programmer, subdivide the right-click context menus into submenus (a la Thor modulation matrix menus). Also, adding an option for step increments for the Rotaries would be welcome. In cases where steps are needed, you could switch the Rotary to use steps. If you need the rotary as it is, you could switch it back. Also, give the user the ability to choose how many steps are required (up to 16 or 32 would be nice).
  4. Integrate ReCycle into Reason (or Record). Yes, Reason and Record are not considered DAWs, but when most other DAWs have slicing capability built in, it makes for a good justification to integrate this capability into the software.
  5. The ability to reverse midi and audio for backward playback. You can reverse a small sample in the NN-XT, but it would be nice if you could reverse the midi notes (and in record if you could reverse the audio) within the sequencer.
  6. Tap Tempo. This is important on so many levels.
  7. When in edit mode in the sequencer, providing the ability to move notes from one clip into another. Right now you need to combine the two clips, then move the notes around, then cut them up again. It’s very finicky to do this. Further to this, having the ability to see all the tracks while in edit mode is important if you’re trying to line up one set of notes or automation with another track. You can get around this somewhat by using the L/R markers, but it’s limiting.

Do you agree with these points? Is there anything in your wishlist that isn’t here? Anything else you want to see improved in Reason?