5 – Create a Grain Sampler

Learn how to create your own homemade grain sampler. This allows you to take a single sample, and affect the playback, sample start position, Repeat length, Grain Length, and Filter Frequency, among other things.

If you’ve ever used the Malstrom in your projects, you’ll undoubtedly see the benefit of grain synthesis. It’s like sound design under a microscope, as you can take a very short piece of sound and chop it up into little bits and start/stop the playback where you like. The fact that you can’t add your own grains into the Malstrom is somewhat disconcerting, but there’s a simple way you can create your own grain sampler, where you can add any sound and use that sound as a grain. This can be very effective in adding some new creative spark to your musical projects. And it opens you up to adding any sound you like and deconstructing it as you see fit. So let’s see how we can do this.

The files used for this project can be downloaded here: grain-samplers. It includes 4 Combinators that are set to play a clip of random notes on the sequencer. To try each one out, you’ll have to mute all the other Combinators via the Main mixer channel. I’m sure this is self-evident, but it never hurts to explain it here. As always, this is open source so feel free to use it in your own projects. Just please provide a link back here or a credit or kudos of some kind. After all, I do this for free. 🙂

Creating the Basic Grain Sampler

  1. Start by creating a Combinator, and in the Combinator create an NN19, Subtractor, and Matrix in that order. 
  2. The NN19 is what we will use to contain the sample or “Grain Table.” This is our sound generating device. So starting there, initialize the device so we have a base from which to start. Bring the Polyphony down to “1,” and set the Spread Mode to “jump.” Finally, change the Pitch Bend  Range to “0.” Don’t worry, I’ll explain why we made all these settings after we’ve set everything up.
  3. Load up your favorite sample into the NN19. You only need one. Alternately, you can wait until the end of the setup to load your favorite sample. If you load the sample at the end of this procedure you can then test out the various samples and play around with them at will using the Combinator rotaries that are going to be setup in just a minute. But for now, just have something loaded so you hear some sounds.
  4. Moving to the Subtractor, bring the polyphony down to “1,” and change the Pitch Bend Range to “0.” More importantly, change the Mod Envelope settings to the following: A=0, D=0, S=127, R=0.
  5. On the Matrix, change the number of steps to “1,” and raise the gate to 127 on the first step.
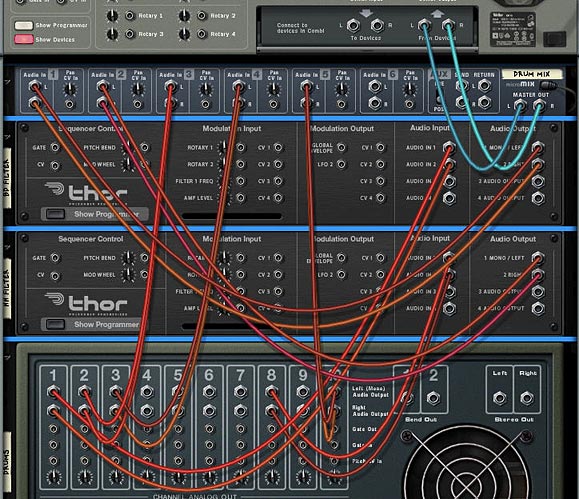
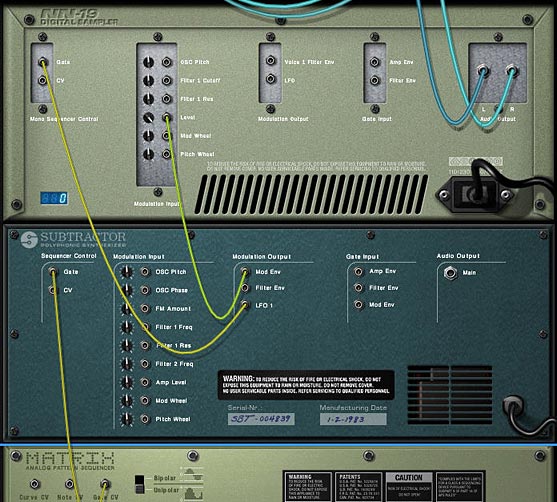
  6. Turning to the back of the rack, there’s really very little to cable. First, cable a CV connection between the “Mod Env”  in the Modulation Ouptut section of the Subtractor to the Level input on the NN19. Also, raise the pot next to this input to 127. Second, cable a CV connection from the LFO1 on the Subtractor to the Gate input on the NN19. Third, cable a CV connection from the Gate CV on the Matrix to the Subtractor’s Sequencer Control Gate input.
  7. The basic cabling for our Grain Sampler
    The basic cabling for our Grain Sampler
  8. Now comes the fun part: Programming the Combinator. Flip the rack around to the front and show the Combi’s programmer. Here are the settings that we have to make:
For the NN19 (Grain Sampler):

Rotary 1 > Sample Start: 0 / 127

Rotary 3 > Amp Env Attack: 0 / 75

Rotary 4 > Amp Env Release: 0 / 90

Button 2 > Filter Res: 0 / 90

Button 2 > Filter Freq: 127 / 90

Button 2 > Filter Mode: 3 / 1

Button 3 > Osc Kbd Track: 0 / 1

Button 4 > Stereo Spread: 0 / 127

Pitch.B > Osc Env Amount: -63 / 63

Mod.W > LFO Amount: 0 / 127

For the Subtractor (LFO):

Rotary 2 > LFO1 Rate: 40 / 127

Button 1 > LFO1 Wave: 0 / 2
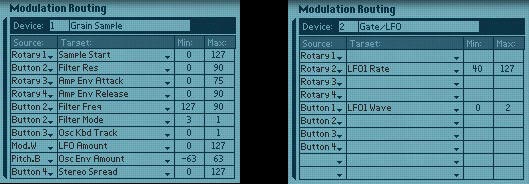
The modulation for the NN19 Sampler (Left) and the Subtractor (Right)

Here is an example of the various things you can do with a basic grain sample:
[ti_audio media=”277″ repeat=”1″]

Explanation of the Functionality

Now for some explanation. The NN19 acts as the grain sampler and the heart of everything. This is why it’s so heavily programmed. The amplitude is controlled by the Subtractor because we set up the Mod Envelope’s Sustain to 127, and cabled the cv from the mod envelope to the level input. And the mod envelope of the subtractor remains “on” because we are sending a gate signal from the matrix. This is simple and effective, and makes our grain sampler very “light weight” by only containing 3 devices.

But don’t let this simple setup fool you. The way we programmed everything gives you a very wide degree of control over the sound — and that sound can be any sample you choose to load into the NN19. Let’s take a peek at what’s going on at the front of the Combinator.

Pitch Wheel: This is set to control the oscillator envelope amount from the NN19.  This is probably one of the coolest and freakiest uses of the Pitch Wheel you could have, and is great for mangling sounds into weird and wonderful effects. 

Mod Wheel: This is set to control the LFO amount on the NN19, for more strangeness, giving the sound a warped and warbled effect.

Rotary 1: Controls the Grain Index, much like the Malstrom’s “Index” function operates. What this is doing is controlling the start position of the sample on the NN19

Rotary 2: This controls the rate of the LFO from the Subtractor, or the speed of the grain playback. All the way left and you get a very slow speed, but turn up the knob and it can get extremely fast.

Rotary 3: Controls the Amp Envelope Attack of the NN19. All the way left gives you fast attack, and all the way right gives you a slow attack.

Rotary 4: Controls the Amp Envelope Release of the NN19. All the way left gives you a short release, and all the way right gives you a long release.

As for the buttons, they are all set up to provide some further sound morphing capabilities.

Button 1:  Switches the LFO Type on the Subtractor. You can program this button to switch between any 2 of the 6 LFOs available on the Subtractor, depending which ones you like best.

Button 2: Controls the Filter mode of the NN19. When off, it uses the default LP12 settings, with a fully open frequency and no resonance. Turn it on, and it turns into a HP filter with the frequency somewhat open, and the resonance dialed up high.

Button 3: This is a very important button in my estimation. It controls the Keyboard Tracking of the Grain Sampler’s Oscillator. This is going to largely depend on how you want the notes in your sequencer to be played by the Grain Sampler. If you look at the project files included here, you’ll see I placed a bunch of random 1/32 notes in a clip on the sequencer. The notes are all different pitches between C2 and C4. If you leave the Key Track button off, the pitch of the notes do not affect the sound. The sound remains constant. If you turn the Key Track button on, then the pitch of the sequencer notes affect the Grain Sampler’s oscillator, and have an affect on the pitch heard. To me, this gives you a great deal of control over how you play your sequencer clips. All with a simple switch.

Button 4: This controls the Stereo Spread of the Sample playback. With this button turned off, there is no spread. With it turned on, full spread is applied across the entire stereo field. Also, since “jump” was selected on the NN19’s Spread mode, it will jump back in a random fashion between the left and right fields.

Exploring Alternate Grain Sampler Ideas

Now that we have the basic grain sampler idea laid out, there’s a few variation Combinators that are included in the project file which you can explore in greater detail. I’ll lay out some of the highlights here.

Mal Grain Sampler: This Combinator inserts a Malstrom and uses it’s “A Curve” in place of the Subtractor’s LFO. It’s then tied to the Rotary 3 on the Combi, so you can use any one of the 31 Curves to affect the gate of the Grain Sampler. The “B Curve” is also plotted to the Oscillator Pitch on the Grain Sampler, and is also plotted to the Rotary 3 on the Combinator. Button 1 on the Combinator turns the B Curve on or off. This means that when you press button 1, it creates all kinds of weird sound morphing (or pitch morphing) to the sample, based on the position of the Rotary 3 knob.

Thor Grain Sampler: This Combinator uses the Thor’s LFO in place of the Subtractor. This isn’t that big of a deal or much of a change. But what’s nice about the Thor is that you can map the Thor’s Sequencer Curve 1 to affect the Oscillator Pitch of the Grain Sampler. Turning on Button 1 on the Combinator starts Thor’s sequencer to Run and provides some Pitch shifting to the sample. The added benefit of using the Thor is that you’re not limited to using the Global parameters. Since the Thor Gate is always on, you should be able to utilize any of the Thor parameters to affect your sample sound. You just need to program them in the Modulation Bus Routing System (MBRS).

Triple Thor Grain Sampler: This Combinator layers 3 Grain Samplers together, all playing different samples. The curves on the 3 Thor’s are all different, and the Mode of the step sequencers in them are set to play randomly. This creates a lot of pitch variation when you press button 1 on the Combinator. Instead of Rotary 3 and 4 affecting the Attack and Decay of the Grain Samplers, I set them to control the level of Sample B and C respectively through a line mixer at the top of the Combi stack. This way, the sample you add into the “Sample A” NN19 is always playing at full level, while Sample B and C’s levels can be adjusted (I didn’t want to give up the functionality on either of the first two rotaries, so that’s why Sample A is always at full level. However, you can create a sequencer track for the Line mixer and adjust the level via automation in the sequencer if you like). Try adjusting the programmer settings on the first two rotaries if you want to have the various samplers playing at differing speeds and at different index points. This can create some pretty elaborate sound designs.

As a final tip, you can try automating the Rotaries for any of the Combinators to randomize things. I would also suggest you read a great article by Lewis72 on the art of Granular Synthesis on his blog. He also created a very nice grain sampler which you can download for free. If you find any other ideas out there on the web on the art of Grain Sampling within Reason and Record, please feel free to post them here in a comment. And if you find these useful or create something interesting with them, please let me know. I’d love to hear how you can use these in your own work. All my best!

4 – Map Reason Songs to Record

Learn how to transfer all settings from one channel in the Reason Mixer to one channel in the Record Main Mixer. With this technique you can properly tranfer any song with any mixer settings from Reason to Record.

As a beta tester, when I got Record I was super excited. I promptly downloaded and installed, and went to open it up. I was salivating by the time all three record windows were opened stacked in front of me on my screen. The “AHHHHH” moment. A halo emanated around my computer. Come on, you know what I mean. I first saw the double rack and was amazed. Then I looked at the main mixer and my jaw hit the ground. Beautiful! A work of art. now I can finally work on making my tracks truly sing.

Then I opened a Reason song. And everything that I had hoped and dreamed got shattered in one swift moment. What? My mixer with 9 tracks and automation applied to the sends, EQ settings, panning, levels got reduced to a measly single track attached to the new main mixer in Record. All my earlier praise now turned to dismay.

I’m sure most of you know exactly what I mean. You’ve been there. You’ve gone through the same agony. So what do you do now? Curl up in a ball? Send Record back to the Props? Well, you could do that. Or you can read this tutorial and learn how to properly transfer all your settings from the 14:2 mixer in Reason into the SSL Main Mixer in Record. It’s not that hard, as you’ll see. But it is a little time consuming, depending how many tracks you have. And I’m not going to undertake doing an entire song mix. What I’ll do is show you how to transfer all settings from one channel in the Reason Mixer into one channel in the Record Main Mixer. Once you have that down, you can do any number of channels, no matter how complicated the song. So let’s get busy.

Before starting, I’ve put together a zip package with the project files. It contains the Reason song with a single channel and the Record version of the same song once it was converted: Download the Project Files.

It should be noted here that if you have not yet done any serious mixing in your main reason mixer, and don’t have any automation set up for any mixer parameters AND don’t have any CV setup for the Pans/Levels on the back of the mixer, then you can safely open the Reason song in Record and delete your main mixer. Then you can select all the (now disconnected) devices, right-click, and choose “Auto-route Device.” This will create Mix Channels for all the devices. Depending on how creative your connections were to begin with, you may find a few devices that require some custom routing after you do this. [thanks to Mattpiper from the Props forum for this excellent tip]

However, if you already have your mix set up with a lot of automation applied to the Reason main mixer device, then read onward, because this article is for you!

  1. First thing, open the Reason song, mixer and all, in Record.
  2. Next, you’re going to have to move any mastering Combinator or devices into the Master Section in Record. Let’s say we have a “Dance” Combinator inserted between the Reason Mixer and the Hardware Interface. Select all the devices in the Dance Combi and move it into the Master Section. Flip the rack around, and move the “From Devices” and “To Devices” cables from the Dance Combi to the same ins/outs of the Master Section. Then delete the audio ins/outs from the dance Combi, and delete the Dance Combi altogether. You don’t need it anymore.
  3. Adding the mastering Combi into the Master Section
    Adding the mastering Combi into the Master Section
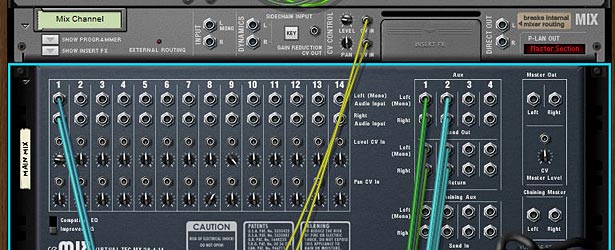
  4. Now let’s assume you have a Matrix set up to control the Panning of the channel, and another Matrix set up to control the Level of the channel. You’ll have to flip to the back of the rack, and move the CV inputs from the Reason Mixer to the CV inputs of the Mix channel. Then adjust the pots to the same settings they were at in the Reason Mixer. Level and Pan is done. Note that if you have several channels set up in your song, you’ll have to create the same number of Mix devices in Record.
  5. Pan / Level CV rerouted through the Mix Device
    Pan / Level CV rerouted to the Mix Device
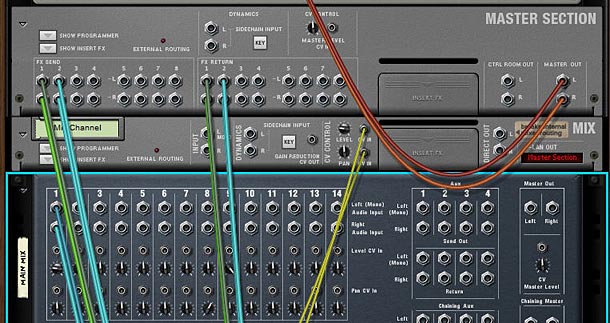
  6. Next, let’s move the Aux Sends/Returns from the Reason Mixer to the Master Section’s Sends/Returns in Record. This is pretty straightforward. Plus in Record you can now set up 8 Aux sends if you want, which is more than enough power. But in the example I’ve provided there was a Reverb and a Delay set up. So we’ll move those over now.
  7. Send / Return cable rerouting to the Master Section
    Send / Return cable rerouting to the Master Section
  8. Our last cable job is to move the Lead Audio Cables from the first channel in the Reason Mixer over to the Main L/R input on the Mix Device. You can now flip the rack around. You’re done with the cabling.
  9. Cabling the Main Audio outs from the Lead track
    Cabling the Main Audio outs from the Lead track to the Input on the Mix Device
  10. Now let’s move to the Record mixer. Press F5 and F6 at the same time to show both the rack and the main mixer in record. If your channels have any settings that ARE NOT automated, but are static for the entire duration of the song (and are different from their default setting), then you can adjust those settings on the main mixer channels in Record. For example, if a channel is set to a level of 90 in the main Reason mixer, and stays at 90 through the duration of the entire song, then you can change the dB level on the Main Record Mixer’s channel to -2.8 dB and leave it there. If the Level stays at 100 for the duration of the entire song in Reason, then you won’t need to change a thing in Record, because the level is already set to 0.0 dB. Make sense so far?
  11. At this point, you’ve probably realized that the new Mixer in Record use decibel values, not midi values. This is a good change, however, it makes it a little difficult to translate levels and send values from the old mixer. So I put together this little chart in PDF format that you can download to see the values. You may not get to use those exact values shown in the chart due to the jumps between values in the Record Mixer, but you can get pretty close. Thanks to Selig on the Props forum for the chart values. Download the Midi to dB Conversion Chart. Note that the chart is also included in the Project Files zip above.

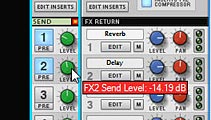
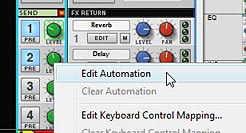
  12. Next, turn the sends 1 and 2 on in the Main Mixer’s Send section in Record. Since the example file has automation set up for these sends, right-click and select Automate. Do this for both sends. However, don’t move to the sequencer just yet. Instead, Look at the other elements on the channel that are automated, and do the same for those as well. So in our example, the solo and level parameters are automated, so right-click and select “Edit Automation” for those two parameters as well.
  13. Turning on and adjusting the Send settings
    Turning on and adjusting the Send settings
    Selecting "Edit Automation" for all parameters which were automated in the Reason Mixer
    Selecting "Edit Automation" for all parameters which were automated in the Reason Mixer
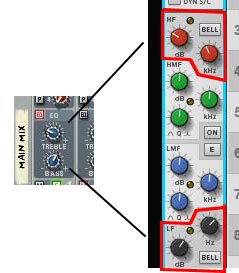
  14. One last thing in the Mixer. If you’ve adjusted the Reason Mixer’s EQ settings for Bass and Treble, you’ll have to map that over to the Record mixer as well. The best way to do this is to adjust the HF (High Frequency) and LF (Low Frequency) settings in the EQ section of Record’s main mixer. This is a shelving EQ which controls your bass and treble. Note that it gives you more control over the Bass/Treble settings that you’d find on the 14:2 Mixer in Reason, because it allows you to dial in the proper frequency range to affect. So you’ll have to use your ears for this one. For more on the EQ settings found in the new Record Mixer, you should read Ernie Rideout’s great article: Tools for Mixing: EQ (Parts 1 and 2).
  15. Converting the Treble and Bass EQ settings
    Converting the Treble and Bass EQ settings
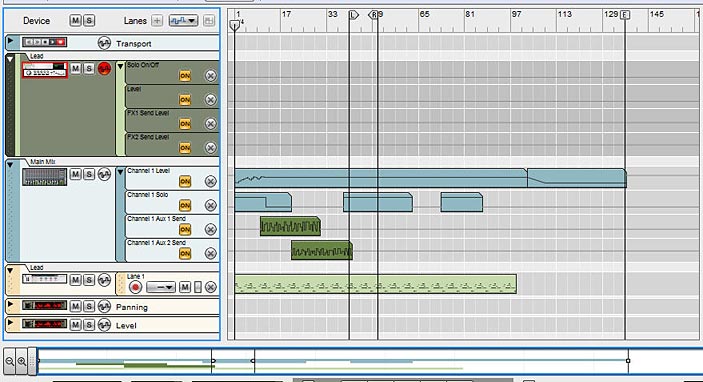
  16. Finally, we move to the sequencer. Press F7 on your keyboard to open the Sequencer. Notice that you have the Mixer with all the parameter automation, but since you selected “Edit Automation” for all those same parameters in Record’s mixer, you have all those lanes set up under the Mix Device. Now it’s just a matter of moving the clips from the Mixer into the proper lanes in the Mix Device. To make things easier (if your song is very long), expand the view by dragging the view window along the bottom of the sequencer all the way to the right, or click the “Zoom Out” magnifying glass at the bottom-left in the horizontal scroll view.
  17. Zooming out to see the whole track in view along the timeline
    Zooming out to see the whole track in view along the timeline
  18. When you move the automation over, some lanes may show “Alien Clips.” To convert the lanes to proper automation, right-click and select “Adjust Alien Clips to Lane.”
  19. Adjusting Alien Clips to Lane
    Adjusting Alien Clips to Lane
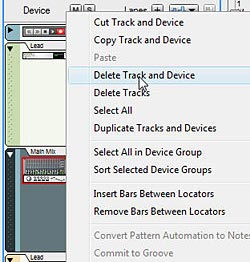
  20. And last but not least, right-click on the Mixer device in the sequencer and select “Delete Track and Device.” You won’t need it anymore. You’ve now converted your Reason song into Record and are free to mix and master your song using the SSL Mixer in Record. The sound should be pretty darn close to the original mix in Reason.
  21. The Final step: Deleting the Mixer
    The Final step: Deleting the Mixer

Be sure to save your song as a .record file. You’ll still have the original Reason song saved away which you can open as a reference, as opening Reason songs in Record does not overwrite your Reason song. It leaves it as is. The really nice thing about the Record mixer is that it gives you a wide array of other options which cannot be found on the Reason mixer, such as High and Low Pass filters, Compression, and a Main Compressor you can apply to the overall mix. More Sends, and handling of rotary and button controls for your devices makes this mixer a huge and powerful addition to your Reason software. So go forth and convert. It takes some time, but the more you do it the better you’ll get at it.

What are your experiences with song conversion from Reason to Record? Did you find this helpful? Is there anything I’ve missed? Please comment and let me know.

3 – Filtering Audio through Thor

In this project I’m going to demonstrate a few ways you can use Thor’s filters, FX (Delay and Chorus), and LFOs creatively by routing any of your audio sources through Thor. This can be a great way to punch up some drums or create new innovative sounds from any of the synths. So let’s start our exploration.

In this project I’m going to demonstrate a few ways you can use Thor’s filters, FX (Delay and Chorus), and LFOs creatively by routing any of your audio sources through Thor. This can be a great way to punch up some drums from a Redrum, or to create some new innovative sounds from any of the synths. Furthermore, you’re not limited to using only 1 filter. You can connect your audio through a series of Thor devices to gain access to more than 1 filter at a time. So let’s start our exploration.

Basic Audio Filtering through Thor:

  1. Open Reason. In the rack create a Combinator and inside the Combinator create a Thor, initialize the patch, and then create a Redrum underneath. Add a drum kit and create a simple pattern with a kick, high hat and a few other drums. Don’t make it too complex. Use about 4 or 5 drum samples to create the pattern.
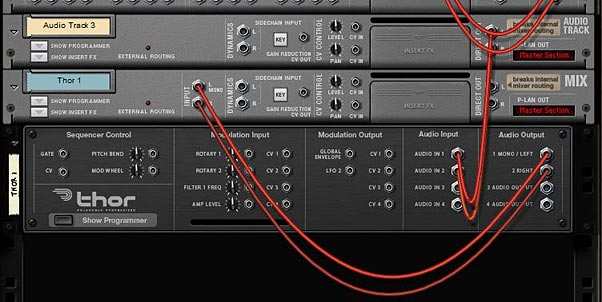
  2. With all the hard work done, now we’ll do some routing. Flip the rack around and route the Left and Right audio output from the Redrum into the “Audio In 1” and “Audio in 2” on the Thor.
  3. Basic cable routing to pipe audio through Thor
    Basic cable routing to pipe audio through Thor
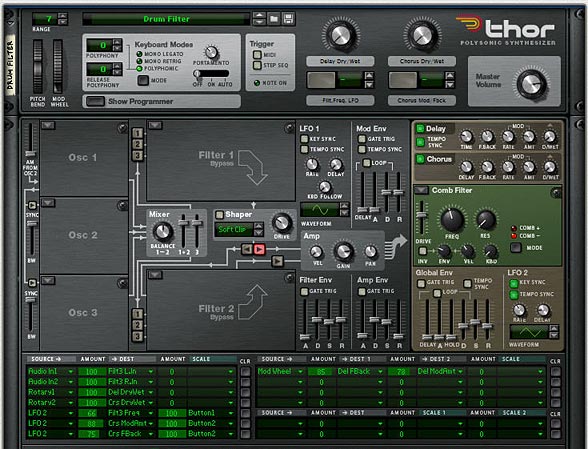
  4. Flip the rack back around, show the Programmer for Thor, and uncheck all the little green lights in the “note” section (the section that is dark and not light brown). Also, turn the analog osc.1 off, and bypass the Ladder Filter (Filter 1). Then turn off the routing between Osc.1 and Filter 1 (the little red “1” light). In the top device section, set Polyphony and Release Poliphony to “0” and turn off both trigger lights (Midi and Step Seq). The point is that you don’t need any of that mumbo jumbo.
  5. Add a Filter into the third Filter slot of Thor. A Low Pass Ladder or Comb filter works well with Drums, but you can use any filter you like.
  6. At this point, most people will press play and think that they should be hearing something. But we’re not finished yet. We need to reroute the default Thor audio signal. Here’s how to do that: In the MBRS (short for “Modulation Bus Routing Section”) of Thor, in the first row on the left, click on the “Source” and select the bottom-most option “Audio Input > 1” then set the “Amount” column to “100.” Click the “Destination” column and select “Filter 3 > Left In.” On a new row, do the same thing, but for Audio Input 2 as a source and “Filter 3 > Right In” as the destination.
  7. The MBRS at the bottom of Thor
    The MBRS at the bottom of Thor
  8. Now press play. You’ll hear the drum pattern, which is routed through Filter 3 in Thor, then to the Chorus and Delay section, and back out to the mixer.
  9. Optionally, you can use the FX (Delay and Chorus), or route the LFO2 to affect any of the parameters in Filter 3 or the FX. One thing I like to do is turn on both the Delay and Chorus. Then in the MBRS section, program the two FX Dry/Wet parameters to the two Rotaries. If you use amounts of +100 for both, then turn the actual Dry/Wet knobs on the FX all the way down, you create a controllable Delay and Chorus effect via the Rotaries. I also use the Mod wheel to control the Filter 3 Frequency or Resonance or both. That way, it’s all controllable. If you want to push it further, you can assign the LFO2 to affect the Frequency or Resonance via one of the Thor buttons. This all gives you a great degree of control over affecting the sound. Download the example file (at the bottom of this post) to see these routings.
The front of Thor, with all routings for the FX and LFO2

First, here’s an example of the original sound:
[ti_audio media=”177″ repeat=”1″]

Second, here’s an example with the audio filtered through Thor (remember, you can adjust the filter to taste):
[ti_audio media=”175″ repeat=”1″]

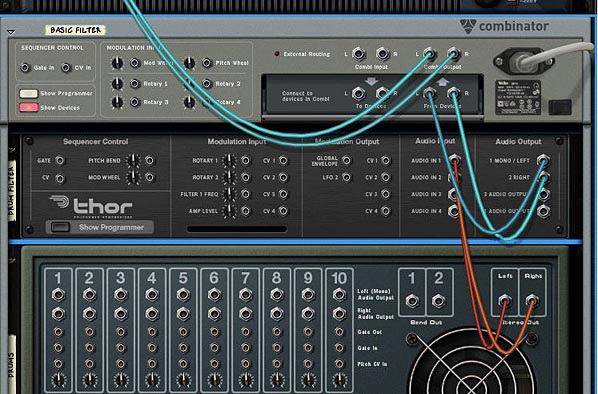
As an aside, if you’re using Record and have an audio track, you can still route your audio through Thor, by cabling the direct output of the audio track to the Thor inputs 1 + 2 as shown below.

Routing an audio track in Record through Thor

Audio Filtering through a Series of Thor Filters:

By now, you will have noticed that plugging audio through Thor gives you access to the global section (the parts of Thor that are light brown). What if you want the use of more than one filter. Let’s say you want your audio path to move this way: Audio Device > Formant > Comb > Low Pass Ladder? Well, it’s really quite simple. Follow the above directions to set up your first Thor, and then build upon that as follows:

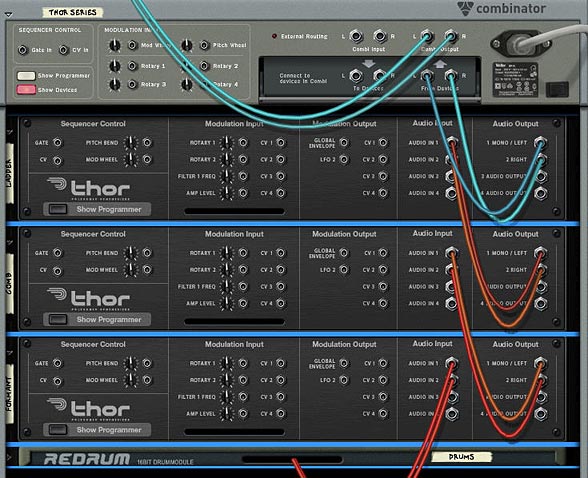
  1. Flip the Rack around. Right-click over Thor and select “Duplicate Devices and Tracks.” Do this one more time. You should now have 3 Thor devices.
  2. Move the “Audio In” cables from the first Thor to the bottom-most Thor’s “Audio Ins” and then cable the “Audio Outs” from that bottom-most Thor into the Thor above’s “Audio Ins.” Finally, cable the “Audio Outs” from the middle Thor to the “Audio Ins” of the top-most Thor.
  3. Flip the rack around again to see the front. Then switch the bottom-most Filter 3 to “Formant” and top-most Filter 3 to “Low Pass Ladder.”
  4. Press Play and adjust the three filters to taste. It might help to bypass the filters on the top two Thors. Adjust the bottom filter, then turn the middle filter on, adjust it, and then finally turn the top Thor filter on and adjust it. That’s all there is to it. 3 filters affecting one sound source.
Routing Thor filters in series to affect a sound source

Example of the Filters in Series:
[ti_audio media=”178″ repeat=”1″]

Audio Filtering separate Drums through Thor:

All of the above is fine and dandy, but what if you don’t want all the Drums filtered the same way. Let’s say, for example, you want the Bass Drum to be filtered by a Low Pass Ladder filter and the High Hat to be filtered through a High Pass in a State Variable filter. Well, without getting too complicated, here’s what you do:

  1. Follow the steps to create a Basic Thor Filter above.
  2. Create a Line Mixer 6:2 and move it to the top of the Devices in the Combinator.
  3. Flip the Rack around, and delete the audio output cables from the Redrum.
  4. Duplicate the Thor device (so you now have two Thor devices under the Line Mixer.
  5. Move the Audio Outputs from the first Thor into the Master Audio Outputs of the Line Mixer.
  6. Cable the Bass Drum Audio Outputs from the Redrum to the first Thor’s Audio Inputs 1 + 2
  7. Cable the High Hat Drum Audio Outputs from the Redrum to the second Thor’s Audio Inputs 1 + 2
  8. Cable the Audio Outputs from the two Thors into Channels 1 & 2 on the Line Mixer.
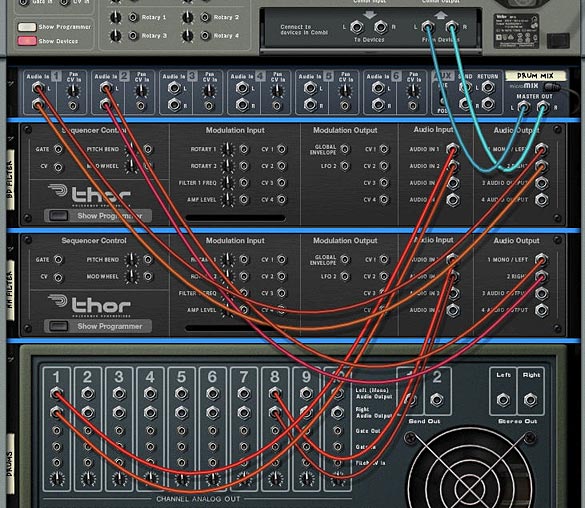
  9. Routing two separate filters to control the Bass and High Hat Drums
    Routing two separate filters to control the Bass and High Hat Drums
  10. Cable the other Drums into the free channels on the Line Mixer.
  11. Routing all the drums to the Line Mixer
    Routing all the drums to the Line Mixer
  12. Flip the Rack around again to the front, and then insert the Filters of your choice into the Filter 3 slots of both Thors. Adjust them to taste in order to affect the Bass and High Hat Drums

Example of separately filtered Drums (with a little delay on the High Hat):
[ti_audio media=”176″ repeat=”1″]

Some Final Thoughts:

Finally, just because you filter one sound through the Global section of Thor, this doesn’t mean you can’t use the Thor to generate a sound of its own. This way, you end up merging two sounds together in a kind of layering. If you want to see how this is done, look at the “Synth+Filter – Droid Chatter” Combinator in the example files. You can do some pretty interesting things this way. Additionally, you can take one sound source, split it into two different Thor filters and then route them to two separate channels in the mixer, or back into one channel if you like. A wealth of options and possibilities, for sure. 

Example of a Synth Arp + Thor with an Analog Oscillator, both generating sound. The Synth Arp is being filtered through Thor while Thor is generating a sound of it’s own. This creates a layered effect:
[ti_audio media=”179″ repeat=”1″]

So as you can see, routing audio through Thor is not difficult, but most people miss the step about the Modulation Bus Routing Section. If you remember to reroute the audio signal, you’re golden. That’s it in a nutshell. nothing fancy.

I mainly use Thor’s comb or Low Pass Ladder filter to affect drums and then put it all in a combinator. But that’s just one way you can use Thor.  Are there any other ways you Route your audio through Thor? Do you have some creative ideas that I haven’t covered here? Please share them. I’m curious to see how people are using Thor to affect external sources.

Download the Example Files

2 – Reusable Device Toolboxes

let’s discuss the possibility of adding a whole new dimension to your sound arsenal by creating Matrix device templates that speed up your workflow. Sound like something that could benefit you? Read on. . .

There is a wealth of devices, patches and samples available in the Factory, Record, and Orkester Soundbanks. And the amount of refills available on the internet grows each and every day. So why are we going to discuss yet another Device Toolbox? Because this one is going to be a little different. Here, I’m going to explore what isn’t in any of the prefab refills provided with the software. Here I’m going to discuss ways in which you can create your own repository of Matrixes. If you extend this idea, you can create your own Redrum devices as well, or how about a complete storehouse of Bass lines and melody lines. It all revolves around the same idea below. So let’s discuss the possibility of adding a whole new dimension to your sound arsenal by creating device templates that will speed up your workflow 10 times over. Sound like something that could benefit you? Read on. . .

Device Toolbox – a multitude of kits

  1. Let’s start by creating an empty document. This document is going to be used to house a variety of matrixes, but no sounds will be generated. So contrary to the way you usually start off a song, you won’t need a mixer or any kind of insert or send effects. Simply start by opening a blank document and off we go.
  2. You should get into the habit of saving your document right off the bat. So let’s do that now. Give the document a name like “Matrix Toolbox” or something you will remember.
  3. Next, create a matrix. Change the switch from Keys to Curve, and Steps to 32. Add in a curve that you use most often. Perhaps a sawtooth or sine-shaped curve. Now switch to the second pattern. Since the Matrix can house up to 32 curves, you may as well maximize the use of the Matrix and use up all those slots. That way when you insert this matrix into your projects, you have 32 choices right off the hop. So add in the next pattern. You can elect to store the Resolution and number of steps along with the pattern settings, but I prefer to leave these as is when creating some general curves (for CV control, such as panning or level control on a mixer channel, for example). This is because using all 32 steps allows you a greater degree of control over the curve. And the resolution will change depending on your song, so change that later when you insert the Matrix into an actual project.
  4. We’re only creating the repository here, so go nuts. Add in a bunch of Matrixes. In my project file I’ve added a lot of random Matrixes, with random notes and curves because this can do wonders for glitch tunes. Use 10 Matrixes tied to the 10 channels of a Redrum and you have an instant glitch kit. So keep adding. When you’re done, save the entire project as an .rns or .record file. Then when you have a song file open that requires some CV control, you’ve got a whole warehouse of Matrixes at your fingertips. Just open up the toolbox, and copy the Matrix into your song file. Don’t forget this can work in reverse as well, so as you work on your song projects, and create new Matrixes with new curves, open up the toolbox file and add the new curve(s) into a new Matrix for later retrieval.
A variety of Matrixes ready to go with nothing more than copy & paste

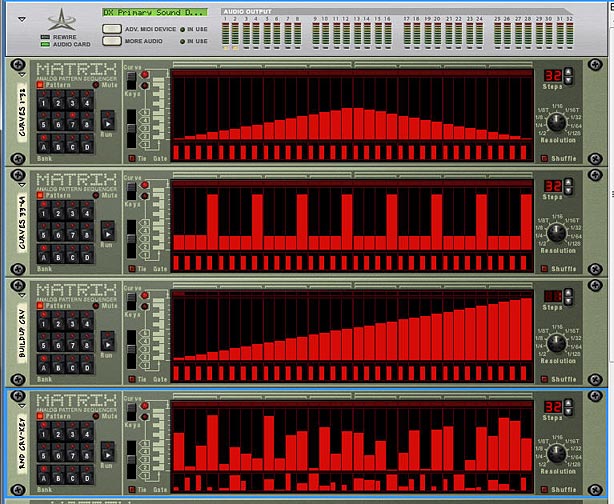
There are quite a few ways you can use a Matrix. You can have them control a sound device’s LFO, Filter Frequency, Resonance, etc. or you can use the Matrix as a monophonic note player which plays the sound device for you. You can also use it to control many different parameters in a combinator, and you can even control the pattern selection of the Matrix itself via a rotary on a combinator. These are pretty powerful devices. See below for a some suggestions. I’ve also included a ton of pattern variations in a nice little package for you (so all the legwork is done). You can download the file below.


matrix-toolbox 

What’s in this Package? Here’s the highlights:

Curves 1-32: Contains Main Curves that can be used for CV control of other devices, with a focus on LFO curves. Most of the main curves here are familiar ones, with Sine, Sawtooth, Pulse Width, etc. Make sure that you switch to Bipolar on the back of the matrix in order to open up the curves to any control which is bipolar in nature (such as controlling the panning of a channel). Switching between Unipolar and Bipolar is a simple way to extend the use of these curves and essentially doubles the amount of curves contained in a single matrix from 32 to 64.

Curves 33-64: More curve fun. This set is more focused on melody and beat than LFO use, but of course you can use any one of these curves to control any CV parameter (LFO, beats, filter frequency, filter resonance, etc).

Buildup Crv: This Matrix uses a sawtooth curve as its basis. You’ll see the same curve in all 32 banks, but each slot adjusts the steps upward incrementally (A1 has 1 step, A2 has 2 steps, etc.). This is more experimental than anything else, but the thought is that you can use this Matrix to slowly build up a pad or any other sound by placing this matrix in a combinator, having the matrix control a sound device, and programming the pattern to a rotary. Then create an automation track for the combi, and slowly bring up the rotary along the length of the sequencer, the sound should build upward incrementally. Of course, you don’t have to use it in a combi, and instead can program the pattern section of the matrix directly in the sequencer, but this would take you much more time as you would have to fiddle with the pattern changes in the sequencer. Try the combi idea first. It’s easier. Then also If you want to create a fade-out “build-down” instead, simply reverse the programming of the Pattern section in the combi’s mod matrix. Simple.

Rnd Crv-Key: This can be used for random curves or random keys. Every pattern in this matrix lasts for 32 steps and is using 1/16th resolution. So the timing and length of the patterns stay the same, however, the patterns themselves are different.

Rnd Step: Same as the Rnd Crv-Key Matrix, however, this time, the Length of the Patterns is also randomized (sequentially from 1 step in Bank A1 up to 32 steps in Bank D8). Try adding this to a combi and programming the pattern section to a rotary. Then in the sequencer create some crazy random vector automation to switch between all the patterns. Or control the rotary on your controller and have some fun spinning the dial for a bit of craziness.

Rnd Res: The same as the Rnd Step Matrix, except the Steps remain constant at 32 for each pattern. What changes here is the Resolution. Be warned that this can get a little chaotic because the Matrix switches in and out of Triplets, which I’ve always found a little jarring. But it’s there to play with.

Rnd All: The granddaddy of them all. This is the “everything-but-the-kitchen sink” of Matrixes. All banks are loaded with patterns, and everything is randomized: Steps, Resolution, Patterns. It’s the whole enchilada. Just be warned, this may create some complete and utter nonsense and may cause aural nausea. But again, it’s fun to tinker.

Rnd 4/4: This Matrix can be used for random curves or random keys. But it’s a lot less random than the Rnd All matrix. As the name suggests, all the notes and curves are completely random, however, the beats are kept to a basic 4/4 structure, and in 4 steps or beats per bar. Bank A1-A8 all use ¼ time, with 4/8/12/16/20/24/28 and 32 steps respectively. Same goes for Bank B1-B8, with the difference being everything is set in 1/8 time. Bank C1-C8 is 1/16 time, and Bank D1-D8 is 1/32 time. I set it up this way because I rarely utilize the ½, 1/64 or 1/128 time unless it’s something very specific. So this can be used in most general circumstances and create a cohesiveness to whatever parameter you’re controlling. At the same time it is still a random controller, so expect the unexpected. If you want to work only within a specific time, then place this matrix in a combi, and assign the pattern section to a rotary which controls only a specific bank (A: 0-7, B: 8-15, C: 16-23, or D: 24-31). If you instead want to work with only a specific amount of steps in different timings, then create a track for the matrix in the sequencer, and program the same numbers in each bank. For example, working with 8-step patterns only, you would program A2/B2/C2 and D2 in the sequencer. This way, all the timing would be different, but the amount of steps for each pattern remains the same.


The real power in this project lies in the fact that you only need to build the toolbox once, and you can reuse it as many times as you like. The more variety you have in the toolbox, the more variety you can insert into your song projects and the more organized you are, the quicker you can do it. So think about applying this idea not only to Matrixes, but how about Redrum patterns, and other things like basslines or melody lines. You can create a whole series of quick beat loops or chord sequences that you can recall at a moment’s notice. Break out and create your own toolboxes to suit your needs.

Do you think this can help you out in your own work? What kinds of other items do you think you can turn into a toolbox? What other matrixes do you have that you’d like to share? Any suggestions for some Matrix patterns that I may have missed? Let me know and I’ll add it into the package.

Happy Reasoning!

1 – Record as a CD Mastering Tool

My task a few weeks ago: To turn Propellerhead Record software into a CD mastering tool. Learn how to master 12 audio tracks in Record. A Record Template file is included.

So my task a few weeks ago: to turn Propellerhead Record software into a CD mastering tool. Keep in mind most of my tracks were already created in Reason and mostly fully formed. I had 12 tracks to master. My results:

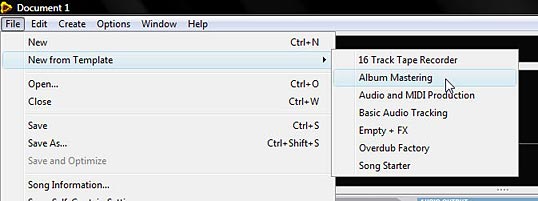
  1. Open Record and go into File > Create from Template > Album Mastering. The template opens with the default mastering suite as an insert effect before 10 empty audio tracks. Ok. not great. But just ok. I think what would have made it better here is if there were some reverb already plugged into the master FX sends, with all the sends switched on the master mixer and set to a low value (saving some steps here would do wonders). Though, since you can create your own templates out of anything, it’s not a major issue.
  2.  
    Opening the Record Album Mastering Template Opening the Record Album Mastering Template


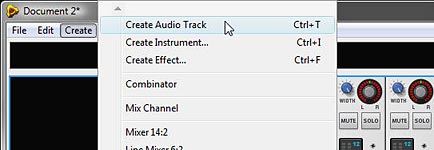
  3. I created two additional audio tracks (I have 12 tracks in total on my new CD project, not 10).
  4. Adding 2 more audio tracks to the template
    Adding 2 more audio tracks to the template
  5. I updated the master insert effects with the mastering combinator. Under the Master Section, click “Show insert FX” to expand the FX section, and update the empty mastering suite with your own mastering FX. In this case, I used the “Dance” combinator, as I really like the sound that this mastering combinator gives to my own music. I realize that usually this is the last step when mastering the mix, and this may seem kind of backwards, but I find that once I have all the tracks laid out and they are ready to be mastered, I’d rather listen to how these FX work with each track and do all the final adjustments from there. And if you don’t want to do it this way, you can always bypass the Insert FX with the click of a button, toggling the dance combi on and off. A great way to see how it affects each track.
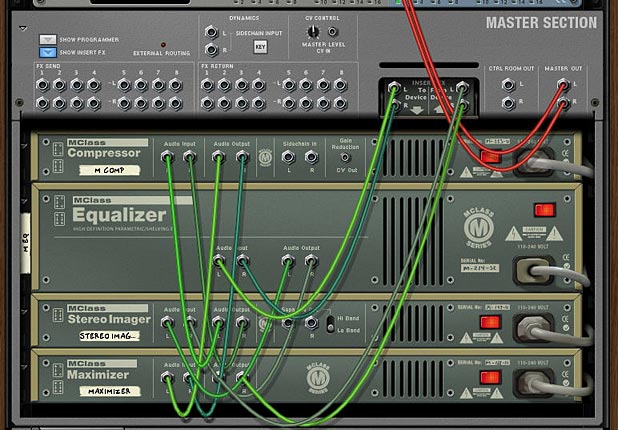
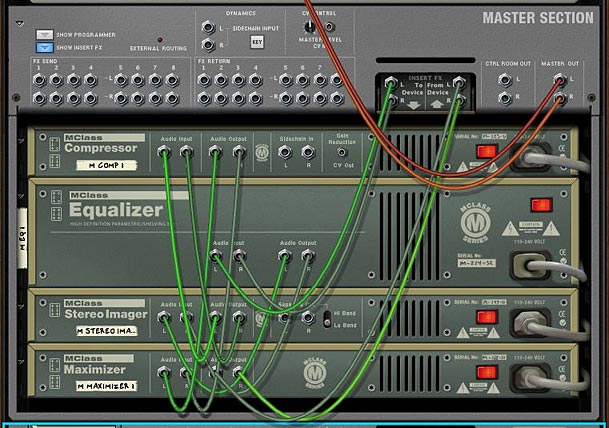
  6. Note: since you can’t insert a combi inside the master section, one way to add the Dance mastering combi in there is to first right-click over the front of the master section and select “Clear Insert FX,” then create the dance combi underneath the master section (hold down shift, so it is not auto connected. Expand it, select all the devices inside it and then drag them into the master section. Flip the rack around and move the blue “To Devices” L and R cables which are still connected to the dance combi to the master sections “To Devices” L and R cables. Do the same for the “From Devices” cables and then delete the now-empty dance combi. Voila, the Dance combi and all connections are inside the master section as Insert FX (see the image below for a look at the back of the rack and the connections.

    Back of the Master Section with a Mastering Suite Combi attached
    Back of the Master Section with a Mastering Suite Combi attached
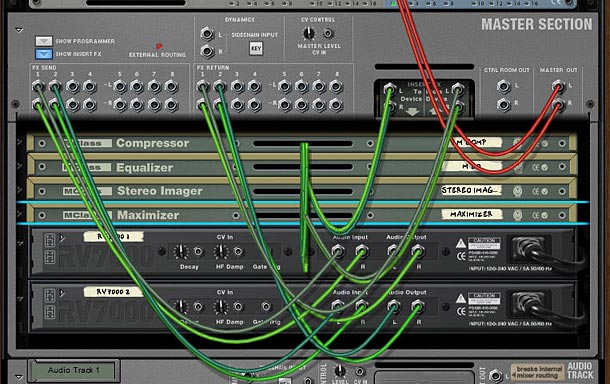
  7. I added two reverbs as send effects I added the “All Plate Spread” and “All Warm Plate” RV7000 units as send FX in the Master Section. I also set the dry/wet amounts very low (setting on 5 for each). This was done to add a little smooth reverb to all my tracks and make them “fit” or “glue” better together (see step 1 above — would have been nice if this step was already done).
  8. Adding the two Reverbs as Send FX
    Adding the two Reverbs as Send FX
  9. Added each song (wav) file to each of the audio tracks using the File > import audio track on each channel and set them up one after the other in the sequencer timeline.
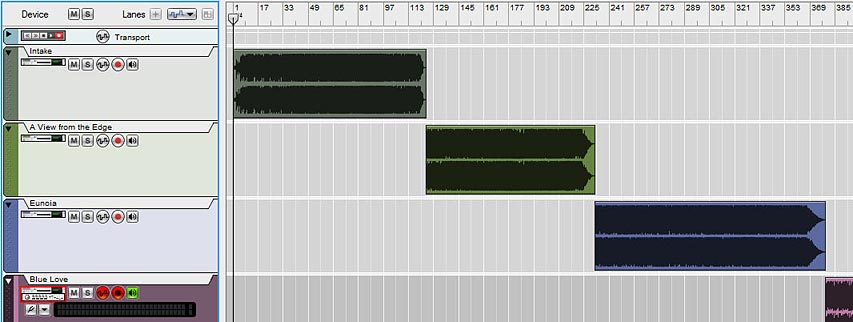
  10. Note: You can also set your tracks up on top of each other in a stack if you prefer. This is probably a wiser course of action, but as this was my first time using Record to master my CD, I opted to try laying things out on a timeline. The benefit to laying it out sequentially is that you can track the total time of your songs combined. The downside is that it makes for a real pain when it comes to bouncing each song individually to a wav file. There’s a lot of movement of the L / R markers in the sequencer at that stage.

    The tracks laid out in series within the Sequencer
    The tracks laid out in series within the Sequencer

    Note: it was at this point I realized something. I had one track out of the 12 whose tempo was faster than it should have been. It took me a while, but I figured out that this was the only track that was output from Record, not Reason. When you import an audio track that was produced with record, it understands the tempo data from the file (The track was 100 bpm, while my “CD Mastering” project tempo was 120). If you import a wav file that was created via Reason’s export, it shows “no tempo data” which I still find a little odd.

    Soooooooo…. I went to the tempo transport in the sequencer and switched the tempo to 100 for the duration of that one track. Problem fixed.

    It was also at this point that I was glad that Record didn’t make the connection and understand the Reason song tempos. Otherwise I’d have to go back and write down the tempo of each of my songs, and then change the transport’s tempo over each song to match. What a pain that would have been.

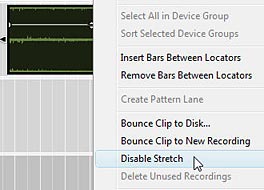
    Update: Mattpiper provided this nice little tip which avoids having to use the Tempo Automation Track: “In Record, you can right-click on any clip and select “Disable Stretch.” Then the clip will not have its tempo affected by the song tempo.” — Thanks Matt!

    Disabling Stretch by right-clicking on the audio clip in the Sequencer
    Disabling Stretch by right-clicking on the audio clip in the Sequencer

    Back to my strategy:

  11. Turned on “send 1” and “send 2” for all the audio tracks so the reverbs I set up were audible. Adjusted the send levels for each track to taste.
  12. Adjusting the Send levels in the Main Mixer
    Adjusting the Send levels in the Main Mixer
  13. Now the hard part: On the Main Mixer I adjusted compression settings for the Master Compressor, as well as for individual tracks. Also adjusted the LPF/HPF on some tracks, though not very much because as I say, all the work was already done in reason, and I didn’t want to go overboard. This process took a few days as I didn’t want to rush it and suffer from ear fatigue when adjusting these settings.
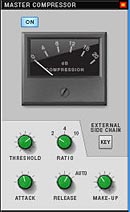
  14. Final adjustments with the Master Compressor
    Final adjustments with the Master Compressor
  15. Now the hard part (part 2): listened to each track once or twice and adjusted the volume levels so that they were just below clipping. My intention was to have them all evened out. I got about halfway through and called it quits for the night. Finished it in about 2 nights. For what it’s worth, I find that even if the song shows clipping in Reason or Record here and there (via the clip out light on the transport panel), as long as the clipping light is shown infrequently, and they are short clips, it doesn’t affect the final mixdown or output. Since this is the final adjustment before bouncing, I don’t mind pushing it. If I were still in the mixing stage, I would leave more headroom (about 2-3 dB). 
  16. Set up the L/R markers in the sequencer and bounced each song (LOOP) to an audio file individually. Loop is in caps for a reason. Since all the tracks are in the sequencer in sequence (how self-reflexive), each song is really considered a loop by the software. So don’t make the mistake of bouncing the song, otherwise you’ll end up with one huge wav file of the whole CD (of course, this may be what you’re after, but probably not).
  17. It’s times like this I wish I could set up multiple start/stop markers within Record, and bounce them all to individual tracks with one click of a button. But Record just isn’t there yet. Note to props: this would be a great addition! Also, the whole project turned out to be 1.5GB, so it’s not for the feint of heart. But it’s worthwhile to do if it’s going to make all my tracks have a certain amount of consistency across the board.

Now tell me: do you think this is an approach that makes sense? I know we all have different approaches when it comes to mastering, but is there anything you would do differently? Anything you would add or subtract from this process? Any suggestions to improve this process? Would anyone care to share their own process using Record?

If you would like to listen to the final result, all the tracks on the CD can be found here: http://www.phisequence.com

Also, if you would like the template file, I’ve created the one I set up here, with the Dance Combi and Reverbs in the Master Section, as well as all the sends turned on. I also added the extra two audio tracks:

Download the cd-master-tpl (zip file)