We don’t live in a vacuum (well maybe sometimes we do, however, for the most part we learn by experimenting with many different elements from different sources) and so this tutorial will build upon a previous tutorial on using Thor’s CV capabilities to switch between 2 different CV sources. In addition, there will be a new element which shows how the Auto CV on the back of the Scream can be used to follow the audio from a Dr. Rex. And this is really the heart of the tutorial.
The “Auto CV” feature on the back of the Scream device is an envelope follower with a twist. While most envelope followers work on Audio and in essence shape the parameters of the audio, the Scream’s envelope follower follows the audio, and then converts that to a CV signal. Before Reason 4, this was the only way you could essentially create a CV signal from an audio source. With the advent of Reason 4, you can use Thor to perform the same functions. Even so, it’s worthwhile to note how the Auto CV works in the scream, as it can still be used effectively, with the added bonus that it leaves a lighter CPU footprint, and allows you access to the Scream as an FX insert as well. Finally, I’ll touch upon how you can achieve a similar effect using Thor.
The project files can be downloaded here: auto-cv-chasing-audio It contains three Combinators which are used as examples to show the Auto CV setups described below. A matrix is used to play a random pattern so you can hear the results. All Combinators play simultaneously through the main mixer, so don’t forget to mute or unmute the channels to hear the proper example.
Using the Scream Auto CV to convert Audio into CV
- Create a Combinator and a 6:2 Line Mixer. Then holding shift down, create in order a Thor, NN-XT, Scream and Dr.Rex device.
- Click the Show Programmer button in Thor, and turn off Oscillator 1, Bypass Filter 1, and click the “1” button next to the Filter 1 slot. Add a Low Pass Ladder Filter in the Filter 3 slot. Finally, click the Delay button to turn on the Global Delay.
- In the NN-XT open up the patch browser and navigate to the Factory Soundbank. Go to the NN-XT Sampler Patches > Synth Poly and open the Odd Poly patch.
- In the Scream device, turn off the “Damage” parameter.
- In the Dr.Rex device, open the Patch browser and in the Factory Soundbank, nagivate to Dr Rex Drum Loops and load the Hse40_RideBeat_130)eLAB.rx2 patch.
- We’re done with the front panel. Flip to the back of the rack, and let’s move on to routings. First, route the NN-XT’s 1/L and 2/R to the Audio In 1 and Audio In 2 on the Thor Audio Inputs, respectively. Then route the 1 Mono/Left and 2 Right from the Thor’s audio outputs to Channel 1 on the Line Mixer (left and Right, respectively). This sets up the audio to be heard. Now comes the Auto CV magic.
- In order for Auto CV to work, the Scream needs to have a sound source fed into it. So connect the Dr.Rex L & R audio outputs into the Scream Audio Inputs (L and R, respectively). Then connect the Auto CV output from the Scream unit into the CV 1 Modulation input on Thor.
- Flip the rack around and let’s set up the Thor Modulation Bus Routing Section (MBRS). Enter the following parameters on the left side of the bus:
CV In 1: 66 > DelFBack
CV In 1: 66 > Del ModAmt
Enter the following parameters on the right side of the bus (just to keep things simple for now):
Audio In1: 100 > Filt3 L.In
Audio In2: 100 > Filt3 R.In
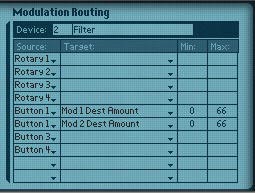
- With this setup, the Auto CV is affecting the Thor Delay Feedback and Delay Modulation Amount. To hear what the Scream is actually doing, we can set up a Combinator switch on button 1. So click the Show Programmer button on the Combinator, and click the Thor in the Device section of the programmer. Enter the following two lines in the Modulation Routing section:
Button 1 > Mod 1 Dest Amount: 0 / 66
Button 1 > Mod 2 Dest Amount: 0 / 66
- Now set up a Matrix to play a simple pattern using the Combinator. Turn Button 1 on to hear the Auto CV affecting the Delay. Turn it off to hear the unaffected Delay. Note that you need to have the Dr. Rex receive notes in order to have it send audio into the Scream device. By setting up the Matrix to sequence the combinator, the matrix ends up playing the Dr. Rex. So you’re all set. Alternately, if you don’t want the matrix sequencing the Combinator, you can always copy the Rex notes to its sequencer track so that the Dr. Rex is played via the main sequencer. The point is, the Dr. Rex needs to be active.
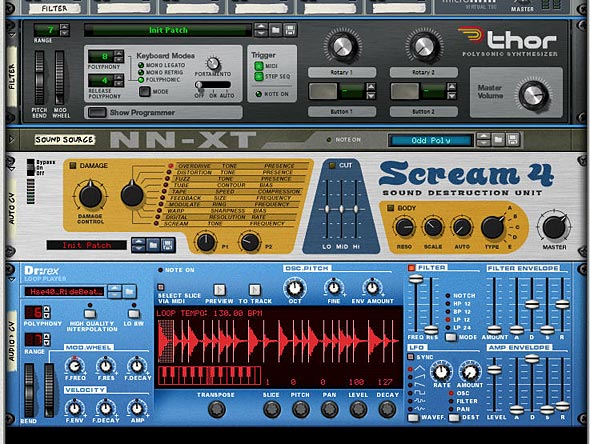
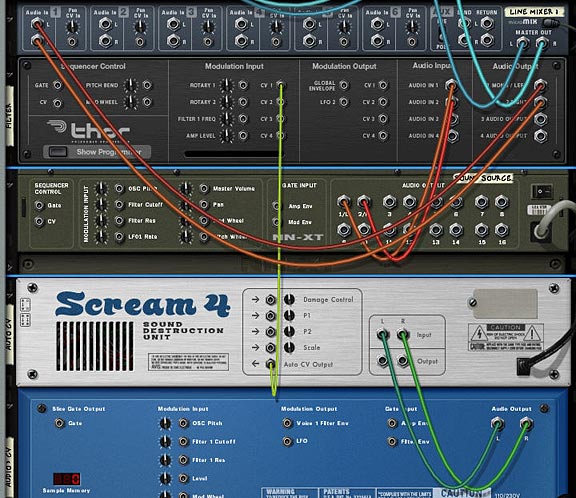

What’s happening is the Dr.Rex loop is converted to CV, and this CV is used to affect the Thor Delay. It’s a simple but powerful setup. And you don’t have to limit yourself to affect Thor parameters. I only used this as an example. You run any audio source through the Scream and then use the Auto CV to affect any other CV parameter. Also, since the Scream is not generating any audio output, it doesn’t affect the mix in any other way than a simple CV conversion (or more technically, a CV envelope follower).
Switching CV sources
Not to be one to leave well enough alone, here’s a way to extend the Auto CV idea above and have the ability to switch between two different Rex Files (2 CV sources) using the Thor. The parameters affected are the same (Delay Feedback and Delay Modulation Amount), but the Rex file used to affect the delay can be switched. Here’s how you do it:
- Building upon the above example, at the bottom of the Combinator stack, holding Shift down, let’s add another Scream and Dr. Rex.
- Next, turn off the Damage parameter in the second Scream. Also, add a different loop into the second Dr.Rex device.
- Flip the rack to the back, and send the Audio from the Second Dr.Rex to the Second Scream, and send the Auto CV output from the second Scream to the CV 2 Modulation input on the Thor.
- Now we’ll have to set up Thor to also accept the second Dr.Rex CV source. In the MBRS section, enter the following:
CV In 2: 66 > DelFBack
CV In 2: 66 > Del ModAmt
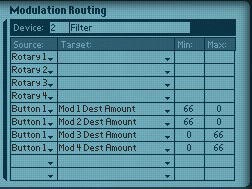
- Finally we need to use the Combinator button 1 as a switcher between the two CV sources. So in the Combinator’s Modulation Routing section, enter the following:
Button 1 > Mod 1 Dest Amount: 66 / 0
Button 1 > Mod 2 Dest Amount: 66 / 0
Button 1 > Mod 3 Dest Amount: 0 / 66
Button 1 > Mod 4 Dest Amount: 0 / 66
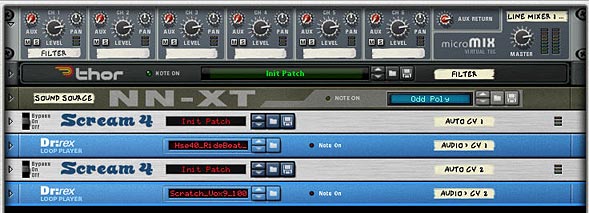

With this setup, Button 1 on the Combinator is used to switch between the 2 Scream CV sources (which in turn comes from the two Dr.Rex devices). Leaving button 1 off uses the first Scream device. Turning the button on turns off the first Scream CV source, and turns on the second Scream CV source. Note: it’s not actually the Scream that is turning off. We’re just bringing the amounts down to zero on the Thor programmer panel, which has the same effect.
It should also be noted that you can program a Rotary on the Combinator to cross-fade between the two CV sources, if you wish to have a fading effect between the two. Where you take this idea is really up to you.
Using Thor as an Audio/CV converter
Let’s say you don’t want to use the Scream, and instead want to use Thor as a “Auto CV output” or CV envelope follower. Here’s how you set that up.
- Starting from scratch, Create a Combinator and a 6:2 Line Mixer. Then holding shift down, create in order a Thor, NN-XT, and Dr.Rex device.
- Click the Show Programmer button in Thor, and turn off Oscillator 1, Bypass Filter 1, and click the “1” button next to the Filter 1 slot. Add a Low Pass Ladder Filter in the Filter 3 slot. Finally, click the Delay button to turn on the Global Delay.
- In the NN-XT open up the patch browser and navigate to the Factory Soundbank. Go to the NN-XT Sampler Patches > Synth Poly and open the Odd Poly patch.
- In the Dr.Rex device, open the Patch browser and in the Factory Soundbank, nagivate to Dr Rex Drum Loops and load the Hse40_RideBeat_130)eLAB.rx2 patch.
- We’re done with the front panel. Flip to the back of the rack, and let’s move on to routings. First, route the NN-XT’s 1/L and 2/R to the Audio In 1 and Audio In 2 on the Thor Audio Inputs, respectively. Then route the 1 Mono/Left and 2 Right from the Thor’s audio outputs to Channel 1 on the Line Mixer (left and Right, respectively).
- This time, connect the Dr.Rex L & R audio outputs into Thor’s Audio Inputs (3 and 4, respectively). Then connect the CV 1 output to the CV 1 Modulation input, both input and output are on Thor, so yes you can route a CV out on Thor to a CV in on the same Thor.
- Flip the rack around and let’s set up the Thor Modulation Bus Routing Section (MBRS). Enter the following parameters on the left side of the bus:
CV In 1: 66 > DelFBack
CV In 1: 66 > Del ModAmt
Enter the following parameters on the right side of the bus:
Audio In1: 100 > Filt3 L.In
Audio In2: 100 > Filt3 R.In
Audio In3: 100 > CV Out1
Audio In4: 100 > CV Out1
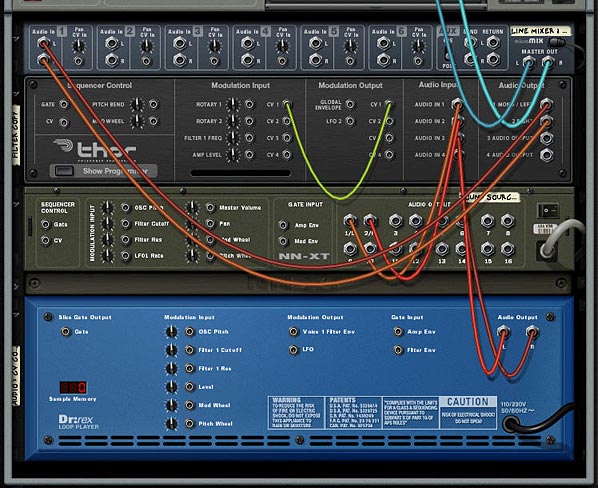
With this setup, the Auto CV is contained within Thor. The Thor is using the Audio from the Dr.Rex directly, and then converting the Audio source into a CV signal which is then sent back into Thor to affect the Delay Feedback and Delay Modulation Amount.
One note here: if you test out the sounds from the Thor CV setup versus the Scream CV setup, you’ll notice that the Thor CV is much smoother. I’m not sure why that is. It may be a difference in the way I’ve routed things, or a difference in how the Scream handles the Auto CV output feature. But there is definitely a difference in sound. Of course this could be pilot error and I may not have the connections set up correctly. I admit my mistakes all the time. But at least it gets you pretty close.
So any other ideas you have for using the Auto CV output on the Scream device or setting up Thor to convert an Audio signal into a CV signal? This is a very basic example, but it opens up a lot of potential with other sound sources / CV destinations. For example, if you have a CV destination that you want to track to the lead vocals in a song, you can do it easily. So what other possibilities are out there?


This is a very interesting article.
Is it possible to create to drum triggers?
I want to take the reason 5 sampling input en then split the signal in 3 bands low mid and high.
To trigger a kick, snare and hi hat from analog drums via a microphone.
With you article á a step closer.
In stead of the dr rex i wil use the sampling input.
This signal is split with the filter low pass for the kick bandpass for the snare en higpass for the hihat.
Do you think this is possible??
Rgrds
Tim
Tim, I think that’s an interesting approach. Live Sampling might not be able to handle this if it’s a long passage because I believe there’s a set time limit on how long you can sample. It’s basically set up for short samples, not long ones.
I’m also unclear as to what you are trying to trigger. Is your source the analog drums sent through a mic which then goes into the live sampling? The question is this: where do you go from there? I could see you sending that audio into the scream (or even Thor can convert audio to CV) and then that triggers whatever you want.
Yes that might be possible. My best advice would be to post your question on the Propellerhead User Forum, where many other intelligent Reason users can chime in and help you out.
I am really close now. actually i got it
Split the audiosignal you want to convert in 3 bands low mid and high.
I used the envelope controlled filter with band pass settings.
You dont need scream but is used it any way so you still have envelope cv for other proccesing.
the trick is to use the mclass compressor gain reduction cv out.. this is an peak detector.
Got this from sound on sound.
I sent you the combinator patch this says more than my explenation. many thanks for your pointers.
I think it is possible to make a polyphonic audio to cv/gate but 1st thing 1st.
Instead of the DRrexdrum loop you can also use a live drummer via mics on the audio in from reasson.
@Tim,
I’m going to look at your patch during the week. Things have been very busy lately. Would you be willing to start doing a write-up for your technique and I can post it in the “Contributor” section here. I’m sure others could benefit from your knowledge. Send me an email and let me know and we can work it out.
Thanks again,
Rob
Hey, now you can use Audio to CV Rack Extension to get “auto CV”.
Yup. You sure can. You can also use Thor to convert audio to CV and back again too. 🙂