72 – Pounding The Pulveriser (Pt. 1)

Now there’s a word with some power behind it: PULVERISE! Let’s pulverise our sound. New in Reason 6 is this wonderful Distortion-Compression-Tremolo-Follower-Filter-Parallel Processor — And oh yeah, it’s got a Lag feature too! Suffice it to say this thing is vintage goodness, and it can do an awful lot to your sound, whether you just want to warm things up a bit, or set your sound to completely self-destruct. Let’s push it to the limit and see where it takes us.

Now there’s a word with some power behind it: PULVERISE! Let’s pulverise our sound. New in Reason 6 is this wonderful Distortion-Compression-Tremolo-Follower-Filter-Parallel Processor — And oh yeah, it’s got a Lag feature too! Suffice it to say this thing is vintage goodness, and it can do an awful lot to your sound, whether you just want to warm things up a bit, or set your sound to completely self-destruct. Let’s push it to the limit and see where it takes us.

This article is going to provide you with an introduction to the device, as well as show you how to use it as a parallel compressor. I’ll get into more tricks with it in part 2. But for right now, I thought we’d first like to get acquainted with all of it’s goodies. So let’s start with a look at all the parameters on the device.

Also don’t forget that my latest Refill, Pureffects, is available with 1,250 effect patches designed specifically with Reason 6 in mind. There’s 200 Pulveriser patches alone, and several Pulveriser-based Combinators with all kinds of interesting routing ideas. Read More about the ReFill.

Explaining the Interface

Here’s the front look at the Pulveriser and a brief explanation of what each feature does.
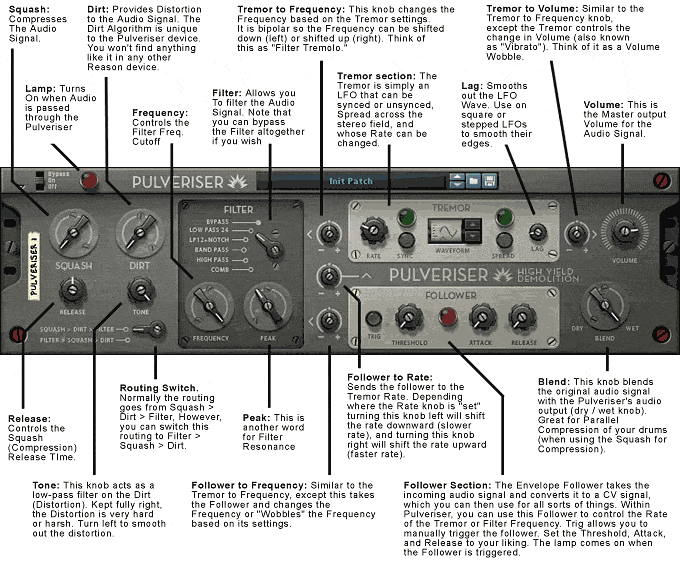
The front panel of the Pulveriser with an explanation of the interface.

Now let’s break down the Pulveriser into it’s Component Sections:

Compression Section

  • Squash: This is another fancy word for Compression. It compresses the audio signal coming into the Pulveriser. So in this respect, it’s kind of like the Compression Ratio of the M Class Compressor. Though it’s probably a different algorithm entirely if I’m reading the Props correctly (maybe Selig can provide charts and comparisons?).
  • Release: Controls the Release of the Squash (compression).

Distortion Section

  • Dirt: This is another fancy word for Distortion. It distorts the signal coming into the Pulveriser. Note that the Dirt algorithm is unlike any other one found in any other Reason device. I have this on very good authority from the Props themselves. So you can think of this as a brand new Scream algorithm if you like. And I must say it’s one of the cleanest distortions I’ve heard in Reason or any other virtual instrument. Definitely one of the highlights of Reason 6.
  • Tone: This controls a low pass filter that is applied to the Dirt. It is outside the realm of the Filter section, so this is not to be confused with any of the Filters found there. This is a separate filter altogether. Practically, it smooths out the Dirt (Distortion), the further left you turn the knob; which may be what you want.

Filter Section

  • Filter: Allows you to select from a variety of built-in Filters. Bypass will bypass the Filter section entirely. The other filters provided are Low Pass 24, Low Pass 12 + Notch, Band Pass, High Pass, and Comb.
  • Frequency: Controls the Filter Cutoff Frequency. Pretty standard for most filters.
  • Peak: This is just another fancy word for Filter Resonance. However, to my ears this Resonance is not as bright as other Resonance settings for other filters in Reason. I may be wrong, or my ears may be shot. But this Resonance algorithm sounds a little more “tame” than the others. But don’t get me wrong, if that is the case, I’m happy about this. It means that we have more choices in Reason on what kind of Filters and Resonance settings to use. More choices = more flexibility.

Tremor Section

The Tremor section can be thought of as an LFO which you can send to various parameters both inside and outside the Pulveriser.

  • Tremor Rate: This controls the Rate of the LFO.
  • Tremor Synch: This controls whether the Tremor is synched to Tempo (when the Sync button is lit) or the Tremor is unsynced/free running (when the Sync button is turned off).
  • Waveform: You can select between 9 different waveforms, as follows: Sine (0), Triangle (1), Square/Pulse (2), Sawtooth (3), Random Square (4), Downward Ramp (5), 3-Step Sawtooth (6), 4-Step Sawtooth (7), and 4-Step Triangle (8).
  • Tremor Spread: This is another fancy way of saying “Pan.” It pans the LFO across the stereo field in a ping-pong kind of way, based on the Rate and LFO waveform.
  • Lag: This is actually yet another filter inside the Pulveriser, however, it’s a filter which is not so much audible, as it is a tool to smooth out the LFO Curve. Obviously if you select a sine wave, it’s already smoothed out, so lag has no effect. But if you select a square wave, for example, the more lag you use (more right you turn the knob), the smoother the corners of the LFO Curve become. So fully right and a square wave would become a Sine wave.

Note: That’s also my biggest beef with the Alligator. For all the greatness it possesses, it doesn’t posses a “lag” knob for the LFOs, which would reduce the pops and clicks I was speaking about in the Alligator tutorial I wrote. And as far as I can tell, there’s no way for you to “add” any lag to the LFO in the Alligator because you can’t, for example, take an LFO from the Pulveriser and use that to affect the LFO of the Alligator.

Oh and by the way, did anyone catch that little note on the back of the Pulveriser? It points you in the direction of how to use the “Lag” feature. However, I don’t see a similar note on Alligator. Too bad.

  • Tremor to Frequency & Tremor to Volume knobs: Here’s how I think of it. When you use the “Tremor to Volume” knob, you are creating Tremolo (change in amplitude over time, or more colloquially, a “Volume Wobble”). Depending where the volume knob is located, this Tremolo effect tremors lower (to the left) or higher (to the right). But it’s more of a Vibrato effect when using the “Tremor to Filter” knob. Because the Tremor creates a “Filter Frequency Vibrato” — think Dubstep Bass Wobble. I honestly don’t know if musical terminology has an alternate name for “Filter Frequency Vibrato” since strictly speaking, “Vibrato” refers to a change in Pitch, not in Filter Frequency.

Follower Section

The Follower is an Envelope Follower that takes the incoming Pulveriser audio and converts it to a CV signal that you can use to modulate all kinds of things both inside the Pulveriser and outside the Pulveriser (via the CV on the back of the Pulveriser – don’t worry, we’ll get to that shortly).

  • Trig: This allows you to manually trigger the Follower section. If you do this, you are no longer using the Audio alone to trigger the Follower. It becomes a manual process (for as long as you hold down “Trig”). Once you let go, if you have any audio going into the Pulveriser, it triggers the Follower to act. Of course, you can disconnect audio from being sent into the Pulveriser and use the Trig button to manually trigger the follower. Nothing is preventing you from doing that. In that case, the Follower is purely manual, with no audio controlling the Follower whatsoever.
  • Threshold: Controls the Threshold of the Follower.
  • Lamp: The Lamp is just a simple red light which turns on while the Follower is triggered. Note that the intensity of the red light shows the level of the Follower. So if the light is dull, the level is low. If the light is intensely red, then the Follower level is high.
  • Attack: Controls the Attack of the Follower.
  • Release: Controls the Release of the Follower.
  • Follower to Rate: The Follower affects the Rate. So if you aren’t using the Tremor to affect either the Filter Frequency or the volume, this knob does nothing. If, however, you are using the Tremor for anything, using this knob will basically send the follower to the Tremor Rate. Depending where the Rate knob is “set” turning this knob left will shift the rate downward (slower rates), and turning this knob right will shift the rate upward (faster rates). So, for example, if the Tremor is affecting your volume, and the Tremor Rate is set to 1/4, turning the knob right means the volume will be “wobbled” at a rate starting at 1/4, but then the wobble will get faster — move at a faster rate — depending on your follower settings. The Follower is kind of like a “rate envelope” (i.e.: it changes the Tremor Rate over time). With the knob set further left of center, the rate still starts at 1/4, but becomes “slower” over time. Personally, this is one of the most interesting knobs on the whole device IMHO.
  • Follower to Frequency: Similar to the “Tremor to Frequency” knob, this knob sends the envelope follower to control the wobble of the Frequency. You can get some really interesting effects when using both Tremor and Follower sent to the Frequency, so its important to play around with both knobs in tandem (though you don’t have to). This is bipolar. Moving the knob more to the left, and the Frequency wobbles below where the Frequency knob is set. Moving the knob more to the right, and the Frequency wobbles above where the Frequency knob is set.

Mix Section

  • Volume: This is the master volume for the Pulveriser. Pretty standard.
  • Blend: This blends the original audio signal with the “Pulverised” audio signal. In this sense, it acts as a Dry/Wet knob. However, when you use this in conjunction with the Squash on your Kick drum, for example, it turns into a Parallel Processor. The nice thing about using the Pulveriser in this way is how easy it is to create create Parallel Compression for your audio, because you only need one device and two knobs to achieve the effect. Of course, you can still use all the other features, such as Dirt, Filtering, Tremor, etc.

Ins and Outs of The Pulveriser: A Look at the Flipside

The back of the Pulveriser presents several ways you can modulate the Pulveriser with CV and output the Tremor and Follower to modulate other devices in Reason. Here’s the skinny. . .
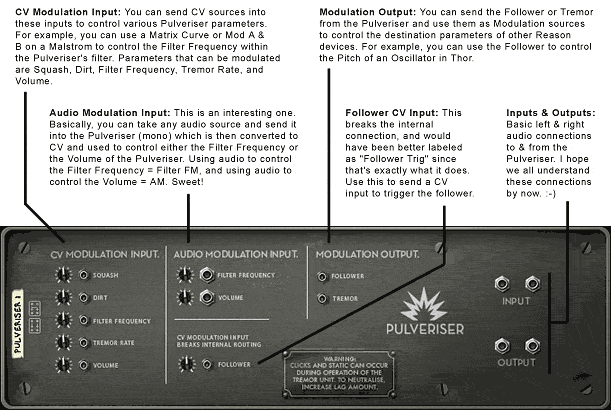
An explanation of the connections on the back of the Pulveriser device.

I won’t go into explaining all the uses of the inputs / outputs and CV connections. Instead, the image pretty much says all you need to know. In the next article, I’ll go over some of the uses of these connections, and how you can use them in various Pulveriser techniques. Suffice it to say you have a lot of power on the rear of the device, as I hope you can see from the image above.

Basic Application: Parallel Compression.

So after reading that somewhat elaborate explanation of all the parameters on the Pulveriser, where do you start?

A hint comes in the way I’ve explained things. Notice that each part of the front of the Pulveriser is divided into sections. These sections can be used independently or in tandem to produce results. In addition, the Pulveriser’s sections are also very interdependent; arguably more-so than the other effect devices. So, for example, if you want to Parallel Compress your kick drum you would create your drum sound, and then add the Pulveriser as an insert effect. Bypass the filter section, and use the following:

Squash and Release + Blend = Parallel Compression

Instant Parallel Compression using 3 knobs. It really can’t get much easier than this.

Let’s compare this to how you would traditionally set it up in Reason. To get this setup outside the Pulveriser, you would have to split the output of your drum module and send one split into an M Class Compressor and then out to Mix Channel “1” and then send another split directly to Mix Channel “2.” While you can say that this setup provides for more control over the compression, you could also say that it involves more routing, more time to setup, and more controls to worry about. In our Pulveriser setup, this process is much more efficient and easy to setup and control, at the expense of a slight loss in some of the finer aspects of control (you don’t have Compression Attack, for example, which you DO have with the M Class Compressor setup).

In the Pulveriser, the M Class Compressor would be akin to the Squash and Release knobs, while the two faders used to “blend” the two Mixer channels together would be akin to the (you guessed it) Blend knob.

Here’s a video to show you the comparison:

So which setup do you select? That all depends on what you feel sounds better to you, and it’s important to note that both setups are equally valid. The Pulveriser simply provides you with a convenient way to set up Parallel Compression.


Well that’s it for now. I’m a little worn out from writing all this stuff out. But I’ll come back and continue with the Pulveriser to see some of the cool things you can do with it. Stay tuned. And write me if you think of some really wacky ways it can be used. From my own experiments, I’ve learned you can do everything from enhance and warm up sounds to completely destroy them. Hours of fun, and you won’t hurt anything except maybe your hearing while you experiment. Let me know what you think. And thanks for reading this.

Echodile Deluxe

Here’s an interesting patch that I submitted to the productspecialist@propellerheads.se email in response to their first video in the “Reason Sound Design” series, a new series put out by the Propellerheads to help us all learn a little more about the Combinators inside the Factory Sound Bank, and allow the user community to submit their patches. I love it when they launch a new series!

Here’s an interesting patch that I submitted to the productspecialist@propellerheads.se email in response to their first video in the “Reason Sound Design” series, a new series put out by the Propellerheads to help us all learn a little more about the Combinators inside the Factory Sound Bank, and allow the user community to submit their patches. I love it when they launch a new series!

Here’s the original video in case you’ve been living under a rock and don’t know about this new series:

So without further ado, I give you my humble take on this type of technique. . .

The 4-Way X-Fade Echodile Deluxe

Download the .reason file (example) and Combinator patch here in zip file format: echodile-deluxe.

4-Way Crossfade Echodile Deluxe
4-Way X-Fade Echodile Deluxe

First, here’s a video to showcase what the Echodile Deluxe sounds like:

An explanation of the Controls:

Pitch Bend: This is connected to the Echo Envelope.

Mod Wheel: Connected to the Delay R Offset

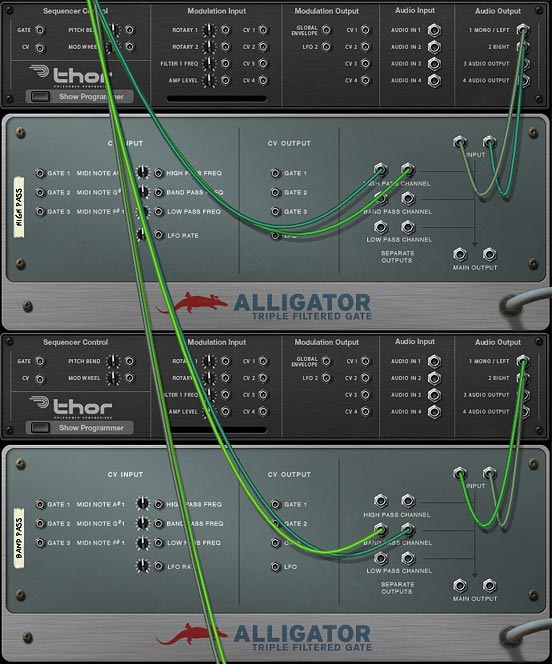
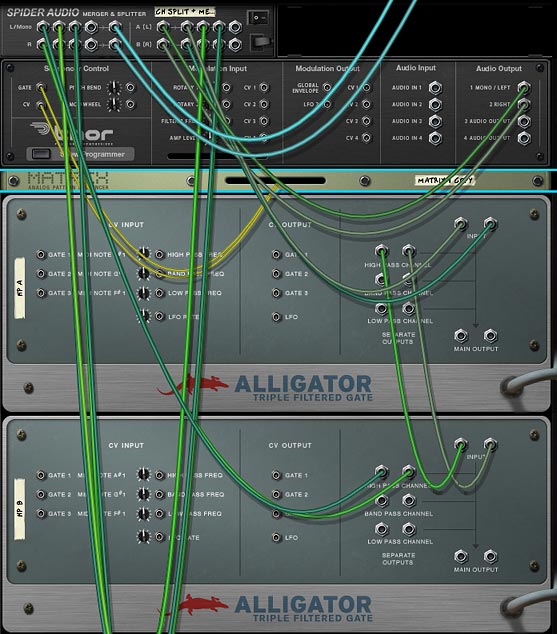
Rotary 1: This rotary crossfades between 4 different Alligator Patterns, and is really the heart of the whole thing. It allows you to blend any two of the four Alligators together using a single Rotary. Ed Bauman came up with the idea of using the Thor’s Shaper set to a Sine wave to fade between four different Mixer Channels. If you want to know more about this little trick, I wrote about it here. So in the interest of full disclosure, I wanted you to know this was not my own idea. A good artist mimics, a great artist steals. According to Picasso anyway.

Note: In order to have all four Alligators Crossfade properly, you will need to either press the “Run All Pattern Devices” button on the Combinator, or press “Play” on the Transport first. Otherwise, the CV-based Thors’ step sequencers won’t start running, and that’s necessary to let the signal pass through them.

You’re also not tied to using these 4 Patterns. You can, of course, change them around to your liking, or else load completely new Alligator Patches into each of the 4 Alligators. In this way, you can really make this device “your own.”

Rotary 2: Echo Feedback. Simple enough. Mix / Max values are 0 / 72

Rotary 3: Shift. Allows you to use the Shift knob of all four Alligators at the same time.

Rotary 4: Delay Time. I ran out of Programmer assignments for the Echo unit, so I had to route this through the P-Pongy Thor’s Rotary 1 and send that into the Delay Time CV on the Echo. So you won’t see the delay move visually on the Echo.

Button 1: Freq. Shifter. The LFO from each Alligator is split out to all three filter frequency bands on the respective Alligators. This way you get some further Filter modulation if you want it. Turns it on or off.

Button 2: Smear. I love this little button. It cranks up the LFO in the Echo to give it a really nice gritty electro quality. Sweetness to my ears.

Button 3: Pingy-Pongy. Turns the Ping Pong of the echo on, but also wobbles both the Ping Pong Panning as well as the Feedback Offset R knob, based on the settings in the Pulveriser.

Button 4: Delay Time Sync. Turns on the sync.

Hope you guys have fun with it! 😉

71 – Entering Song Contests

One of the best things you can do to learn, improve, contribute, and generally be creative is to enter your music in contests. Usually there are several contests through magazines, online music forums, bandcamp, soundcloud, and the like. I would strongly urge you to look up some of them and enter into the contests you feel are appropriate for your style of music.

One of the best things you can do to learn, improve, contribute, and generally be creative is to enter your music in contests. Usually there are several contests through magazines, online music forums, bandcamp, soundcloud, and the like. I would strongly urge you to look up some of them and enter into the contests you feel are appropriate for your style of music.

First, some Suggestions and Tips when Contributing

There’s a few suggestions I would make when looking at which contests to enter.

  • Look for a contest where you find like-minded people and musicians that will be accepting of your work. For example, if a contest is put on by a cinematic club, you wouldn’t post country music. So first, read up about the contest, listen to some of the tracks done for previous competitions of the same contest, try getting in touch and networking with individuals that are a part of the contest or group submitting their tracks to the contest. And then get up the courage to submit your work.
  • Read the rules! I can’t stress this enough. Read the rules and then follow those rules. The worst thing you could have happen is that you win a contest only to be disqualified because you didn’t follow the rules properly. Remember that unless YOU are the organizer, you can’t make the rules. Therefore, don’t argue about them. Just follow them. If you have a question, don’t hesitate to ask for clarification. And suggest ways to improve the competition in the future. But remember the goal is to get your music out there, connect with others, and learn more about music in general (others’ music and your own).
  • Generally, don’t submit a work longer than about 4 minutes, unless the competition specifically asks you to. Long drawn-out tracks are a surefire way to bore even the most die-hard music enthusiast, and will probably tire out the judges and those that will have to listen to your music. Make it interesting and get your point across in a reasonable length of time. Sure there are exceptions to this rule, but if it’s not specified, assume a length of 3-4 minutes is standard. And see the previous point: if you don’t know, ask!
  • Listen to the music of others and participate when you have a point and when and where you can. Discuss what you like about other peoples’ work. Provide “Constructive Criticism” and DO NOT give an opinion without any feedback. You know what I mean. Don’t say “this sounds good” or “love it.” That’s not helpful at all. And if you have nothing to provide, then just keep your mouth shut! A helpful comment always comes with honest feedback which helps the musician learn what is working and what is not working, and always with zero negativity. For example, “The compression on that kick drum seems a little too high for my taste, and the melody line comes across too rigid. Perhaps try to lower the compression on the Kick drum and try using and arpeggiator on the melody. That could be one approach to enhancing the track. But that bass you have going on is perfect. The frequency is just where it needs to be.” Notice here that you’ve not said anything negative and you’ve provided some helpful ideas. As an aside, it’s usually good form to tell the musician what you enjoy about the track and what you feel works in the track if the majority of your comments are things you would do differently in the track.
  • Don’t overdo it! If you are commenting 10 times on every song or in response to every single comment, people are going to get tired of listening to you, and you’re probably cluttering up the competition with a lot of crap. Tone it down. Think about your responses. And if you’re impulsive (hey, we’re all impulsive from time to time, especially about things that we feel passionate about), instead write your comment down in notepad and save it for one day. Then go back to it and see if you still want to post it. The one day rule gives you some time to ponder what you’re saying, maybe you want to rework what you previously wrote as well. And it gives you a break from the forum / competition. Most importantly, it gives the other people a break from YOU. And remember, a well-formed and well thought-out comment is usually greeted with much more acceptance than an impulsive one.
  • Most importantly, have fun submitting your track(s). Well-run competitions are fun places where everyone shares ideas. Make the most of them. Listen to what others have to say about your work. And try to grow from the experience. You will find many useful ideas that others suggest are often ideas you hadn’t thought about before, and it may be just what you need for some new inspiration.

Always remember that competitions are NOT about winning, despite what others might say. Competitions are about people getting together to share their passions. They are about learning how to take your music to the next level. They are about learning from the techniques about others. Winning is merely a by-product and a cherry on the cake. If you win, great. But if you lose, you still win. Those that enter competitions merely for the sake of winning are actually the ones that are losing. Because they are stagnant. Those that get the most out of the competitions are those that open themselves up to the process and learn from the experience. They are the ones that go home with new friends, new ideas, new techniques, and new ways to improve themselves. Ask yourself which one do you want to be?

My Song Contribution to the Reason Song Challenge III

So with all of that said, here’s my own entry from the Reason Song Challenge III put on by Rob (FailedMuso). In order to use this file, you will need to download Patrick’s (Bitley’s) DeLight Fairlight Demo ReFill. The whole idea for this competition was to create a full song from the sounds found in that demo ReFill. Lots of entries were created. I think a total of 32 songs were submitted. Mine did not make the grade. But as I said, that’s totally ok with me. I’m just very happy to be listening, talking, and sharing with such a talented group of people. That’s why I wanted to share my track with everyone. That way you could take a look at how it was put together, and perhaps find a few ideas in there which may spark your own creative juices or inspire you in some way.

So here is the final entry I submitted to the contest (sadly, it did not come in first, second, nor third place. Nor did it get any honourable mentions). But that’s ok. As I said, even when you don’t win, there’s a lot you can take away from it, and a lot you can learn.

Enlightened v2 by Phi Sequence

And you can download the song here: Enlightened. The file is zipped up, and when you open it you’ll also need Reason 6 to inspect it (since it was done in Reason 6 and is a .reason format). Feel free to look it over, play around with it, remix it and send it back to me. Have at it. But remember it’s still copyrighted and I still own the rights to it. So no distributing it without letting me know first.

Finally, here’s a video I put together on YouTube to show you what’s inside the file. I think the hardest thing was coming up with Hi Hats (none were included in the demo ReFill), and making the song “my own.” It was also interesting to try to cull the proper sounds I wanted out of the demo. For instance, there were no sweeps inside the demo, so I had to make changes to the synth parameters to get some sweeps out of them. Little things like this add up to a lot of fun hours working inside the song document and making the demo sounds do what I wanted them to do. But in the end, I can honestly say it’s all worthwhile.

Also, limiting your song palette in this way forces you to work within boundaries. And that is sometimes a great source of inspiration. Especially when all the ReFills out there have massive libraries of sounds and effects. It’s very easy to get lost in a sea of sounds. Sometimes a competition like this comes along and it forces you to work in a limited way. Or else it forces you to find workarounds you might not have ever thought about before. In short, it’s a great way to stimulate your musical mind.

I hope you found some of this useful information. Drop me a comment and let me know what you think? I’d love to hear from you.

70 – ChipTune Sounds

There’s a wealth of great information out there on recreating the sounds of old computer chips, like the Commodore 64 or old SID chips and video console chips, and using these sounds to create tunes (Chiptune). I honestly knew very little about the subject until I, along with several other very talented folks, were asked to put together some fresh new sounds for the Reason 6 Factory Sound Bank (FSB). So here I’m going to explore and explain how I created a few of these sounds, and show you that you can definitely recreate some convincing Chiptune sounds using nothing but Reason and a little experimentation.

There’s a wealth of great information out there on recreating the sounds of old computer chips, like the Commodore 64 or old SID chips and video console chips, and using these sounds to create tunes (Chiptune). I honestly knew very little about the subject until I, along with several other very talented folks, were asked to put together some fresh new sounds for the Reason 6 Factory Sound Bank (FSB). So here I’m going to explore and explain how I created a few of these sounds, and show you that you can definitely recreate some convincing Chiptune sounds using nothing but Reason and a little experimentation.

There are no additional project files for this tutorial because all the project files can already be found in the FSB (Factory Sound Bank) for Reason 6. So read the article, watch the videos, and I’ll point to where you can find these chiptune sounds and show you how they are put together.

The Process: It’s all in seeking out the Answers!

Before I delve into creating these wily little playful sounds, I want to shed a little light on how I approached the subject. Because hopefully that might give some insight into the process of sound creation and more importantly, might inspire you to seek out the knowledge you need to tackle any sound design project, even if you know very little about it. The whole process starts by asking yourself two questions:

  1. What is the sound I’m looking for? What does Chiptune sound like?
  2. How can I recreate those sounds inside Reason.

The answer to the second question depends upon the first, so your first step is to seek out Chiptune sounds. Try to find some sites on the internet that cater to that specific sound and immerse yourself in them. It also helps if you can download a few sounds in your genre of choice and then deconstruct them using a spectrum analyzer. The more you do this, the better you will be at instantly recognizing what type of Oscillator was used, envelope settings, and the like. And yes, this is another plea for the Props to introduce a fully-featured Spectrum Analyzer in Reason. Because, for a sound designer, this is a very important analysis tool.

Once you have an idea of how the genre or specific instruments sound, the next step is to seek out information on how those sounds are built. I went to my best virtual friend next to Google to get the answer: Wikipedia. Enter “Chiptune” into the search box, and you have all the information you need to figure out how to build chiptune sounds inside Reason (or at least a very good start). Look for keywords like which “Oscillators” and “Waves” and “Filters” were used. Then you can transfer this knowledge over to Reason and be well on your way to creating vintage Chiptune sounds.

So if you really want to know about Chiptune, go here: http://en.wikipedia.org/wiki/Chiptune. After you’ve read that (especially the section on “Technology” and “Style”), come back here and we’ll continue with taking the knowledge from that article and build our chiptune sounds in Reason.

Note: There are several sites dedicated to creating Chiptune sounds, software and hardware used to create chiptune sounds, discussion groups, sound share sites, and a plethora of everything to try to recreate these old video game consoles and chips. Simply searching on Google will give you a wide variety of information and I urge you to explore those avenues as well, if this is your thing.

Components of Chiptune Sounds

Now that we have an idea of what Chiptune sounds like, and we know a little about what elements of the synthesizers are used to recreate those sounds, we can jump into Reason. Of course since this is a Reason article and since we’re using Reason software, it makes perfect sense that we are taking the software route to recreate these sounds. But that doesn’t mean you can’t recreate them via hardware instead. You could also, if you’re lucky, have access to those older chips from the 80’s and build your own box if you are feeling inspired by your inner engineer spirit. There’s also a wide variety of other software dedicated to recreating these chips and chip sounds. But that’s a whole other article for a totally different kind of blog. Here, it’s all about software and Reason.

Most of the components of the chiptune sounds use some or all of the features below, and are very simple to create in Reason. As a matter of fact, you can use any or all of Reason’s synths to mimic some very realistic chiptune sounds. Where the fun comes is adding your own variation or style to the sound. Since the chips used to create the sounds of the 80’s arcade devices were very basic, they required very little CPU and that holds true even today. So you can create whole songs out of them with very little strain on your processor.

  • Usage of Square Wave (also called Pulse Wave)
  • Usage of the Bandpass filter
  • Bitcrushing to add distortion and a low quality feel
  • White noise for drum sounds
  • Arpeggios were simulated with a fast-changing pitch (something easily simulated by an LFO affecting the Pitch)

That’s pretty much it in a nutshell. Now let’s see how we can set up our sounds using all three Reason synths.

Malstrom Chiptune Sounds

Here’s the video that shows you how to build some chiptune sounds using the Malstrom. Think of this as your own Malstrom chiptune emulator:

Here’s the process to create some interesting Chiptune sounds with the Malstrom (the short version):

  1. Create a Combinator and a 14:2 Mixer inside the Combinator. Then create a Malstrom, so it is auto-routed to the first channel of the Mixer.
  2. Turn off filters A & B in the Malstrom.
  3. Select Curve 26 for Modulator A, and Curve 3 (square wave) for Modulator B. You can play around with the Curves after you’ve created most of the patch. The key is to select sharp-edged (stepped or square) waves. This provides a distinctive chip sound for the patch.
  4. Turn the Rate knob for Modulator A to around 104, and the Rate knob for Modulator B to around 96. Also set the “Modulator A to Pitch” knob to 63 (all the way up). And then set the “Modulator B to Motion” knob to around 22
  5. In Oscillator A, select “VSWaves” and turn the Motion down to -64. Then turn the Index up to 127. Finally, set the ADSR envelope of Oscillator A to 0 / 127 / 0 / 0
  6. Set Polyphony to 1.

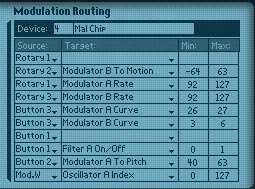
Now when you play the Malstrom you should hear some interesting chippy sounds coming out of it. You can now set up the Combinator Rotaries/Buttons to play around with the Rates of both Modulator A & B, as well as the Modulator A to Pitch, Modulator B to Motion, and Oscillator A Index. Here are the settings I entered for the Malstrom Emulator patch I created for the Reason 6 FSB. The idea is to keep things playful, flexible and usable.

The Combinator's Modulation Routing settings for the Malstrom, which were used in the Chiptune Emulator A patch from the Reason 6 FSB

Adding some “Crunch” or Bitcrushing into the Mix

To add a bit of bitcrushing to the sound, you can do the following:

  1. Select the 14:2 Mixer and create a Scream 4 device. This will auto-route to the first Auxiliary of the Mixer.
  2. Turn the “Return” knob of Aux 1 down to around 50 or so. Then turn Channel 1 Aux 1 all the way up to 127.
  3. Select the Scream device, and set the Damage Control to full (127), Damage Type to “Digital,” and P1 to 105.
  4. Select the “Scream 4” in the Combinator Mod Routing section, and enter the following settings: Rotary 4 > Parameter 2 : 0 / 127. Also set Button 4 > Damage On/Off : 0 / 1.

This way, Button 4 acts as the Bitcrush On/Off switch, and Rotary 4 acts as a “tone” knob for the bitcrusher. If the effect is too much for you, reduce the Return knob on the Mixer for Aux 1 down a bit more. If it’s not enough, turn it up.

Thor Chiptune Sounds

Here’s the video that shows you how to build some chiptune sounds using the Thor synth. Think of this as your own  Thor chiptune emulator:

Here’s the process to create some interesting Chiptune sounds with Thor (the short version):

  1. Create a Combinator and a 14:2 Mixer inside the Combinator. Then create a Thor synth, so it is auto-routed to the first channel of the Mixer.
  2. Ensure Oscillator 1 is Analog (by default, this should already be set). Then change the wave to a square (pulse) wave. Use the Oscillator 1 Mod setting to 64.
  3. Bypass the Filter 1 slot, but ensure the Oscillator is still going into Filter 1 (the red “1” button to the left of the Filter 1 slot).
  4. Set the LFO 2 to a square (pulse) wave, and the Rate to somewhere around 11.3 Hz. Things are more interesting if you don’t “sync” the LFO to the tempo, so leave that off for now.
  5. Set the Amp Envelope’s ADSR to 0 / 127 / 0 / 0
  6. Set Polyphony to “1” and Release Polyphony to 0 (zero).
  7. In the Modulation Bus Routing Section (MBRS) at the bottom of Thor, enter the following: LFO2 : 66 > Osc1 Pitch
  8. Setting up the “Bitcrusher” is exactly the same as previously described when creating the Malstrom patch, so you can set that up for your Thor chiptune emulator if you desire.

Now when you play the Thor synth you should hear a classic Chiptune sound. The next step is to set up the Combinator Rotaries/Buttons to play around with the Rate of the LFO2, as well as the PWM (Pulse Width Modulation) of Oscillator 1.

The interesting thing about using Thor is that you also have access to the built in step sequencer. So another approach is to set up a random pattern to a “Pendulum” setting, then unsyncing the step sequencer, and having it trigger from a button on the Combinator (see the video for more on this). Setting up the sequencer this way means that you have an “auto-sequenced” pattern triggered from the Combinator button. Handy for instant chiptune.

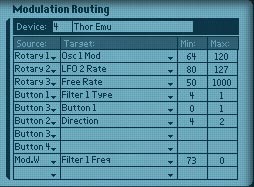
Here are my own Combinator settings for the Thor device:

The Combinator Modulation Routing settings for the Thor chiptune Emulator.

Now let’s have a look at some Chiptune sounds triggered via Kong.

Here is another little patch that I put together for the FSB, along with some other talented people who helped out by providing a few of their sounds as well. It’s a little Kong Kit that you can experiment with. Note that in order to create some of the drum sounds that are classic 80’s arcade, you will want to use “white noise.” This formed the basis for classic chiptune drums.

So there are a few outlines to create classic 80’s arcade sounds. With a little tweaking, I’m sure you can come up with several authentic sounding video game sounds using Reason. And I’d sure love to hear them. Furthermore, armed with this knowledge, why don’t you try out using the Subtractor to create chiptune sounds. And if you come up with some good ones, please be sure to send them my way and let me have a listen. Until next time, happy Reasoning.

69 – All about the Alligator (Part 2)

Let’s continue with the Alligator and find a few other tricks that it can perform. In the first part, I looked at how the Alligator works, and provided a few ideas for how to work with it. In this part, I’m going to get a little more practical and show a few new ideas you can incorporate into your tunes. Hopefully this will provide you with some new creative inspiration.

Let’s continue with the Alligator and find a few other tricks that it can perform. In the first part, I looked at how the Alligator works, and provided a few ideas for how to work with it. In this part, I’m going to get a little more practical and show a few new ideas you can incorporate into your tunes. Hopefully this will provide you with some new creative inspiration.

You can download the project files here: alligator-techniques-part2. There are some Combinators and a .reason file showcasing the examples found below. In the .reason file, I’ve used mutes to silence all the tracks. To listen to a track, unmute it. I hope you find some of these tricks useful.

Also don’t forget that my latest Refill, Pureffects, is available with 1,250 effect patches designed specifically with Reason 6 in mind. There’s 200 Alligator patches alone, and several Alligator-based Combinators with all kinds of interesting routing ideas. Read More about the ReFill.

So let’s continue where we left off last. . .

Technique #5: Using the Alligator Effects without the Gates or Filters

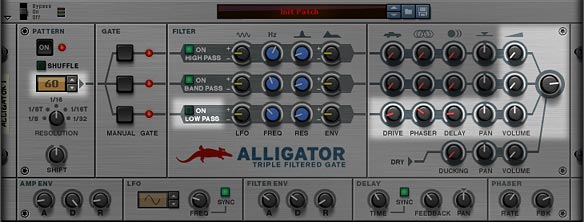
After I wrote the first tutorial, it occurred to me that you can use each part of the Alligator independantly. For example, you can use the Gates only, without the Filter and Effects section. Or you can use the Filter section only, while keeping the Gates continually open. And lastly, you can use the Effects or Mixer sections only, if that’s all you want to use (Drive, Phaser, Delay, Pan, Volume). The way to achieve it is as follows:

  1. Start with “Technique #2: Keeping your Gates Open.” To recap, you set the pattern to #60, and ensure the Amp Envelope Decay knob is set to 127 (fully right). Then flip to the back of the Alligator, and send Gate CV Output 1 to Gate CV Input 3, Gate CV Output 2 to Gate CV Input 1, and Gate CV Output 3 to Gate CV Input 2. This way all your gates are Fully open.
  2. Fully turn down the volume of the High and Band pass filters. Note: Alternately, you can move the main left/right output cables to the Low Pass Channel left/right outputs on the back of the Alligator. This way, the audio input into the Alligator is only passing through the Low Pass section of the Alligator. Note also that this doesn’t have to be the Low Pass Channel. This idea works with any of the Channels in the Alligator, since the effects and mixer sections are the same for all 3 Channels. The idea is to pick one Channel, and mute the other two.
  3. Turn off the filter section (green light) on the low pass filter.
  4. You might also want to reduce the volume of the low pass filter (I found a volume setting of 64 for the low pass volume combined with a volume setting of 100 for the master volume is equivalent to bypassing the Alligator — at least to my ears).

Now your signal is passing through the low pass Channel only, and with the Gate always open and the Filter section turned off, you can use the effects & mixer sections independently to affect your sound.

The Alligator Front Panel, showing the areas of importance when trying to use a single channel for effects and Mixer only; in this case, using the Low Pass Channel

Technique #6: Using External Effects

As with all Reason devices, you can very easily set things up to use external Reason devices. In other words, you are not limited to using the Drive, Phaser, and Delay that’s already built into the Alligator device. If you wish to use an external effects device, such as an Echo, Scream, or even any of the Kong FX modules, you can easily set this up. Here’s how you go about it.

  1. Select the sound source device or Audio Channel and then add an Alligator so that it’s auto-routed.
  2. Determine if you want the external effect to be applied to all three Channels or just one of the Channels.
  3. If you want the effect applied to all three Channels, it’s super easy. Just select the Alligator and add your effect device (a Scream, for instance). The Scream is auto-routed after the Alligator and will be applied to the Gated signal from all three Channels.
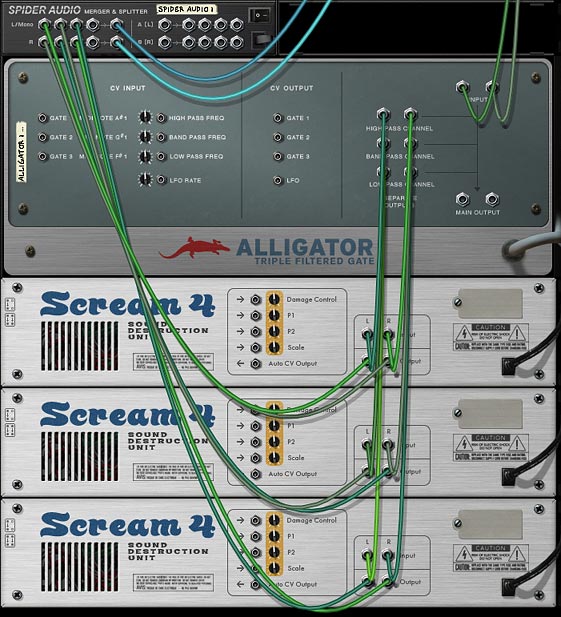
  4. If, however, you want to have the effect applied to specific Channels, select the Alligator and add your effect device (a Scream, for instance). Then flip to the back of the device (Tab), and move the main left/right Alligator audio output cables to one of the three desired Channel output pair (High, Band, or Low Pass Channel).
  5. If you desire, you can do the same thing for the other two Channels by adding other effects and routing them in a similar way. This way, you could have a Chorus effect inserted into the High Pass Channel, a Scream inserted into the Band Pass Channel, and a Pulveriser inserted into the Low Pass Channel. Or you could have three different screams inserted into the three different Channels, and set the parameters/settings for all three Screams differently to get more variation.

The more you experiment with external devices, the more I’m sure you’ll find how versatile the Alligator is in processing your sounds. You might even wonder how you ever lived without this device.

The back of the rack, showing how to process the audio through single Alligator channels and external effects.

Here’s the video showing you the above two techniques:

Technique #7: Gating Three different Audio signals across Three Different Gate Channels.

Here’s an interesting way to go about using the Alligator Effect device. How about taking three different sound sources and passing them through the three different Alligator Gate Channels, and then outputting them to three different Mixer Channels? Confused yet?

No, you can’t really do this with a single Alligator because the Alligator only has one pair of Inputs. However, you can create three Alligators, and then send your three audio sources into the three different Alligators (one audio source for each Alligator). Once this is done, you can send the separate channel outputs on to their own Mix Channel Inputs. The setup would look like this:

  • Audio Source 1 > Alligator “A” main left/right input > High Pass Channel left/right output > Mix Channel “A” left/right input
  • Audio Source 1 > Alligator “B” main left/right input > Band Pass Channel left/right output > Mix Channel “B” left/right input
  • Audio Source 1 > Alligator “C” main left/right input > Low Pass Channel left/right output > Mix Channel “C” left/right input

The nice thing about this setup is that you can choose to keep all three Alligators’ “Pattern” section the same, in which case the “Pattern” sounds sync nicely together between all three Alligators, or you can spice it up by setting up different parameters in each of the Alligator “Pattern” sections. For example, you could set Alligator “A” to have a resolution of 1/8, Alligator “B” to have a resolution of 1/16, and Alligator “C” to have a resolution of 1/32. And/or you can set all three Alligators to different patterns entirely. This way, you can attain some very intriguing and unique gate patterns going on, and all your friends will wonder how the hell you did it. Well, maybe not, but it’s something worth a try!

Showing different audio sources processed by different alligator channels to achieve an interesting result.

Technique #8: Oh Hell, let’s just dive off the cliff already!

You want something completely off the wall right? Well here goes. Since the Alligator contains separate outputs, you could theoretically “Nest” the Alligators one after the other. This creates a Double-Gate-Filter-FX Channel for any audio source passed through it. Here’s how this little trick works at it’s most simplest (note that you can create Triple- Quadruple- and so on, nested Channels up to the point where it probably just won’t sound good anymore and your CPU will have a heart attack and lie dead on the operation table). This technique goes down one nested level, and only highlights the “High Pass” Channel. Of course, there’s nothing stopping you from mixing/matching nested channels either. For example, a High Pass Channel goes into a Low Pass Channel, or a Low Pass Channel goes into a Band Pass Channel. Just be warned that you may need to write this out as a diagram on paper first before you lose yourself in Cables.

  • Audio Source > Alligator “A” main left/right input > High Pass Channel left/right output. . .
  • . . . Alligator “A” High Pass Channel left/right output > Alligator “B” main left/right input > High Pass Channel left/right output > Mix Channel left/right input

So now that you’ve set it up in this way, if all your Alligators are set to the exact same parameters, adding on these additional “nested” Alligators won’t produce a different sound. Where things get interesting is when you start changing the parameters so each of the Alligators are set with unique parameters. See the Project Files at the top of this tutorial for a Combinator that shows this type of setup.

Of course, if you want to use all three channels, you’ll need to create more Alligators, and each nested level will require a new Alligator. You’ll also need a Spider Audio Merger/Splitter to both split the Audio Source into the three channels, and then use the Merged side to merge them back again before going on to the Mix Channel input. As I said, this could get very tricky very quickly, and will probably be quite CPU-intensive. My advice would be to start off with one Channel and two levels (as the example shows above), then start setting up the parameters on both Alligators. See how that works out for you. Then build it up by moving to the next Channel (if you like), and so on.

Processing your audio source through multiple Alligator Channels. This shows the High Pass Channel in series. But you can do the same with other Alligator channels.

Technique #9: Let’s Dial it Back a Bit. Adding Filter Movement

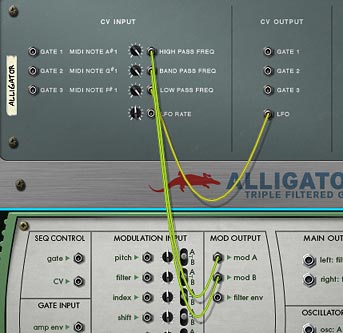
This technique is a little less freaky, and I’m going to end off with it so that you give your mind a chance to wrap around that last little technique. In this one, we’ll do something easy. We’ll take some Malstrom Curves and send them into the Alligator’s Frequency CV inputs to create some movement. Then, since there is only 2 Curve’s available with the Malstrom, we’ll steal the LFO CV output and send it into the third Filter Frequency CV input (all within the same Alligator). Sounds more complicated than it actually is. But here’s an image that shows the setup:

Showing the Malstrom's 2 Mod A/B waves and the Alligator's LFO to provide movement to the Alligator's 3 filters.

Those are all the ideas I have for the Alligator at the moment. I’m sure there’s many other interesting ways it can be used. If you have any other ideas, I’d love to hear them, so please don’t be shy and comment to let me know what you’ve come up with. I’m all ears. Until next time, go make some killer music. 🙂