60 – Generative Ideas (pt. 1)

Enough about Kong already. Let’s try something a little more interesting. Let’s start with a concept: Generative Music. And let’s see what we can do with it in a Reason environment. For starters, let’s see how we can extend the Thor step sequencer a little bit. Well, okay, let’s make it go absolutely NUTS!

Enough about Kong already. Let’s try something a little more interesting. Let’s start with a concept: Generative Music. And let’s see what we can do with it in a Reason environment. For starters, let’s see how we can extend the Thor step sequencer a little bit. Well, okay, let’s make it go absolutely NUTS!

You can download the project files here: thor-extended-step-sequencer-ideas. This contains a lot of different ideas from EditEd4TV, Sterioevo, and myself. All of us had a hand in working out my little idea. And I just want you guys to know that you’re the best! Without your ideas, I never would have been able to make this thing work. So anyway, there are 5 Reason (.rns) files and 5 Combinator (.cmb) files. Read below to see what kind of mayhem you’ll find inside. Note: to “Run” any of the patches in the file, just press Button 1 on the Combinator. This will start the sequence/system going. To stop the sequence/system, press Button 1 again. There’s a “Sound Source” setup in each Combinator to test the sound. There’s also 2 DDL-1 devices in each Combinator which is used to visually see the CV Note / Gate values.

Defining Generative Music

There’s many definitions for what Generative music is. Put simply, it can be defined as music that meets the following requirements:

  1. It must be created by a “system,” which is to say that it requires an algorithm to generate the “structure” (such as algorithms, mathematical equations, number sequences, etc). There must be logic behind it, whether this logic is set up by the composer or the listener.
  2. It is ever-different and changing over time; non-repeatable and “emergent,” as wind chimes are.

Brian Eno provided a really great Generative Music lecture at In Motion Magazine. I would highly recommend giving it some time if you also enjoy this sort of thing.

Starting off with a Problem

First I’ll give you the problem: How do we create a step sequencer pattern that is 128 steps long and randomly selects values between 0 – 127 in real-time? Can this be done in Reason using Thor’s Step Sequencer?

When I was building my “Key Flux FX Processor” behemoth, I wanted a way to randomly select the MIDI note values from 0-127 (C-2 to G8). Using the Matrix was a workaround, however, you have to jump through some serious hoops in order to get it to use note values outside the typical 5-octave range of the device. And even then, the randomizations aren’t really random. You’re selecting from a set of pre-defined patterns that never change. You can click the “Randomize” function in the Matrix, but once the notes are assigned to the Matrix, they’re permanent. Thor, on the other hand, provided a way to assign a “Random” run mode that is random during “Live play” — and this is the crux of the biscuit. This is what can open you up to one area of Reason which is truly “Generative.” It’s like the Holy Grail of building a “Generative System” in Reason. However, like the Holy Grail, it’s elusive. You’ll soon see why.

As for the “Key Flux FX Processor” patch, I settled on the Matrix because I couldn’t solve a simple problem at the time: How to Merge the Note values coming out of Thor, so that you could create patterns longer than 16 steps (the total length of a Thor Step Sequencer). The idea was to set up a series of Thor Sequencers and increase each step by 1, and then randomize the whole lot, so that you can get something truly random going from 1 – 127 MIDI value. Of course, I soon realized that you can’t get something truly random like that with the Thor Step Sequencer because the way it would work is it would go from Thor 1 (randomized between 1-16 MIDI value), then to Thor 2 (randomized between 17-32 MIDI value) and so on. Not “truly” random, but still better than nothing.

However, there are two main issues with Thor’s Step Sequencer:

  1. The Thor step sequencer leaves the gate open from one step to the next and never fully returns to zero between steps. This means that merging the note/gate values sums the previous note value with the next note value. And using the “End Trig” CV to trigger the “Start Trig” of the next Thor sequencer sums the two values together. This could be seen as a bug or a feature, depending on what it is you want to do with the CV values given off by Thor. Sometimes keeping the gate and CV open is a good thing. However, not in this case.
  2. The second issue is that the Note CV values from Thor’s Step Sequencer are bipolar (-64 to +63). Not a really big deal if you understand that. But something that will leave you scratching your head if you’re trying to visualize your CV with a DDL-1 device.

These two seemingly harmless facts about the Thor Step Sequencer ended up in hours upon hours of frustration when I was trying to do something as simple as connect multiple Thors together and have them generate the exact note/gate values to apply to a single sound device.

To recap, here are the three limitations/hurdles we need to overcome in order to tackle the issue:

  1. We need to use Thor, because it’s the only device that can generate a real-time “Randomized” sequence. Using the Matrix is a non-starter because the notes cannot be changed or randomized in real-time (not to mention it uses only a 5-octave range out of the box).
  2. We need to be able to create a Step Sequencer that is 128-steps long, so that each MIDI value has a chance to be selected. Since Thor is 16 Steps long, we need 8 Thors to generate a step sequence from one end of the MIDI spectrum to the other.
  3. We need to build a method to Randomly “play” the entire sequence so that only one MIDI value is selected and played at any one time, and this value can freely jump from any value between 0-127 to any other value between 0-127.

The solution(s)

Hurdle #1:

Tackling the first issue is simple. We use Thor and forget about the Matrix. Check!

Hurdle #2:

The second issue was beautifully tackled by both Sterioevo and EditEd4TV, with two different solutions:

First, Steve (Sterioevo) came up with the brilliant idea of using the Global Sustain on Thor to shut the gate off between notes. This was perfect. You simply connect all your Thors together, send the CV from the Note / Gate outputs through Rotaries in Thor and then use the Global Envelope Sustain to scale the note and gate CV in the Modulation Bus Routing Section (MBRS) in the Thors. This allows the Global Envelope Sustain to “shut off” the gate between the steps, and you can freely merge as many note CV and gate CVs as you like. In essence, you can string as many Thors together as you like and merge them properly. See the project files for his patch.

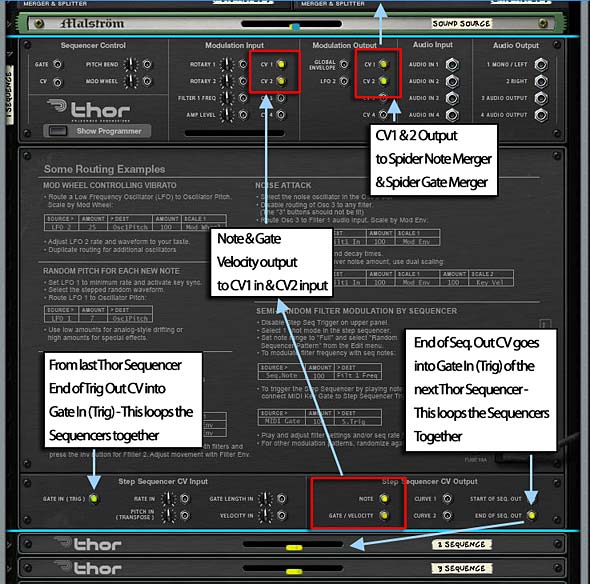
Next, EditEd4TV provided a more compact solution. His solution sends both the note / gate CV outputs into the CV1 and 2 CV inputs on the same Thor, and then outputs them to CV 1 & 2 outputs to the Spider Note / Gate CV mergers. This step is done to convert the note values from bipolar to unipolar (that so-called benign problem #2 was solved). Then in the MBRS, he programmed the following:

CV in1 : 100 > CV out1 : 100 > Last Gate

CV in2 : 100 > CV out2 : 100 > Last Gate

The Modulation Bus Routing Section (MBRS) of Thor showing the assignments and Steps
The back of the first Thor device showing the CV routings to set up the first set of 16 steps in the 128-step Forward-running sequencer where the Thors are strung together and play end to end.

Brilliant. The “Last Key > Gate” (ie: Last Gate) is what shuts off the gate after each step, and allows you to merge the note / gate CV successfully. Now you are free to string up as many Thors as you like, without a hassle. See EditEd4TV’s patch which is also included in the project files. Hurdle #2 has been jumped and solved. Check!

Note: Due to EditEd4TV’s solution being easier to build, and more self-contained, I’m going to build on his patch to solve hurdle #3. Not that Sterioevo’s solution isn’t any less brilliant or usable by the way.

Hurdle #3:

Solving the third problem hit me in the head like a ton of bricks. What was needed was a set of recursive on/off triggers. One Thor needs to be set up to control the on/off state for every two Thor sequences beneath it. Once this is set up, you can then work backwards, building a pyramid of Thor controllers to turn things on and off. Visually, it looks something like this:

Master Controller > > Controller A > > Controller A1 > > Sequence 1 (Steps 1-16)
> Sequence 2 (Steps 17-32)
> Controller A2 > > Sequence 3 (Steps 33-48)
> Sequence 4 (Steps 49-64)
> Controller B > > Controller B1 > > Sequence 5 (Steps 65-80)
> Sequence 6 (Steps 81-96)
> Controller B2 > > Sequence 7 (Steps 97-112)
> Sequence 8 (Steps 113-127)


So I started to work from the bottom of the pyramid upward. It worked out well for Controller A1 controlling two sequences underneath. To see how this was set up, you can look at the “Thor 32-step random sequencer” rns or Combinator file in the Project files at the top of this article. Incidentally, it uses the “double-scaling” lines in the Modulation Bus Routing Section of the Pattern Sequence Thors (so that’s a little nod to Hydlide’s next tutorial all about the MBRS — See his latest on the Mod Matrix Filters and Amps — a great read).

The idea is to create another Thor (Controller A1 in the diagram above) which switches Sequence Thor 1 and Sequence Thor 2 on or off. I used the 2 Curves inside Controller A1, and set them so that they are both 16 steps which are set to “Random” mode, as follows:

Curve 1: Step 1 – 0; Step 2 – 100; Step 4 – 0; Step 5 – 100, and so on. . .

Curve 2: Step 1 – 100; Step 2 – 0; Step 4 – 100; Step 5 – 0, and so on. . .

Then I sent Curve 1 into CV 3 input on the first Thor Sequence, and Curve 2 into CV3 on the second Thor Sequence. In these Thor sequencers (1 and 2), set the following lines into the last 2 lines on the MBRS (the ones with 2 scalers):

The MBRS for the first Thor Step Sequencer
The step sequencer on the "Controller A1" Thor, which uses both curves set in opposition to each other to control the 2 Thor step sequencers underneath it.

So this creates the “Thor 32-step Random Sequencer” patch found in the project files at the top of this article. If you duplicate this same setup for the next two sequences (Sequence 3 & 4), controlled by “Controller A2,” you end up with one level tackled. Our next step is to figure out how to extend this to 64 steps. So let’s try doing that now.

You would think that using this same idea one level higher would yield the same results. What you find out instead is that this trick can only be used once. As soon as you use the double Curve trick one level higher (“Controller A”) to control the level below (“Controller A1” and “Controller A2”), you end up with completely messed up CV values coming out of the system. Trust me: I tried. So what we need to do is find a new trick to select between the two “A1” and “A2” Controllers.

Enter the Mod Bus switcheroo! This time, we need to separate the merged note/gate outputs from Thor Sequence 1 & 2 and Thor Sequence 3 & 4 so that they both are on separate Spider Merger/Splitters. Then send the merged outputs from all 4 of those Spiders into the “Controller A” CV inputs 1-4. Be sure to keep track of what is going where, as shown below:

Note Merge 1 & 2 > into CV 1 input

Note Merge 3 & 4 > into CV 2 input

Gate Merge 1 & 2 > into CV 3 input

Gate Merge 3 & 4 > into CV 4 input
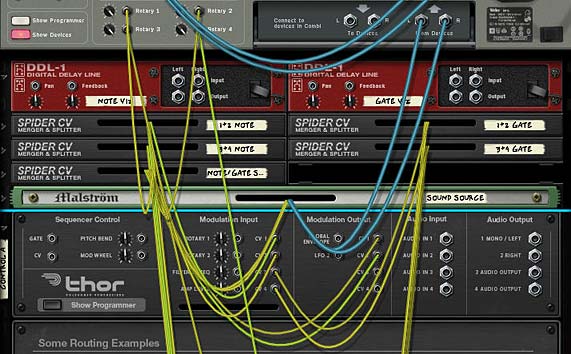
The routings to split the 2 sets of Thor sequencers into their own Spiders, and send the merge outputs into the "Controller A" CV inputs. The CV 1 & 2 outputs are sent to the Combinator Rotaries.

Then you setup the Thor “Controller A” MBRS as follows:

CV In1 : 0 > CV Out1

CV In2 : 0 > CV Out1

CV In3 : 0 > CV Out2

CV In4 : 0 > CV Out2

While you’re there, set up the steps on the Thor “Controller A” the same way you did with “Controller A1” and “Controller A2”:

Curve 1: Step 1 – 0; Step 2 – 100; Step 4 – 0; Step 5 – 100, and so on. . .

Curve 2: Step 1 – 100; Step 2 – 0; Step 4 – 100; Step 5 – 0, and so on. . .

The MBRS and Step Sequencer of the Thor "Controller A"

In the Combinator Modulation Routing section, select “Controller A” and enter the following:

Rotary 3 > Mod 1 Dest Amount : 0 / 100

Rotary 4 > Mod 2 Dest Amount : 0 / 100

Rotary 3 > Mod 3 Dest Amount : 0 / 100

Rotary 4 > Mod 4 Dest Amount : 0 / 100

The Combinator Modulation Routing for "Controller A"

On the back of the rack, send the CV Output 1 & 2 from the Thor “Controller A” into the Combinator’s Rotary 1 & 2, respectively. Note: in the setup shown above, these CV outputs are split with a Spider “Note/Gate” splitter so that I could send the signal to two additional rotaries to visualize the CV values in the two DDL-1 devices, but you don’t need to do this. This is so that I could test out the CV and make sure the values output are indeed random and working properly.

Turn up the CV trim knobs to 127, and on the front of the Combinator, turn the rotaries to zero (0). And there we have it. a 64-step random sequencer. Of course, you have to use 2 Rotary CV sources on the Combinator, but if you have version 5, you can set this up on the new CV inputs, without giving up any rotaries. Take a look at the “Thor 64-step Random Sequencer” patch included in the project files at the top of this tutorial to see it in action.

Finally, to gain access to the next level (Master Controller), I have to concede that I cheated a bit. I used a Thor and called it “Doubler” which essentially doubles the CV values of all the Thor Step sequencers. Then I used a curve value to send a series of random steps set to either a value of zero (0) or 100. This was sent into the final CV input on all the step sequencers, and the following was entered into the MBRS of each Thor Step Sequencer (Sequencers 1-4):

CV In4 : 99 > S. Transp (Step Sequencer > Transpose)

This has the effect of extending the range of the four Thor Sequences from 0-64 to 0-127. Of course there may be a limitation when it comes to changing other parameters of the step sequencers, like Gate Length and Gate Duration, because you essentially have 1 step which acts for 2 outputs. For example, the Gate Length for step value “1” will also double for value “66.” So this system is not exactly perfect. But it’s the best I could come up with at the moment. Perhaps someone smarter than I could come up with a better solution. If so, I’m all ears and would love to hear it. Check out the “Thor 128-step Random Sequencer” patch in the project files at the top of this tutorial and you can see the finished version.

So there you have it. This solves the third and final hurdle. Checkmate and your move!

Moving Forward

In the next part of this series, I’ll try to explore a little more about how you could potentially use this type of setup. For right now, just have a look and see if you can improve upon this or create a better way to create a fully functional 128-step random sequencer.

As for the “Generative Music” concept, I think this could have some interesting potential. For right now, I’ll just leave off with another interesting “Generative” site that I found online which takes mathematical number sequences and converts them into music. You can listen to thousands of sequences all based on these math sequences. I thought it was interesting. Check it out here if you have a minute: http://oeis.org/play.html. The site is a little cludgy, as you have to copy the database integer sequence number into the “Play” page, but once you do, you can hear that database record as a MIDI file and choose the instrument that plays the sequence.

And here’s another site which generates music (MIDI files) from paintings: http://www.synestesia.fi/ Now there’s something original.


In conclusion, you can indeed insert some “Generative” elements into your Reason projects. Hopefully you won’t have to spend hours upon hours figuring out how to do it like the three of us did, and instead spend hours and hours coming up with your own “Generative” systems a la Brian Eno. More to come on this later. . .

In the meantime, send me your best “Generative” music ideas and let’s see where this concept will take us in Reason and Record. Peace out!

59 – Komplete Kongtrol (Part 2)

There is always more to be discussed where Kong is concerned, and here we’ll build upon the first article about Kong control and figure out a few enhancements and other off-kilter things we can do with the Kong device. So step inside and prepare yourself for the journey.

There is always more to be discussed where Kong is concerned, and here we’ll build upon the first article about Kong control and figure out a few enhancements and other off-kilter things we can do with the Kong device. So step inside and prepare yourself for the journey.

The project files for this article can be downloaded here: Komplete-Kongtrol-Part2. There are a few upgrades to the old files from Part 1, as well as an .rns file / Combinator file for the Note Repeating example, and an .rns / Kong patch to show how to create a pitched sample player across all 16 pads in Kong. Enjoy!

Expanding on the Previous “Thong” Patch

Previously, we created an 8-way control of Thor (and the Malstrom) filters. In this patch, we provided step by step control of each elements of the filters via the Kong pads. This time, we’ll switch things around a little so that we can add the ability to hold the pad down and the parameters “glide” upward or downward instead of stepping through each parameter’s 0-127 MIDI value. This allows you to more smoothly and quickly glide each parameter upward or downward. And the truth is that it’s a very simple implementation. Thanks goes once again to Sterioevo for his simple solution.

The idea is to go inside all the up/down Thor devices, and switch the Run Mode on the Step Sequencer from “Step” to “Repeat.” Once this is done, you can press and hold the pads to move the parameter smoothly upward or downward, as desired. The rate at which the parameter glides is determined by the “Rate” setting of the step sequencer. I found a rate of 1/16 – 1/64 is  a good setting.

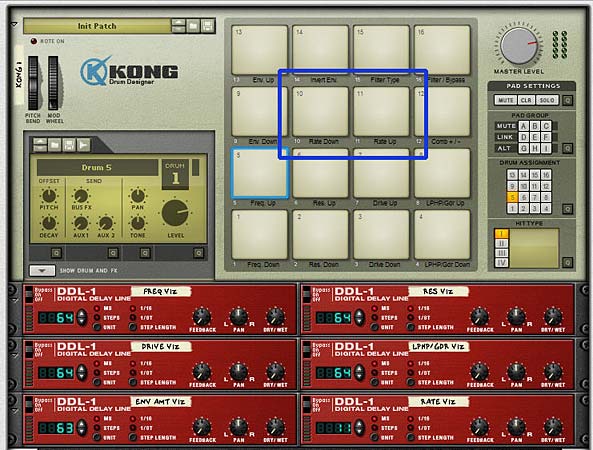
Taking this approach a step further, I modified the patch by also allowing you to control the rate of all the step sequencers at once using the two free Kong pads. Pad 10 now decreases the rate and Pad 11 increases the rate. The rates are synced, and the Pitch Bend wheel is used to map the rate to the Thor devices. Finally, I added a new DDL-1 device to show the 21 different rates that can be selected. 18 on the DDL-1 = 1/16 rate on the Thor Step Sequencers.

In order to achieve a proper up / down switch for Pads 10 and 11, I had to change the notes in the Rate Up / Rate Down step sequencers and Rate Merge Spider trim pots as follows:

Rate Up Thor device: Step 1 note value = C4

Rate Down Thor device: Step 1 note value = C2

Rate Merge Spider Trim Pot Values = 88

These settings will ensure that the up / down pads properly switch between all Synced Rate values in the up / down Thor devices.

The "Thong 8-type Filter" patch updated with a new global rate control.

Note: I also updated the FM Pair patch from part 1 of this tutorial. However, since there were no pads available to control the rate, I mapped the rate control to Rotary 1. Furthermore, I added a sync control on button 1, so you can control the rate either synced or free-form, depending on whether the button is on or not. When off, the rate is synced. When on, the rate is free-form.

Note Repeating

There’s been a lot of people asking if Kong can provide “Note Repeat” functionality found on their pad controllers. It seems every week I get one or two questions on this issue. One person actually emailed me a Battery tutorial video to ask how this functionality can be replicated in Kong. After watching that video, I put together this patch to show how you could indeed apply the same concepts in Reason. It’s really not hard at all, but it does involve the use of 2 pads for each drum or sample sound (which, coincidentally, works out perfectly to replicate that Battery tutorial, as he only uses 8 drum sounds/pads). Here’s how it’s done:

  1. Ensure you have a main mixer set up in your Reason or Record document. Then create an empty Combinator, and inside the Combinator create a Kong device. The Kong device’s main audio output will be routed to the Combinator’s “From Devices” inputs.
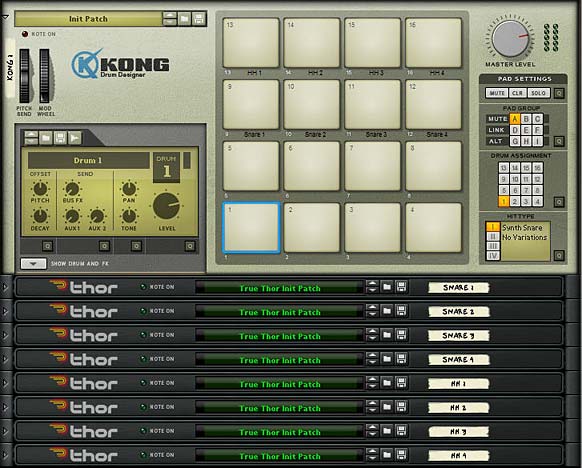
  2. Click the “Show Drum and FX” button on Kong, which opens up the drum modules. on Drum Module 1, add a Synth Snare into the drum module. Copy and paste this snare into the next three drum modules.
  3. Open up the fifth drum module and add a “Synth Hi-Hat” into that drum module. Then copy the hi hat into the next 3 drum modules. You now have pads 1-4 with the same Snare Drum sound, and pads 5-6 with the same Hi-Hat sound.
  4. In order to stay true to the Battery video, change the pitch of each Snare Drum and Hi Hat in the following way:

    Snare (Drum Module 1) & Hi Hat (Drum Module 5): Pitch = 24

    Snare (Drum Module 2) & Hi Hat (Drum Module 6): Pitch = 12

    Snare (Drum Module 3) & Hi Hat (Drum Module 7): Pitch = 0

    Snare (Drum Module 4) & Hi Hat (Drum Module 8): Pitch = -12

    Note: I changed the pitch of each drum Module’s “Pitch” parameter, as opposed to the “Pitch Offset” located on the main Kong panel. I don’t think it really matters one way or the other which pitch parameter you end up adjusting to be honest.

  5. Holding down the shift Key, create a Thor device underneath Kong. Then completely initialize it by turning down all the polyphony settings, removing the Oscillator, Bypassing the filter, etc. In short, ensure it makes no sounds, since we’re only using the Thor Step Sequencer to generate our rolls. Label the Thor device “Snare 1.”
  6. In the Thor Step Sequencer, change the Run Mode to Repeat. Now flip it around to the back and send the Gate Output from Pad 9 to the “Gate In (Trig)” of the Thor device (you’ll need to expand Thor fully to access the Step Sequencer CV inputs and outputs.
  7. Next, send the Gate / Velocity CV output from Thor to the Gate Input on Pad 1 in Kong. With this setup, you can use Pad 1 to trigger a 1-shot for the Snare drum, and Pad 9 to trigger a roll for as long as your finger is pressing the Pad (this is your “Note Repeat” functionality).

    The Gate in / out CV cables from Kong into the Thor. Pad 9 triggers the step sequencer to start, and the Gate output is sent to Pad 1 to start the roll of the Kong drum.
    The Gate in / out CV cables from Kong into the Thor. Pad 9 triggers the step sequencer to start, and the Gate output is sent to Pad 1 to start the roll of the Kong drum.
  8. Repeat this process by duplicating the Thor device 7 more times, and route it to the other pads in sequence. Pads 9-12 become the Snare Rolls (or Snare Note Repeat), and Pads 13-16 become the Hi-Hat Rolls (or Hi Hat Note Repeat).
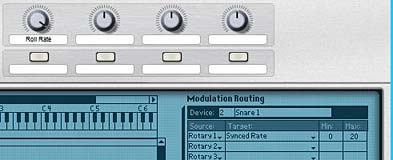
  9. Finally, we want to provide a way to speed up or slow down the rolls. This can be achieved quite easily by mapping all the Thor devices’ Step Sequencer rate to a Combinator knob. Open up the Combinator programmer, select the first Snare 1 Thor device, and enter the following line in the Modulation Routing section:

    Rotary 1 > Synced Rate : 0 / 20

  10. Now enter this line for all the Thor devices so that the Rotary will globally change the speed or Rate of your drum rolls when you press pads 9-16. You can now create a pitched roll going from a high pitch to a low pitch by playing from pads 9 > 10 > 11 > 12 for the Snare, or pads 13 > 14 > 15 > 16 for the Hi Hat. If you want the rolls slower, turn Rotary 1 to the left. If you want them faster, turn Rotary 1 to the right.
Setting up the Combinator's Rotary 1 to control the rate of the Drum Rolls.

Note: You don’t have to use a “Synced Rate” necessarily. Try letting the rate go freeform for speeds that are outside the normal synced tempo pace of the song. To do this, you’ll need to turn off the “Sync” button in all the Thor Step Sequencers and then change the Combinator Modulation Routing for all the Thors from “Synced Rate” to “Free Rate.” This can produce some chaotic results which might work better, depending on the type of beats you want to lay down on your track.

The Kong Drum Roll Setup.

Pitching for any Sample or Sound (the Akai MPC “16 Level” function)

One other little trick that many people have asked about is the ability to take one sample and spread the pitch out across the 16 pads in Kong (Pitching it up or down). This, too, is an easy thing to setup, but it might not be that obvious at first. This is because on most pad controllers (like the Maschine, for example), you select the sample, press a button, and the sample is layered on all pads at different pitches. Kong is different. You can’t select one sample and hit a button and have that sample pitched across all the pads. Instead you have to select a sample, copy it across all the drum modules, and then pitch the sample differently in each drum module. Once done, you have your setup and can save it. If you think of it as a template, you can go back in and switch out the samples, and save a new version of the Kong device. Then you can create a library of pitched sample devices for any and all of your sounds. 1 Kong per sample.

I provided a hint to how these pitch changes can be made up above when I was discussing the “Note Repeat” function. This is what I’m going to call the “Easy way.” This time, however, we’ll use a sample; pitching it up and down across the entire 16 pads. Here’s how you set it up:

Pitching a Sample across 16 Kong Pads — The “Easy” Way

  1. Create a Mixer and then a Kong device (doesn’t have to be inside a Combinator).
  2. Click the “Show Drum and FX” button to open it up to the first drum module. Click the Drum Module drop-down arrow and select “NN-Nano Sampler.” Click the “Browse Sample” button and load up a sample of yours or a sample from the Factory Sound Bank.
  3. Right-click and select “Copy Drum Patch” (Ctrl+C) and then select Drum Module 2 by pressing Pad 2, and then right-click over the drum module area and select “Paste Drum Patch” (Ctrl+V). Do this for all 16 Drum Modules so that you have the same sample across all 16 pads.
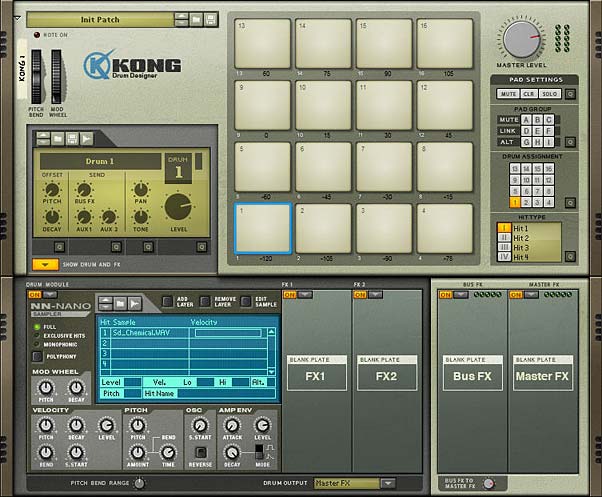
  4. Now for each drum module, change the “Pitch Offset” parameter found on the main Kong panel. Since this parameter can go from -120 to +120 (range of 240), you can divide this up into increments of 15 or 16 roughly (240 / 16 = 15). So on Pad 1, change the Pitch Offset to -120, on Pad 2, change the Pitch Offset to -105, on Pad 3, change the Pitch Offset to -90, etc. all the way up to Pad 16.

Now you can play the sample back and have its pitch spread across all the Kong pads.

The front of the Kong device with the same sample copied into all drum modules and the pitch varied across all 16 pads.

Pitching a Sample across 16 Kong Pads — The “Alternative” way

The hard way involves creating an up / down set of pads for the Pitch parameter in Kong and then loading the same sample into Pads 1-14. By now you should be familiar with how to set this up if you read the first part to my Komplete Kongtrol article here. So I shouldn’t have to repeat this setup here. But just note that this is another way you could set things up in Reason. The benefit to this type of setup is that you can control multiple samples at once (up to 14) with a global pitch up / pitch down set of pads. It all depends on what you want to accomplish.

Any thoughts on these Kongtrolling methods?

58 – Taking Komplete Kongtrol

This tutorial should prove a little enlightening for those that only think of Kong as a basic drum module. Here we’re going to twist it into the ultimate controller for everything under the sun. For starters, I’ll show how Kong can control 8 filters at once, and then I’ll move on to use Kong to control the FM Pair Oscillator in Thor. Using some of these methods, you’ll be able to control pretty much anything in Reason or Record with Kong; moving traditional device control from a basic keyboard to a Pad controller.

This tutorial should prove a little enlightening for those that only think of Kong as a basic drum module. Here we’re going to twist it into the ultimate controller for everything under the sun. For starters, I’ll show how Kong can control 8 filters at once, and then I’ll move on to use Kong to control the FM Pair Oscillator in Thor. Using some of these methods, you’ll be able to control pretty much anything in Reason or Record with Kong; moving traditional device control from a basic keyboard to a Pad controller.

Sound exciting? I thought so.

You can download the project files here: Taking-Komplete-Kongtrol. This file contains 2 .rns and 2 .cmb files that are outlined below. Both require Reason 5 or Record 1.5 due to the fact that it uses the new Kong device and new CV inputs on the back of the Combinator. There is also a “Volume Control” example .rns file for you to get your feet wet.

Note also that I’ll be unplugged until next Thursday April 15th, so don’t take it personally if I don’t respond to questions until that time. Some times you just have to unplug from things for a bit. But feel free to leave me a little love. I promise to get to all your comments or questions when I jump back online. Have a great week! 🙂

A Little Background

When I was working on my mammoth “Key Flux FX Processor” patch I got a post on the Propellerhead User Forum from someone who jokingly said “what’s next? A Kong controlling Thor? A Thong?” After I stopped laughing and rolling around on the floor, I thought about it for a minute and said “well why not?” And that was the start to this tutorial here. I decided I wanted to try to control Thor with Kong. Whether or not this is practical is for you all to decide. For my part, I can see this being a new fun way to play around with the devices inside Reason.

Understanding the Kong Control Concepts

There are two main concepts that I’d like to outline here. The first is the idea of using the Pads in Kong as an up / down selector switch to transpose MIDI values up or down. The other is the idea of visualizing these changes in Reason, since visualization in Reason (and Kong especially) is somewhat limited.

The first concept was opened up to me by Ed Bauman of EditEd4TV fame. In the midst of his working on recovers for his 80’s band, I asked him to help me figure out how to transpose from one octave to the next using the Kong pads. This helped me set up the Kong Piano Roll Keyboard (again, that was explored in another article). So credit where credit is due. Without his help on that project, I couldn’t have figured out some of these tangential concepts to control other parameters with the Kong pads.

The concept works like this: Using one pad in Kong for the upward movement and one pad for the downward movement, you use the Thor Step Sequencer “Note Transpose” function to manipulate a device parameter that goes from 0 – 127 MIDI value. Each time the up or down pad is pressed, it transposes the value by an increment of “1.” For example, you can go from 64 to 65 to 66 to 67 and so on, using the “Up” pad. Since Reason allows you to interchange CV values (using Note CV for Gate or Gate CV for Note), this isn’t difficult to accomplish.

Here’s the basic setup to control the Volume of a Channel in the Mixer (just as an example):

  1. Open up Reason with a Main Mixer. Then create a Combinator with a 14:2 Mixer.  Underneath that, create a sound generating device (for simplicity’s sake, create a Subtractor and load up your favorite Sub patch). But note that this can be any device you like. Underneath that, create a Matrix and add a pattern in, so that it is playing the Subtractor.
  2. Now holding the Shift key, create a Kong device. Still holding Shift, create a Thor device and call it “Vol Up.” Completely initialize the Thor device by pulling down all the parameters, removing the Oscillator and Filter, and turning everything to 0 (zero). Also while we’re at it, pull down the level of the Channel on the Mixer where the Subtractor is connected to 0 (zero).
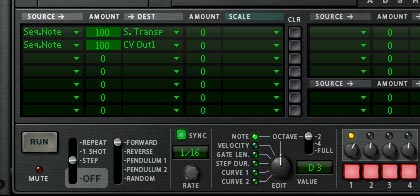
  3. Open up the Thor programmer, and in the Step Sequencer set the Run Mode to “Step,” Step Count to “1,” and set the first step’s note to “D3.” In the Modulation Bus Routing System (MBRS), set up the following 2 lines in the first 2 slots:

    Seq. Note : 100 > S. Transp (Step Sequencer Note : 100 > Step Sequencer Transpose)

    Seq. Note : 100 > CV Out1

  4. Duplicate the “Vol Up” Thor device and rename it “Vol Down.” Then go into this Thor’s Step Sequencer and change the note value of step 1 to “A#2.”

    The MBRS settings for the "Vol Up" Thor device.
    The MBRS / Step Sequencer settings for the "Vol Up" Thor device.
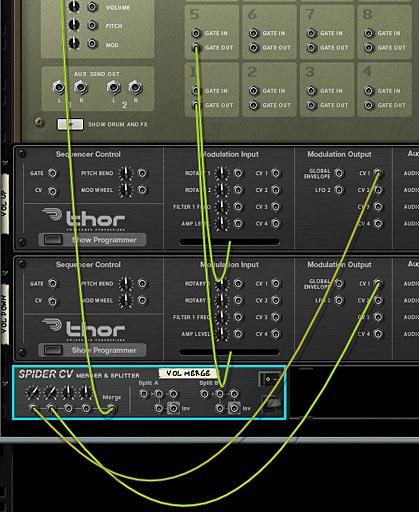
  5. Next, holding the Shift key down, create a Spider CV Merger/Splitter at the bottom of the Combinator rack and name it “Vol Merge.” Now it’s time to route everything up.
  6. Flip the rack around to the back, and on the Combinator’s 14:2 Mixer, turn the Subtractor channel’s level trim knob up to 127. Then connect the Merged output from the “Vol Merge” Spider to the Level CV input on the Mixer channel.
  7. Connect the Kong’s pad 1 “Gate Out” CV to the “Gate In (Trig)” CV input on the “Vol Down” Thor. Also connect Kong’s pad 5 “Gate Out” CV to the “Gate In (Trig)” CV input on the “Vol Up” Thor.
  8. Connect the CV 1 Modulation Output from the “Vol Up” Thor to the “Vol Merge” Spider’s Merge Input 1. Also connect the CV 1 Modulation Output from the “Vol Down” Thor to the “Vol Merge” Spider’s Merge Input 2. Set both trim knobs to a value of “84.” That’s the magic CV number that makes things happen correctly.

    The CV routing for the Up / Down Volume Control using the Kong Pads
    The CV routing for the Up / Down Volume Control using the Kong Pads
  9. Flip the rack to the front again, and label Pad 1 in Kong “Vol Down” and Pad 5 “Vol Up.” Now play your device by pressing “Play” on the Transport and you’ll hear the volume at level 64. Press Pad 5 about 10-15 times and you’ll start hearing the volume rising. Press Pad 1 and the volume drops. You’ve now set up Kong to act as your up / down fader for the volume of your Subtractor device.

Visualizing the Kong Volume Control

Since there’s no visualization in Kong, it’s hard for us to track where the volume is located for the Subtractor. Here’s one way to do it using the DDL-1 device. Note that this trick is curtosy of Sterioevo, and I can’t thank him enough for showing it to me. See the comments to my previous “Kong FX Chain Builder” tutorial for more information on the ins and outs of this visualizing method.

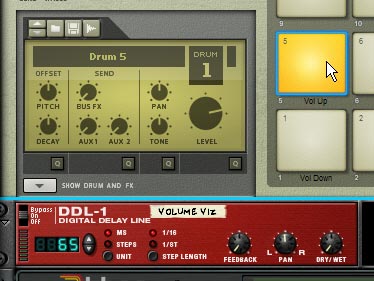
  1. Building on our previous volume level control, hold Shift down and create a DDL-1 device underneath your Kong device. Label it “Volume Viz” or something like that. Also change the Unit to “MS” for Milliseconds.
  2. Open up the Combinator programmer, select the “Volume Viz” device, and in the Modulation Routing area, set up the following line:

    CV In 1 > Delay Time (MS) : 1 / 127

  3. This sets up the CV 1 input on the combinator to change the display of the DDL-1 to show values between 1 and 127.
  4. Now we just need to send the same CV merged signal to also send a value to the CV 1 input on the Combinator, so flip the rack around to the back, and move the CV merged output to one of the A split outputs. Then connect the Merged output to the Split A input on the same “Vol Merge” Spider.
  5. Finally, send another A split output to the Combinator’s new CV 1 input and turn its trim knob all the way to 127.
The DDL-1 used as a visualizer for the Volume setting

You’re all set. Now when you flip to the front of the rack and start pressing the volume pads, you’ll see the value update in the DDL-1 device. I know, it’s pretty sweet. You now have visualization of your volume setting.

A Look at the “Thong 8-Type Filter FX Processor” Combinator

So to answer the question about controlling Thor with the Kong device, I set up 2 patches. The first one is the “Thong 8-Type Filter FX Processor” which can be used as an insert effect on any sound you like. This patch allows you to switch between 8 different filter types and control them all via the Kong pad interface. Here’s a rundown of the pad assignments. Note: You do not want to use any of the Combinator parameters, since all the CV for the Rotaries, as well as the Mod Wheel was used to create the pad assignments and visualization. So simply create a track for the Kong device in the Combinator, and use that track as your control.

Note: I made all the up / down switches bipolar so that everything starts out with a value of 64. This is because each pad press only moves up one midi value, and if you started out at 0 (zero), you’d have a long way to go to get higher up on the register. Starting out at the middle makes working with the up / down pads a lot easier IMHO.

  • Pads 5 & 1: Controls the Frequency of all filter at once. Pad 5 moves the filter frequency up and Pad 1 moves the filter frequency down. These two pads together act as the frequency rotary control. Visualization for the Frequency setting can be seen on the “Freq Viz” DDL-1 device located just below the Kong device.
  • Pads 6 & 2: Controls the Resonance of all filters at once. Pad 6 moves the resonance up, and Pad 2 moves the resonance down. These two pads together act as the resonance rotary control. Visualization for the Resonance setting can be seen on the “Res Viz” DDL-1 device located just below the Kong device.
  • Pads 7 & 3: Controls the Drive of all filters at once. Pad 7 moves the drive up, and Pad 3 moves the drive down. These two pads together act as the drive slider control. Visualization for the Drive setting can be seen on the “Drive Viz” DDL-1 device located just below the Kong device.
  • Pads 8 & 4: Controls the LPHP parameter of the “Notch” and “Peak” filters, as well as the Gender parameter of the “Formant” filter. Pad 8 moves the LPHP and Gender parameters up, while Pad 4 moves the LPHP and Gender parameters down. These two pads together act as the LPHP and Gender rotary controls. Note that the filter must be set to “Notch,” “Peak,” or “Formant” for you to hear the effects of these two pads. Visualization for the LPHP/Gdr setting can be seen on the “LPHP/Gdr Viz” DDL-1 device located just below the Kong device.
  • Pads 13 & 9: Controls the Envelope Amount of all filters at once. Pad 13 moves the envelope amount up, while Pad 9 moves the envelope amount down. Together, these two pads act as the envelope amount rotary. Note: To turn off the envelope entirely, reduce the envelope amount to 0 (zero) using the “Env Down” Pad (Pad 9). If you wish to insert your own pattern sequence to control the envelopes, change the pattern sequence in the Thor Filter device’s Step Sequencer. Each Thor Filter device Step sequencer controls the corresponding filter envelope, except for the “Peak” Thor Filter, which controls both the “Peak” Thor and “AM” Malstrom filters. Visualization for the Envelope Amount setting can be seen on the “Env Amt Viz” DDL-1 device located just below the Kong device.
  • Pad 14: Controls whether the Filter Envelope is turned on or off for all filters. Visualization for this pad can be seen on the fourth band of the “Filter Type Viz” BV512 Vocoder device.
  • Pad 12: Controls whether the “Comb” filter is set to plus (+) or minus (-). Visualization for this pad can be seen on the third band of the “Filter Type Viz” BV512 Vocoder device. Note that this is a very specific setting, and the filter type must be set to “Comb” in order for you to hear anything.
  • Pad 15: Controls which filter is heard. Visualization for the Filter Type setting can be seen on the first band of the “Filter Type Viz” BV512 Vocoder device.  Selections can be one of the following 8 different filter types:
  1. LP (Thor Low Pass Ladder Filter)
  2. HP (Thor State Variable Filter – High Pass mode)
  3. Comb (Thor Comb Filter)
  4. Formant (Thor Formant Filter)
  5. BP (Thor State Variable Filter – Band Pass mode)
  6. Notch (Thor State Variable Filter – Notch mode)
  7. Peak (Thor State Variable Filter – Peak mode)
  8. AM (Malstrom AM Filters – both Filter A and B are set exactly the same way when controlling this filter).
  • Pad 16: Filter / Bypass. This provides you with a quick way to switch between the Filtered sound and the non-filtered sound. Think of this as a Wet / Dry switch.

A Look at the “Oscillator Kongtrol – FM Pair” Combinator

The second patch is a Kong controlling an Oscillator inside Thor. To start things off easy, I decided to control the FM Pair Oscillator. Again, I made all the up / down switches bipolar so that everything starts out with a value of 64. This is because each pad press only moves up one midi value, and if you started out at 0 (zero), you’d have a long way to go to get higher up on the register. Starting out at the middle makes working with the up / down pads a lot easier IMHO.

The FM Pair Oscillator control has at least one interesting twist. Since controlling the Carrier / Modulator pair is unlike controlling a MIDI value of 0 – 127, we need to figure out the proper settings to control a MIDI value of 1 – 32. This is done by going into the Up / Down Thor devices and changing the note values of the first step to the following:

“Up” Thor device: G#3

“Down” Thor device: E2

Once this is updated, you can control parameters that have 32 options. This does not only mean the FM Pair Carrier and Modulator, but also the Matrix pattern devices, or Thor’s Wavetable Oscillator “Table” selection. Anything with 32 MIDI values can now be controlled and stepped through one at a time in Kong.

Here’s a rundown of the pad assignments. Note: You do not want to use any of the Combinator parameters, since all the CV for the Rotaries, as well as the Mod Wheel was used to create the pad assignments and visualization. So simply create a track for the Kong device in the Combinator, and use that track as your control.

  • Pads 5 & 1: Controls the Pitch of the Oscillator. Pad 5 moves the pitch up and Pad 1 moves the pitch down. Visualization for the Pitch setting can be seen on the “Pitch Viz” DDL-1 device located just below the Kong device.
  • Pads 6 & 2: Controls the FM Parameter of the Oscillator. Pad 6 moves the fm up and Pad 2 moves the fm down. Visualization for the fm setting can be seen on the “FM Viz” DDL-1 device located just below the Kong device.
  • Pads 7 & 3: Controls the Carrier setting of the Oscillator. Pad 6 moves the carrier setting up and Pad 2 moves the carrier setting down. Visualization for the carrier setting can be seen on the “Carrier Viz” DDL-1 device located just below the Kong device.
  • Pads 8 & 4: Controls the Modulation setting of the Oscillator. Pad 6 moves the Modulation setting up and Pad 2 moves the modulation setting down. Visualization for the mod setting can be seen on the “Mod Viz” DDL-1 device located just below the Kong device.
  • Pads 13 & 9: Controls the Amp Envelope’s “Attack.” Pad 13 moves the Attack setting up (slower attack) and Pad 9 moves the attack down (faster attack). Visualization for the envelope’s attack can be seen on the first and second band of the “Amp Vizualize” BV512 Vocoder device, located just below the 4 DDL-1 devices. The first band shows the upward setting, and the second band shows the downward setting (much easier to see when you are actually using the Kong controller – so download the patch and try it out).
  • Pads 14 & 10: Controls the Amp Envelope’s “Decay.” Pad 14 moves the Decay setting up (longer decay) and Pad 10 moves the decay down (shorter decay). Visualization for the envelope’s decay can be seen on the third and fourth bands of the “Amp Vizualize” BV512 Vocoder device, located just below the 4 DDL-1 devices. The third band shows the upward setting, and the fourth band shows the downward setting.
  • Pads 15 & 11: Controls the Amp Envelope’s “Release.” Pad 15 moves the Release setting up (longer release) and Pad 11 moves the release down (shorter release). Visualization for the envelope’s release can be seen on the fifth and sixth bands of the “Amp Vizualize” BV512 Vocoder device, located just below the 4 DDL-1 devices. The fifth band shows the upward setting, and the sixth band shows the downward setting.
  • Pads 16 & 12: Controls the Panning of the sound. Pad 16 moves the panning left, while Pad 12 moves the panning right. Visualization for the panning can be seen on the seventh and eighth bands of the “Amp Vizualize” BV512 Vocoder device, located just below the 4 DDL-1 devices. The seventh band shows the leftward setting, and the eighth band shows the rightward setting.

Where can you go from Here?

Sometimes it’s the smallest concepts that can lead to the biggest revelations; opening doors to new ideas and solutions. This is definitely one of those cases. Using these simple ideas, you can now control virtually every possible parameter in Reason via the Kong Pads. These are just two types of control devices I built here. But there’s nothing stopping you from building a Reverb Kong controller (ReKong 7001?), or a DDL-1 controlled by Kong (DDKong-2?). And there’s nothing stopping you from building a controller that allows you to combine Oscillators or Filters or any number of things together that can be triggered by Kong pads. Just use your imagination and come up with some cool ways to take your pad controlling to new heights. This is just the tip of the iceberg. Where you go from here is all up to your patience and ambition.

Any thoughts?