In this tutorial I’m going to jump into Thor’s oscillators and show you how a simple method to cycle through the oscillator’s waves (Carriers, Modulators, Phase Mod Waves) can create lots of unexpected outcomes (a la Glitch). It can also allow you to modulate the Oscillators in a way you might not have thought about previously. So let’s jump right in.
The project files can be downloaded here: Glitch-Oscillatoriffic. This zip file contains a single RNS file with 2 different Combinators. You can use the mute buttons on the main mixer to highlight each Combinator and play with each one individually.
I also wanted to say thanks to Geoff Wakefield for talking over this idea through an email exchange. Your ideas are great, as is your music Geoff! Keep up the great work. And go check out his music here: http://soundcloud.com/raven-2741.
First, here’s a video that outlines the basic concepts of modulating Thor’s oscillator waves:
Modulating Thor’s “FM Pair” Oscillator’s Carrier and Modulator
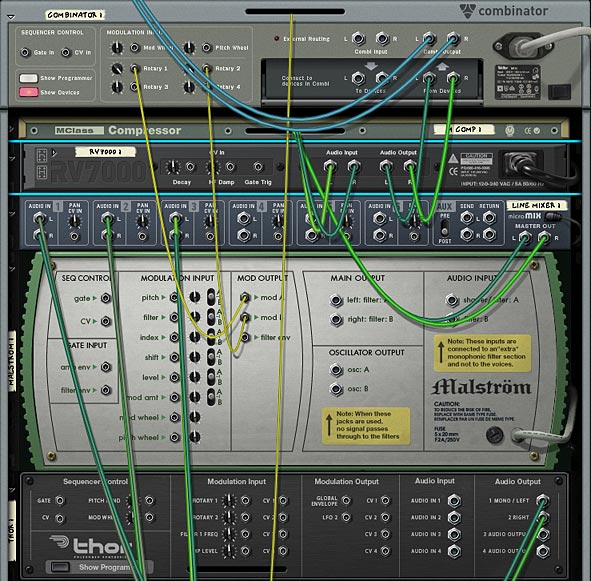
The main trick here is to keep all the devices inside a Combinator so that you can use CV to trigger the Rotaries of the Combinator. The Modulation Bus in the Combinator is used to set up the Oscillator’s Carrier and Modulation waves in the FM Pair, so that when CV is cabled into Rotary 1 & 2, the CV triggers a “cycling” through the different waves. This in turn affects the sound coming out of Thor. You then use the Malstrom’s Mod A & Mod B to supply the CV source, which is sent to the Rotary 1 & 2 CV input.
Also in the Modulation Bus of the Combinator, you’re going to set it up so that Rotary 3 and Rotary 4 (sources) are set up to adjust the Malstrom’s Mod A and Mod B (the destination). You can adjust the Min/Max settings to be as wild and crazy (full 0/31) or as tempered as you like (1/3, for example). In this way, you can not only adjust the Carrier / Modulation waves of Thor’s Oscillator with Rotary 1 and 2, but you can also adjust the Modulation Curve settings of the Malstrom’s Mod A and Mod B with Rotary 3 and 4.
Modulating Thor’s “Phase Modulation” Oscillator’s Wave 1 & 2
Now that we have the basic concept down, it’s a snap to transfer this same idea over to the Phase Modulation Wave 1 and Wave 2. Simply switch the Thor oscillator in slot 1 to “Phase Modulation” and then go back into the Combinator Modulation Bus, and change Rotary 1 and Rotary 2 as follows:
Rotary 1 > Osc 1 Phase Modulation Wave 1
Rotary 2 > Osc 1 Phase Modulation Wave 2
Note: the actual Min/Max settings, as shown earlier, can be anything you like, depending how crazy you like things.
Modulating Thor’s “Wavetable” Oscillator’s Tables
Now instead of the Phase Modulation oscillator, switch to the Wavetable Oscillator. Personally, this is my favorite oscillators for this type of technique. The variety and timbre of the sounds make it a really nice glitch mayhem device for the task. In using it though, there’s only 1 parameter we can effect, which is the actual Wavetables themselves. So switch Rotary 1 in the Combinator Modulation Bus as follows:
Rotary 1 > Osc 1 Wavetable Table
Once again, the actual Min/Max settings are up to personal taste.
One Step Further with the Oscillator’s “Modulation” Parameter
When it comes to any of these oscillators, there is a “Modulation” parameter that you can also control using CV. For example, when using the FM Pair oscillator, you can have CV control the “FM Amount” knob. When using the Phase Modulation oscillator, you can use CV to control the “PM Amount” knob. When using the Wavetable oscillator, you can use CV to control the “Position” knob.
If you want to do this, you can borrow from one of the existing CV cables coming from the Malstrom and split it using a Spider CV Merger/Splitter, then send one split to the original Rotary destination and send another split into Thor’s CV in. Then it’s a matter of going into Thor’s Modulation Bus Routing Section (MBRS) and entering the following:
CV In1 : 100 > Osc1 FM Amt / Osc1 PM Amt / Osc1 Pos
If you set the FM/PM/Pos on Oscillator 1 very low, then using a high Amount (100) in the MBRS makes sense. If, on the other hand, you set the FM/PM/Pos knob very high, using a lower setting (-100) makes more sense. It depends which direction you want the CV to influence the knob (upward or downward).
Now that we’ve done 3 different Oscillators, I’ll leave you to work your magic on Thor’s “Multi Oscillator” — yes, you can certainly have a lot of fun with that oscillator as well.
Bringing it all Together
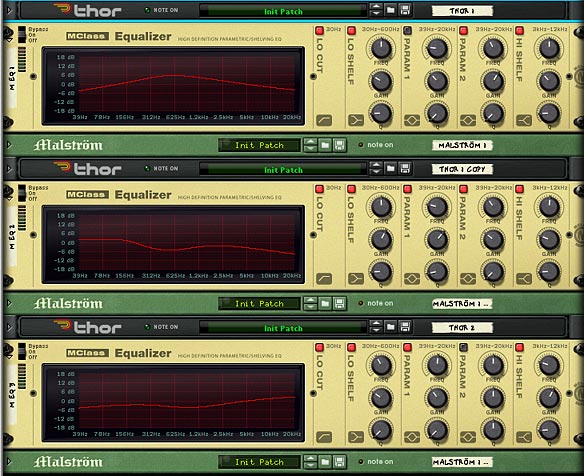
If you look in the project file, you’ll see a few Combinators that take this whole idea a step further by creating a 6:2 Mixer in the Combinator, and then creating three sets of devices (each set contains a different Thor Oscillator, 1 Matrix to use the Mod A/B curves, and an Equalizer at the end of the signal chain, which is then sent to the line mixer and back out to the Combinator’s “From Device” input).
Here’s a video that goes through the steps needed to build one such Combinator:
The idea is a simple one. Have a different oscillator in each of the Thors. Set up the amp envelope any way you see fit. I find a high Decay, Sustain, and Release setting works pretty well, but again, you may have a different preference. The Malstrom Modulation Curves are there for you to use to affect the Thor oscillator waves or even the Modulation knob of the oscillator. This is where experimentation comes in.

Finally, you have an Equalizer which is applied as a dynamic insert effect used to split each of the Thor sounds into their own specific range along the stereo field. This way, you can set up three oscillators and have each oscillator represent a place along the spectrum: Low, Mid and High. This way, you can balance out the sounds and let them shine in their own frequency range, without interfering with each other. Of course, these are all just suggestions. You might find some other ways to set things up for yourself.

I hope this opens up some new creative avenues for you. There’s a lot more that can be done with the Thor oscillators, and this just attempts to scratch the surface or get your feet wet. Don’t be afraid to jump in though, and create your own masterpiece. Oh and if you do, please feel free to share it here. The more we see your ideas, the more we can learn from each other.

Thanks Rob, That was really well done with lots of ideas to go from into your own concepts. I like the part three in which you added the equalisers too. Keep up the good work and hope I can be of use to you and all of the Propheads again in the future too.
Geoff
Thanks Geoff!
I appreciate all your thoughts on the subject. Like I said, if you have any other super ideas like this, feel free to let me know and I’d be happy to write about them. 😉 Definitely keep in touch.
Lovely .. I am getting some inspirational stuff from that patch already.. thanks Phi!
Hi Rob,
Thanks for the inspiration! Here’s a quick song I made after recreating and playing around with your patch. The EQ made for an interesting and different modulation sequence, depending on which octave I was playing in. I’d like to share the patch but not sure how to do that. Anyway, here’s the link:
http://soundcloud.com/soulreaon/oslating-osolation
Thanks again,
Mick
PS. I need to go back and credit you on soundcloud!!!
Mick,
I really love that song. Very much right up my alley! I got your patch and I’m going to upload it here at some point over the weekend or next week. I appreciate you sharing it. Thanks! And let me know when you’ve posted some new music so that I can check it out.
Rob