In this tutorial, I’m going to show you how to split an audio signal into multiple parallel audio signals, send them to various effects, and then merge them back together. You control the mix level of all 3 effects and the original signal. As an example, we’ll create a Dynamic Effects processor (Compressors / Equalizers) to apply to your bass sounds. The Combinator knobs will be used as the basis to sculpt your sounds. Add some additional effects to the buttons and you have yourself some very powerful sound development indeed.
The inspiration for this tutorial came from a procedure I had read about in which the Kick drum is compressed and then the original Kick is mixed back in with this compressed Kick drum to give a beefier sound. So I thought, if you could do this with a Kick drum, how about doing it with other sounds such as a Bass, and then allowing you to mix in not only the original sound, but also different compression schemes. With the Combinator allowing you to utilize 4 knobs, you can actually create 3 different compression/EQ schemes (each tied to their own Rotary on the Combinator), and then tie the original mix to the fourth Rotary. This way, you can have some fun adjusting the balance of all 3 compressions as well as the original to create your final sound. This opens up a huge array of sound possibilities.
Once I show you the method to do this, you’ll be able to parallel process any kind of effect you can create in Reason or Record. For example, we can take 3 variations on a Chorus, and tie each variation to their own Rotary, then have some fun mixing them together. This turns your Combinator into a very flexible Chorus machine.
The project files can be downloaded here: parallel-effects-processing The zip file contains 1 Combinator inside an .rns file and a Combinator template. The .rns file contains the Parallel Processor which we’ll create here. You can use it to process your bass sounds. Different Bass tones and cabinet models are packed inside the Combinator. The template file can be used to start you off creating your own effects. You won’t have to enter any settings in the Combinator’s Modulation Routing, unless you tie some effects to the buttons. Otherwise, have at it building your own Parallel processing effects.
Here’s the basic Combinator setup:
- First, Create a new Reason document and then create a 14:2 Mixer. Next, create a sound module, such as a Bass sound. You can find great bass sounds under the Factory Sound Bank (FSB) or you can create one of your own using a Thor, Mal, or Sub. You can even create a sampled Bass sound using the NN-19 or NN-XT. It’s up to you, but since we’re going to create a Combinator effect unit, you’ll need some kind of sound which is to be affected.
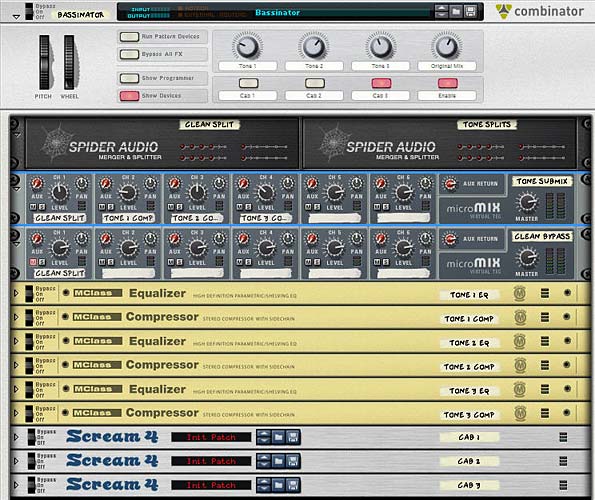
- Next, create a Combinator under the sound source and in the Combinator hold down shift and create in the following order two Audio Spiders/Mergers, two 6:2 Line Mixers, 3 sets of M-Class Equalizer/M-Class Compressor devices, and 3 Scream devices.
- Label the first Audio Spider/ Merger “Clean Split” and label the second Spider/Merger “Tone Splits.” Label the first 6:2 Mixer “Tone Submix” and the second 6:2 mixer “Clean Bypass.” Label each set of EQ/Compressor as follows: Tone EQ 1/Tone Comp 1, Tone EQ 2/Tone Comp 2, and Tone EQ 3/Tone Comp 3. Finally, label the 3 Scream devices “Cab 1,” “Cab 2,” and “Cab 3.” These will be our cabinet emulations. This is how we will refer to each device for the remainder of the tutorial.
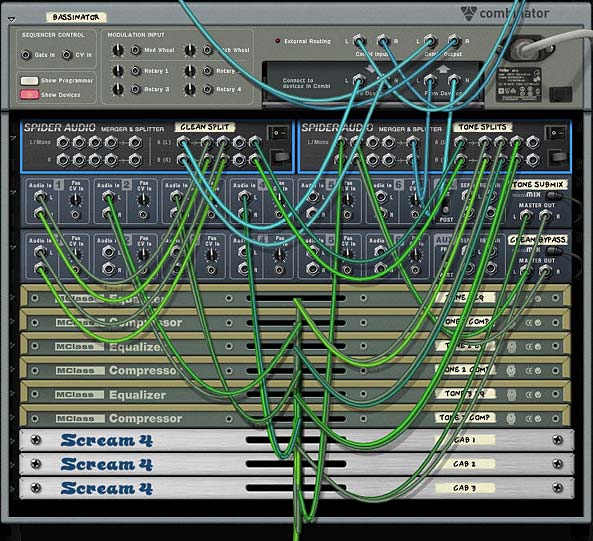
- Flip the rack around to the back as it’s time to do some serious routing. Note that all the routings below are Left/Right stereo pairs. Move the Audio outputs from the sound device to the Combinator inputs, and then move the Combinator audio outputs to the Main 14:2 Mixer’s Channel 1 inputs. Route the “To Devices” cables from the Combinator to the main inputs on the splitter side of the “Clean Split” Spider device.
- Send one of the splits from the “Clean Split” device to Channel 1 input of the “Tone Submix” mixer, another split to Channel 1 of the “Clean Bypass” mixer, and a third split to Main inputs on the splitter side of the “Tone Splits” Spider device.

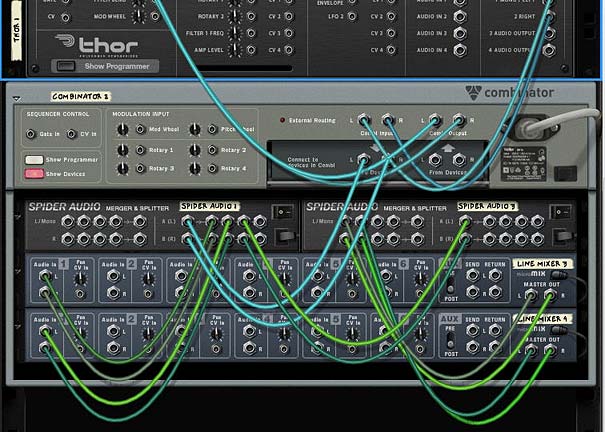
The back of the rack for the Template file. I'm jumping ahead a little. But this shows the basic routing before setting up any of the Effect devices. - Send one split from the “Tone Splits” Spider to the “Tone EQ 1” inputs. Send a second split to the “Tone EQ 2” inputs. Send a third split to the “Tone EQ 3” inputs. Then send the audio outputs from each of the EQ devices to the audio inputs of their respective Compressor devices. Then send the outputs of each of the Compressor devices into Channels 2, 3, and 4 of the “Tone Submix” mixer device.
- Next, send the Master output of the “Tone Submix” mixer to the input of the “Cab 1” scream device. The “Cab 1” output goes to the “Cab 2” input, the “Cab 2” output goes to the “Cab 3 input,” and finally the “Cab 3” output goes back into the Merge side input of the “Tone Splits” Spider device. Also send the Master output of the “Clean Bypass” mixer device to another merge input on the “Tone Splits” Spider device.
- Last but not least, send the Merged output from the “Tone Splits” Spider device to the “From Devices” input on the main Combinator panel. I know this all looks really messy, but sometimes you just have to get in there and get dirty to get what you want out of Reason.

The back of the rack when finished routing 
The front of the rack - Now let’s flip the rack around to the front and work on the Combinator Modulation Routing section. Click the “Show Programmer” button on the Combinator. Enter the following settings:
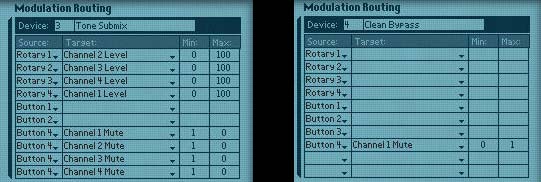
For the “Tone Submix” mixer device:
Rotary 1 > Channel 2 Level: 0 / 100
Rotary 2 > Channel 3 Level: 0 / 100
Rotary 3 > Channel 4 Level: 0 / 100
Rotary 4 > Channel 1 Level: 0 / 100
Button 4 > Channel 1 Mute: 1 / 0
Button 4 > Channel 2 Mute: 1 / 0
Button 4 > Channel 3 Mute: 1 / 0
Button 4 > Channel 4 Mute: 1 / 0
For the “Clean Bypass” mixer device:
Button 4 > Channel 1 Mute: 0 / 1
For each the “Cab 1” Scream device (note, each Cab device has the same settings, except Cab 2 is tied to Button 2 and Cab 3 is tied to Button 3):
Button 1 > Damage On/Off: 0 / 1
Button 1 > Cut On/Off: 0 / 1
Button 1 > Body On/Off: 0 / 1

Combinator Modulation routing for the two Mixers
Here’s what is happening:
Button 4 is used as a bypass switch. When this button is turned off, the original sound will travel through the Combinator untouched. When Button 4 is turned on, you can use the 4 Rotaries to create a custom mix between all the sets of effects. Rotary 4 is a “special” rotary, in that it allows you to mix the original audio back into the mix. It’s important to note that this original audio is separate from the audio that goes through the Combinator when button 4 is off. Hence the need for two different mixers inside the Combinator. This way you can have the original mix work as though it were just another tone alongside the others, and when you switch back to a “clean” signal, a separate “original audio” is piped through the Combinator.
Buttons 1, 2, and 3 are your different Cabinet emulations. Those with Record are even luckier in that they can add in a few Line 6 Cabinet modeling devices and use those instead of the Scream. But with Reason, you can still get some amazing cabinet models by using the “Body” setting of the Scream unit (in conjunction with a little distortion and EQ cutting if you wish).
Another thing to keep in mind is that the Tones attached to the Rotaries are independent of the Cabinet models. You can dial in Tones without ever having to use the Cabinet models. However, button 4 must be turned on or enabled for you to hear any of the Tones or Cabinet models. In addition, you can have two Cabinet models used in series (note however, that this was not really the intended purpose — my thinking was that you can use each Cab model individually, and not together, but if you want to use them together, go for it).
Now as a final step, you will need to enter individual settings in the Equalizer / Compressor and Scream units. I won’t go into all the settings you can enter, but rather, you should build your own settings within these devices to your taste. However, take a look at my own settings to see what I used for Bass processing. The idea is to create each set of Equalizer/Compressor settings separately. So, for instance, turn rotary 1 all the way right and turn down all other rotaries to zero (fully left). Now listen to your sound source going through the device, and adjust the “Tone EQ 1” and “Tone Comp 1” devices until you hit on a nice bass processing setting.
Next, turn Rotary 1 all the way down and turn Rotary 2 all the way up. Now work on the second set of EQ/Comp devices to get an entirely new bass processing outcome from the devices. Once that’s done, repeat this for the final set of EQ/Comp devices.
Note: If you want to cheat a little bit, select your sound source, and then right-click and select “Create Effect.” Open up the Factory Sound Bank and look under the ALL Effects Patches > Dynamics > Basses folder and open up one of the bass Combinator patches that you like. Now be sure to adjust the settings on the front of this Combinator patch until you find the sound you’re looking for. Then click the “Show Devices” button on the Combinator, and copy/paste the devices from this Bass patch into your parallel processing Combinator. Delete the (now empty) bass Combinator. In the parallel processing Combinator, you will need to do a little routing to set things up as I have (routing into the main inputs of the first device, and routing the outputs from the last device). But once you do, you can then repeat this process two more times choosing different Combinator patches to copy from in the FSB.
Here’s a 2-part video series that expands upon this idea. It doesn’t always come out exactly the way you expect. But that’s the fun of trying out the technique. You may find something worth keeping, and then you can save the Combinator as a patch and use it in your own compositions.
Part 1:
Part 2:
Now for your cabinet models (Scream devices) you would go through the same process.
Note: When working with the Scream devices, in order to balance the volume level between the Original sound / Tones (using Button 4), you will need to raise all the Scream device Master volume settings up to 100. In this way, if you use Button 4 to switch between the Original volume on Rotary 4 and the volume of the clean bypass (being sent to the “Clean Bypass” mixer), the volume levels will match. So first raise all the master levels for all Scream units to 100.
Listen to the bass sound going only through Rotary 1 and with Button 1 enabled. Then enter a proper Cab setting in the “Cab 1” Scream device. When you have something that sounds nice, test it out with the other Tones on the other Rotaries individually. Note that you may need to put a limiter (M Class Compressor) after the Scream device to tame the sound if it gets too crazy.
Why I feel this setup is so powerful
This type of setup can be very flexible and powerful. Instead of using a single effects processor (one EQ and one Compressor) you can create any kind of mix between three different EQ/Compressor setups. Add to that the Cab models and you end up with some very powerful audio processing.
Another reason I feel this setup is powerful is because you end up with a processor that is greater than the sum of its individual parts. It’s also a handy way to store three setups (plus the original mix) in a single Combinator.
So what are your thoughts? Does this open up some new possibilities for you? Have you used this technique before in other areas or with other devices? I’d love to hear your thoughts on this. Thanks for reading. Now go out there and make some amazing music!

“sometimes you just have to get in there and get dirty to get what you want out of Reason” – I couldn’t agree more 🙂
Nice article, and a handy device too.
Thanks Meowsqueak,
And you’ve got some amazing ideas going on with your site (http://www.offwhitenoise.blogspot.com) — please keep all that hard work up. I’m sure it will pay off musically at some point. Please keep me up to date on it.
All my best,
Rob