22 – Parallel Effects Processing

Split an audio signal into multiple parallel audio signals, send them to various effects, and then merge them back together. You control the mix level of all 3 effects and the original signal. As an example, we’ll create a Dynamic Effects processor (Compressors / Equalizers) to apply to your bass sounds.

In this tutorial, I’m going to show you how to split an audio signal into multiple parallel audio signals, send them to various effects, and then merge them back together. You control the mix level of all 3 effects and the original signal. As an example, we’ll create a Dynamic Effects processor (Compressors / Equalizers) to apply to your bass sounds. The Combinator knobs will be used as the basis to sculpt your sounds. Add some additional effects to the buttons and you have yourself some very powerful sound development indeed.

The inspiration for this tutorial came from a procedure I had read about in which the Kick drum is compressed and then the original Kick is mixed back in with this compressed Kick drum to give a beefier sound. So I thought, if you could do this with a Kick drum, how about doing it with other sounds such as a Bass, and then allowing you to mix in not only the original sound, but also different compression schemes. With the Combinator allowing you to utilize 4 knobs, you can actually create 3 different compression/EQ schemes (each tied to their own Rotary on the Combinator), and then tie the original mix to the fourth Rotary. This way, you can have some fun adjusting the balance of all 3 compressions as well as the original to create your final sound. This opens up a huge array of sound possibilities.

Once I show you the method to do this, you’ll be able to parallel process any kind of effect you can create in Reason or Record. For example, we can take 3 variations on a Chorus, and tie each variation to their own Rotary, then have some fun mixing them together. This turns your Combinator into a very flexible Chorus machine.

The project files can be downloaded here: parallel-effects-processing The zip file contains 1 Combinator inside an .rns file and a Combinator template. The .rns file contains the Parallel Processor which we’ll create here. You can use it to process your bass sounds. Different Bass tones and cabinet models are packed inside the Combinator. The template file can be used to start you off creating your own effects. You won’t have to enter any settings in the Combinator’s Modulation Routing, unless you tie some effects to the buttons. Otherwise, have at it building your own Parallel processing effects.

Here’s the basic Combinator setup:

  1. First, Create a new Reason document and then create a 14:2 Mixer. Next, create a sound module, such as a Bass sound. You can find great bass sounds under the Factory Sound Bank (FSB) or you can create one of your own using a Thor, Mal, or Sub. You can even create a sampled Bass sound using the NN-19 or NN-XT. It’s up to you, but since we’re going to create a Combinator effect unit, you’ll need some kind of sound which is to be affected.
  2. Next, create a Combinator under the sound source and in the Combinator hold down shift and create in the following order two Audio Spiders/Mergers, two 6:2 Line Mixers, 3 sets of M-Class Equalizer/M-Class Compressor devices, and 3 Scream devices.
  3. Label the first Audio Spider/ Merger “Clean Split” and label the second Spider/Merger “Tone Splits.” Label the first 6:2 Mixer “Tone Submix” and the second 6:2 mixer “Clean Bypass.” Label each set of EQ/Compressor as follows: Tone EQ 1/Tone Comp 1, Tone EQ 2/Tone Comp 2, and Tone EQ 3/Tone Comp 3. Finally, label the 3 Scream devices “Cab 1,” “Cab 2,” and “Cab 3.” These will be our cabinet emulations. This is how we will refer to each device for the remainder of the tutorial.
  4. Flip the rack around to the back as it’s time to do some serious routing. Note that all the routings below are Left/Right stereo pairs. Move the Audio outputs from the sound device to the Combinator inputs, and then move the Combinator audio outputs to the Main 14:2 Mixer’s Channel 1 inputs. Route the “To Devices” cables from the Combinator to the main inputs on the splitter side of the “Clean Split” Spider device.
  5. Send one of the splits from the “Clean Split” device to Channel 1 input of the “Tone Submix” mixer, another split to Channel 1 of the “Clean Bypass” mixer, and a third split to Main inputs on the splitter side of the “Tone  Splits” Spider device.
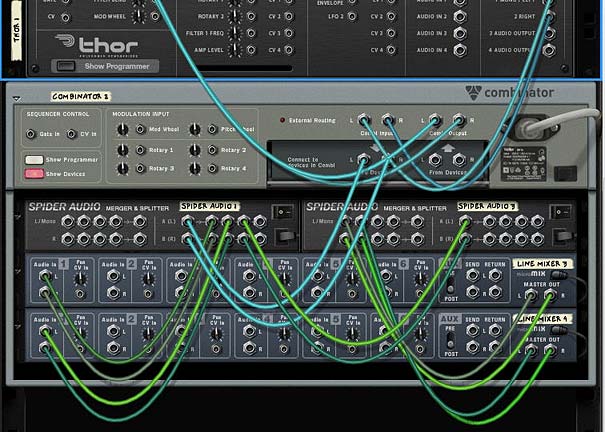
    The back of the rack for the Template file.
    The back of the rack for the Template file. I'm jumping ahead a little. But this shows the basic routing before setting up any of the Effect devices.
  6. Send one split from the “Tone Splits” Spider to the “Tone EQ 1” inputs. Send a second split to the “Tone EQ 2” inputs. Send a third split to the “Tone EQ 3” inputs. Then send the audio outputs from each of the EQ devices to the audio inputs of their respective Compressor devices. Then send the outputs of each of the Compressor devices into Channels 2, 3, and 4 of the “Tone Submix” mixer device.
  7. Next, send the Master output of the “Tone Submix” mixer to the input of the “Cab 1” scream device. The “Cab 1” output goes to the “Cab 2” input, the “Cab 2” output goes to the “Cab 3 input,” and finally the “Cab 3” output goes back into the Merge side input of the “Tone Splits” Spider device. Also send the Master output of the “Clean Bypass” mixer device to another merge input on the “Tone Splits” Spider device.
  8. Last but not least, send the Merged output from the “Tone Splits” Spider device to the “From Devices” input on the main Combinator panel. I know this all looks really messy, but sometimes you just have to get in there and get dirty to get what you want out of Reason.
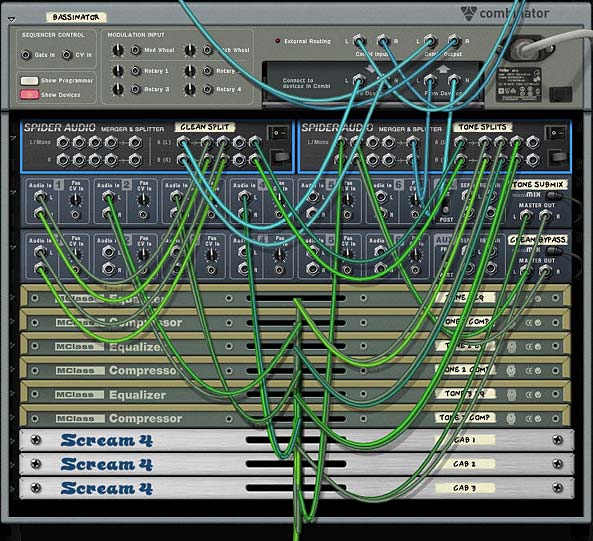
    The back of the rack when finished routing
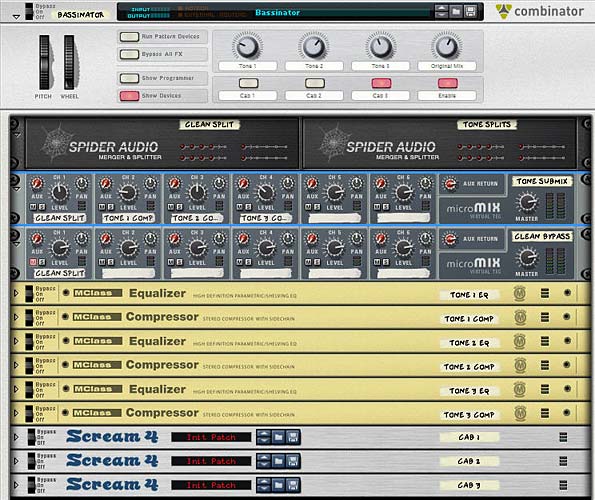
    The back of the rack when finished routing

    The front of the rack
    The front of the rack
  9. Now let’s flip the rack around to the front and work on the Combinator Modulation Routing section. Click the “Show Programmer” button on the Combinator. Enter the following settings:

    For the “Tone Submix” mixer device:

    Rotary 1 > Channel 2 Level: 0 / 100

    Rotary 2 > Channel 3 Level: 0 / 100

    Rotary 3 > Channel 4 Level: 0 / 100

    Rotary 4 > Channel 1 Level: 0 / 100

    Button 4 > Channel 1 Mute: 1 / 0

    Button 4 > Channel 2 Mute: 1 / 0

    Button 4 > Channel 3 Mute: 1 / 0

    Button 4 > Channel 4 Mute: 1 / 0

    For the “Clean Bypass” mixer device:

    Button 4 > Channel 1 Mute: 0 / 1

    For each the “Cab 1” Scream device (note, each Cab device has the same settings, except Cab 2 is tied to Button 2 and Cab 3 is tied to Button 3):

    Button 1 > Damage On/Off: 0 / 1

    Button 1 > Cut On/Off: 0 / 1

    Button 1 > Body On/Off: 0 / 1
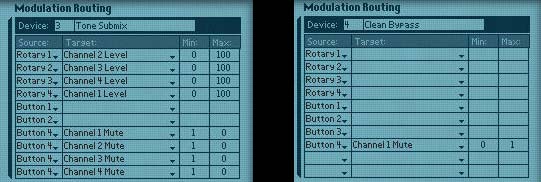
    Combinator Modulation routing for the two Mixers
    Combinator Modulation routing for the two Mixers

Here’s what is happening:

Button 4 is used as a bypass switch. When this button is turned off, the original sound will travel through the Combinator untouched. When Button 4 is turned on, you can use the 4 Rotaries to create a custom mix between all the sets of effects. Rotary 4 is a “special” rotary, in that it allows you to mix the original audio back into the mix. It’s important to note that this original audio is separate from the audio that goes through the Combinator when button 4 is off. Hence the need for two different mixers inside the Combinator. This way you can have the original mix work as though it were just another tone alongside the others, and when you switch back to a “clean” signal, a separate “original audio” is piped through the Combinator.

Buttons 1, 2, and 3 are your different Cabinet emulations. Those with Record are even luckier in that they can add in a few Line 6 Cabinet modeling devices and use those instead of the Scream. But with Reason, you can still get some amazing cabinet models by using the “Body” setting of the Scream unit (in conjunction with a little distortion and EQ cutting if you wish).

Another thing to keep in mind is that the Tones attached to the Rotaries are independent of the Cabinet models. You can dial in Tones without ever having to use the Cabinet models. However, button 4 must be turned on or enabled for you to hear any of the Tones or Cabinet models. In addition, you can have two Cabinet models used in series (note however, that this was not really the intended purpose — my thinking was that you can use each Cab model individually, and not together, but if you want to use them together, go for it).

Now as a final step, you will need to enter individual settings in the Equalizer / Compressor and Scream units. I won’t go into all the settings you can enter, but rather, you should build your own settings within these devices to your taste. However, take a look at my own settings to see what I used for Bass processing. The idea is to create each set of Equalizer/Compressor settings separately. So, for instance, turn rotary 1 all the way right and turn down all other rotaries to zero (fully left). Now listen to your sound source going through the device, and adjust the “Tone EQ 1” and “Tone Comp 1” devices until you hit on a nice bass processing setting.

Next, turn Rotary 1 all the way down and turn Rotary 2 all the way up. Now work on the second set of EQ/Comp devices to get an entirely new bass processing outcome from the devices. Once that’s done, repeat this for the final set of EQ/Comp devices.

Note: If you want to cheat a little bit, select your sound source, and then right-click and select “Create Effect.” Open up the Factory Sound Bank and look under the ALL Effects Patches > Dynamics > Basses folder and open up one of the bass Combinator patches that you like. Now be sure to adjust the settings on the front of this Combinator patch until you find the sound you’re looking for. Then click the “Show Devices” button on the Combinator, and copy/paste the devices from this Bass patch into your parallel processing Combinator. Delete the (now empty) bass Combinator. In the parallel processing Combinator, you will need to do a little routing to set things up as I have (routing into the main inputs of the first device, and routing the outputs from the last device). But once you do, you can then repeat this process two more times choosing different Combinator patches to copy from in the FSB.

Here’s a 2-part video series that expands upon this idea. It doesn’t always come out exactly the way you expect. But that’s the fun of trying out the technique. You may find something worth keeping, and then you can save the Combinator as a patch and use it in your own compositions.

Part 1:

Part 2:

Now for your cabinet models (Scream devices) you would go through the same process.

Note: When working with the Scream devices, in order to balance the volume level between the Original sound / Tones (using Button 4), you will need to raise all the Scream device Master volume settings up to 100. In this way, if you use Button 4 to switch between the Original volume on Rotary 4 and the volume of the clean bypass (being sent to the “Clean Bypass” mixer), the volume levels will match. So first raise all the master levels for all Scream units to 100.

Listen to the bass sound going only through Rotary 1 and with Button 1 enabled. Then enter a proper Cab setting in the “Cab 1” Scream device. When you have something that sounds nice, test it out with the other Tones on the other Rotaries individually. Note that you may need to put a limiter (M Class Compressor) after the Scream device to tame the sound if it gets too crazy.

Why I feel this setup is so powerful

This type of setup can be very flexible and powerful. Instead of using a single effects processor (one EQ and one Compressor) you can create any kind of mix between three different EQ/Compressor setups. Add to that the Cab models and you end up with some very powerful audio processing.

Another reason I feel this setup is powerful is because you end up with a processor that is greater than the sum of its individual parts. It’s also a handy way to store three setups (plus the original mix) in a single Combinator.


So what are your thoughts? Does this open up some new possibilities for you? Have you used this technique before in other areas or with other devices? I’d love to hear your thoughts on this. Thanks for reading. Now go out there and make some amazing music!

Reason 5 / Record 1.5 Overview

Reason 5 and Record 1.5: An overall 6 out of 10. Bottom line: The updates improve workflow, but there is nothing here which is earth-shattering, and very little that you can’t already do with Reason 4 and Record 1.0.1. Still, I’ll end up buying the upgrade because I’ve already invested $850 in the software. So what’s another $129 right?

DISCLAIMER: This is an opinion piece. This is an editorial. This is my view of the software while it is in the beta testing stages. The software is not yet finished or finalized. I take full responsibility for my opinion. But please let’s be crystal clear on this: Your rating and thoughts on the subject of the software may be completely different than mine. You may see this software as the second coming of Christ and it may bring you to the heights of orgasm. You may run out into the street totally naked yelling “This is it! Finally. It’s here! It’s here!” If that’s your thing, great. Send me a postcard from jail. I’ll be working on Reason & Record at home, as I usually am.

This is my view on the software as it stands right now with what information I have about it currently. This is based entirely on public knowledge of said software. If you agree with me, then great. If you disagree that’s ok too. Once this software is released, more than likely no one’s going to care about our opinions anyway. The time is now June 17th, 2010. All names have been changed to protect the innocent.

So here’s the talk of the town lately: Reason 5 / Record 1.5. And in case you don’t want to read through my rant, let me give you the lowdown right upfront:

Dr. Rufus Rex, the 8-legged animal: 5 out of 10

Bricks: 4 out of 10

That Roman Sea God (there’s always a deity involved): 6 out of 10

That live audio import thingamajig: 6 out of 10

King…. well you know.: 7.5 out of 10

. . . and more (secondary features): 7.5 out of 10

Overall: 6 out of 10

*(you did read that bit about names being changed in the disclaimer right?)*

To be fair, if you are a musician who cares nothing about Sound design or if you’re brand new to the program or you care more about making your workflow faster, then these ratings may be somewhat higher than mine. But for me, that’s it in a nutshell. Now will I purchase the upgrade. Sure. Why? Because I’ve already invested $850 in Propellerhead products and an extra $129 — even for the lackluster features — is not going to kill me. When you’ve run 14 km in a 15 km race, what’s one more mile?

I’d rather not be so nonchalant. I’d much rather be jumping for joy and bursting at the seams like I was for Thor. I’d rather be itching to get my hands on the new Kong features, but somehow that’s just not happening. We’ve seen Kong before in Live’s new drum setup. We’ve seen blocks in the form of scenes. And what is Octorex really trying to do? It feels like they took out your Grandfather’s car and are busily polishing it up to be sold as a fresh new idea. Sure, I love the vintage look of the thing, and I love how it rides. But can we kick-start it into the year 2010? To be fair, blocks is starting to grow on me. And Kong is definitely better than I expected, and it’s a very welcome addition to the software.

Don’t get me wrong. I love Reason. I even love Record. I love that I don’t even need to open up Reason anymore. Just launch Record and everything is there for me. Great. But where is the “wow”? I sure didn’t see it come to me in 5 days of anticipation when they were unveiling. It just kind of left me scratching my head.

Where is Recycle integration? I had to go out and buy it separately because I want to put some rex files together. And where are all those wonderful ideas turned into reality that we’ve all been adding to the Propellerhead feature suggestion forum? The ideas keep piling up. And this is the best they’ve got? Perhaps I have more faith in their programming skills. After all, they haven’t disappointed in the past. They did give us Thor after all. So maybe they’ve set the bar too high in the past that now they just can’t live up to their reputation? I don’t know for sure. I just know I expected so much more. And if I’m reading all the forums correctly, so did you.

Revisiting the Wishlist

So I went back to my old post (here it is if you need a refresher: My Reason/Record wishlist) and I looked to see how much of my dreams will actually come true in September. Green shows features implemented in Reason 5, Purple shows features partially implemented, and Red indicates those things which have not been implemented.

First, Record:

  1. Automatic Routing of the Reason mixer channels to the Record Main Mixer. Somewhat there with Record 1.0.1, however this could still be improved because routings through spiders/mergers and Redrum / NN-XT individual outs are not handled correctly.
  2. Comping for Midi as well. Nope. No improvements here.
  3. Split Performance Controller Data into Separate Lanes. Nope. No improvements here.
  4. Record Performance Controllers as automation. I think we got this with Record 1.0.1, so kudos!
  5. Tempo automation/changes on a per-track basis. Well, you can timestretch audio clips. So I’ll say this is halfway there.
  6. Display Masked Audio portion in the Audio Clip. Nope. No improvements here. Right now, there’s no visual indicator to show how far and wide the masked area is. It’s worthwhile to note that this is already pretty much implemented in the audio comp tracks. Now if we could bring that into the main arrange view, we’d be golden.
  7. Synch Reason / Record Favorites. Nope. No improvements here.
  8. Cut Note Events in the Clips. Nope. No improvements. Sometimes you DO want to split the notes, and sometimes you don’t. Provide us with the option to split the notes or not when splitting clips apart.
  9. Scale Transposition of Notes. Nope. And this one is not difficult to do. This is imminently more useful than chromatic transposition of the notes.
  10. Multiple Left and Right locators. Nope. No improvements here.
  11. More Training/Tutorials and videos included in the user documentation. Documentation is starting to improve. Microtutorials, James Bernard video series. Glad to see this getting better! Green light on this one.

And now for Reason:

  1. Adding some new Effects, especially a glitch box such as “Glitch“ Nope. Not there.
  2. Having the ability to Randomize the entire Matrix or Redrum device with one click of a button. Nope. And for this one, I’m truly saddened. Especially since almost all their changes for Reason 5 are simply workflow improvements. To miss out on this one is nuts frankly.
  3. Combinator updates: More CV connections and a better subdivided menu system get a big thumbs up from me. I would still like to be able to switch the rotaries from “pot” mode to “step” mode. But that’s a minor nit-pick. Kudos again!
  4. Integrate ReCycle into Reason (or Record). Come on guys. Seriously! Big thumbs down! When is this going to happen already? Give us sampling without the ability to slice stuff up makes you look money-hungry; holding onto Recycle like an old dog clutching a tattered bone.
  5. The ability to reverse midi and audio for backward playback. Yes. Beautiful!
  6. Tap Tempo. Thank you!
  7. When in edit mode in the sequencer, providing the ability to move notes from one clip into another. Yup. This one is added in Record 1.0. Sweet. However, I’m only giving half points here because it’s not currently available in Reason. If this makes it into Reason 5, I’ll give it the green light.

So 4 out of 18 of my original requests made it in, and 3 are halfway there. A little over 1/3 of my features made it in. I don’t think that’s too bad. You be the judge. To be fair, there may be more to remove from my list once Record graduates to 2.0, and I will say that a few things which made it into this update I’m very glad to see and would have had on my list if I had given it more thought. To name a few:

  • Neptune. I really can’t wait to get my hands on this and seeing what can be done with it from a sound design perspective. Routing Thor through it and using it in an experimental way should be really interesting.
  • Kong. Although I’m less than thrilled with the implementation — It feels cluttered with all the mini-fx machines and just doesn’t look very intuitive — I’m eager to explore some routing possibilities on the back of the device. Perhaps that’s just my nature. And I am glad to see some modeling synthesis introduced. But a Guitar modeler is really what I’d like to see more than anything. Perhaps the Props are testing the waters and we’ll see this in Reason 6.0?
  • As said before, the Combinator update with new CV and easier menu system. Yes. Thank you lord. Finally.
  • Sampling. Sure. Great. But I have a field recorder, so is this really adding to my toolbox? Not really. Sure it’s handy. But I’ve already got a workflow for this. Still, it’s a feature that’s been wanted by many, so I’ll add it to the “glad to have it” pile.

In case you didn’t know. . .

And for those that didn’t know, don’t forget to read the fine print. There’s lots of little additions to the program that you may have missed when you were enthralled with the Big 5. Some of these surprised me in that they are not hyped more. The extra CVs in the Combinator are a huge deal and should be up there in lights. However, these are the features that are relegated “second class citizen” status. You should read them nonetheless: Secondary updates to Reason/Record.

Of course, don’t forget to check out the videos from the Props home page below, and  judge for yourself if these new updates are worth your money. Most of the updates are helpful to improve workflow. But bottom line is that there is nothing here which is earth-shattering, and very little that you can’t already do with Reason 4 and Record 1.0.1. My overall take is that there are three camps:

If you are a sound engineer and have invested in purchasing both Reason and Record, then it’s probably worthwhile to upgrade.

If you are a new hobbyist or musician who has only invested in Record and/or Reason, you may not need the update at all and might be better off sticking with what you have (which is already a very powerful system).

For people working on Live recording only and who only own Record, then the only advantage is Neptune. And honestly if you’re in this boat it’s probably not worthwhile.


What’s your take on the Record 1.5 and Reason 5 package?

http://www.youtube.com/watch?v=cBdy0aTW5YI&feature=related

21 – Massive Combi Drum Kit

Turn a Combinator into a 61-synth drum kit that spans the range of the Matrix pattern sequencer so you can use the Matrix to trigger your drum hits. Yes it’s massive. Yes it’s crazy. And yes, you should try it out! Why? Because apart from being time consuming, it’s dead easy to accomplish. And it doesn’t have to break the CPU bank.

This project was a real blast to put together. Essentially it involves turning a Combinator into a 61-synth drum kit that spans the range of the Matrix pattern sequencer so you can use the Matrix to trigger your drum hits. Yes it’s massive. Yes it’s crazy. And yes, you should try it out! Why? Because apart from being time consuming, it’s dead easy to accomplish. And it doesn’t have to break the CPU bank.

Download the project file here: minimal-super-kit. This zip file contains my Minimal Super Drum Kit Combinator with 61 synth sounds that can be played by the Matrix. I’ve added 32 random patterns in the Matrix which is assigned to a Rotary knob so you can dial in a pattern you like. Also, you can turn the matrix off using button 1, so that you can play the drum kit with your keyboard controller if you wish. This is a great flexible way to show off your drum kit creation chops. So enjoy! And when you’ve had it with my own drum sounds, try your hand at creating your own. Read on to find out how.

There’s also a few extra devices in the Combinator, and assignments on the other Rotaries / Buttons which affect the drums globally. Feel free to explore their routings as well if you’re interested. The focus here, however, is turning your Combinator into a massive drum kit which can be sequenced using the Matrix.

Back to Basics: Setting things up

  1. Open up a new document with a 14:2 Mixer and then create a new Combinator. Inside the combinator, create five 14:2 mixers all in succession so that they are all chained one after the other.

    The five 14:2 Mixers are chained together.
    The five 14:2 Mixers are chained together.
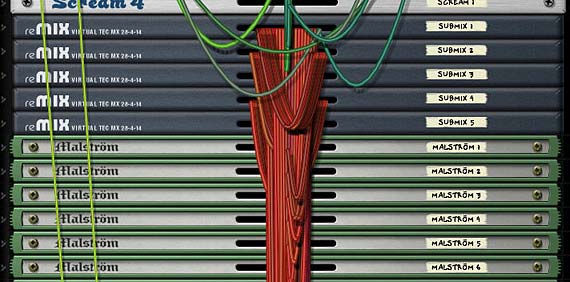
  2. Create 61 Synths. Yes, that’s right. 61 Synths. These can be any combination of Thors, Malstroms, or Subtractors. one trick before you go nuts copying and pasting is to create one instance of Thor, one Subtractor, and one Malstrom, and then initialize all 3. This way, only one oscillator or graintable is used and it will be light on the CPU. Once you’ve done that, copy and paste so you have 61 different synths and connect them each to their own mixer channel.

    Each of the synths are connected to their own Mixer channel.
    Each of the synths are connected to their own Mixer channel.
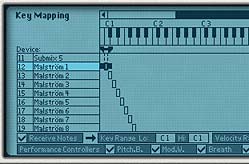
  3. Now this is the trickiest part of the whole tutorial. Click the “Show programmer” button on the front of the Combinator, and select the first synth in the list at the top. Notice in the Key Mapping area on the left part of the Combinator screen, the key range for this synth spans the entire keyboard range. If you look at the bottom of the Key Mapping area, the value under Key Range is C-2 (Lo) to G8 (Hi). We’re going to change these values so that both read C1. The easiest way to do this is to click and drag upward over the “Key Range Lo” field until it reads “C1.” Once you’ve done that, you can click and drag down all the way on the “Key Range Hi” field. This means that the synth will only be triggered by pressing C1 on your keyboard controller.
  4. The first Synth selected in Key Mapping. See that the range listed is C1 (Lo) to C1 (Hi)
    The first Synth selected in Key Mapping. See that the range listed is C1 (Lo) to C1 (Hi)
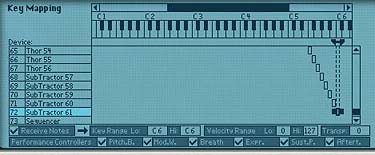
  5. Sweet! Now do this for each subsequent synth, but incrementing each one by one note value upward on the scale. So, for example, the next synth is only triggered by C#1 and the one following that by D1, and so on up the scale until you have the last synth in place at C6. Ta da! Now each synth can only be triggered and played from it’s corresponding note on the keyboard controller. And taken as a whole, the entire kit ranges the same 5-octave span of the Matrix (from C1 to C6).
  6. The last Synth selected in Key Mapping. See that the range listed is C6 (Lo) to C6 (Hi).
    The last Synth selected in Key Mapping. See that the range listed is C6 (Lo) to C6 (Hi).
  7. Now comes the really fun (but tedious) part. Go through each synth one at a time and sculpt your drum sounds. Go wild. Enter some amazing Kicks, Snares, Toms, Hi Hats, Rim shots, glitch mayhem, or whatever sounds you really enjoy listening to through Reason. Don’t be shy. Jump in and have some fun. And if you’re really hard pressed for some ideas, sift through the Factory Soundbank (FSB) for some inspiration. There are plenty of synth ideas in there.
  8. Note: audition your sounds using your keyboard controller. This way you can hear each note triggering each synth. If you forget your place on the keyboard, minimize your entire stack of synths by holding down Alt as you press on the minimize arrow of one of the devices. This will automatically minimize all devices within the Combinator. Now press a key on your controller and look for the “Note On” light as you press. This “Note On” light will show you which synth is triggered by the note you are playing. Since each synth is tied to an individual note on the keyboard, only a single “Note On” light will flash when you press a single key. Trust me, this is a great time saver when working with so many devices.

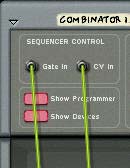
  9. Add a Matrix under everything, flip the rack around, and tie the “Note/Gate CV out” cables from the back of thedevice into the Sequencer Control “Note/Gate CV in” on the Combinator. Flip back around to the front again and start dialing in some Note/Gate patterns into the Matrix pattern banks. Or use the right-click context menu to select some random patterns for the various Matrix pattern banks.

    Connecting CV cables from the Matrix to the Combinator's Sequencer  Control section.
    Connecting CV cables from the Matrix to the Combi's Sequencer Control section.
  10. Finally, go back to the Combinator’s Modulation Routing section and with the Matrix device selected, enter the following settings:

Rotary 1 > Pattern Select: 0 / 31 (assuming you’ve entered patterns in all 32 pattern banks of the Matrix)

Button 1 > Pattern Enable: 0 / 1

Entering the Matrix Sequencer Parameters in the Combi's Modulation Routing Section.

Keeping Button 1 off means that you can play the Combinator in a “live” situation, accessing the drums to be played in real time and ignoring the Matrix. Turning on Button 1 automates the drums and plays the drums according to what is programmed in the Matrix. Spinning the Rotary 1 knob will select from the 32 Matrix pattern banks. You can also automate pattern changes for the Matrix in the Sequencer if you create a sequencer track for the Matrix.

I hope you’ve enjoyed this little exploration of what can be done with a bunch of synths and a Matrix inside a Combinator. You can create some gigantic kits using this technique. And it can be an alternative to using the NN-XT for a sample-based drum kit.

As with any method, there are pros and cons to this approach. I like it because it can be much easier to tweak the sounds later if you want to adjust any of the synth parameters for your various hits. Personally, I feel this can give you more flexibility than storing your kit in an NN-XT. That being said, the downside is that it’s not quite as compact, takes some time to load up in your song, and it’s not sample-based so it’s not as “organic” as samples in an NN-XT can be. Both approaches, however, are valid. It all depends what you’re after.

If you have any other ideas or unique ways in which you’ve created your own kits please share them with us. I’d love to know some new techniques that I may not have thought about before.

Until next time, I hope this inspires you to build some kick-ass drum kits. Good luck!

20 – CV Switching

Learn how to switch between 2 CV sources that control a single destination. This method can expand the number of patterns you use in a Matrix (from 32 to 64) to control a single destination. It can also allow you to switch between two RPG-8 Arp devices or any two CV sources anywhere in Reason and Record for that matter.

At some point when working with CV, you end up wondering if you can expand beyond the limits. For example, if you have a Matrix loaded with 32 pattern banks, you’re going to wonder if you can push it to 64. If you have an Arp applied to an instrument, you’re going to wonder if you can have two Arps applied to the same instrument. I know that’s what I was wondering a few nights ago. And that’s the subject of this article. How to expand upon CV connections by switching between these CV devices in real-time.

You can download the project files in the following zip file: cv-switching. These project files include 2 Combinators that show you how to switch between two matrixes or two Arps on the fly. Both Combinators are connected to the same mixer, so to hear each one separately, just mute/solo each one and press play on the Transport bar.

Switching between 2 Matrixes

  1. First open up a new document, and first place a 14-2 Mixer at the top (if you are in Record, you won’t need the mixer, because everything gets tied to your BIG mixer).
  2. Now, open up a Combinator and holding Shift down, place a sound source at the top (for example, a Subtractor), a Thor underneath that, and then two Matrixes underneath the Thor.
  3. Next, flip the rack around and let’s route the audio up.  Route the Left Audio output from the Combinator to Channel 1 on the mixer. Then Route the Audio out of the Subtractor to the Left audio In of the Combinator (From Devices).
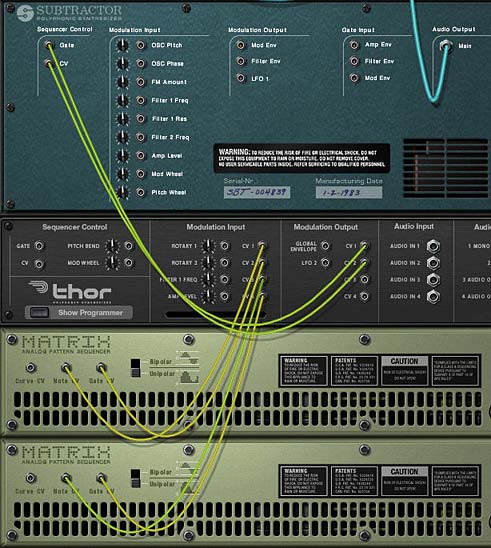
  4. Now for the CV routings. Route the CV 1 and CV 2 Modulation outputs from the Thor to the Gate and CV Sequencer Control section of the Subtractor, respectively. Take the Note and Gate CV of Matrix “A” and route them to the CV 1 and CV 2 Modulation inputs of the Thor, respectively. Finally, route the Note and Gate CV of Matrix “B” to the CV 3 and CV 4 Modulation inputs of the Thor, respectively.

    Proper CV routings for the Thor and Matrix A & B devices
    Proper CV routings for the Thor and Matrix A & B devices
  5. Flip the rack around. On the Subtractor, select a patch you like, or program in some patch parameters that you want to hear. Alternately, leave the default init patch as it is.
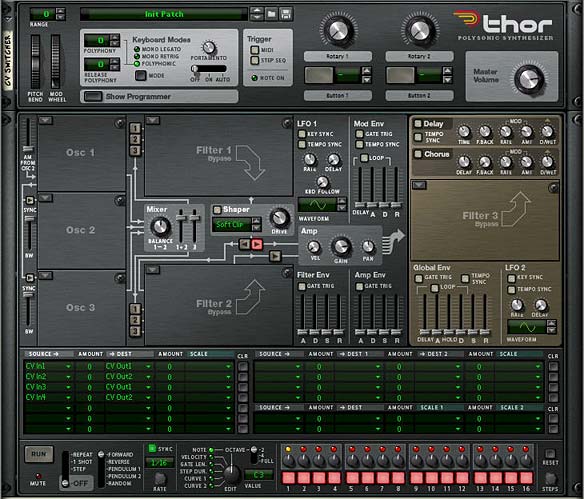
  6. On the Thor, completely initialize the patch by turning Oscillator 1 Off, Bypassing Filter 1, turning off the Mod/Filter/Amp/Global envelopes, and reducing the Range, Polyphony, and Release Polyphony down to zero (0) in the Global section. We’re using Thor purely as a CV switcher between the two Matrixes.
  7. In the Modulation Matrix area of Thor, enter the following:

    CV In1 : 0 > CV Out 1

    CV In2 : 0 > CV Out 2

    CV In3 : 0 > CV Out 1

    CV In4 : 0 > CV Out 2

    A completely initialized thor, with the proper routings in the Modulation Bus Routing Section (MBRS)
    A completely initialized thor, with the proper routings in the Modulation Bus Routing Section (MBRS)
  8. In the Matrix A, fill up all 32 of your pattern banks with random patterns or midi patterns that you want to use to play the Subtractor. Random patterns are just quicker for the purposes of this exercise.
  9. In the Matrix B, do the same. However, note that in the example file I have not loaded any patterns into Matrix B. This is so that you can hear the difference when you swtich between Matrix A and Matrix B. But for practical purposes you’ll want to load up all 32 pattern banks with more patterns with which to play the Subtractor sound source.
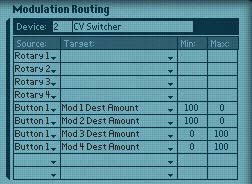
  10. In the Combinator’s Programmer, select the Thor device (I call it the CV Switcher) and enter the following settings for the Modulation Routing:

    Button 1 > Mod 1 Dest Amount : 100 / 0

    Button 1 > Mod 2 Dest Amount : 100 / 0

    Button 1 > Mod 3 Dest Amount : 0 / 100

    Button 1 > Mod 4 Dest Amount : 0 / 100

    The Combinator's Modulation Routings for the Thor device (CV Switcher)
    The Combinator's Modulation Routings for the Thor device (CV Switcher)
  11. For the Matrix A and Matrix B devices, enter the following programmer modulation (for both Matrixes):

    Rotary 1 > Pattern Select : 0 / 31

Now, when you press the play button on the Transport, both matrixes will engage, but only one will be used to play the Subtractor, depending on the on/off state of the first button on the Combinator. This first button determines which Matrix is used (if off, Matrix A is used. If on, Matrix B is used). The first Rotary on the Combinator moves through all 32 pattern banks of both Matrixes, thus allowing you access to 64 pattern banks to apply to your Subtractor sound source.

Everything gets switched using the Thor. And the beauty of this type of setup is that you don’t need to worry about Matrix delay problems. Since both Matrixes are always running, and the Thor is used to switch between them, the switching is done completely in real-time with no latency whatsoever.

Ramping it up with an Arp

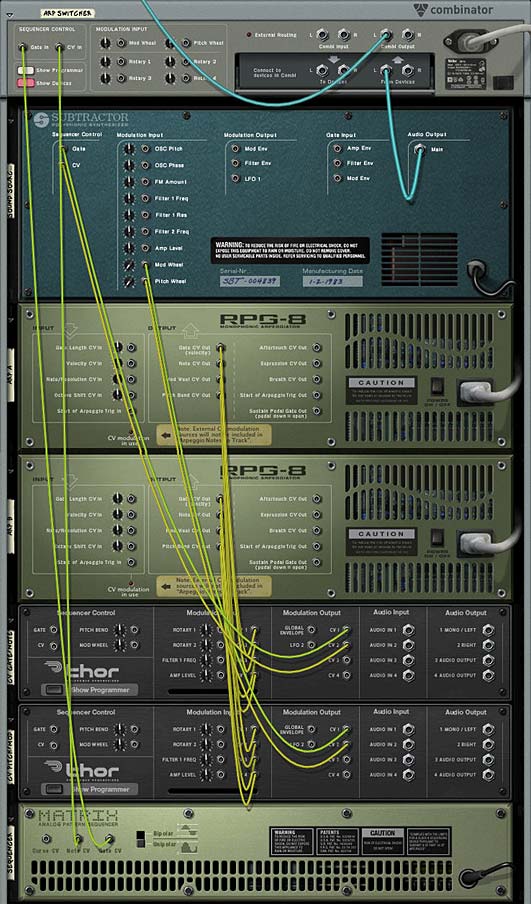
I won’t go into too much detail about applying this same technique to an Arp. You have the sample file, and you can open this up and see how it’s done. But basically, instead of two Matrixes, you have two Arps that are going through two Thors (one Thor controls the Note / Gate CVs, and the other Thor controls the Pitch/Mod wheel CVs).

One other difference is that you will need a separate Matrix to play the Combinator (ie: the Matrix Note / Gate CV will be sent to the Combinator’s Sequencer Control). This is to ensure something is triggering your sound source, whereas in the previous Matrix example, the matrix units themselves were triggering the sound source.

Alternately, if you don’t want to trigger your sound source via the Matrix, you can set up two sequencer tracks (one for each Arp device) and add your midi note clips there. If you want to switch between both Arps and have them both playing the same part exactly, just duplicate the note clips on both Arp tracks so they are identical. Or have some fun switching up the notes. Experiment with this one.

Proper routings on the back of the rack for the Arp Switcher Combinator

Where do I go from here?

Using this method you can switch between any two CV sources going to the same destination CV input. So let your mind wander and try it out using a Scream or RV7000 or any filter envelope. Anywhere you use CV, this method hopefully inspires you to try playing around with CV and using it more creatively when working on your songs.

Did you find this tutorial useful or beneficial? Let me know. And as always, if you have other ideas related to CV switching, please share them with all of us.

Reason Patch A Day Refill

A review of Robb Neumann’s “Reason Patch A Day” Refill, with approximately 500 Patches for Propellerhead Reason. This is one refill you don’t want to miss. Basses, Pads, Effects, Combinators, Synths. It’s all in there. Take a listen for yourself.

If you frequent the various Propellerhead forums and sites, you’ve probably come across Robb Neumann’s “Reason Patch A Day” website. The concept is simple. Robb provides a new patch each day which is produced by him or contributed by others, and he provides a short write-up explaining each one on his blog at http://www.reasonpatchaday.blogspot.com/

Recently, he decided to release the entire 1.5-year collection in a single Refill that anyone can download for a donation. Being a person who runs my own Reason website, I know what goes into maintaining this growing monstrosity. And I know that a few modest donations go a long way. And for 500 patches in a rock-solid refill, that’s well worth it. And that’s what you get.

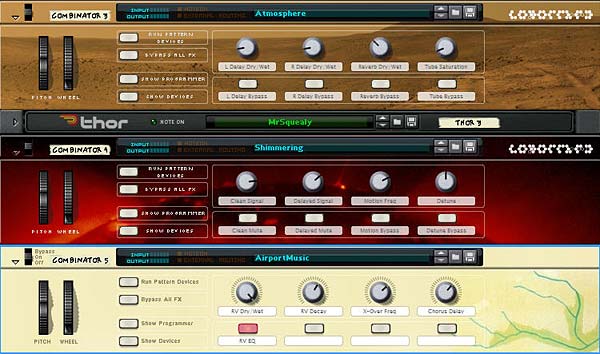
Some of the great Combinator patches from the refill
Some of the great Combinator patches from the refill. Notice the dedication to Brian Eno in the bottom Combi backdrop. Love it!

There’s Basses, Synths, Rhythm patches, and tons of Effects. If you’re looking for some great new sounds or looking to be inspired and see how one sound designer works his magic, then this is a great refill which you’ll want to have in your collection. Play the video review I put together below to hear some of the sounds and what you can accomplish.

Now keep in mind this only scratches the surface. I could go on and demonstrate many more of his patches, but I think this modest little intro showcases some of the magic you’ll find here.

I think in general the refill focuses on Basses, Synths, Pads and Effects. However, there are also some really nice percussion kits, and a lot of great Yamaha RX one-off samples that you can easily put inside an NN-XT kit.

The only nit-pick I would have is that some of the Combi patches that I opened up were templates where you had to add in your own Redrum kits. I would have liked to have been able to open up those Combis and start rocking out right away. But that’s such a minor nit-pick, it should in no way stop you from downloading this refill right away. You will not be disappointed.

To download the Refill, go to http://www.reasonpatchaday.blogspot.com/ and click the Donate button on the right side navigation bar. Once you enter a paypal donation, Robb will send you an email with a link to download the refill. Simple as that.

I think the cherry on the cake are the Combinator backdrops. There’s some really nice designs in there. I know that’s just a minor thing, but it adds that special touch that is usually lacking in a lot of refills. So this refill gets an extra gold star for that.

So thanks to Robb and thanks to all of you Reason/Record sound designers out there. You guys all give of yourselves so much and so freely that it makes me proud to be considered part of this small little niche community. Keep up the great work!