Kevin Parks, Remembered

Kevin Parks (aka: “Liquid Silver,” “Wyatt,” or “Ambient Synthesis”): June 8, 1949 – April 28, 2010. It’s hard for me to find the right words, but I lost a great internet friend recently, and I wanted to pay homage to his memory. He was talented, kind-hearted and was always there to lend a musical hand. He will be missed.

Kevin Parks (aka: “Liquid Silver,” “Wyatt,” or “Ambient Synthesis”)

June 8, 1949 – April 28, 2010

I am writing for Kevin to let you know his trip to Mexico was unsuccessful.  He died April 28, 2010.  Your friendship and sharing with him added so much to his life these past two years.  He enjoyed his friends in music to such a degree that he hardly had time to notice how ill he was.  Thank you, thank you.
– Louise Parks

Kevin Parks
Kevin Parks (1949-2010)

That was the email that hit my inbox last week and though I never met Kevin, we had some wonderful online conversations, discussions about music, discussions about Reason. He sent me a song whenever he could; usually more than I had the time to really get into and play with. And we shared in some wonderful one-on-one collaborations. I kept telling myself if only there were more time and if only I was less busy. But in the end honestly we make our choices in how we spend our time, and I regret not having more time to devote to our friendship and nurturing our collaborations. You see, we never finished anything together. We had a lot of back and forth musically, and we lended each other a lot of ideas over the past 2 years, but everything we did was unfinished. Such is the way life can be.

We first met due to a mutual interest in Photoshop and graphic design. From there it was a short leap to find our mutual interest in music. He was mainly using Adobe Audition for his audio, and I helped teach him some of the fundamentals of using Reason and midi. He taught me some of the finer points of audio processing. He was also the first to contribute an article to my blog all about panning and getting your mix right. A good read which I highly recommend: http://www.reason101.net/contributions/panning-to-punch-out-your-mix/

I am very fortunate we had the friendship we did. Without him, you wouldn’t be reading this blog at all. This site would never have existed. It was in part his prodding and the fact that he was my first beta tester for a lot of my combinators. Without him, I probably never would have started this at all. So I owe him a great debt of gratitude. He was such a good musical friend. And when I got too deep into making combinators or designing sounds, he was always there to help out and he would always tell me to never forget about actually making music. That’s the kind of guy I knew him to be. Practical, honest, and always trying to improve himself through his music.

Letting the Work speak for the Man

It’s hard for me to find the right words. Usually most people will say the usual: he was kind. He was a great guy. He was always there when you needed help. With Kevin that was all true. Any question I would ask, he would always be there to respond. Anytime you needed help he was the guy you wanted helping you. In truth I can’t say enough good things about him.

It’s with great sorrow that I have to inform everyone of his passing. I hate letting go of the good people in life; the selfless souls that are kind to the core. I can only hope that he’s up there teaching a few angels how to play some really great music on his Fender Strat!

The following is an unfinished piece which Kevin sent to me. I’d like to share it with everyone as it is. It is 100% Kevin’s, and completely unaltered. It was the last piece of music he sent me. At the time, he was trying his hand at something atmospheric and ambient. I think this work is simple understated brilliance:

Symbionic: [ti_audio media=”486″]

And this is a piece he put together last July which shows a glimpse of his guitar work:

Blue July: [ti_audio media=”487″]

This is a video he put together for one of my songs. As I said, he was a great guy and was always there when you needed a helping hand. Since we both had a love for Photography and Photoshop, he wanted to try his hand putting together a video for me. I was so grateful when he did:

Here are a few links to some of Kevin’s work and online locations, if you are interested and would like to learn more about him:

http://www.motagator.net/Liquid_Silver//User_520.php

http://www.youtube.com/user/AmbientSynthesis

http://www.soundclick.com/bands/default.cfm?bandID=524961

And here is a quote from Kevin which can be found on http://www.yourbestsound.com/InaSpin/files/ExtraSpin.pdf :

Music means more to me now than ever before. I started music lessons in 1957 …first performed at the Worlds Fair, NYC, 1960. Did get tired of playing Debussy on clarinet, though. Then I discovered guitar!

Guitar was my constant companion through the 60’s and 70’s …playing in numerous acoustic groups, played a lot of parties, lots of late night jam sessions, and sidewalk-guitar. In the 80’s I played regularly for my church and taught guitar and songwriting.

I once had the privilege of knowing Broadway Musical Director, Stanley Lebowski, who many years ago said that he thought I had a germ of talent. I wish he were still around to see what I did with it.

Currently, I spend enormous amounts of time in my studio, searching out elusive sounds on guitars, harmonicas, keyboard, and congas. Retirement just doesn’t get better than this.

Rest in peace my friend. We’ll all miss you greatly.

19 – Spatial-based FX

In a previous tutorial I spoke about how you can create frequency-based FX and divide your FX, sending different delays or phasers or any combination of FX to different frequencies in your mix. This time we’re going to send those same FX to different locations in your mix: Front, Back, Left and Right. This way, we’ll create different FX for 4 different corners of your mix.

In a previous tutorial I spoke about how you can create frequency-based FX and divide your FX, sending different delays or phasers or any combination of FX to different frequencies in your mix. This time we’re going to send those same FX to different locations in your mix: Front, Back, Left and Right. This way, we’ll create different FX for 4 different corners of your mix.

The tutorial files can be downloaded here: 4-corner-spatial-fx This zip file contains 2 Combinators: 4-corner delay FX and 4-corner phaser FX.

Starting of creating the Front and Back sections

First, the video:


  1. First, we’ll start in Reason, and start by opening a new document with all the usual suspects. Create a main mixer, and a sound source (an initialized Thor would do just fine).
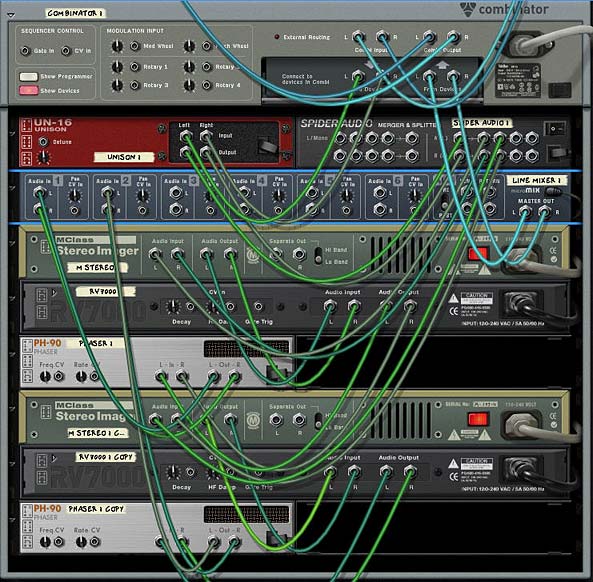
  2. Next, create a Combinator under the sound source. Inside the Combinator, hold down shift and create a Unison device (UN-16), Audio Merger/Splitter, 6:2 Line Mixer, Stereo Imager, RV7000, and for our FX device, let’s create a Phaser (PH-90).
  3. Now holding shift down, select the Stereo Imager, RV7000, and PH-90 Phaser, then right click and select “Duplicate Devices and Tracks.”
  4. Routing time (note that all the audio routings we’re going to create here are in Stereo pairs): Flip the rack around, and move the Thor Audio outputs into the Combinator Audio inputs. Send the Combinator outputs to Channel 1 on the main mixer. Send the Combinator To Devices outputs into the Unison inputs. Then send the Unison outputs to the Audio Splitter inputs. Send 1 split into the first Stereo Imager’s inputs (we’ll call this the Front Imager), and the second split into the second Stereo Imager’s inputs (we’ll call this the Back Imager).
  5. Continuing with our routing, send the Imager outputs to the RV7000 Inputs (do this for both front and back imagers). Then send the RV7000 outputs to the Phaser inputs (both front and back). Then send the front and back Phaser outputs to Channels 1 and 3 on the 6:2 line mixer. Finally, send the Mixer’s master output to the “From Devices” inputs on the Combinator.

    The Routings on the back of the rack. Looks complicated, but it's really pretty straightforward.
    The Routings on the back of the rack. Looks complicated, but it's really pretty straightforward.
  6. Flip the rack around to the front. Now it’s time to set up some parameters. On the Front Imager, send both the Lo and Hi bands fully Mono (fully left). On the Back Stereo Imager, send both the Lo and Hi bands fully Wide (fully right).
  7. Open up the Remote Programmer on both the front and back RV7000 Reverbs. The Hall algorithms are the default and these are fine for now. On the front Reverb, reduce the size fully (to 13.2 m) and reduce the Global decay to around 50. Increase the HF Dampening to around 84. On the back Reverb increase the size fully (to 39.6 m) and increase the decay to around 98. Also leave the default HF Dampening at around 28. Finally, decrease the Dry/Wet knob on both reverbs to around 30-40 or thereabouts.
  8. Open up the Combinator’s Programmer, select the 6:2 Line Mixer and enter these settings:

Rotary 1 > Channel 1 Level: 0/85

Rotary 3 > Channel 3 Level: 0/85

Now, the First Rotary controls the Front Mix, and the third Rotary controls the back mix. If you play your sound source through this FX Combinator, you’ll hear the front and back sounds by adjusting the Rotaries. But what makes things more interesting is if you apply different settings to your two Phaser devices. Even some subtle changes to the Frequency and Width parameters can provide a much more rich soundscape which makes even Thor’s initialized patch sound pretty interesting.

You can also leave things as they are, or you can move on and create two more spatial corners in our mix by adding both Left and Right panning. In this way, you create a 4-Corner FX split for Front Left, Front Right, Back Left, and Back Right.

Moving from side to side

Now, for the second part in the Video Series:

So let’s continue on our journey and create a split for left and right.

  1. First thing we’ll have to do is hold the shift key down and create two other phasers; one next to the front phaser and another next to the back phaser. Then select the front RV7000 and holding shift down, create a Spider Audio Merger/Splitter. Do the same for the back by holding down the back RV7000 and creating another Spider Audio Merger/Splitter.
  2. Flip to the back of the rack and let’s set up some new routings. Move the cables from the inputs on both Phasers and move these cables to their respective Spider Splitters (in the main Split). Then send one split to the Front Phaser 1 (let’s call this left) and send another split to the Front Phaser 2 (let’s call this right). Then send the outputs from the two new phasers to Channel 3 and 4 respectively.
  3. Flip to the front of the rack and on the 6:2 Line Mixer set the panning for Channels 1 and 3 to about -22 (left) and Channels 2 and 4 to +22 (right). How far left or right you set the panning is really a matter of taste. With this all set up, the 6:2 Line Mixer will be set up as follows:

    Channel 1: Front Left Phaser

    Channel 2: Front Right Phaser

    Channel 3: Back Left Phaser

    Channel 4: Back Right Phaser

  4. Open up the Combinator Programmer, and assign the 6:2 Line Mixer Channel 2 and Channel 4 to Rotary 2 and 4 respectively as follows:

    Rotary 2 > Channel 2 Level: 0/85

    Rotary 4 > Channel 4 Level: 0/85

  5. Now you can provide labels for all 4 rotaries as follows:

    Rotary 1: Front Left

    Rotary 2: Front Right

    Rotary 3: Back Left

    Rotary 4: Back Right

And there you have it. A 4-corner mix with different FX for each corner. You don’t have to restrict yourself to Phasers. With some ingenuity you can assign any FX to any location, or any combination of FX to any of these 4 locations, and all of those with different parameters too. The only thing left is to adjust the Phasers to have different settings as you see fit.

Here’s a video showing you some of the things you can do to modulate the Phasers:

A few other notes:

  • The reason we set up a Unison device in front of the mix is because this ensures that the signal sent into both the imagers is in Stereo. This is needed for the Stereo Imager to function as it should. It won’t work with a Mono signal. It means that even if you use a Subtractor, for example (which is mono), it can still be sent into the Imagers and the Imagers can work their magic.
  • Using the Width / Mono setting on the Imager bands helps to create the illusion of front and back audio locations. Used in conjunction with the Reverbs, you can create some sophisticated positioning not only with your FX, but also audio of any kind. When you move towards Mono, the sound appears to come from the front of the mix. By widening the bands, the sound becomes more spread out and appears to come from the back.
  • Just as with the Imagers, changing the space size and decays on the Reverbs helps the illusion along. Smaller sizes and shorter decays means a tighter reverb space which appears as though the sound is closer. For the back Reverb, the opposite is in effect. By creating a wider space with a longer tail reverb, you end up with a sound that is pressed further back. Keeping the same algorithm type still binds the two reverb spaces together. However, there’s nothing preventing you from trying to use different algorithms altogether (for example, a Small Space reverb for the front and an Arena reverb for the back).
  • Ever look at those Escher drawings where the staircases keep looping back into themselves? They are impossible pictures. Well, the same can be achieved with sound. You can create some really weird effects by creating an impossible space. Try switching the Reverbs around but keeping the Imagers as they are. The Imagers will tell your ears that the sound should be coming from the front and back, but the reverbs will be telling you the reverse. It can be a disturbing effect. But in the virtual world, you can create these “Impossible” sounds easily. Try that one out.

As always I’d love to hear what you think? Show some love and drop me some feedback or any questions you might have. Until next time, good luck in all your musical endeavors.